
If you are starting to reach the midgame and have a few Skill Points, or if you want to know what to work towards from the start, we'll help you pick the best skills for combat and traversal in Hagga Basin. Hagga Basin melee builds outperform ranged in the midgame, but ranged is still strong early and makes a comeback in the endgame.
We'll outline the best build choices for melee and ranged, going over all the skills worth considering. You can also run a hybrid setup to fit your playstyle, mixing and matching from the recommended options.
This guide assumes you are still in Hagga Basin and don't have access to endgame gear options. If you have already completed the story, check out our Comprehensive Build Guide, which covers everything you need to succeed in the endgame.
Quick Links:
- Overview & Playstyle
- Equipment
- Armor
- Weapons
- Best Abilities & Techniques
- Best Abilities, Techniques & Passive Skills by Class
- Passive Skill Priority
Overview & Playstyle
This guide focuses on two things, lethality and speed. We hit hard and fast in melee, easily moving between targets with traversal abilities and gap closers. At ranged, we burst them down, clicking heads and dropping bombs.
One of the best things you can do for your build is to unlock all the Skill Trees by completing the basic quest for each class (aside from your starting class). Our trainer questline guides for Mentat, Trooper, Bene Gesserit, Planetologist, and Swordmaster will provide all the information you need to unlock all the Skill Trees. After unlocking all the Skill Trees, you can spread your Skill Points out, getting lots of valuable small bonuses for a single point each.
Equipment
There are only a few core pieces of equipment you need for this build:
- Full Suspensor Belt > Emperor's Wings
- Holtzman Shield (highest tier you can craft)
- Power Pack (highest tier you can craft)
The Full Suspensor Belt will let you float upwards for as long as your Power lasts, but it's most useful when used to preserve our momentum. If you use a traversal ability like Shigawire Claw or Charging Knee and activate the Full Suspensor Belt while travelling, you can maintain a high rate of speed for long distances. With this trick, Charging Knee can take you over chasms and Shigawire Claw can scale mountains in a single jump.
The Emperor's Wings Mk1 is a unique Suspensor Belt that can be found very early on at the end of Testing Station No. 2. It can be used to preserve momentum like the Full Suspensor Belt, although it's a little less effective. With it, you can double or triple the height gained from Shigawire Claw, and with the amount of climbing in the story, this is an incredible time saver.
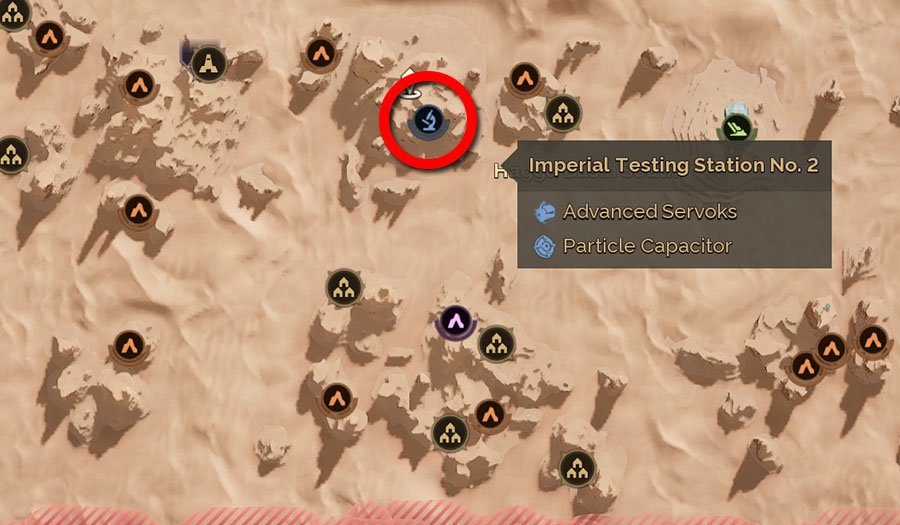
Testing Station No. 2, is located west of the Wreck of Alcyon and Breaker Station.
Remember to upgrade your Holtzman Shield and Power Pack to the highest tier available for better Shield efficiency. The damage reduction and Mitigation from your armor does not affect your shields, so the only way to improve your Shield is to upgrade it and your Power Pack.
As with all builds, make sure you always have:
- Water (highest tier Literjon you can craft, kept stocked up)
- Medkits (bandages can be purchased for 20 Solari at tradeposts)
- Vehicle Fuel Cells (try and keep at least 2 full Vehicle Fuel Cells with you at all times)
Armor
We're going to be using Heavy Armor for extra Dart Mitigation because we're much more likely to be hit by Darts while unshielded. The penalty to Blade Mitigation that Heavy Armor has might seem like a lot, but the naturally higher Armor Values it comes with take some of the edge off.
Keep in mind that Heavy Armor increases the Stamina cost of dash, which can leave you in a tight spot if you are not careful, and it also provides no heat protection so make sure you are stocked up with plenty of water at all times!
Weapons
Melee Weapon
Swords are generally the better melee weapon choice because of their area effect parry and high base damage.
The best sword you can get before unlocking Tier 6 (Plastanium) gear is the Jolt-sword. You receive it for free by completing the final quest in the Swordmaster Advanced Trainer quest line.
Ranged Weapon
The poison sniper (Spitdart) is one of the strongest weapons in Dune Awakening. It has high damage, great range, and its poison can be applied through shields. Along with Spitdart rifles, Rafiq Snubnose pistols pair well with headshot builds, working well as a sidearm.
GRDA 44 shotguns (scatterguns) pack a punch and stagger enemies on hit, but their short range makes them a better companion to a melee focused build.
Drillshots can't headshot through shields, but they remove the need for shield breaking weapons at the cost of some damage. The earliest you can craft a drillshot is at Tier 4 (Aluminium).
For shield breaking you can use a Disruptor M11 (SMG) at the highest available tier or a Disruptor Pistol, however Disruptor Pistols require unique blueprints to make.
The best sniper rifle you can get before Tier 6 (Plastanium) gear is Thufir's Best. You receive it for free by completing the final quest in the Mentat Advanced Trainer quest line.
Best Abilities & Techniques
Best Traversal Abilities
- Swordmaster (The Way Tree) - Knee Charge
- Bene Gesserit (Weirding Way) - Bindu Sprint
- Trooper (Tactical Tech) - Shigawire Claw
We strongly recommend unlocking at least one of these Abilities, not only because traversal Abilities are a lot of fun, but because they are a huge quality of life upgrade, especially when paired with a good Suspensor Belt. You only need to complete the basic quest for Swordmaster, Trooper, or Bene Gesserit to unlock their Skill Trees.
Best Combat Abilities
Melee
- Swordmaster (The Way Tree) - Knee Charge
- Bene Gesserit (Weirding Way) - Weirding Step
- Trooper (Tactical Tech) - Shigawire Claw
The Ability choices we make for melee are selected for maneuverability and CC. The most powerful kind of attacks you can do in melee are slowblades, the shield penetrating heavy attacks. Knee Charge, Weirding Step, and Shigawire Claw can all stagger or CC enemies long enough for a slowblade, and they are all great gap closers.
Ranged
- Trooper (Tactical Tech) - Explosive Grenade or Assault Seeker
- Trooper (Tactical Tech) - Shigawire Claw
- Trooper (Gunnery) - Energy Capsule
Shigawire Claw helps us to reposition when melee enemies get too close, or it can get us to high ground for a better vantage point. Energy Capsule adds some needed damage for bursting down heavys and Explosive Grenade or Assault Seeker is good for area effect.
Best Techniques
Melee
- Swordmaster (The Way) - Disciplined Breathing
- Trooper (Gunnery) - Center of Mass
- Bene Gesserit (Weirding Way) - Manipulate Instability
We're always running low on stamina in melee, so Disciplined Breathing's increase to Stamina Regen is a welcome addition to the build. Center of Mass increases our blade damage, and all we lose is some headshot damage, which we weren't relying on anyway. Manipulate Instability will come into effect almost anytime we're slowblading, which should be a lot.
Ranged
- Mentat (Mental Calculus) - Marksman
- Mentat (Mental Calculus) - Exploit Weakness
- Trooper (Tactical Tech) - Battle Hardened
Marksman's increase to headshot damage is just what we want in a ranged build because shooting heads is already the best strategy. Exploit Weakness can be a little random, but the weakspot can be targeted through shields if we manage to apply it. Battle Hardened reduces the cooldown on all three Abilities we recommend so this is an easy choice.
Best Abilities, Techniques & Passive Skills by Class
These are the Abilities, Techniques, and Skills we think are the most worthwhile for each class Skill Tree.
Trooper
Gunnery
- Ranged Damage increases the damage of all guns in the game.
- Center of Mass comes with a penalty to headshot damage, but boosts body, blade, and shield damage.
- Disruptor Damage increases the damage of Disruptor M11 guns, the SMGs of the game. This will not increase Disruptor Pistol damage because they are classified as Snubnose Pistols, not Disruptors as the name suggests.
- Scattergun Damage increases the damage of GRDA 44 guns, the shotguns of the game.
- Field Maintenance and Gunsmith help with durability and are worth a point each.
Suspensor Training
- Suspensor Dash lets you dash mid air at the cost of power while slotted as a Technique.
- Suspensor Efficiency reduces Suspensor power drain and is worth putting a point in.
- Suspensor Blast hits nearby enemies, getting them off you and slowing them down. This can be helpful against NPCs, but it's better used in PVP when you are being pushed by a melee opponent.
Tactical Tech
- Shigawire Claw is probably the best traversal Ability in the game. You can cast it while airborne, so it's great for climbing mountains, but it also works in combat to stagger enemies.
- Battle Hardened reduces the cooldown of Trooper Abilities while slotted as a Technique. Keep in mind that this cooldown reduction does not affect the other classes at all.
- Explosive Grenade and Assault Seeker begin dealing real damage at level 2 and can one-shot unshielded enemies at level 3. Assault Seeker is easier to aim and deals a little more damage.
- Attractor Field pairs well with SMG and shotgun loadouts, making them easier to aim. Running Attractor Field with the Center of Mass Technique makes for a sizeable damage increase.
Mentat
Mental Calculus
- The Sentinel is a deployable turret that is okay to use early on, but doesn't scale well into the midgame.
- Ranged Damage increases the damage of all guns in the game.
- Pistol Damage increases the damage of Maula Pistols and Rafiq Snubnose guns. The Disruptor Pistol is classified as a Snubnose and benefits from Pistol Damage.
- Rifle Damage increases the damage of Karpov 38 and JABAL Spitdart guns, the assault rifles and sniper rifles of the game.
- Marksman increases headshot damage when slotted as a Technique.
- Exploit Weakness puts a random weakspot on the enemy, which, when hit, will give you a bonus to ranged damage.
Assassination
- Headshot Damage increases the headshot damage of all guns.
Tactician
- Gravity Mine creates a large field that slows enemies and drains their shields, making them much more vulnerable to your ranged attacks.
Planetologist
Scientist
- Overcharge gives a decent boost to your power and is more noticeable early on.
- Rerouting improves Power Recharge Rate and is a good pick.
- Deep Analysis and Compaction are both worth at least a point for resource gathering efficiency.
Mechanic
- Vehicle Repair reduces vehicle durability loss when repairing, making it great value for one point.
- Vehicle Mining is good for resource gathering efficiency when you have a buggy for mining.
Bene Gesserit
Weirding Way
- Bindu Sprint is one of the fastest ways to travel on the ground. If you have a Full Suspensor Belt or Emperor's Wings, you can Bindu Sprint off a cliff and activate your Suspensor to fly incredibly fast.
- Blade Damage increases your damage with all melee weapons.
- Weirding Step teleports you behind enemies, making them vulnerable to attack.
- Short Blade Damage increases your damage with kindjal blades, the daggers of the game.
- Manipulate Instability increases your damage against staggered enemies or stunned enemies, when slotted as a Technique.
The Voice
- Compel is a ranged CC Ability that gets interrupted by damaging the target. This Ability is best used when setting up for slowblades against a heavy.
- Voice Training reduces the cooldown of The Voice Bene Gesserit Abilities. Worth at least a point if you are using a Voice Ability.
Body Control
- Vitality increases your maximum health.
- Self-Healing will make your Healkits and Bandages more effective.
Swordmaster
The Blade
- Blade Damage increases your damage with all melee weapons.
- Long Blade Damage increases your damage with swords.
The Way
- Knee Charge is a great traversal and combat ability. It can one-shot unshielded enemies when leveled, it staggers targets hit, and it has a short cooldown. You can aim it in any direction, allowing it to also be used as a high jump. If you activate the Full Suspensor Belt or Emperor's Wings, while Knee Charging you can travel long distances.
- Optimized Hydration increases your maximum stamina when you are hydrated.
- Field Medicine increases your healing with Healkits and is worth a point.
- Crippling Strike is most useful as a PVP skill when fighting in melee combat, its slow can be especially useful.
- Disciplined Breathing increases your stamina regeneration when slotted as a Technique.
- General Conditioning increases maximum stamina.
- Inspiration is great when playing in groups because the bonus to melee damage is applied to everyone nearby.
Passive Skill Priority
Melee
You can skip Scattergun Damage if you don't use a shotgun. We are going to want the following passive skills, in order of importance:
- Swordmaster (The Blade) - Long Blade Damage (+15% long blade damage)
- Swordmaster (The Blade) - Blade Damage (+9% blade damage)
- Bene Gesserit (Weirding Way) - Blade Damage (+9% blade damage)
- Bene Gesserit (Body Control) - Vitality (+55 max health)
- Swordmaster (The Way) - General Conditioning (+25 max stamina)
- Swordmaster (The Way) - Optimized Hydration (+25% hydrated stamina bonus)
- Trooper (Gunnery) - Scattergun Damage (+15% Scattergun Damage)
- Bene Gesserit (Body Control) - Self Healing (+30% healing effectiveness)
- Swordmaster (The Way) - Field Medicine (20% Healkit instant regen bonus)
Ranged
You can also take Scattergun Damage to increase drillshot damage. We are going to want the following passive skills, in order of importance:
- Mentat (Mental Calculus) - Ranged Damage (+9% Ranged Damage)
- Trooper (Gunnery) - Ranged Damage (+9% Ranged Damage)
- Mentat (Assassination) - Headshot Damage (+15% Headshot Damage)
- Mentat (Mental Calculus) - Rifle Damage (+15% Rifle Damage)
- Mentat (Mental Calculus) - Pistol Damage (+15% Pistol Damage)
- Bene Gesserit (Body Control) - Vitality (+55 max health)
- Swordmaster (The Way) - General Conditioning (+25 max stamina)
- Swordmaster (The Way) - Optimized Hydration (+25% hydrated stamina bonus)
- Bene Gesserit (Body Control) - Self Healing (+30% healing effectiveness)
- Swordmaster (The Way) - Field Medicine (20% Healkit instant regen bonus)
You'll note that the above list doesn't include any of the great Planetologist passives (such as Enhanced Mining and Compactor Yields). Split your points between the above and Planetologist as desired, depending upon the content you are looking to tackle.
Once you are ready to leave Hagga Basin, you can check out our Comprehensive Build Guide to help you decide on the best endgame build for you.