
Once you reach the endgame in Dune Awakening and unlock the Overland Testing Stations your build will begin to matter a lot more. Not all Abilities are useful in endgame content, so we've designed the core loadout to have Abilities that scale well into higher difficulties, giving you the best build possible. This guide will give you a strong core of Skills, Abilities, and Techniques, then offer alternatives and paths to increase your power as you unlock more Skill Points and gear.
The most powerful builds in Dune Awakening use melee weapons for clearing regular enemies and then switch to ranged weapons for defeating bosses. We will present options for more ranged focused builds, but a hybrid setup is preferable.
Quick Links:
- Overview & Playstyle
- Strengths & Weaknesses
- Core Build
- Abilities & Techniques
- Piloting the Build
- Skill Trees
- Alternative Abilities
- Alternative Techniques
- Alternative Armor
- Optional Ranged Weapons
- Headshot Build Variant
- Ranged Only Build Variant
- PVP Build Variant
Overview & Playstyle
This guide will assume you have completed the story and crafted a full set of the highest tier gear you can before tackling the Overland Testing Stations. The core skill tree will use 150 skills points as a baseline which will give us the Abilities, Skills and Techniques we need to clear Testing Stations efficiently.
This build gives us the tools we need to go fast, not only through movement, but through raw power as well. This build uses strong burst skills for bosses, powerful CC abilities for regular enemies, and great movement abilities for traversal.
This build is designed to be useful in all PVE combat scenarios, allowing you to take it into any Testing Station without the need for respecs. However, if you'd like to use a more specialised build, check out the guides for our Overland Testing Stations.
Strengths & Weaknesses
Strengths
- High burst damage
- Great manoeuvrability
- Easy to use and rewarding to master
- Excellent for PVE content
Weaknesses
- Lacks skills for farming resources
- Relies on CC abilities that can be interrupted by DoTs
- Highest damage output requires being close to enemies
Core Build
The two required weapons for this build are a shotgun and melee weapon, but we include the Tripleshot as a part of the core build for midrange damage.
Melee Weapon Options
For clearing regular enemies we'll be using a melee weapon, because we lack the ability to safely and efficiently break shields. The listed weapons are best in class, but you can use other weapons of the same type if these aren't available.
Melee weapons in order of preference:
Static Needle rapier has the longest reach out of the recommended weapons, allowing you to chain heavy attacks together, lunging at the enemy and hitting them, even as they try to get out of the way. The Static Needle is preferred over Halleck's Pick, because the poison inflicted by Halleck's Pick will interrupt our CC abilities.
Replica Pulse-sword has an AoE parry that replenishes your stamina, helping you to avoid being caught out with an empty bar. If you find the rapier parry too frustrating, the Replica Pulse-sword is for you.
Replica Pulse-knife is the compromise between the rapier and sword, as it keeps some of the reach that the rapier has, but loses the swords AOE parry. If you like to spam attacks, the unique effect which returns stamina on hit can be very helpful.
Burning Blades are a favourite of many players and they are lots of fun to use. Unfortunately, they have a short range and their unique slowblade attack is less practical when compared to the other weapons.
For your melee weapon, you will want the following Augments (in order of priority):
Ranged Weapons
Ranged weapons are best for dealing damage to bosses, but they can also be effective against regular enemies at lower difficulties. If you want to limit your ranged weapon choices to two, then a shotgun and spitdart will be enough in most cases.
Shotgun
The Perforator or Shellburster shotguns are the best weapons for this build and can be found in Testing Station No. 136 (Fire). Both shotguns have comparable sustained DPS, however the Perforator is the preferred shotgun for its superior burst damage. Shotguns are incredibly powerful and can stagger bosses and regular enemies alike.
Best augments for the shotgun are Heavy Caliber Upgrade, GRDA 44 Amplifier, and either GRDA 44 Expander or GRDA 44 Optimizer.
Spitdart
The damage from Regis Tripleshot Repeating Rifle can compete with shotguns, as both weapons have their bullet spread problems solved by Attractor Field. The JABAL Spitdart Expander really unlocks this gun's potential and even with a lower grade Expander you can double or triple your clip size. Keep in mind that the poison damage this gun inflicts will break CC effects like Compel.
Best augments for the Regis Tripleshot Repeating Rifle are JABAL Spitdart Expander, Heavy Caliber Upgrade, and JABAL Spitdart Amplifier.
Armor
The best all-rounder Armor set for PVE uses the Forge as a foundation, then swaps out the Gloves and Chestpiece for Circuit Gauntlets and Power Harness. Forge is good for its Fire, Poison, and Blade mitigation, with the Fire Mitigation being most helpful in early difficulty Testing Station 136 (Fire) runs. We have to make some compromises when running one Armor set all the time, but this setup is a great core to build upon.
- Head: The Forge Helmet
- Chest: Power Harness
- Legs: The Forge Pants
- Gloves: Circuit Gauntlets
- Boots: The Forge Boots
Circuit Gauntlets reduce your Power usage by 10%. This works for everything, your shield, tools, energy weapons, and suspensor belt. Anything that uses power gets this benefit.
Power Harness gives you 50 extra Power Capacity. If you were using a Young Sparky Mk6, this would equate to a 7% increase in shields. Of course, power is also used by your other pieces of equipment, like Suspensor Belts, tools, and energy weapons, all of which will work for longer periods of time.
Equipment
A unique Power Pack or Shield isn't required for this build, but they are nice upgrades to have.
- Power Pack: Young Sparky Mk6 > Accelerator Power Pack
- Shield: Adaptive Holtzman Shield > Holtzman Shield Mk5
- Suspensor Belt: Full Suspensor Belt > Responsive Planar Belt
Full Suspensor Belt conserves your momentum when it's activated and transforms Knee Charge and Shigawire Claw into long range traversal Abilities. The Full Suspensor Belt also lets you float after jumping or travel upwards as long as your Power lasts.
Responsive Planar Belt does not conserve your momentum when it's activated and instead allows you to hover in the air, moving around as if you were walking. The hover effect can be maintained at greater heights if you have a way to propel yourself upwards, e.g. using a Shigawire Claw.
The Accelerator Power Pack is the easiest upgrade to obtain in this list, because you can farm it at Testing Station 89 (Radiation) on Challenge Level 1 for the highest drop chance.
Young Sparky Mk6 and Adaptive Holtzman Shield are both drops found in the Deep Desert.
Abilities and Techniques
These are the core Abilities and Techniques we recommend for fighting regular enemies.
Abilities
- Knee Charge
- Weirding Step
- Compel
Knee Charge is combat ability that doubles as a traversal ability, allowing you to cover long distances when paired with a momentum preserving Suspensor like the Full Suspensor Belt. It's great for engaging or disengaging from fights.
Weirding Step is a movement ability that teleports you behind the targeted enemy, temporarily disabling them and giving you an opening to attack.
Compel is a ranged CC ability that can be used to peel regular enemies or buy yourself time to heal and set up for burst damage against bosses.
Techniques
- Center of Mass
- Manipulate Instability
- Suspensor Dash
Center of Mass is the best damage increasing Technique available because we can make use of all the damage bonuses and deal more damage with Attractor Field as well. Unless you are running a headshot build, Center of Mass should always be used.
Manipulate Instability increases damage by 20% against staggered enemies, adding to our slowblade damage. Manipulate Instability also works with ranged weapons, so when you stagger an enemy with a shotgun blast, followup attacks will deal increased damage.
Suspensor Dash lets you dash in midair. This Technique can be absolutely life saving in intense combat encounters because the air dash allows us to conserve our stamina and get away quickly. The air dash is also faster than running, so it can be used for traversal outside of combat.
Abilities and Techniques for Bosses
These are the core Abilities and Techniques we recommend you use for boss fights.
Abilities for Bosses
- Attractor Field
- Energy Capsule
- Compel
Attractor Field gives a sizeable boost to damage when paired with Center of Mass. After being attached to a target all shots fired into it will deal body damage. This has great synergy with shotguns because the sphere captures their wide pellet spread, ensuring no damage is lost.
Energy Capsule increases ranged damage by 35% and is used as a part of our burst damage Ability rotation. Energy capsule can be swapped out for a traversal or CC Ability like Weirding Step, Knee Charge, or Shigawire Claw.
Compel is the longest CC in the game and works in all the boss fights, buying you enough time to bandage or kill adds. If you are fighting with Spice Prescience active and have the passive skill Voice Training at level 3, you can keep the boss CC'd indefinitely.
Techniques for Bosses
- Center of Mass
- Battle Hardened
- Death From Above
Center of Mass is a great all round damage increase and remains good in boss fights.
Battle Hardened reduces the cooldown of Trooper Abilities by 30% and in boss fights we use two Trooper Abilities, Energy Capsule and Attractor Field. If you use Spice Prescience in a boss fight, you can keep close to 100% uptime on Attractor Field, but even when not spiced up the cooldown reduction is noticeable.
Death From Above is a more advanced Technique that gives you a 20% damage boost when your Suspensor Belt is used. Suspensor Dash can be used instead of Death From Above if you find it difficult to make use of the damage boost or haven't unlocked it yet.
Piloting the Build
Our core pre-boss Abilities, Knee Charge, Weirding Step, and Compel are used for clearing regular enemies. We'll give you some strategies and combinations to get the most use out of these Abilities, so you can efficiently clear Testing Stations.
Knee Charge
Knee Charge is used as a traversal and combat ability in this build. You can aim knee charge in any direction, even upwards, then once you begin travelling you can activate your Full Suspensor Belt to preserve the momentum. This can be used to travel long distances across Hagga Basin or quickly move across the room in a Testing Station.
Knee Charge also staggers the target it hits, which can set them up for a slowblade or regular blade attacks.
Weirding Step
Weirding Step teleports you behind the targeted enemy, temporarily disabling them and making them vulnerable to attack. If you have a shotgun you can Weirding Step behind an unshielded enemy and shotgun them three times in the back, adding a brief pause to let them dash as they try to recover, before shotgunning them again.
By using Weirding Step, melee enemies can be slowbladed one or two times, but against heavy enemies, you can slowblade them up to three times before they react. If the heavy's shield is down when you Weirding Step, you can add a brief pause to allow the shield to come up before slowblading as normal.
Compel
Compel is an incredibly powerful CC Ability and works great as a peel Ability, taking heavys out of the fight or splitting up melees when more than one attacks you.
Compel can be used in a CC chain by casting it against a heavy, then slowblading them three times and dashing back as they try to suspensor blast you. After backing away to safety you can reengage with Weirding Step, getting two more slowblades against the heavy, before they have a chance to attack again.
Fighting Bosses
We take Attractor Field, Energy Capsule, and Compel into boss fights. For specific strategies, you can check out our Overland Testing Station walkthroughs and builds.
Attractor Field
Attractor Field adds a huge damage boost and we want to use it off cooldown against the boss. When targets have Attractor Field attached, any shots that are fired into the sphere will be redirected to the target's body, giving us excellent synergy with the Center of Mass Technique.
Shots into an Attractor Field will not stagger the target or apply secondary effects from weapons like Perforator bleed, Shellburster burning, or Tripleshot poison. Damage over time effects will interrupt Compel and we rely on Compel when fighting bosses, so the loss of DoTs is not a problem.
Compel
Compel and Energy Capsule are used frequently as a part of our burst combo against bosses. To execute the burst combo, first use Compel against the boss, then activate Energy Capsule and fire Attractor Field. This combo lets you use your Abilities safely and reliably, while also providing a window for your burst.
Compel can also be used to disable the boss for long periods of time, giving you window to heal or recharge your shield. If you have Spice Prescience activated and Voice Training at level 3 for -30% Voice Cooldowns, you can cast Compel again after the boss recovers, keeping them out of the fight indefinitely.
Energy Capsule
Energy Capsule slows your movement during activation, which can make you vulnerable to attacks from enemies. To provide a little more safety, it's good practice to fly up into the air with a Full Suspensor Belt, to counteract the slowdown.
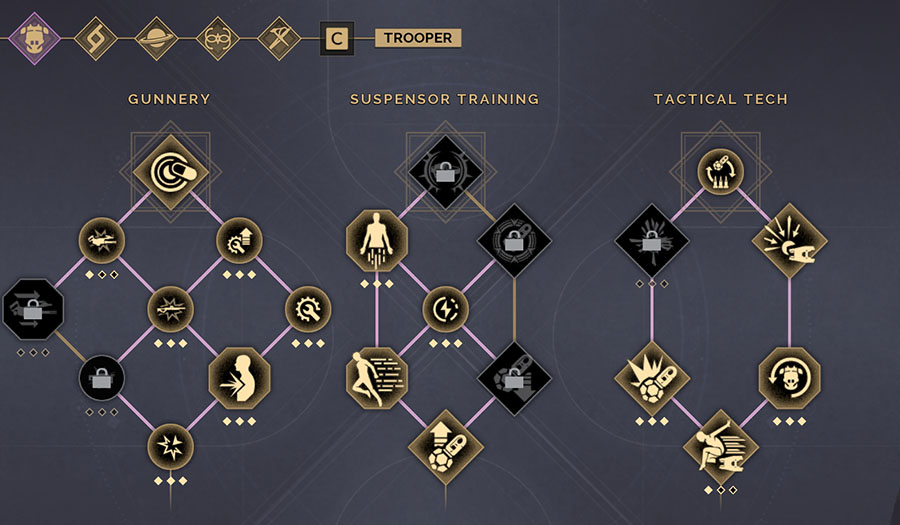
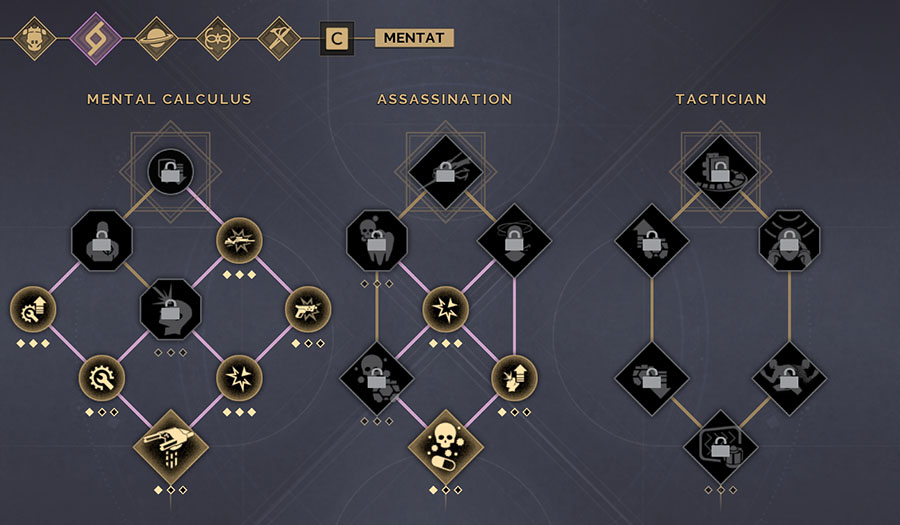
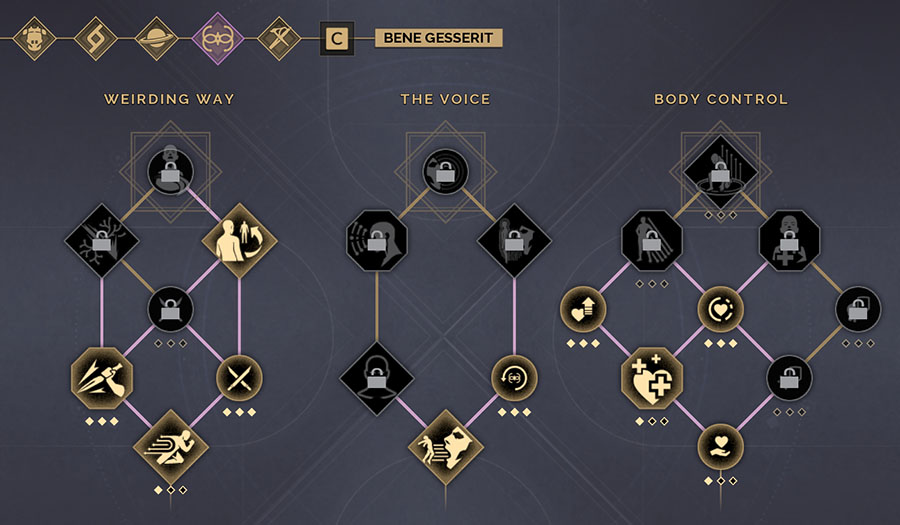
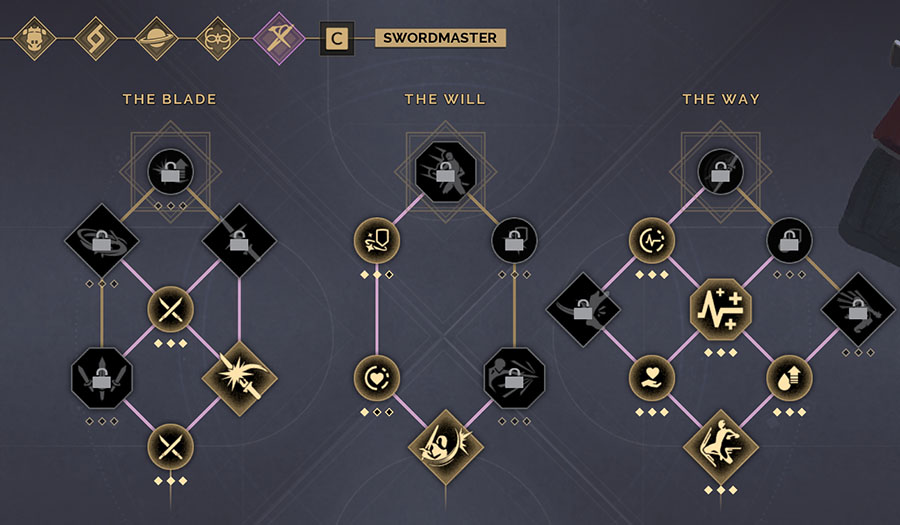
Skill Trees
These are the skills we recommend you use for the core build. The 150 Skill Point build will give you the Abilities, Techniques, and Passives you need to get started.
Skill Tree - 150 Skill Points
For our first 150 Skill Points we want to pick up as many damage passives as possible, while still putting points into our core Abilities.
Key Skills
Trooper - Ranged Damage, Scattergun Damage, Battle Hardened, Suspensor Dash, Attractor Field, Energy Capsule.
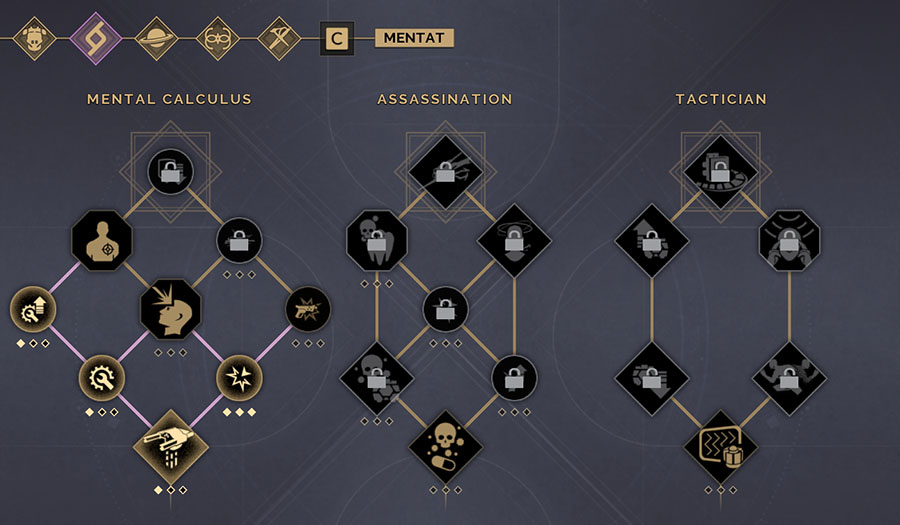
Mentat - Ranged Damage.
Planetologist - Rerouting.
Bene Gesserit - Compel, Voice Training, Blade Damage, Vitality, Manipulate Instability.
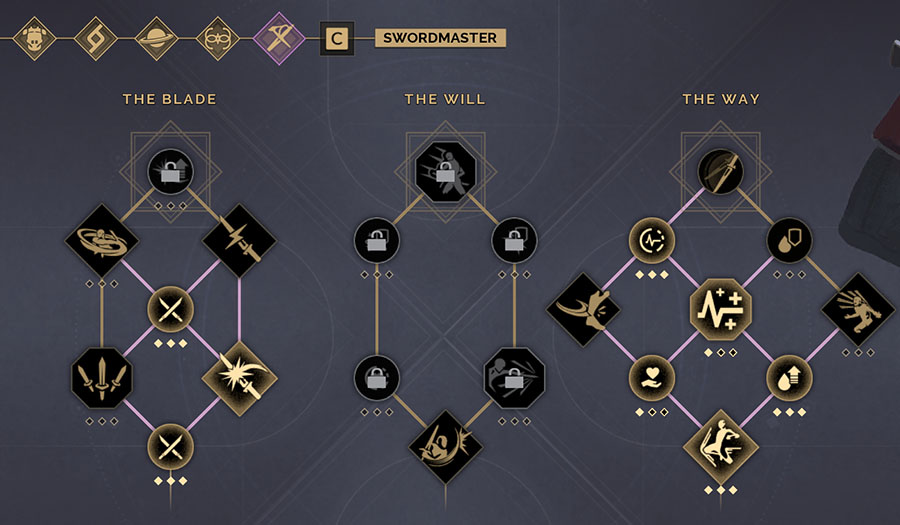
Swordmaster - Blade Damage, Longblade Damage, Knee Charge, Optimized Hydration, General Conditioning.
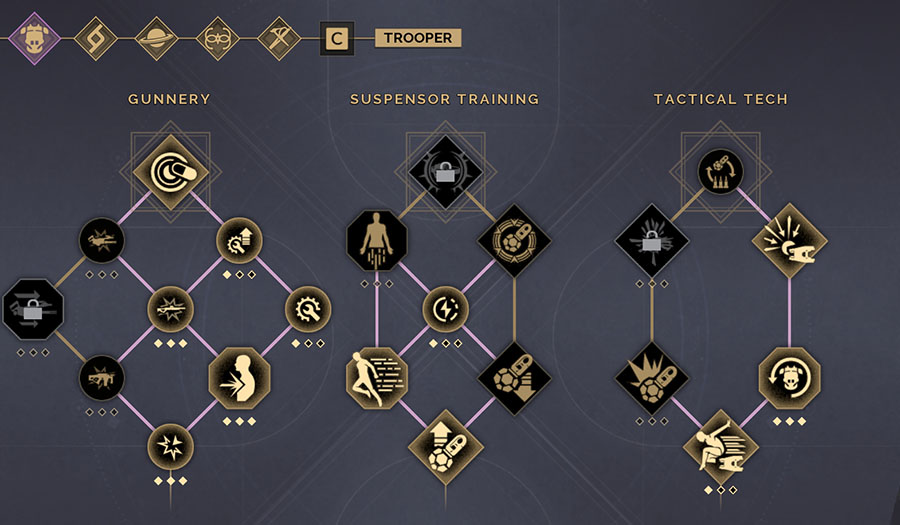


Skill Tree - 200 Skill Points
At 200 we can add Rifle Damage, Death From Above, and two levels in Solid Stance so the Testing Station 152 (Electric) boss won't stagger us with his shots.
New Key Skills
Trooper - Death From Above, Field Maintenance.
Mentat - Rifle Damage.
Planetologist - Overcharge.
Bene Gesserit - Self-Healing.
Swordmaster - Solid Stance (level 2).
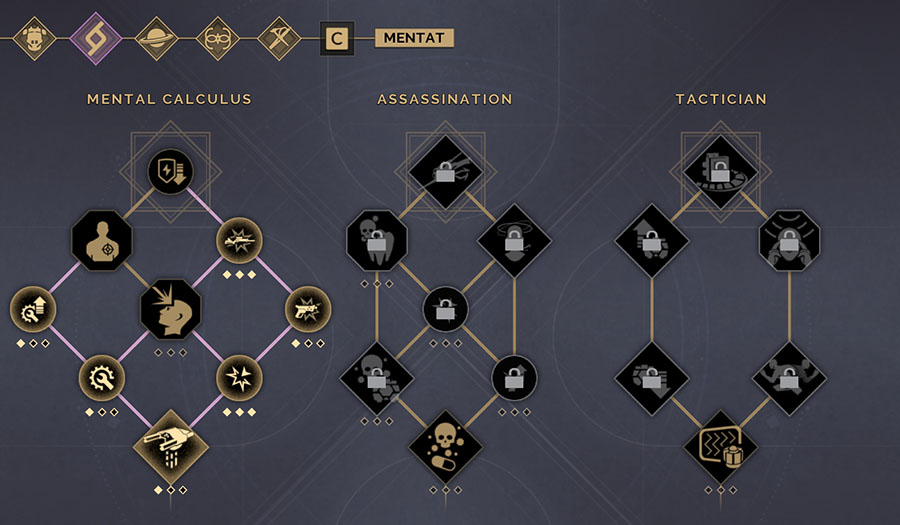

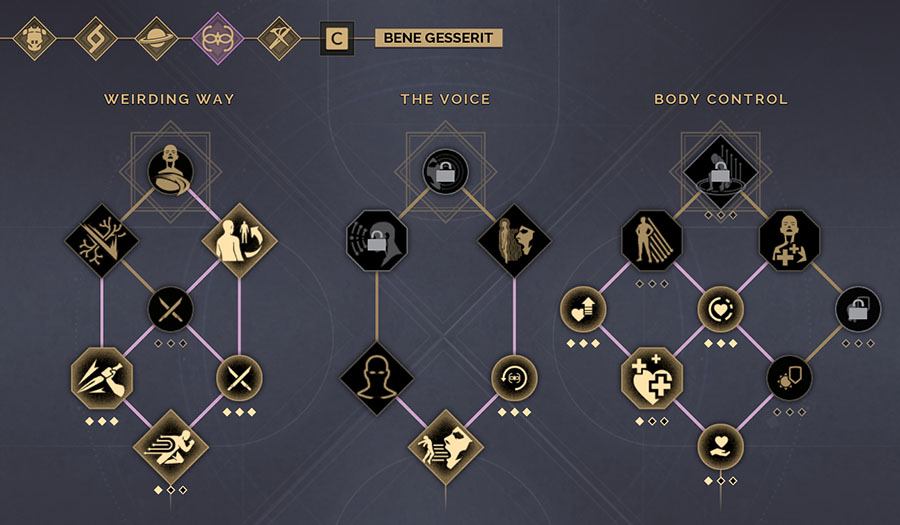
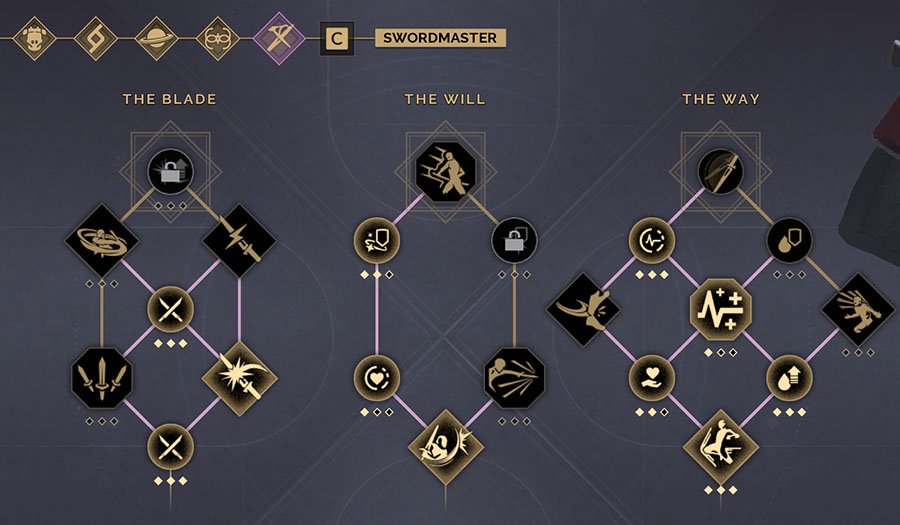
Skill Tree - 254 Skill Points
At Combat level 100, we'll have access to 54 more Skill Points, allowing us to pick up Explosive Grenade and Reflexive Reload. The Explosive Grenade Ability is used to proc Reflexive Reload during Spice Prescience, giving us instant reloads and a nice boost to DPS. We grab Assassin's Shot to give bonus damage to our Weirding Step + shotgun blast combo and spend the rest of the points in quality of life passives.
New Key Skills
Trooper - Explosive Grenade, Reflexive Reload, Suspensor Efficiency, Gunsmith.
Mentat - Assassin's Shot, Tailoring.
Swordmaster - Disciplined Breathing.

Alternative Abilities
These Abilities are the alternatives that might be better to use, depending on the situation.
Explosive Grenade for Reflexive Reload
Explosive Grenade damage falls off in higher difficulty Testing Stations, but we can use it to proc the skill Reflexive Reload which will instantly reload the currently equipped weapon. Weapons with long reload times like The Ancient Way and Seethe will benefit the most from this, but it will work with any non-energy weapon. It costs 12 Skill Points to unlock level 3 Explosive Grenade and Reflexive Reload, so it's a sizeable investment.
Stop
Stop is one of the Bene Gesserit Voice Abilties that disables enemies within a cone in front of you. It's a little more clunky to use when compared with Compel and damage will snap the enemies out of Stop's CC, but it is a powerful Ability in the right situation.
Gravity Mine
Gravity Mine creates a large field that slows enemies and drains their power over time. This mine is very useful against groups and the energy drain effect makes cracking enemy shields a lot easier.
Source of Power
Source of Power boosts Power Regeneration by 30% for anyone standing inside its large area effect. This Ability works best when playing in groups and helps to sustain energy weapons or shields. It costs seven Skill Points to acquire this Ability because it's at the end of the Mentat skill tree.
Deflection
Deflection will block projectiles from hitting you for as long as your stamina lasts. This Ability functions great as a panic button for when your shields go down. In the Testing Station 152 (Electric) boss fight Deflection will negate the boss's shots allowing you to safely wait for your shields to come back online.
Inspiration
Inspiration is a fantastic group buffing Ability, giving you and nearby allies a boost of up to 35% blade damage when cast. For solo play we would prefer to have a CC or movement ability, but when playing with friends support abilities like Inspiration and Source of Power become much more valuable.
Alternative Techniques
Disciplined Breathing
Disciplined Breathing improves your Stamina Regeneration by up to 20%, helping you to maintain one of your most valuable resources. You could easily run this as a core Technique instead of Suspensor Dash if you find yourself not making use of the air dash.
Marksman
Marksman is the only Technique we would recommend using to replace Center of Mass. Center of Mass reduces our headshot damage, while Marksman increases our headshot damage by 20%. For headshot builds, like those using the Seethe, Marksman is a great use of Skill Points.
Exploit Weakness
Exploit Weakness creates a weakspot on enemies that increases your ranged damage by 30%, however the weakspot is placed randomly on the target's body, making this Ability fairly unreliable. The weakspot will continue to work even if the target's shield returns, meaning you can still benefit from the increased damage when hitting the weakspot on a shielded enemy.
Conservation of Energy
Conservation of Energy reduces your Power usage by 9%. This works for everything, your shield, tools, energy weapons, and suspensor belt. Reduced Power usage is a great bonus, but it comes at the cost of 9 Skill Points and a Technique slot, making this a tough sell. If you are leaning heavily into energy weapons or want to maximise shield efficiency, this Technique is worth a look.
Alternative Armor
Ix-core Leggings
Ix-core Leggings are light leg armor with the same Blade Mitigation as The Forge Pants, but they trade the Poison and Fire Mitigation for 10% Stamina Dash Cost Reduction (6% more than the Forge Pants).
Pincushion Set
Pincushion is a light armor set like the Forge, providing the same Blade Mitigation and Stamina Dash Cost Reduction, but loses the Poison and Fire resist for some Dart Mitigation.
Bulwark Set
Bulwark is a heavy armor set which has high Armor and Dart Mitigation, but it lacks the Stamina Dash Cost Reduction of the light armor sets and comes with a penalty to Blade Mitigation. This set is less of an everyday wear because the weakness to blade damage will be felt in some Testing Stations.
Optional Ranged Weapons
Missile Launcher
The Ancient Way is one of the best ways to clear out groups of unshielded enemies and is highly recommended for the Testing Station 89 (Radiation) boss.
Best Augments for The Ancient Way are Heavy Caliber Upgrade, Missile Launcher Fragmenter, and Missile Launcher Heavy Payload.
Shield Breaker
Experimental Lightning Gun is mandatory in ranged only builds where you need to constantly be cracking shields.
Best Augments for the Experimental Lightning Gun are Disruptive Coating, Karpov 38 Pressurizer, and Quick-release Trigger.
Headshot Pistol
Seethe has a high headshot multiplier, 2x compared to the 1.5x standard, and really starts to put out damage after being augmented. There's a higher skill floor with the Seethe, so if you can't get consistent headshots your damage output won't be very competitive. The Seethe's headshot playstyle works best when you lean into headshot damage passives and away from shotgun reliance.
Best Augments for the Seethe are Rafiq Snubnose Heavy Kit, Heavy Caliber Upgrade, and Tactical Enhancer.
Headshot Build Variant
Using a weapon like Seethe enables a different style of play where we don't use Attractor Field and focus on maximising headshot damage. Headshot builds have a higher skill floor than Attractor Field builds and deal a little less damage overall. Regardless, they can be a lot more enjoyable and rewarding to play, allowing for more skill expression.
Key Skills
The Mentat tree has three skills we'll need when switching to a headshot variant and to free up the points to get them you can skip taking Battle Hardened, Attractor Field, Center of Mass, and even Scattergun Damage or Rifle Damage.
Marksman is taken at level 3 and slotted as a technique, replacing Center of Mass. The 20% extra headshot damage is a great bonus and is required for this kind of build.
Headshot Damage and Pistol Damage are taken because we need more headshot damage and the Seethe benefits from bonus Pistol Damage.
Ranged Only Build Variant
Some players prefer to never use melee weapons and this strategy is less optimal than the hybrid setup we recommend. You're more likely to find success with a ranged only variant in group play, however with creative use of cover and good game sense you can make a ranged only build work.
Loadout
For a ranged-centric playstyle you will need a shieldbreaking weapon and for that we recommend the Experimental Lightning Gun. During early difficulties an SMG like A Dart For Every Man or Sardaukar Intimidator can serve the same purpose, but they leave you more vulnerable than the Lightning Gun. It might be tempting to use a drillshot like the Penetrator, but drillshot damage does not scale well into higher difficulty Testing Stations.
For your armor, you can swap out the Forge set for Bulwark to maximise Dart Mitigation and Armor Values.
Weapons
Shield Breaker: Experimental Lightning Gun.
Close Range DPS: Perforator or Shellburster.
Midrange DPS: Seethe or Regis Tripleshot Repeating Rifle.
Ranged Only Ability Alternatives
Gravity Mine is much more useful in a ranged only build, because its AOE slow is very strong and it drains shields, helping you to crack them much more easily.
Attractor Field can be run against regular enemies as a boost to damage and shield cracking speed.
Ignore is a Bene Gesserit Voice Ability that works best with Attractor Field. If you use Ignore on an enemy heavy and get behind them, then use Attractor Field, you can fire at them for a long time before they start to react. Enemies won't stagger to shots when Attractor Field is on them and heavys seem to take a long time to recover from Ignore because of this.
PVP Build Variant
The core of this build is PVE focused, but you could take it into PVP with some different weapons and Abilities.
In PVP you want to do all you can to survive burst damage, so take an Accelerator Power Pack for the extra shield. This won't save you against a lot of the overpowered weapons, like the Regis Disruptor Pistol shield one-shot or some of the drillshot shenanigans in the meta, but not everyone will be fully kitted. PVP is very volatile right now and some of the weapons have strange interactions, but the general suggestions we make here should steer you in the right direction.
Abilities
In PVP there's a preference towards traversal Abilities, so I would recommend running Shigawire Claw and Weirding Step. Bindu Sprint can be useful in certain situations, such as when sprinting off cliffs or dunes to build momentum before using a Full Suspensor Belt to carry it over long distances. Attractor Field is very strong in PVP for the extra damage and because it increases your opponent's hitbox, which makes landing your shots easier. The Weirding Step, Gravity Mine combo mentioned below is an option, but this won't work against an experienced player. Source of Power is practically mandatory for base raiding, because the Lasgun is such a Power hungry weapon.
Weapons
Regis Disruptor Pistol at a high grade with two Disruptive Augments, it can one-shot any enemy shield in PVP. Rate of Fire only decreases the time between shots, not charge speed, so a third Augment is optional.
Best PVP Augments for shield breaking with a Regis Disruptor Pistol are Disruptive Coating and Rafiq Snubnose Disruptive Coating.
A Dart For Every Man is a close range shield cracker in PVP that can be used as a part of a Weirding Step, Gravity Mine combo. You teleport behind your opponent, drop a Gravity Mine so they can't dodge, and unload your entire clip into them. It's a bit of a gimmick, but it can be effective against unaware players.
Best PVP Augments for A Dart For Every Man are Disruptor M11 Sprayer, Disruptive Coating, and Disruptor M11 Quickloader.
Dunewatcher poison can be scaled by Toxicity Amplifier, letting you apply a sizeable poison DoT to enemies from long range. You could just run it with this Augment, but an Expander would be nice to have for the clip size.
Best PVP Augments for Dunewatcher are JABAL Spitdart Toxicity Amplifier, and JABAL Spitdart Expander.
Ambition is a drillshot with great accuracy and range. Drillshots are pretty underwhelming in PVE, but in PVP weapon damage is so high that the Ambition is a worthwhile pick.
Best PVP Augments for the Ambition are Heavy Caliber Upgrade, Drillshot FK7 Sprayer, and Drillshot FK7 Optimizer.
Black Market K-28 Lasgun is the best tool for destroying bases and if you have a friend, you can ride on or "surf" their ornithopter and laser other ornithopters out of the sky.
Best PVP Augments for the Black Market K-28 Lasgun are Heavy Caliber Upgrade, Lasgun Amplifier, and Lasgun Harmonizer.
The Ancient Way is great at taking down ornithopters from a distance and can destroy components in a single shot with the right Augments and Grade. Splash radius doesn't seem to have an effect on how many components are damaged by The Ancient Way, so it's not a necessary Augment in PVP, although there aren't great alternatives.
Best PVP Augments for The Ancient Way are Heavy Caliber Upgrade, Missile Launcher Heavy Payload, and Missile Launcher Fragmenter.