
The Old Quarry is the new Testing Station released alongside “The Water Wars” 1.4 update for Dune Awakening. The Water Wars is a cosmetic DLC, however the new Overland Map locations are being released free for everyone as part of the 1.4 update.
The Old Quarry is similar to the other Testing Stations released in the Chapter 3 update, offering scalable content that players can complete to earn powerful rewards. The 1.4 update introduces 14 new Augments, 3 new Garments, and 10 Weapons that can all be earned by completing The Old Quarry.
If you are looking for the difficulty scaling or loot tables, check out our Testing Station Info Page or if you need a walkthrough then we also have a guide available.
Note: We will update this guide whenever we find a better build or improvements to the current build, so we advise you check back often.
Quick Links
Weapons & Augments
Ranged Weapons
The best build for The Old Quarry Testing Station uses a melee weapon and The Ancient Way. A shotgun (scattergun) like the Perforator or Shellburster can be used, however Doctor Jalanta's drillshot deals high damage so consistently lowering your shield can be dangerous. Even if you mostly use a blade, it can still be handy to have a shotgun to switch to when Jalanta tries to Consume Abominations and heal.
The Ancient Way is the best way to deal with the Abominations summoned by Doctor Jalanta.
For The Ancient Way, you will want the following Augments (in order of priority):
If you use a Perforator, you will want the following Augments (in order of priority):
- Heavy Caliber Upgrade
- GRDA 44 Amplifier
- Scattergun Rampage-Enhancement (new Augment from The Old Quarry)
Alternative third Augment choices are GRDA 44 Expander and GRDA 44 Optimizer.
Melee Weapons
For the boss and lock-in rooms, we recommend the Replica Pulse-sword or dual blades like the Burning Blades and the new Leech's Maw. Before the boss, a sword is preferred for its AOE parry, and during the boss dual blades' fast, sweeping attacks are great for DPS or clearing Abominations. Weapons like the Static Needle and Replica Pulse-knife are workable, but they aren't as good against groups of enemies.
Melee and ranged weapons deal comparable damage to Doctor Jalanta, however melee weapons are much safer to use because they don't lower your shield.
For your melee weapon, you will want the following Augments:
- Blade Sharpener
- Heavy Blade Adjuster
- Heavy Metal Blade Coating (new from The Old Quarry)
An alternative third augment is the Edge Optimizer.
Garments & Augments
Light armor comes with Stamina Dash Cost Reduction and we will be dashing a lot in The Old Quarry, so it's a natural fit. A full set of Pincushion is fine, but you have the option to substitute in Ix-Core Leggings for even more Stamina Dash Cost Reduction or the Circuit Gauntlets for some added shield strength in the lock-in rooms.
- Head: Pincushion Helmet
- Chest: Pincushion Chestpiece
- Legs: Pincushion Pants or Ix-Core Leggings
- Gloves: Pincushion Gauntlets or Circuit Gauntlets
- Boots: Pincushion Boots
With enough Dart Mitigation from Dart-proof Latticing and Penetrative Reinforcement Augments you can survive a couple shots from Doctor Jalanta. However, the strategy we'll be using doesn't require an augmented armor set.
Tools
For this Testing Station you will want to run a pretty standard Tool loadout:
- Power Pack: Young Sparky Mk6 > Accelerator Power Pack
- Shield: Adaptive Holtzman Shield
- Suspensor Belt: Full Suspensor Belt
You can choose between Accelerator Power Pack, which has a larger Power Pool that makes your shield tankier against burst, and Young Sparky Mk6, which has better regeneration that helps your shield come back online faster after breaking. Both are good for The Old Quarry.
Abilities & Techniques
We will be running a different build for the pre-boss section of the Testing Station, then switching Skills and Techniques before entering the boss fight. Both builds are outlined below.
Abilities & Techniques - Pre-boss Fight
Here's our suggested Ability loadout below:
- Ability Slot 1: Knee Charge
- Ability Slot 2: Weirding Step
- Ability Slot 3: Compel
And your Techniques:
- Technique Slot 1: Disciplined Breathing or Reckless Lunge
- Technique Slot 2: Manipulate Instability
- Technique Slot 3: Center of Mass
The skills in this loadout are selected for their mobility and crowd control effects, however you could substitute other CC abilities if you prefer. Players who find Knee Charge and Weirding Step unreliable might find more success with Shigawire Claw and Stop or Crippling Strike.
Shigawire Claw can pull down enemies trying to Suspensor jump through the air.
Compel is the only skill we wouldn't consider switching because its 10 second duration CC is invaluable. Compel is great for splitting up enemies and for setting up Heavys for slowblade attacks. Keep in mind that damage over time effects, like burning, will break Compel.
For Techniques we maximise damage output with Manipulate Instability and Center of Mass, using the third slot for utility. You can run Disciplined Breathing for increased stamina regeneration or Reckless Lunge for increased tankiness.
Reckless Lunge is a high damage reduction buff that is activated for five seconds after using a running attack (lunge) with any melee weapon. This buff only helps when your shield is down, but it can be triggered repeatedly, keeping you tanky while you wait for your shield to recharge. You can also use it pre-emptively, then switch to a ranged weapon and open fire.
Abilities & Techniques - Boss Fight
Here's our suggested Ability loadout for the boss fight:
- Ability Slot 1: Collapse Grenade
- Ability Slot 2: Inspiration
- Ability Slot 3: Solido Decoy
And your Techniques for the boss fight:
- Technique Slot 1: Manipulate Instability
- Technique Slot 2: Disciplined Breathing
- Technique Slot 3: Center of Mass or Reckless Lunge
The build for this boss fight uses Collapse Grenade to group the Abominations, making them easier to hit with The Ancient Way. Solido Decoy is used for pulling the aggro of Abominations, giving you a window to DPS the boss and another way to group them. The Abominations are more likely to attack the decoy if you jump and float briefly after activating it.
Inspiration provides a 35% melee damage buff and is used to empower our melee attacks during the damage window we have against the boss while the Abominations are dead. Energy Capsule can be used for its 35% ranged damage bonus in more ranged focused builds.
Reckless Lunge can be used as a safety measure to ensure we don't die while firing The Ancient Way. If you do a running attack and switch to The Ancient Way, you have just enough time to lock-on and fire a missile while the damage reduction from Reckless Lunge is active. With 50 Combat Specialisation and a full set of unaugmented, Grade 0 Pincushion armor, Reckless Lunge let us survive a shot from Doctor Jalanta on difficulty 19. If you don't like using Reckless Lunge, then Litany Against Fear is another option for creating a safe window to use The Ancient Way because of its large armor increase.
Boss Strategy
We'll cover how to pilot the build here, but you can find a full breakdown of the boss's mechanics in our Walkthrough and Boss Guide.
Jalanta can Summon, Inspire, or Consume her Abominations in this fight and our build tries to use the time in between new Abominations being Summoned to DPS the boss. To simplify, we'll look at the start of a rotation where all the Abominations are dead and there's only Doctor Jalanta in the boss room.
First you use Inspiration to increase your melee damage and attack the boss. If you have dual blades then light attacks are best, otherwise heavy attacks will be stronger. Eventually Jalanta will summon more Abominations and at this point you can use Solido Decoy or Collapse Grenade to try and group the horde together. After the Abominations are grouped you can use The Ancient Way to thin out the horde. After the horde is thinned, you can use Inspiration to buff your melee damage and DPS Jalanta until more Abominations are Summoned.
If you are getting killed while trying to use Collapse Grenade and The Ancient Way, the Reckless Lunge Technique can be triggered with a running attack for extra damage reduction before you drop your shield. The Abominations will throw rocks at you as you fly through the air, so you'll need to move quickly to avoid them.
An alternative strategy using a ranged weapon that can stagger, like the Perforator, plays around Jalanta's reload timings. You'll still want to thin out the horde with The Ancient Way, but when it's time to DPS the boss you wait for her to fire a third shot and begin her reloading animation. If you shoot Jalanta with the Perforator while she’s reloading, she will stagger after each hit, interrupting the animation and keeping her locked in a reloading state until she becomes immune to CC and can finish the reload.
Tip: Jalanta's drillshots will deal 15% more damage if they penetrate your shield compared to a direct hit. Light armor keeps our Dash Stamina Cost low, but it's only effective if you keep your shield up and watch your stamina level.
Skill Trees
Check out the images below where you can view the full skill trees for every Skill, Passive, and Technique we use. Techniques and Active Skills used in this build should be max level, before prioritising the Key Skills below.


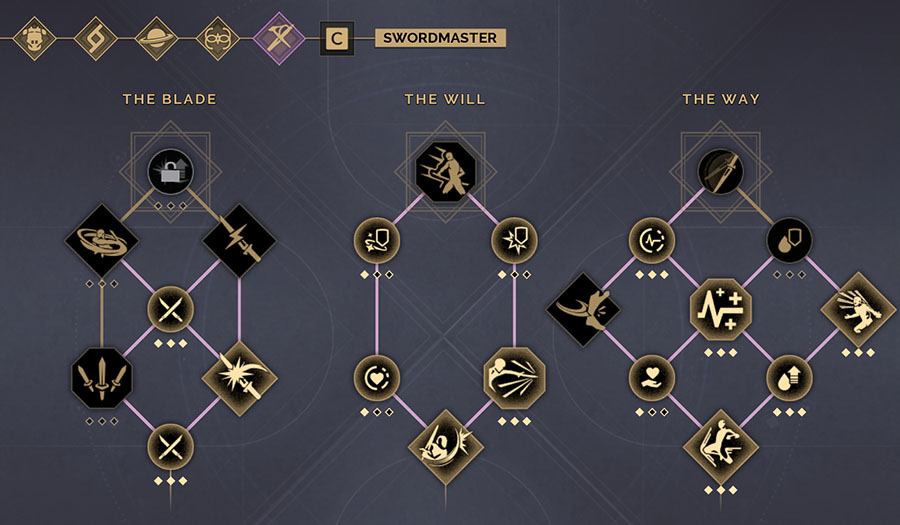
Key Skills
Max any Techniques and Active Skills used first, then prioritise these skills.
- Trooper: Heavy Weapon Damage (Level 3) (The Ancient Way)
- Trooper: Ranged Damage (Level 3)
- Trooper: Scattergun Damage (Level 3) (Shotguns)
- Mentat: Ranged Damage (Level 3)
- Planetologist: Rerouting (Level 3)
- Bene Gesserit: Blade Damage (Level 3)
- Bene Gesserit: Short Blade Damage (Level 3) (Daggers and Dual Blades)
- Bene Gesserit: Vitality (Level 3)
- Bene Gesserit: Voice Training (Level 3)
- Swordmaster: Optimized Hydration (Level 3)
- Swordmaster: General Conditioning (Level 3)
- Swordmaster: Blade Damage (Level 3)
- Swordmaster: Long Blade Damage (Level 3) (Swords and Rapiers)
- Swordmaster: Solid Stance (Level 1)
At least one point in the Solid Stance Skill will stop drillshots from staggering you.