
The Old Quarry is the new Testing Station released alongside “The Water Wars” 1.4 update for Dune Awakening. The Water Wars is a cosmetic DLC, however the new Overland Map locations are being released free for everyone as a part of the 1.4 update.
The Old Quarry is similar to the other Testing Stations released in the Chapter 3 update, offering scalable content that players can complete to earn powerful rewards. The 1.4 update introduces 14 new Augments, 3 new Garments, and 10 Weapons that can all be earned by completing The Old Quarry.
In The Old Quarry Testing Station, players will fight zombie-like Abominations and aggressive enemies that will use new Suspensor Jump tactics. The lock-in rooms offer a decent challenge, although the boss is less mechanically difficult compared to the other Testing Stations.
- Length: ~15 Minutes
- Difficulty: Easy
- Challenge: 2x Lock-in Rooms + Boss
Read on for a simple-to-follow walkthrough of the Testing Station, including the map/layout and a detailed boss guide.
Quick Links
- The Old Quarry Layout
- The Old Quarry Walkthrough
- The Old Quarry Boss Guide (Doctor Jalanta)
- The Old Quarry Loot Table
The Old Quarry Layout
The following image shows the layout of The Old Quarry.
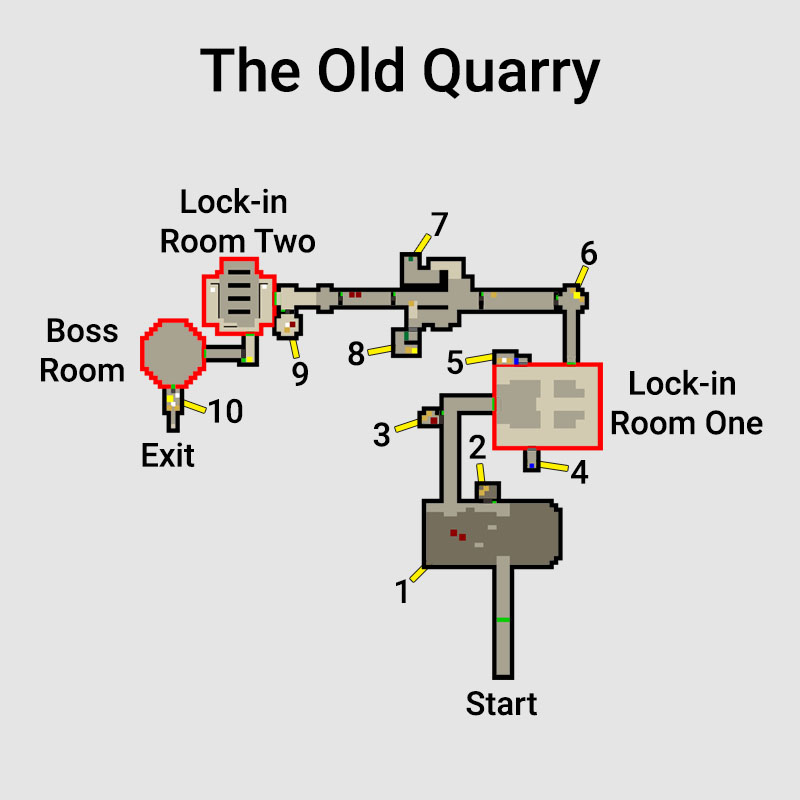
- The pit, with two enemies at the bottom of it. The enemies can be avoided.
- The chute behind a button door. At the bottom are two small chests.
- Two small chests and an enemy behind a button door.
- Blue Identification Band behind a sealed Cutteray door.
- Locked room behind a sealed Cutteray door. Requires a Blue ID band to enter. Contains two small chests and one lore note.
- Cargo container room with one large chest. Two small chests can be found inside cargo containers.
- Green Identification Band.
- Locked room behind a sealed Cutteray door. Requires a Green ID band to enter. Contains one small chest and one large chest.
- Button door room with one enemy, one small chest, and one Doctor Jalanta recording.
- Two small chests, one boss chest, one lore note, one Doctor Jalanta recording.
Lock-in Room Two also contains a Doctor Jalanta recording and one lore note. After leaving the lock-in room, you'll see the third large chest.
There are three large chests with Schematic Patterns on the way to the boss. Two are on your regular path through the dungeon and one requires a short detour to collect. Six enemies can be found outside the lock-in rooms, however you don't need to kill them to progress. The two lock-in rooms start with enemies in them and spawn two more waves of enemies that must be defeated. The pit near the starting location contains two Basalt and Erythrite rocks that can be mined.
The Old Quarry Walkthrough
Preparing For The Old Quarry
Equipment:
- Blade weapon to access the boss room: Dual Blades and Swords are good for the boss fight.
- Full Suspensor Belt to easily access all areas.
- Cutteray for optional rooms.
- For pushing higher difficulties and optimization, consider using a light armor like the Pincushion Set. The boss will require lots of dashing, so light armor is preferred.
Section 1: Up To And Including First Lock-in
Head straight ahead and the area will open up into a large pit with a destroyed walkway and two suspensor platforms. At the bottom of the pit are two enemies.. The enemies can be ignored and we're not here for the ore, so just fly over the gap using your Suspensor Belt.
On the other side there's a door that can be opened, revealing a chute with two small chests at the bottom. Our goal is the main passageway, so we can just continue onwards until we come to the first lock-in room entrance. Opposite the lock-in entrance is another door that can be opened for two more small chests, however these chests are guarded by a regular enemy.
First Lock-in Room
Enemy Composition:
- Start: 2 Ranged + 1 Melee
- Wave 1: 3 Ranged + 1 Melee
- Wave 2: 2 Ranged + 2 Melee + 1 Heavy Gunner

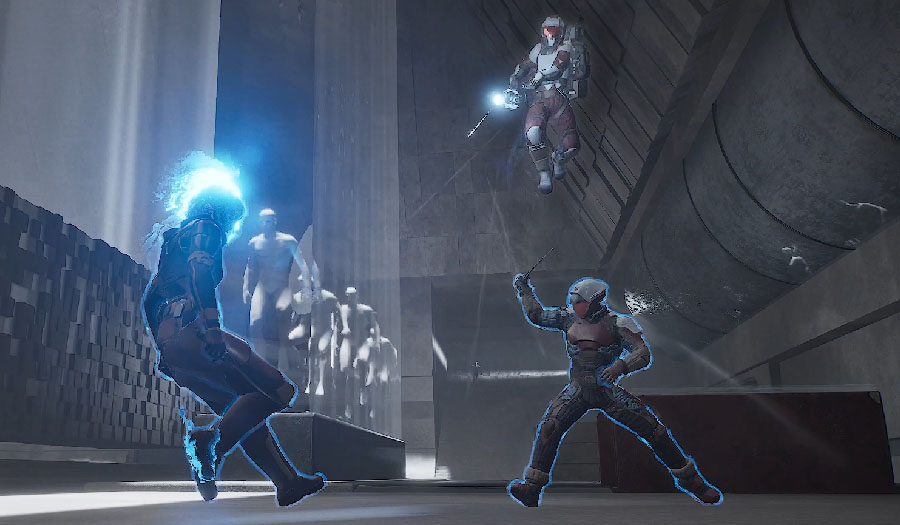
The first lock-in room can catch you off guard if you aren't prepared, because the enemies here use more aggressive tactics. The ranged enemies, including the Heavy Gunner, can Suspensor Jump, traveling in an arc that will fly them over obstacles, allowing them to get past objects used for cover.
Tip: To help avoid getting overwhelmed by the enemy's more aggressive tactics, we recommend staying on the ground floor, close to the north or south side where you can use the walls for cover. If you are upstairs as the enemies spawn, it's much harder to find a safe position.
After the waves are cleared and the lock-in room opens, you can continue on or take a detour and use your Cutteray on the sealed door on the room's south side. After breaking down the door, you can collect an Identification Band which can be used on the opposite side of the room, where you'll find another sealed door that can be opened with the Cutteray. The sealed door on the north side of the room leads to a locked room with two small chests and the lore note "Notice of Evacuation".
Section 2: Up To And Including Second Lock-in
After continuing on through a small hallway, you'll enter a cargo container storage room. The two cargo containers with red-light platforms can be opened with a Cutteray for a small chest. On the ground floor is a large chest that will contain resources and Schematic Patterns (used in crafting Graded gear). A button can be pressed on the ground floor to open a door and continue on. You'll walk through another hallway, at the end of which, on the north side, is a small chest. You can press a button at the end of the hallway to open the door and keep going.
You can keep running straight through the cave-in room or you can detour to the right (northwards), walk up the stairs, and follow the passage to an Identification Band. Backtrack, go down the stairs, and walk across to the south side of the room where you'll find another passage that leads to a sealed door you can open with a Cutteray. Behind the sealed door is a locked room you can access with the ID Band you just found, rewarding you with a small chest and large chest (with more Schematic Patterns). Backtrack and leave through the door you cut down. Use your Suspensor Belt to jump up to the platform ahead of you, where you'll find another small chest. After grabbing the chest, face westwards and you'll see another door you can open.
After you open the door at the end of the cave-in room, a voiceover from Doctor Jalanta begins. As you continue through the large fan, two enemies will attack you. You aren't required to kill them to progress, but they will harass you if they're not dealt with. Press the door button and continue onwards, travelling up the stairs towards the next lock-in room. Before entering the lock-in room, you can detour left (south) and open the door where you'll find an enemy, along with a small chest and a recording of Doctor Jalanta. Enter the second lock-in room.
Second Lock-in Room
Enemy Composition:
- Start: 1 Ranged + 1 Melee + 2 Abominations
- Wave 1: 2 Ranged + 1 Melee + 4 Abominations
- Wave 2: 1 Ranged + 1 Melee + 1 Heavy Gunner + 7 Abominations
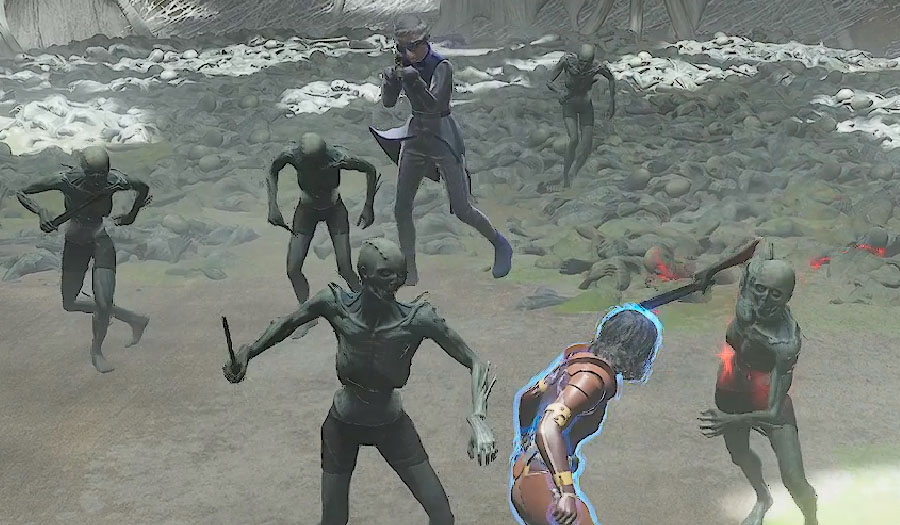
Here is where you'll encounter the zombie-like creatures known as Abominations. They are slow moving and fairly easy to avoid, so focus on the other threats in the room before dealing with them. The Abominations have a melee attack, but they'll also occasionally throw rocks at you, an attack they use fairly often when you're airborne. In this lock-in room, it's safer to stay near walls that you can use for cover, because the ranged enemies here can still Suspensor Jump. The upstairs rooms are good for breaking line of sight and funneling enemies up stairs.
After clearing the lock-in room, you can continue on to the boss, or you can detour for lore. If you backtrack to the entrance room of the lock-in, the desk on the north side has the lore note "Progress Report: Subject 218". On the opposite (west) side of the lock-in, upstairs, you will find another room with two bodies. The body table on the north side of the room has another recording of Doctor Jalanta.
Continue through the lock-in room exit on the ground floor and walk down the hall to the large chest (the third large chest with Schematic Patterns). Next to the chest is a button which will open a passageway that leads to the boss room. Cut open the sealed door with a bladed weapon, run to the end of the hall, and activate the boss encounter.
The Old Quarry Boss Guide (Doctor Jalanta)
Overview
Let's run through the basics of the fight.
Abominations
At the start of the fight, Doctor Jalanta has four Abominations that will fight for her. She will routinely Summon more throughout the fight and use her abilities to Inspire or Consume them. The Abominations become much faster and more aggressive when Inspired. You can tell they are Inspired because they'll have a red effect on them. Abominations will usually melee attack you, but they will also occasionally throw rocks which will stagger and damage you.
Note: If you try to float around the boss arena on a Suspensor Belt, the Abominations will frequently throw rocks at you that bring you back down to the ground.
Doctor Jalanta's Drillshot Weapon
Doctor Jalanta uses a drillshot rifle that can fire three times before she needs to reload. As with all other drillshots, dash to avoid taking damage if you are hit. Our testing showed that a drillshot fired by Doctor Jalanta that burrows through your shield will deal almost 15% more damage than a dillshot that hits you unshielded. Actions that lower your shield, like firing a gun, will cause a drillshot to immediately penetrate and damage you.
Doctor Jalanta's Abilities
Doctor Jalanta can Suspensor Jump, like the enemies you encountered earlier in the Old Quarry, and she can do a melee shove attack. She has three special abilities which will become more powerful as the fight progresses, as follows:
Ability 1: Consume
Doctor Jalanta raises a hand into the air, emitting a yellow light. At least one Abomination will be marked with a yellow and black effect that causes them to run towards Jalanta. The marked Abominations will kneel before Jalanta and she will consume them one at a time, restoring her health with each Abomination consumed. While consuming Abominations, Jalanta cannot be staggered and the only way to interrupt this ability is to kill the Abominations before they are consumed. Abominations consumed by Jalanta are killed.
Ability 2: Inspire
Jalanta will shout, emitting a red effect that buffs at least one of the Abominations. Any Abominations buffed by Jalanta are marked with a red effect that makes them faster and more aggressive. This buff has an unlimited duration. Despite its similarity to the player's Inspiration ability, Jalanta's Inspire does not increase the affected Abomination's damage.
Ability 3: Summon
Jalanta will Summon at least one Abomination from the ground in the boss arena. She uses this ability about once per minute, usually after a Phase transition. Jalanta can continue summoning Abominations up to a maximum of 17.
Doctor Jalanta Boss Fight: Phases
Doctor Jalanta's health bar has three segments and after reaching the next health segment, the fight will progress to the next phase.
Phase 1
- Summon: Summons up to 6 Abominations to join the fight.
- Consume: Calls over 1 Abomination that she consumes for healing.
- Inspire: Inspires 1 Abomination, increasing its speed and aggression permanently.
Phase 2
- Summon: Summons up to 8 Abominations to join the fight.
- Consume: Calls over 2 Abominations that she consumes for healing.
- Inspire: Inspires 3 Abominations, increasing their speed and aggression permanently.
Phase 3
- Summon: Summons up to 10 Abominations to join the fight.
- Consume: Calls over 3 Abominations that she consumes for healing.
- Inspire: Inspires 5 Abominations, increasing their speed and aggression permanently.
Death
When the boss dies, all the remaining Abominations will become Inspired, gaining increased speed and aggression.
Boss Strategy
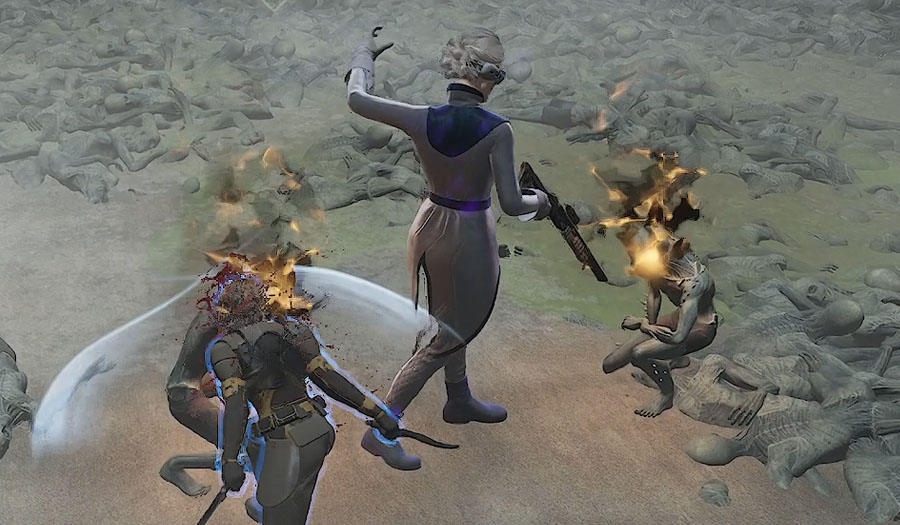
Melee weapons with sweeping attacks will be the most useful for dealing with the Abominations in this boss fight. This means dual blades like the Burning Blades and swords like the Replica Pulse-sword will get a lot of value. If you're not worried about taking shots from the boss, then area effect weapons like The Ancient Way can be great for thinning out the horde of Abominations.
If you have good damage, then you can kill all the Abominations in the room before targeting Doctor Jalanta. If you are struggling to make progress against the boss's healing, try to position yourself so that your melee attacks will hit Jalanta and the Abominations at the same time. This way you'll always be chipping away at her health bar, while thinning out the horde at the same time.
The Abominations aren't very strong fighters, but they can be quite the nuisance if you allow the Inspired Abomination (marked by a red effect) count to build up. Try to prioritise the Inspired Abominations, because they'll be the most aggressive and likely to interrupt your attacks.
If you lack the damage to quickly kill the Abominations during Jalanta's Consume ability, try to find a spot next to her that will allow your swings to hit her and the kneeling Abominations at the same time. Alternatively, you could take out a strong burst weapon, like the Perforator, while she's locked in the Consume animation and get some shots off.
Tip: Keep an eye on your stamina during this fight and try to keep it above a third at all times. Light armor is recommended, because you'll be dashing a lot to remove drillshots from your shield.
The Old Quarry Loot Table
Congratulations on beating The Old Quarry! The new items released in update 1.4 can all be found in the chest at the end of this Testing Station. For a full breakdown, check out The Old Quarry information page.
The room after the boss contains the Testing Station's reward chest, a recording from Doctor Jalanta, and the lore note "From the Journal of Dr. Jalanta".