Raid Setup


Introduction
Welcome to our Mythic Vashnik the Malignant guide, a boss fight in The Venomous Abyss Raid in Midnight Season 2. This guide covers the fight mechanics and the strategy we recommend to defeat this boss on Mythic difficulty.
Fight Style: Single Target with add control, cheese strat (one section).
Recommended Setup: 2x Tank / 4-5x Healers / 14-15 DPS. A 5th healer is worth it, there's no DPS enrage.
Required Utilities: Banish (Warlock) and Grips for the fire adds, dispels, accurate Plague Froth aiming.
Hero/Lust Usage: On Pull.
Easy Mode
- Vashnik looks scary from Heroic but a cheese strat makes it one of the easiest Mythic bosses, as long as your raid can aim the waves.
- The whole fight happens in one section, between the fire and shadow fountains. You always take the ramping damage, as it's low enough to sustain.
- Fire fountain now has 3 fire adds (Burning Venom). Banish one, grip the other two to the middle, grip one to the boss, kill them one at a time.
- Soak every Catalytic Bile, dispel the fire debuff one by one when the raid is stable, same as Heroic.
- Mythic addition: Malignant Totems spawn randomly across your half of the room. Clear them with Plague Froth waves, you get 2 sets of waves per cycle.
- Uncleared totems get popped by the next Imbibe: 1 totem is livable, 2 is almost always a wipe.
- Consider 5 healers, there's no DPS enrage to race against.
Mechanics

On Mythic, Imbibe additionally conjures Malignant Totems from the venomous fountains each time it's cast, on top of everything it already does on Heroic.

Totems that spawn completely at random across the played half of the room. They cannot be attacked or interacted with directly, the only way to remove one is to hit it with a Plague Froth wave.

The totem's payload. If a totem is left uncleared when the next Imbibe goes off, it fires Malignance, a heavy raid-wide Nature hit plus a stacking 60 second DoT. One going off is survivable, two stacking is a wipe.
Strategy
Vashnik is one of those fights that looked challenging based on the Heroic experience, but thanks to a cheese strat it's one of the easiest Mythic bosses in the raid, provided your raid is capable of aiming the waves.
The Setup
The entire fight happens in one section, right where you pull the boss, between the fire and shadow fountains. You'll always trigger this effect, and the ramping damage is low enough that you can just sustain it the whole fight. Practically, that means:
- Tank the boss next to the shadow fountain
- Soak every Catalytic Bile
- Hit all Totems with Plague Froth waves
- Dodge the waves
- Kill the Shadow Adds (Shrouded Venom)
- Dodge the pools
- Kill the Fire Adds (Burning Venom)
- Heal through Imbibe
The Fire Fountain
On Mythic you get 3 fire adds (Burning Venom) instead of the 2 from Heroic.
- Banish one and kill it last.
- Grip the other two to the middle.
- Grip one of those to the boss.
- Kill them one by one, never at the same time.
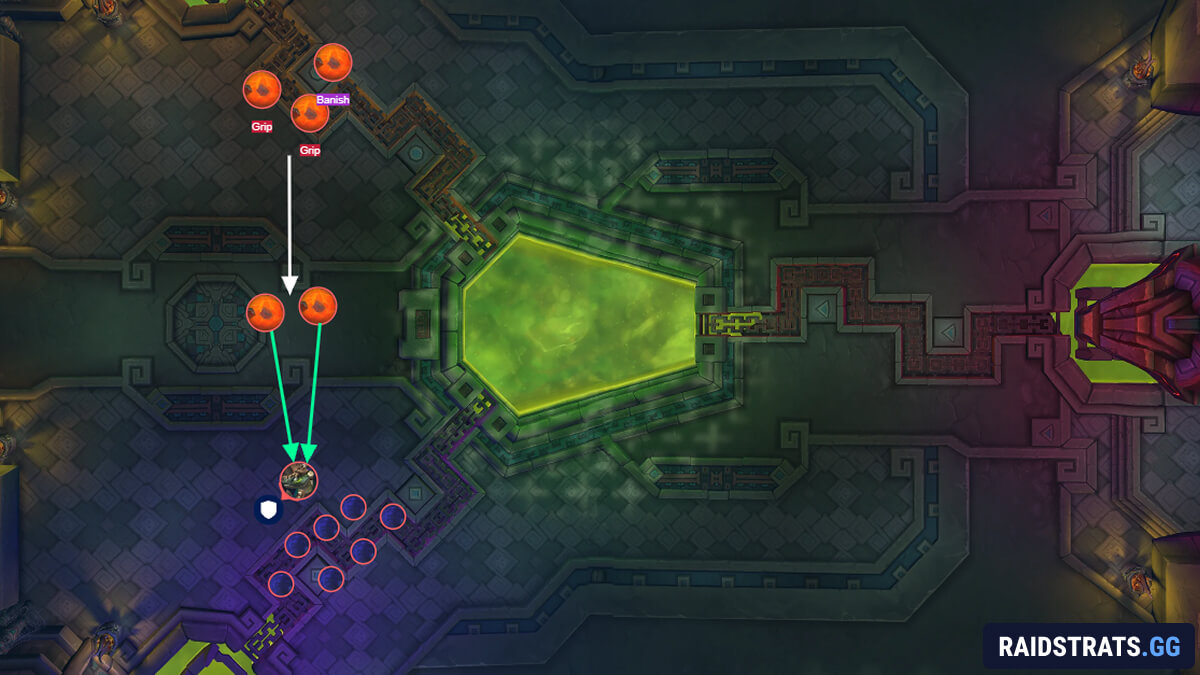
Beyond that, spread to soak every Catalytic Bile exactly like Heroic, and have healers dispel the fire debuff one at a time, whenever the raid is stable. Because there's effectively no DPS enrage, you might want to run this as a 5-heal setup for extra safety.
The Totems
The Totems are the only real Mythic change.
Shortly after the pull, your half of the room gets covered in Malignant Totems. They spawn completely at random, and you cannot attack or interact with them. The only way to remove them is to hit them with Plague Froth waves, and you always get 2 sets of waves to clear them all.
If you don't clear them in time, the next Imbibe pops the remaining totems, giving you a heavy stacking DoT for a minute. One totem going off is livable, two is almost certainly a wipe.
The Totem Clearing Routine
Place world markers as shown in the picture below.
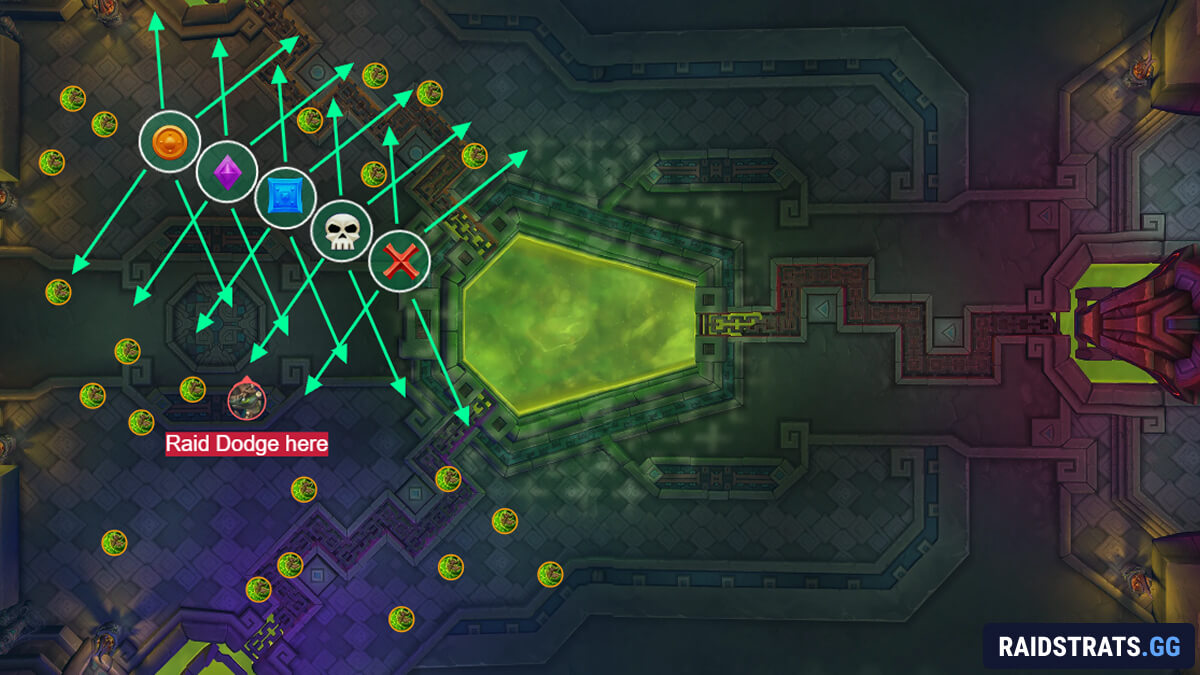
On the first Plague Froth cast after the totems spawn, everyone who gets it moves to one of the markers. This shoots out very structured lines of waves in several directions.
Depending on spawn RNG, that first set either clears most of the totems or not many, so you use the 2nd set to mop up the rest.
The 2nd set needs no markers, just on-the-fly comms about who goes where. Players with a good overview can position so one wave clears totems on multiple sides at once. A totem glows white when a wave is pointing at it, so use that to confirm your aim.
This is the most important mechanic of the fight, so players need to get confident with this as quickly as possible to avoid wipes.
Heal Through Imbibe and Repeat
Once the totems are handled, everyone stacks in melee for the healing cooldowns that carry you through the Imbibe cast, and you repeat the whole process until the boss is dead.
That's really all there is to it. The one thing that matters is being persistent about clearing totems. Your raid needs to understand that this is the entire fight, and not get lazy about moving.