Up to 84% Off VPN


Raid Setup


Introduction
Welcome to our Heroic Guide for the The Coiled Altar boss fight, the seventh boss of the Venomous Abyss raid in Midnight Season 2. This guide covers the fight mechanics and the strategy we recommend to defeat this boss on Heroic difficulty!
Zul'jan is what you get when one angry troll survives a war, drinks the wrong fountain, and comes back strapped with two axes and zero chill. He's the muscle. Big, loud, throws sharp things at you until something dies.
Then his dead buddy Malacrass shows up, and it turns out this whole time he was the brains of the operation, waiting in the shadows for Zul'jan to soften you up so he could steal the kill and the throne. To draw first blood you have to put Zul'jan down, and the second you do, Malacrass comes out of the jungle to finish what his partner started. Nothing is over. Don't fall off the edge.
Fight Style: Single Target (P1) into Two Target (P3), 3 phases plus a damage-amp intermission
Recommended Setup: 2x Tank / 5x Healer / 13x DPS (6 healers at larger raid sizes)
Required utilities: Poison dispels, interrupts, big raid cooldowns for the phase pushes (AMZ, Darkness, Spirit Link)
Hero/Lust usage: The Soulbinding intermission after Phase 2
Method Boss Review
This is a strong penultimate boss carried by two genuinely good phases. Phase 1 is a clean, readable opener with its orb-carrying-and-clearing loop, and Phase 2 is the standout, with the Spiritcackle chase, the Weeping Angel ghosts, and the fragment-blocking intermission all bring something distinct to the table. And as always, a damage-amp window where you get to unload Hero into a helpless boss is just plain fun.
Where it loses a star is Phase 3. After two phases with real identity, the finale reaches for the oldest trick in the book: here are both phases at the same time, enjoy. It's not bad, layering everything at once does create a satisfying wall of pressure, but it's the one part of the fight that feels assembled rather than designed. A unique Phase 3 mechanic or two, instead of a straight remix, would have pushed this into top-tier territory. As it stands, it's a very good fight with a slightly safe ending.
Method Boss Rating: (4/5)
Easy Mode
General:
- 3 phases plus a damage-amp intermission.
- Stay stacked behind the boss all fight.
- Comp: 2 tanks, 13 DPS, 5 healers (6 at larger sizes).
- Hero on the intermission.
Phase 1 (Zul'jan):
- Orb carriers pick up Coalesced Venom and pile it in the middle. The Sever tank clears the pile. Don't micro-manage the Venom Rupture stacks, just clear every orb. Tanks swap each Sever.
- Dodge Axegrinder axes, poison-dispel Venomfang, soak Guillotine with 5+ (two alternating groups, gate out after).
- On push, Zul'jan pops all remaining orbs. Have a raid cooldown ready (AMZ / Darkness / Spirit Link).
Phase 2 (Malacrass):
- Dreadmarch MCs players to the edge, AoE them free. Freed players spawn Manifestation ghosts, face them to freeze them and park them in the middle.
- Move boss + raid to the Spiritcackle add, kick Wail Of Terror late (every kick blinks it), kill before 100 energy.
- Tank clears parked ghosts with Soul Sever. Spread out with Gloombomb, then collect your Soul Fragments in 15s or die.
- Break the Eternal Nightfall shield to interrupt it. Push after a Soul Sever, before the next Dreadmarch. 0% knocks you back, so stand towards the middle.
Intermission (Soulbinding):
- Zul'jan takes 100% more damage, Malacrass is immune. Hero/Lust and blast Zul'jan.
- Intercept Fragment of Malacrass orbs to stop his heal, but each block hits the raid with Spirit Erasure, so delay soaks if the raid is low.
Phase 3 (both, fused):
- Both active. Keep them together for cleave, kill them evenly, or Soulbound berserks the survivor.
- Set up like P1 (orbs in the middle), then survive the layered kit: Grim Guillotine, Gloombomb, Eternal Nightfall, Dreadmarch, Defilement Of The Coiled Altar (heavy raid hit).
- After the opening setup, ignore the orbs and just kill both bosses evenly while surviving. Damage intake is very high, use everything.
Mechanics

Zul'jan channels the altar for a raid-wide Nature hit over 8 seconds and stacks up Twinfang Toxin, which his melee then consumes to spike the tank on his next few swings.
The altar mouths also spew Noxious Ground puddles underneath them, so move off the bad floor and be ready for the tank spike after the channel.

The core Phase 1 mechanic.
The crucible spits venom that leaves Coalesced Venom globules around the room, each pulsing raid-wide Nature damage until it's gone, so they have to be cleared.
Mobile players pick a globule up by stepping on it, which sticks Volatile Venom on them (ticking nearby players for 5 seconds before dropping a fresh globule where it expires), letting them move venom into one pile.
The tank then clears the pile with Sever, but each globule destroyed hits the raid with a Venom Rupture. That rupture is a stacking DoT, clear only as much as the healers can cover.

Zul'jan's tank frontal.
A big Physical cone that stacks 200% increased Sever damage taken for 45 seconds, and it doubles as your venom-clearing tool.
Point it through the globule pile, and tank swap on the stacks.

Zul'jan throws his axe at a player, splitting huge armor-ignoring damage among everyone within 9 yards, so you need at least 5 soakers or the raid eats a deadly Execution instead.
Soakers get a 500% increased Guillotine taken debuff, and afterward the axe erupts: Widow's Kiss hits everyone within 50 yards, and Widow's Touch hits anyone beyond 50 yards.

A poison axe thrown between several players, ticking Nature damage for 14 seconds. Dispel it.


Malacrass possesses several players with an absorb shield and marches them toward the edge to jump off. Break the shield before they get there, and when it breaks, Manifestations of Dread spawn from that player.
Each ghost fixates on someone through Unnerving Fixation, creeping toward them whenever they're not looking at it and freezing when faced by the player (classic Weeping Angel). If it reaches its target it re-applies Dreadmarch.
Fixated players need to kite the ghost to a stack point, then face it to keep it in place, which lets the tank delete it with Soul Sever.

Malacrass's tank frontal. A Shadow cone that stacks 200% increased Soul Sever taken, applies a DoT, clears the kited ghosts, and hits players with Gravebound.
Gravebound fractures your soul into Soul Fragments on the ground, and you must step on them to reclaim your soul before the debuff expires, or you die outright.
Tank swap on the stacks.

The raid-ending cast.
Malacrass shields in a Veil Of Twilight and channels a massive raid-wide Shadow hit plus a DoT.
Break the shield to interrupt it, but while the Veil is up it pumps stacking Suffocating Darkness (a healing absorb) onto the raid, so this is a hard burn-the-shield check, not something you heal through.

Marks several players who explode after 5 seconds, hitting anyone within 15 yards and applying Gravebound.
Spread out, blow up away from the group, then collect your fragments.

Adds that cast Wail Of Terror, an interruptible raid-wide 5 second fear you must kick, while passively chipping the raid with Retaliatory Malice.
At 100 energy they go interrupt-immune via Consumed By Resentment, so that's your deadline to kill them.

Dread Bolt is single-target filler on his primary target, and Dreadful Presence is constant raid-wide Shadow damage all stage. Just healer pressure.

Malacrass channels the ritual, giving Zul'jan Ghastly Regeneration: he heals 2% max health per second for 35 seconds but takes 100% increased damage the whole time.
This is your Hero/Lust window, blast Zul'jan and race his self-heal.
Malacrass himself is untouchable here, sitting behind Deathguard at 99% reduced damage.

During the ritual, fragments rupture from Zul'jan and try to race back to him.
Each one that reaches him heals him for 3% via Reclaim Essence, so you block them by standing in their path. Blocking one triggers Spirit Erasure, a raid-wide hit plus a stacking 20% increased Spirit Erasure damage taken for 2 seconds, so you must block them but can't soak the whole wave at once.
Spread and stagger the blocking of the fragments.

The bosses are linked. Kill one and the other berserks with 100% more attack speed and damage, so they die together like a council.
Save your big cooldowns for this final push.

The Stage Three version of Fangs.
Zul'jan drops a raid-wide healing-absorb barrier and gains Corrupted Toxin (his melee now stacks a Shadow DoT instead of bursting, so tanks swap to shed stacks), while the altar spews Defiled Ground that absorbs your healing if you stand in it.

The Shadow Guillotine. Same 5-soaker rule as in Phase 1 (or a deadly Grim Execution), but the soak debuff also applies a healing absorb, and the eruption is Death's Embrace (within 50 yards) and Death's Whisper (beyond 50 yards).
Same spacing band as Phase 1.

The Stage Three tank frontal, and your combined clear tool.
A Shadow cone that stacks damage taken, applies Gravebound, and destroys both Coalesced Venom and Manifestations of Dread.
Tank swap on stacks.
Strategy
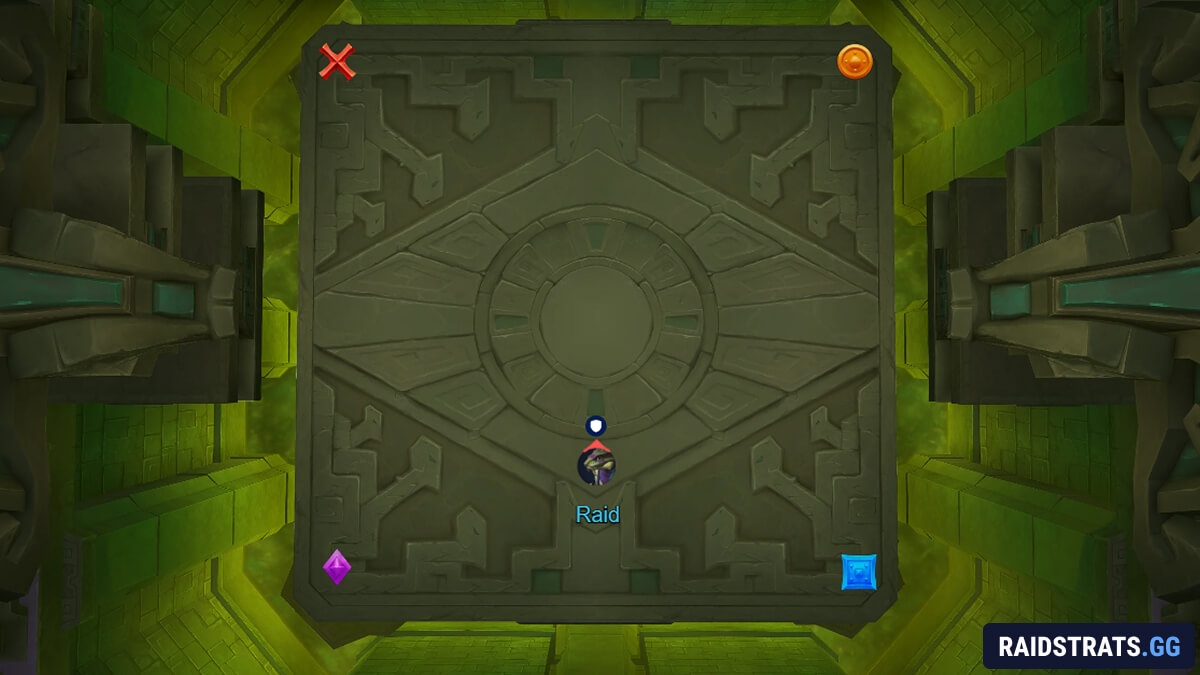
One rule spans the whole fight: stay stacked behind the boss.
You'll set your markers once and keep returning to that formation every phase, so get used to it early.
Phase 1: Serpent's Bargain
You fight Zul'jan in roughly one spot.
The phase runs on the Toxic Deluge loop: green Coalesced Venom orbs spawn around the room, your orb carriers pick them up and drop them in a pile in the middle, and the Sever tank clears the pile by aiming the cone through it.
Don't stack with anyone while carrying an orb, it pulses damage, and it auto-drops after 5 seconds anyway.
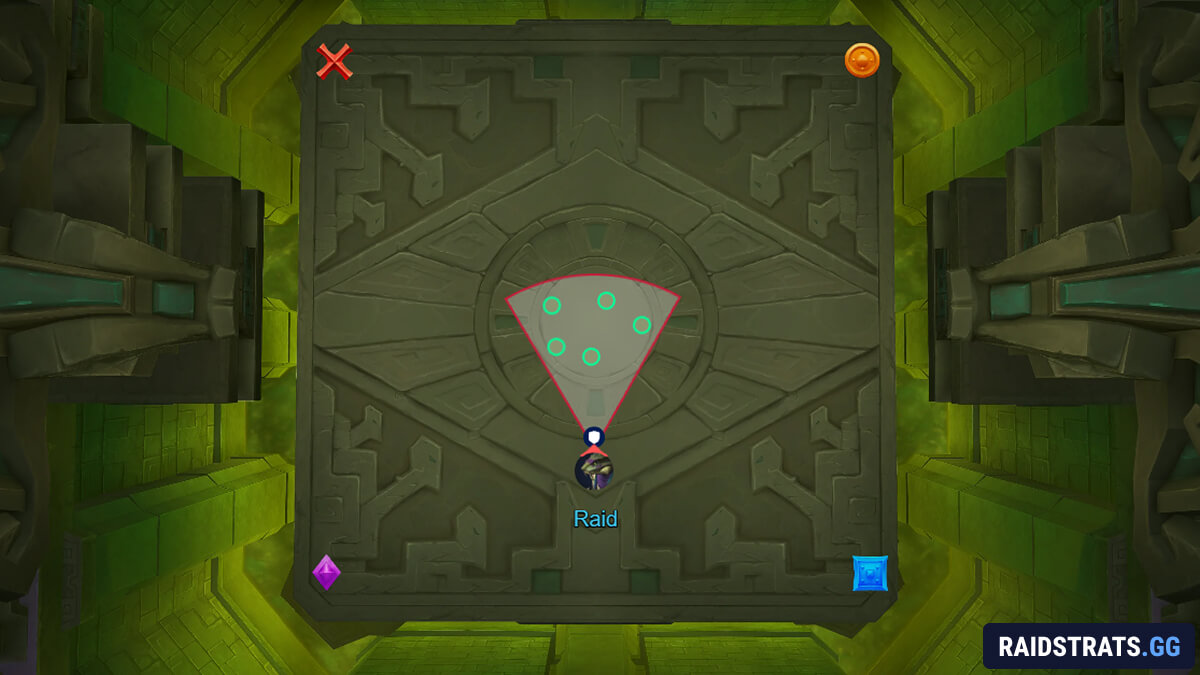
Clearing orbs gives the raid Venom Rupture stacks for 10 seconds. Don't micromanage these, the correct play is just to always clear every available orb, and swap tanks on each Sever cast.
Everything else here is simple: dodge the spinning Axegrinder axes, poison-dispel Venomfang, and soak Guillotine with at least 5 players.
For Guillotine, split the raid into two big soak groups and alternate. The target goes to the purple corner marker with their group, and everyone gates out the moment it lands, since it leaves a zone behind.
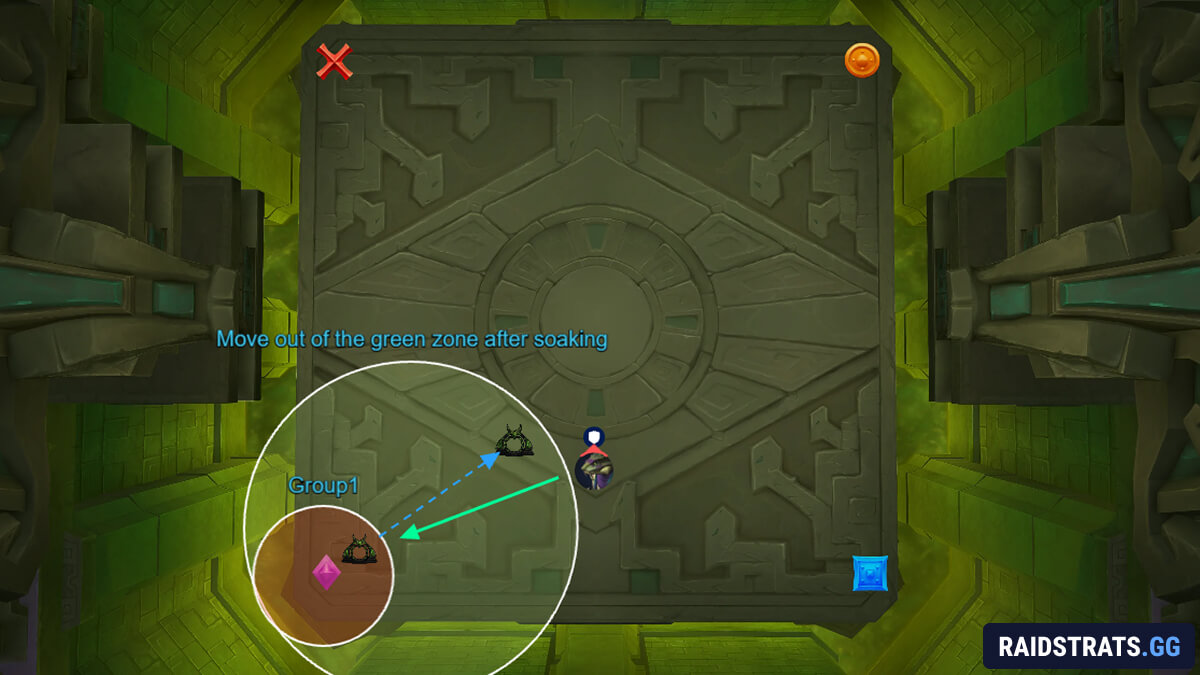
Pushing the phase: when Zul'jan hits 0%, he detonates every remaining Coalesced Venom orb at once, dumping Venom Rupture stacks on the raid proportional to how messy you were.
Have a big raid cooldown ready for the push, AMZ, Darkness or Spirit Link, and it's a non-issue.
Phase 2: Usurper's Reprisal
Malacrass joins and the fight gets busier. Stay stacked.
The phase opens with Dreadmarch, mind-controlling several players toward the edge, AoE them free immediately and grip back anyone who gets close to the edge.
Freed players spawn Manifestation of Dread ghosts that creep toward whoever they fixate unless that person faces them.
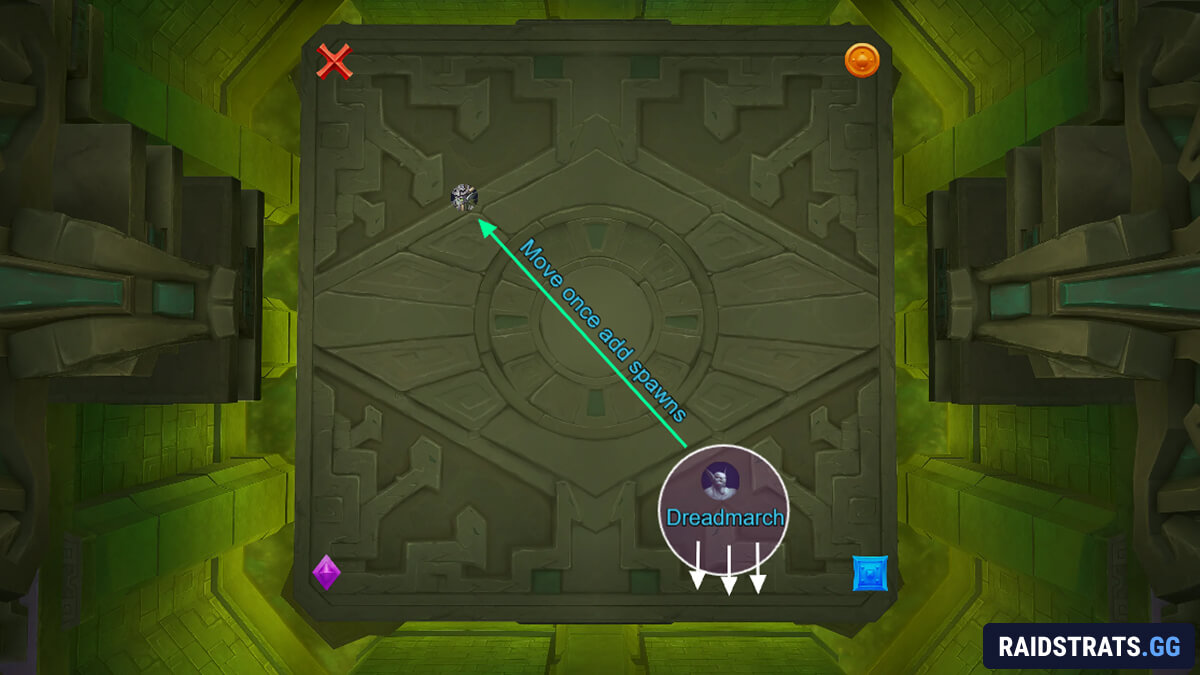
The core movement of this phase is a two-part job happening at once:
Malacrass spawns a Spiritcackle add on the far side of the room. Move the boss and the whole raid to it and interrupt its Wail Of Terror, but wait until the cast is nearly done to kick, because every interrupt blinks the add slightly. If it reaches 100 energy it goes interrupt-immune and fears your entire raid.
As you walk to the add, the fixated players drag their ghosts along and park them in the middle, then face them to hold them there. The tank's Soul Sever frontal then wipes the parked ghosts.
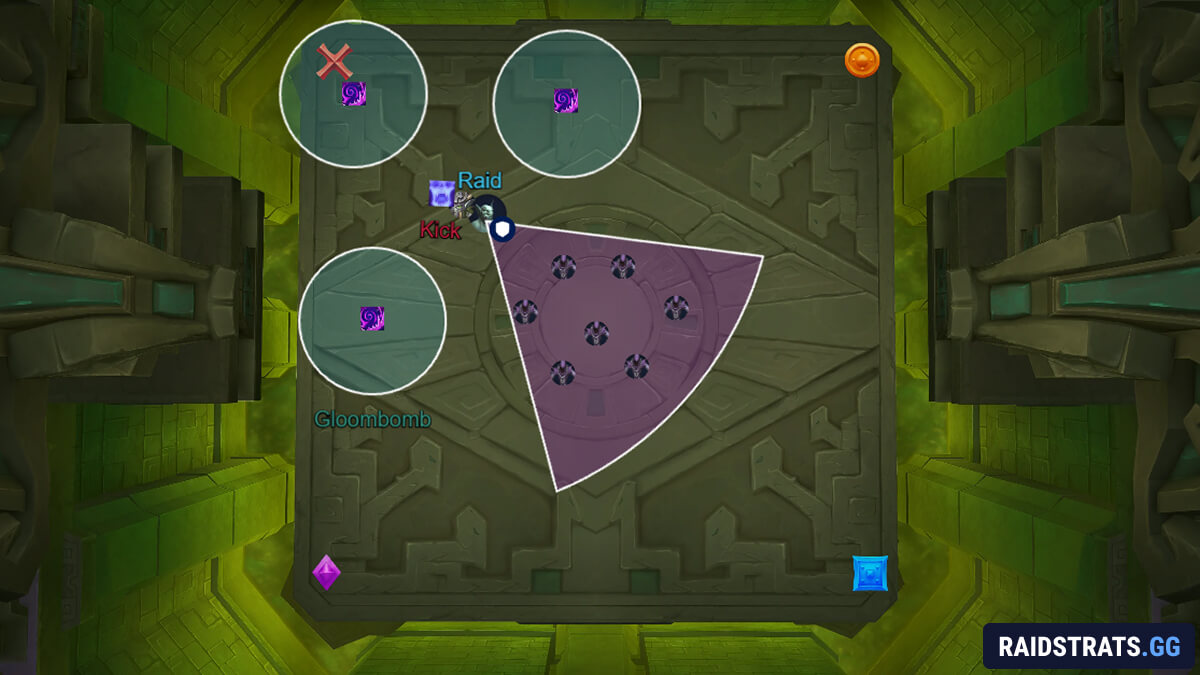
On top of that, three players get Gloombomb. Move out so nobody else is clipped, and after it detonates, collect your scattered Soul Fragments before they expire in 15 seconds or you die.
Malacrass then casts Eternal Nightfall, shielding himself while pumping raid damage and dropping puddles. Break the shield to interrupt it.
Pushing the phase: get a Soul Sever off to clear the remaining ghosts, then push before the next Dreadmarch goes out. At 0%, everyone is knocked back from the boss, so stand toward the middle so nobody flies off.
Intermission: The Claimed Vessel
Malacrass binds his soul to Zul'jan with Soulbinding and starts healing him. Zul'jan takes 100% increased damage during this while Malacrass is immune, so this is your Hero/Lust window, blast Zul'jan with everything and race his self-heal.
Meanwhile, Fragment of Malacrass orbs drift toward Zul'jan, each healing him 3% if it connects.
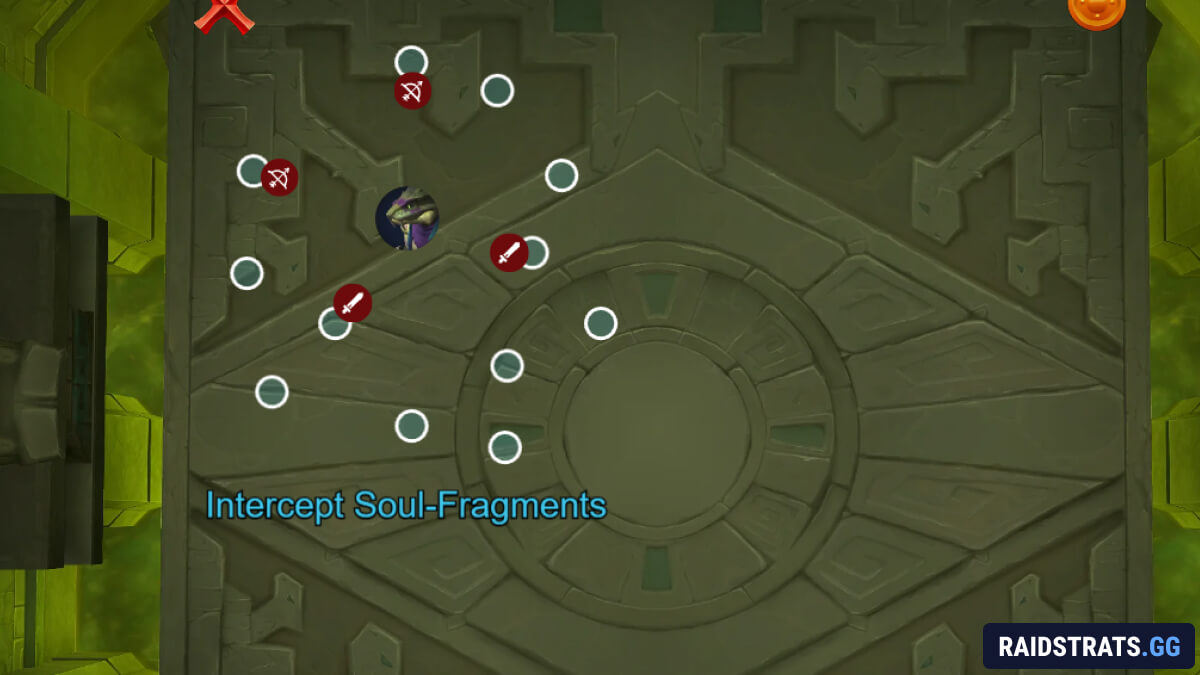
Intercept them by standing in their path, but every intercept hits the raid with stacking Spirit Erasure damage.
So watch your raid frames: block them to stop the healing, but if the raid dips too low, delay a soak or two to let healers recover. It's a balance between his heal and your health bars.
Phase 3: Coiled Union
Both bosses are active and fused, and Phase 3 is a combination of Phase 1 and Phase 2 stacked on top of each other. Keep Zul'jan and Malacrass together for cleave and make sure they die around the same time, since Soulbound makes the survivor berserk if one dies first.
Open exactly like Phase 1: stack behind the boss, orb carriers place orbs in the middle. Then the mechanics start layering in:
- Grim Guillotine, same as Phase 1 but the soak also applies a healing absorb. First soak group to the corner.
- Gloombomb on three players, same as Phase 2.
- Eternal Nightfall, same as Phase 2, break the shield and dodge puddles.
- Dreadmarch, stay stacked, free the players, and move the raid to the opposite side. Fixated players park their ghosts in the middle, non-fixated players grab orbs and drop them in the middle too.
- Defilement Of The Coiled Altar from Zul'jan hits hard, so have healer cooldowns ready for it.
Here's the key Phase 3 call: once you've done the opening setup and reach the first Defilement Of The Coiled Altar cast, you can start ignoring the orbs entirely.
From that point the plan simplifies to killing both bosses evenly while surviving the recurring Gloombomb, Dreadmarches and Defilements.
Damage intake is very high, so throw every personal and raid cooldown at staying alive, and race them both down together.