
Raid Setup


Introduction
Welcome to our Mythic The Twin Fangs guide, a later boss fight in The Venomous Abyss Raid in Midnight Season 2. This guide covers the fight mechanics and the strategy we recommend to defeat this boss on Mythic difficulty.
Fight Style: Mostly Two-Target / Resource management.
Recommended Setup: 2x Tank / 4x Healer / 14x DPS. Prot Paladins (ideally two) make the kick assignments much easier.
Required Utilities: AoE Crowd Control (Shockwave, Howl of Terror and similar) and lots of interrupts.
Hero/Lust usage: On Pull.
Easy Mode
- A big step up from Heroic. Both DPS and healing need to be on point.
- Eternal Venom is the core of the fight. At 10 stacks you die, and when you die you drop 3 Caustic Globule, which usually chain into a wipe.
- Caustic Globule are now protected by Barbed Bulwark. Break it with any CC (Shockwave, Howl of Terror, etc.), so spec into it.
- Stack plan: 10 globules per set, 10 players take one each, the other 10 take the next set. 6 sets total means everyone should sit around 6 stacks before enrage.
- The Raid Leader calls out who is banned from another stack and who must take one, to keep everyone balanced.
- Kill the 3 Venomous Emergence snakes fast, every spit is another stack on the raid.
- Rouse The Brood spawns 10 Broodlings at random spots on the sides. Kick every Visceral Burst, this is the main wipe mechanic.
- Ravenous Feast needs alternating groups: Right side, then Left side, then Melee. Melee avoid the knockback to soak Tainted Blood.
- DPS Plan: Get Vexhul to 40% while cleaving Ithraz, then swap to Ithraz full time. If you're close to the last Submerge, kill Vexhul first for extra enrage time.
Mechanics

Works like Heroic, 10 stacks still kills you.
On Mythic, dying to it also drops 3 Caustic Globule on the ground, and those can easily chain into more stacks and more deaths.

Ithraz channels a torrent of blood into his target for 5 seconds, stacking a large healing absorb every second. The spilled blood coalesces around each Caustic Globule and forms a Barbed Bulwark.

Protects each Caustic Globule, dealing Shadow damage and knocking back anyone who tries to pick it up while it's active. CC removes it, so AoE stuns and fears are the cleanest way to open the globules for soaking.

Ithraz thrashes, hitting the raid with a blood nova and summoning several Broodlings of Ithraz from the depths.

Each Broodling casts this, hitting the whole raid hard and applying a stacking DoT. Interrupting it sends the Broodling back into the water. One getting through can be survivable, more than one usually isn't.

Same 3 hit combo as Heroic, but now every strike needs at least 4 players or the whole raid takes the full hit. Feasted still makes the same players unable to soak twice, so you need three separate groups.
Use this to knock players towards their assigned Tainted Blood soak.
Ravenous Feast now leaves several blood founts for up to 8 seconds. Each one absorbs healing from players within 5 yards, and it has to be fully absorbed before it expires.

If a Tainted Blood fount isn't fully absorbed in time, it explodes for heavy raid-wide Shadow damage.
Strategy
Twin Fangs is a big step up from Heroic, and your DPS and healing numbers both need to be on point to kill it.
Before the pull, split the raid as shown in the picture: Left, Right and Melee.
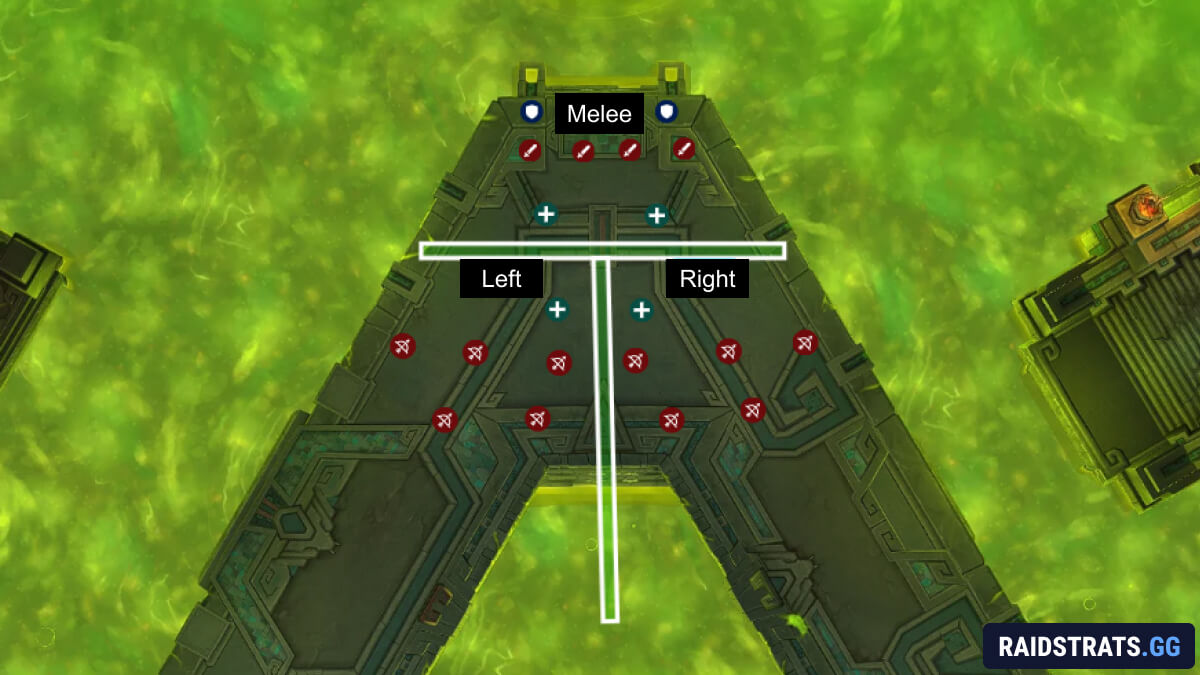
This will help with Caustic Globule soaks, naturally split the raid for Ravenous Feast, and also make it easier for kick assignments.
Eternal Venom Management
Eternal Venom is the core mechanic of the fight. At 10 stacks you die and drop 3 Caustic Globule on the ground, which often starts a chain reaction and ends the pull. Just like on Heroic, anything green that hits you gives you a stack, and Venomous Emergence gives everyone one guaranteed. Killing the snakes matters much more now, since the longer they live, the more they spit and the more stacks go around.
As soon as you pull, you'll notice the globules are protected by Barbed Bulwark, which stops anyone from picking them up. Any form of CC removes it, so make sure to spec into it. Shockwave and Howl of Terror are great AoE options, but anything that works is fine.
The stack management plan itself is simple:
- Each set has 10 globules. 10 players take one each.
- On the next set, the other 10 players take them.
- There are 2 sets before each Submerge and 3 Submerges before enrage, so 6 sets total.
- Done cleanly, everyone should be at about 6 stacks right before enrage, plus a few random ones from snake spits.
That's the ideal case. Because of how the globules spawn, some players will be forced to take extra stacks to stop a globule from exploding, since that gives the entire raid a stack.
The main rule is to have your raid leader call out who is banned from taking another stack next set, and who must take one because they're lower than everyone else. That's how you keep the raid balanced. The NSRT addon is great for a stack overview.
Rouse the Brood (Interrupts)
The other Mythic mechanic, and the cause of most wipes, is Rouse The Brood. It spawns 10 Broodlings of Ithraz in a random order and random positions along the sides. Each one casts Visceral Burst and goes away once kicked. One burst going off can sometimes be survived, but more than that, especially later in the fight, leads to wipes.
To deal with the Rouse The Brood we recommend:
- Check the picture for the rough formation.
- Having a Prot Paladin, especially two, makes this a lot easier since they can handle half of the kicks on their own.
- Place markers however you like, so each group knows which Broodling is theirs.
- Be vocal and focus on your own kick.
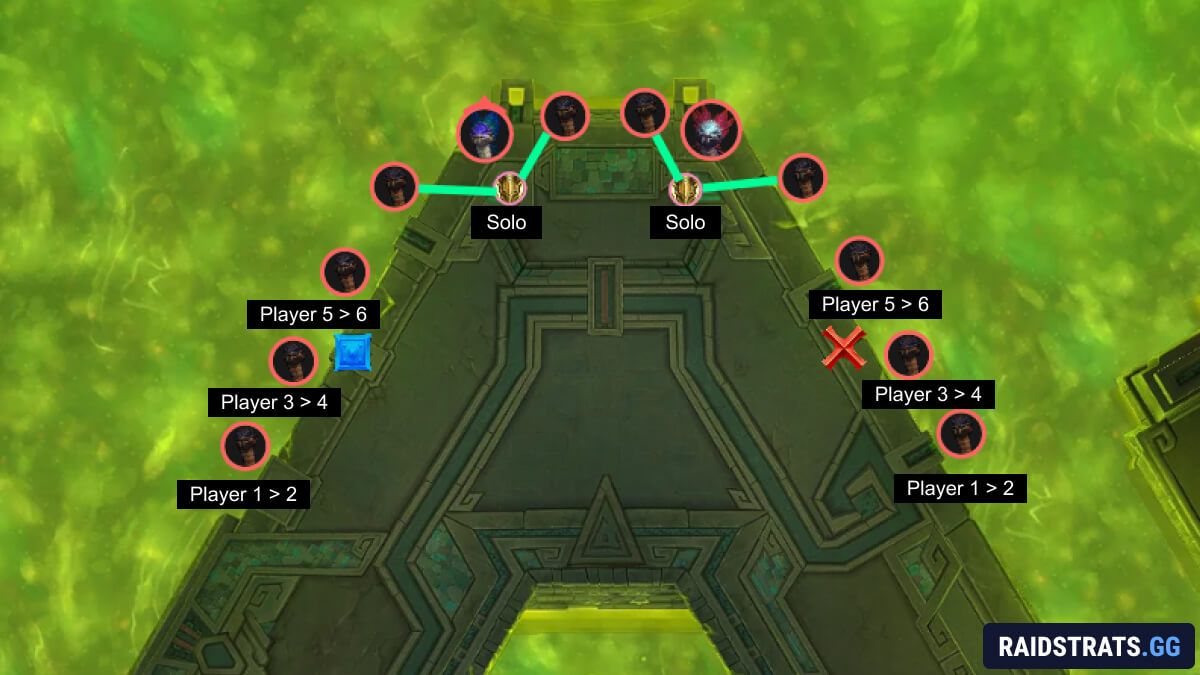
If you have no Prot Paladins, have tanks and melee handle the close ones.
Ravenous Feast
Ravenous Feast now forces you to alternate groups across the 3 hit combo. The easy setup is:
- Right side soaks the first hit
- Left side soaks the second
- Melee soak the third
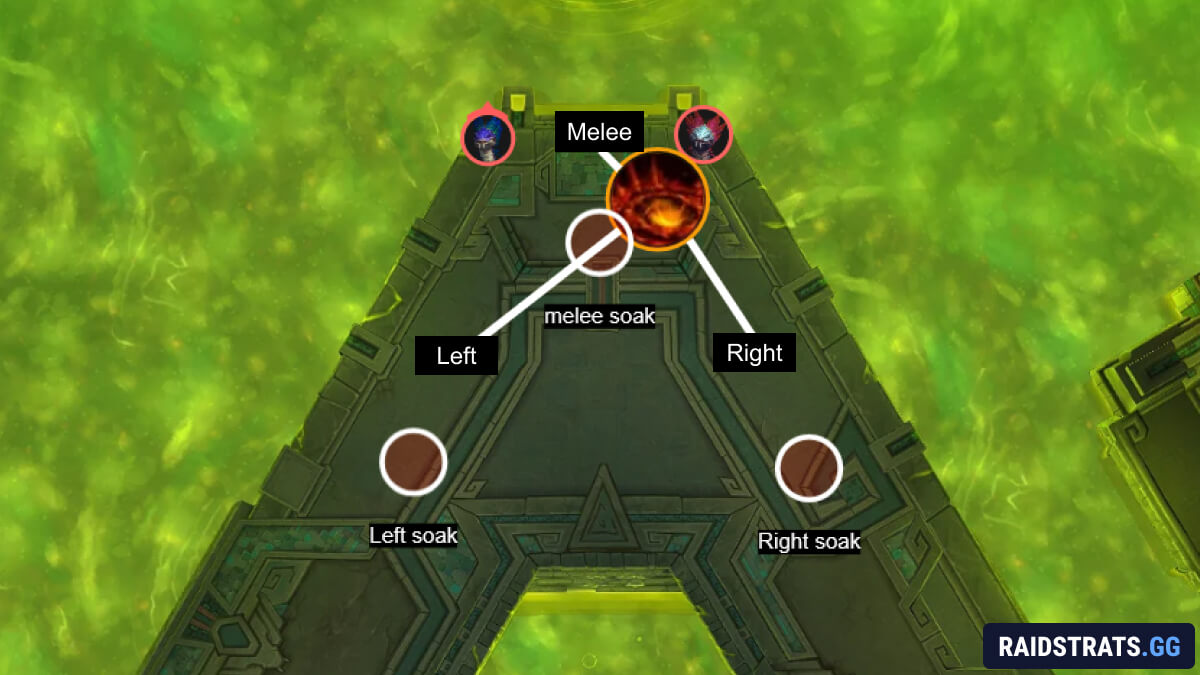
Melee should prevent the knockback, since they need to soak Tainted Blood in melee. The left and right groups can just let the knockback carry them to their soaks.
Note: Make sure to watch out for waves while you're getting knocked around.
Submerge
After that the bosses Submerge, and Vile Flood is baited on the tank that had Vexhul. Stand in the middle and skip the beam. The orbs rotating around the boss show the direction the beam will travel in. So, move in the opposite direction to the orbs, wait for the beam to move beyond the gateway, then gate to the other side once it's safe.
During Submerge is a good point to use movement speed effects to avoid the blood pools that are hitting the floor.
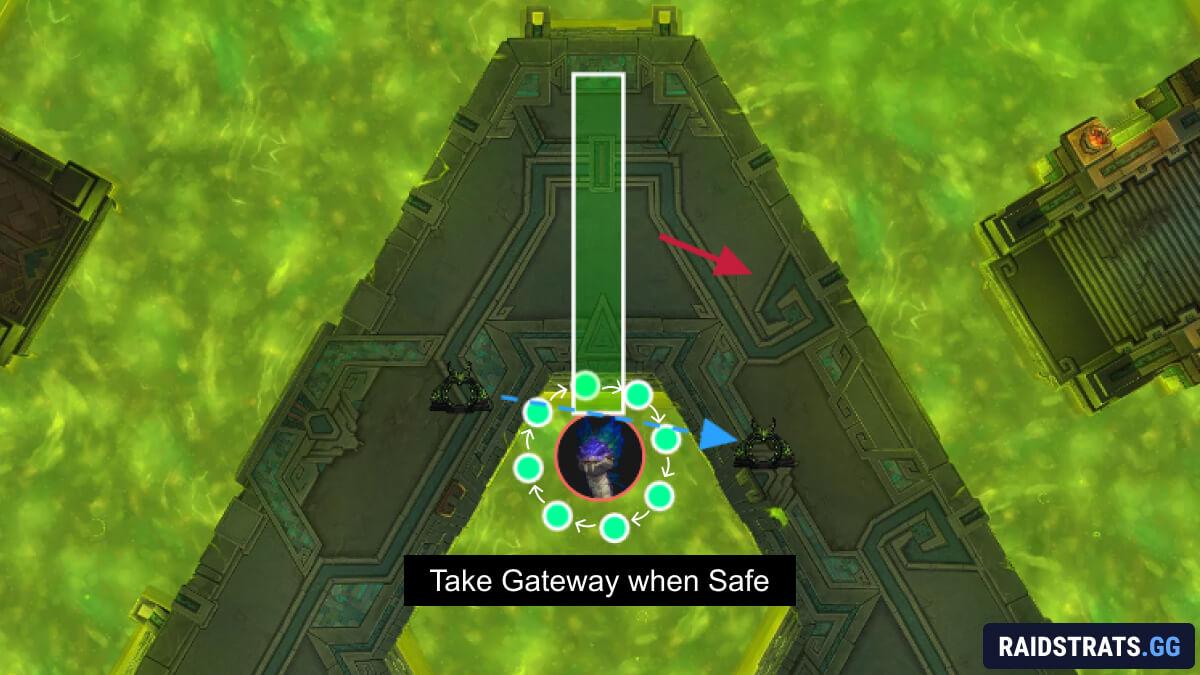
From here the fight repeats, getting harder each time as Eternal Venom stacks pile up.
Beating the DPS Check
Your damage target during the fight should be as follows:
- Start on Vexhul while cleaving Ithraz.
- At 40% on Vexhul, swap to Ithraz full time while cleaving Vexhul.
- That should bring both bosses to roughly the same percentage at the end.
- If you're about to hit the last Submerge, focus Vexhul and kill her before it. That buys a few extra seconds against the enrage.
Final Tips and Focus Points
Once your damage plan is set, the kill comes down to how few extra Eternal Venom stacks you take along the way. Every stack you avoid now is breathing room at the end of the fight.
Dodge every wave. The waves from Stir The Depths are the easiest stacks to avoid, and also the easiest to get lazy about. One careless wave might not seem like much, but across 3 Submerges those stacks decide whether your raid reaches enrage at 6 stacks or at 9. Treat every wave as if it could kill you, because later in the fight it will.
Handle the snakes from Venomous Emergence properly. Every Corrosive Spit that lands is more venom on the raid, so kill order matters:
- Focus one Spawn of Vexhul down immediately so it never gets its spit off.
- Kill the other two before their 2nd cast.
- Cleave alone won't cut it here. Target them on purpose, the boss damage you lose is much cheaper than the stacks you'd take.
Have an emergency plan for high stacks. Sometimes a player makes a big mistake and ends up with a huge number of stacks. When they're about to hit 10:
- The player moves to the middle of the room and calls it out.
- Everyone else moves away, since the Caustic Globule that spawn on death deal damage when they drop.
- Someone has to collect those globules afterwards. If they're left on the ground, they explode and give the whole raid stacks, which can start a chain reaction that wipes the pull.
One death is recoverable. An uncontrolled death in the middle of the raid usually isn't, so call it early and deal with it cleanly.