
Introduction
Hey everyone, and welcome to the Kings’ Rest dungeon guide for season 2 of Midnight! In this guide I’ll be going over the abilities of all the trash mobs and bosses throughout the dungeon, as well as how I recommend you handle them. I’ll be focusing on the mythic and M+ versions of the dungeon, but most of this article will apply to both normal and heroic difficulties as well. I’ll also be including my recommended, PUG friendly route via the Mythic Dungeon Tools addon for anyone interested.
Some background on myself, my name is Tactyks and I am an avid M+ player, achieving the 0.1% M+ title numerous times on 5 different specs, as well as competing in The Great Push in season 4 of Shadowlands. I also create M+, Raid, and tank guide content on my YouTube and Twitch channels, so be sure to stop by and say hi!
Socials:
- YouTube: https://www.youtube.com/@Tactyks
- Twitch: https://www.twitch.tv/tactyks
- Twitter: https://twitter.com/tactyks
Important Abilities











New: Try out the Mythic+ Dungeon Ability Tracker to filter for specific abilities within King's Rest!
Ability TrackerKing's Rest Mythic+ Dungeon Route
If you are using the Mythic Dungeon Tools (MDT) Addon, you can import our PUG Friendly Route for the Mythic+ difficulty of King's Rest below.
King's Rest M+ Dungeon Route: https://wago.io/U22_Bys16
Video Guide
The Golden Serpent Trash
Minion of Zul


- These mobs immediately die if they lose their Bound By Shadow shield, so use purges if you have them
- Avoid these mobs if they fixate you as their melees will apply the Pit Of Despair fear
Animated Guardian




- This mob is immune to CC
- Healers beware of the Heavy Slams AoE damage, especially below 50% health when these mobs gain Released Inihibitors
- Play close to the mobs so you can easily avoid the random target Suppression Slam frontal
Umbral Warrior
- Tanks beware of the instant cast Shadow Slash hit that happens intermittently
Risen Hexer


- Make sure to interrupt every cast of Hex Volley
- Shadowfrost Bolt targets random players, use spare interrupts on this and if any go off use a Magic dispel or freedom to remove the effect
Shadow-Borne Champion

- This mob is immune to CC
- If you have a soothe, use it to remove the Ancestral Fury enrage
- Shadow Whirlwind does an AoE hit, avoid the circles and use a defensive if you aren’t healthy
- Vigilant Defense points a shield towards a random player, move behind the mob when this happens
The Golden Serpent Boss Fight
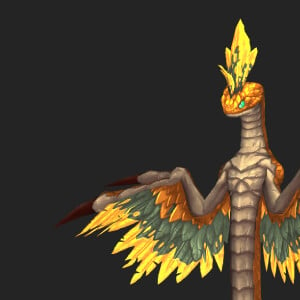
Spit Gold targets 2 random players, use a defensive if needed and drop the puddles this creates near existing ones if possible, as they turn into Animated Gold when Lucre's Call is cast. Cleave these blobs down, using slows and CCs to prevent them from empowering the boss
Healers make sure to prepare for the Serpentine Gust channel, using group defensives or healing cooldowns as needed.
Tail Thrash targets the tank, though this isn’t particularly dangerous.
Mchimba the Embalmer Trash
After defeating the Golden Serpent, you’ll need to fight through a gauntlet of various troll Kings and Queens, which engage you in a random order.
King Rahu'ai
- This mob is immune to CC
- Healers beware of the bouncing damage from Forked Lightning
- Run out of the Overload AoE when it appears
Guard Captain Atu
- Purge the Captain's Bulwark effect from other enemies, or use CCs to delay the cast
Seneschal M'bara
- Interrupt every cast of Unholy Mending, and use a purge to remove it if one goes off
King Timaji
- This mob is immune to CC and shares health with Queen Wasi
- Erupting Slam targets a random player, move away from allies to prevent cleave
- Kite the boss if fixated by the Bladestorm channel
Queen Wasi
Queen Patlaa

- This mob is immune to CC
- Beware of the random target damage from Shoot
- Avoid the puddles created by Shadow Volley
- Use a Poison Dispel or freedom effect on the random target Serpent Strike DoT
- Bestial Berserk enrages the boss and her raptor, use soothes if you have them
Skeletal Hunting Raptor
- This mob is immune to CC
- Hunting Leap aims a frontal through a random player, be ready to avoid it
King A'akul

- This mob is immune to CC
- Mortal Bleed targets the tank, use a defensive or bleed cleanse if you have one
- Blood Drain deals damage to any bleeding players, beware of this extra damage and healing
Bloodsworn Assassin
- Sudden Rupture debuffs a random player, use defensives or bleed cleanses as needed, especially before King A’akul’s Blood Drain
After defeating the gauntlet, you’ll be able to progress towards Mchimba’s room, which has several more new mobs.
Purification Construct
- This mob is immune to CC
- Healers beware of the Heavy Slams AoE damage, especially in combination with the large Purification Strike hit
Embalming Fluid
- Be ready to dodge the Embalming Fluid circles these mobs create on death, and use a Poison dispel if anyone gets hit
Interment Construct
- This mob is immune to CC
- Healers beware of the Heavy Slams AoE damage
- Entomb stores a random player in a nearby sarcophagus, use the extra action button to shake it and free them before Wail Of Mourning does too much damage
Half-Finished Mummy

- Make sure to interrupt every cast of Wretched Discharge
Mchimba the Embalmer Boss Fight
Drain Fluids channels into a random player, avoid the circles this creates and if targeted use a defensive or combat drop to stop the channel. If it does fully channel, healers should make sure to push the target's health above 90% to remove their debuff.
Burn Corruption targets a random player, drop these fire puddles away from the boss and sarcophagi so they don’t block your path.
Make sure players are topped for Awakening Slam, then cleave down the two Half-Finished Mummy mobs this spawns while keeping an interrupt on their Wretched Discharge cast.
Entomb locks a random player into one of the four sarcophagi around the room, quickly spread out to find which one they are shaking to prevent the boss from summoning additional mummy mobs.

The Council of Tribes Trash
Spectral Shaman

- Swap to Healing Tide Totem when they spawn and quickly destroy them
- Beware of the random target Frost Shock and use a Magic dispel or freedom effect to remove the slow
Phantom Hex Priest
- Use an interrupt or Curse dispel on every cast of Hex
- Spectral Bolt targets a random player, use spare interrupts on this
Royal Berserker
- This mob is immune to CC
- Bloodthirsty Axe targets 2 random players, use defensives or bleed cleanses as needed
- Avoid the random target Violent Lunge AoE hit
Ghostly Brute
- This mob is immune to CC
- Soul Crush targets the tank, use a defensive for the damage amp this applies
- Avoid the Seismic Upheaval AoE hit around the mob
Honored Raptor
- Hunting Leap aims a frontal through a random player, be ready to avoid it or use a CC to stop it
The Council of Tribes Boss Fight
Severing Axe targets a random player, use a bleed cleanse or defensive if needed, otherwise focus healing into the target.
Avoid the initial AoE and spinning projectiles created by Whirling Axes. I recommend tanking Kula in the centre of the arena, as this ability continues to be cast from the location of her body after her defeat.
Make sure to group up in a safe spot for the Barrel Through soak, and keep in mind this is still cast after Aka’ali is defeated.
Tanks beware of the Debilitating Backhand knockback and debuff, either kiting until it goes away or using a large defensive to survive the damage amp.
Healers beware of the group damage caused by Arc Lightning, which always cleaves off the tank. Everyone else should watch for the Poison Nova cast and make sure to interrupt it.
When Call the Elements is cast swap to the Explosive Totem first, then the Thundering Totem, and finally the Torrent Totem.

Dazar, the First King Trash
As you make your way to Dazar, a single mini boss blocks your path.
Shadow of Zul
- This mob is immune to CC
- Shadow Barrage targets random players, use defensives if this overlaps with other damage
- Pool Of Darkness creates 2 soaks, make sure players stand in them quickly to prevent AoE hits
- Dark Revelation targets 2 players, move away from your group to prevent cleave and purge or focus the Minions of Zul that spawn from them
Dazar, the First King Boss Fight
On pull the boss summons Reban, then at 80% he gets empowered as he mounts T’zala, who he also shares an Eternal Bond with. I recommend focusing Reban initially to remove the extra mechanics before the boss is empowered.
Tanks watch your positioning as Reban will use Hunting Leap to jump to you and do a frontal through your position which everyone should avoid. Reban also attempts to cast Deathly Roar which you should keep interrupted.
Aerial Smash targets two players, spread out and avoid cleaving allies. When mounted this ability is changed to Quaking Leap, which now targets 4 players and does additional AoE damage that the healer needs to prepare for. This effect can also be cancelled by combat drops if you are the furthest target, which is very useful to reduce group damage.
Tanks be ready with a defensive for the Blade Combo buster, which ramps up over the short channel. When mounted T’zala will use Savage Maul just before the combo, so be ready for this additional damage and use a bleed cleanse if needed.
Make sure to have healing ready for the Gilded Destruction AoE, and tanks remember to point the boss away from your group for the duration as this causes the bosses melee swings to frontal.
Throughout the fight watch out for the Impaling Spear circles and if hit use defensives or bleed cleanses to reduce the damage.