Raid Setup


Introduction
Welcome to our Heroic Sszorak guide, the fifth boss of the Venomous Abyss raid in Midnight Season 2. This guide covers the fight mechanics and the strategy we recommend to defeat this boss on Heroic difficulty!
Deep in the temple, warped by Ula'tek's venom, lives Sszorak: part apex predator, part industrial leaf blower. This is the tier's designated damage check, and his arena comes with six wind tunnels whose only purpose is turning your raid into confetti while you try to hit your buttons.
Fight Style: Single Target / Gear check with forced movement
Recommended Setup: 2x Tank / 4x Healer / 14x DPS (a 5th healer is an option, the damage intake is high)
Required utilities: Two soak groups of 5+, strong sustained healing. Knockback immunities are situational and can grief your Crosswinds partner, coordinate them.
Hero/Lust usage: On pull (or experiment with the intermission damage amp)
Method Boss Review
Sszorak is what happens when a designer asks "what if the damage check also had a physics engine". On paper he's the simplest boss in the raid, one loop repeated until someone dies, and yet every part of that loop punishes autopilot. Random order tank combos, alternating soaks, and an intermission where your positioning homework from a full minute earlier decides whether you turn into a ragdoll.
The cyst system is the standout. Using the boss's own venom globs as a tool against his wind event is genuinely creative design, and the orb telegraphs make it fair: everything that kills you here was announced in advance. When a raid nails the intermission, twenty people surfing a gale into a goo explosion and landing back on the boss, it looks choreographed. When they don't, you get lots of fun clips.
Method Boss Rating: (5/5)
Easy Mode
General:
- Before pull: split into two soak groups of at least 5, and place markers at the wind tunnel positions around the room.
- The fight is a loop: Apex Predator, Venomous Surge, Raging Crosswinds, twice, then intermission at 100 energy.
Apex Predator (5 attacks, random order, cones aim at the tank):
- Ravage (tank frontal), tanks swap between the two casts and take them at the edge.
- Mutilate (raid frontal), group 1 soaks the first, group 2 the second. Never the same group twice.
- Tempest (roaming tornadoes), just don't touch them.
- Marked players run out, drop their Viscous Cyst at the markers opposite the glowing tunnels.
- Orb count in the tunnel = wind order. 1 orb first, 2 second, 3 third.
- 4 cysts, 3 winds, exactly one spare. Don't waste it.
- Dodge the Caustic Claws puddles, boss moves to a clean slice.
- Point your arrow at another arrow, collide mid-air, done. Circles touching counts, don't pixel-aim.
- Missing everyone = drifting towards the platform edge. Immunities can strand your partner, talk first.
Intermission (100 energy):
- Pixel stack in the middle. Wind pushes the raid into your cyst, cyst knocks you back to the boss with wind resistance.
- Boss takes 30% more damage from Dig In, so unload while surfing.
- After 3 winds, pop the leftover cyst as a group, then the loop restarts.
Mechanics

The Altar of the Six Winds constantly leaks a caustic mist, ticking Nature damage on the whole raid every 2 seconds for the entire fight.

Sszorak's melee attacks corrode the tank's armor, stacking 3% increased Physical damage taken per hit.
Nothing dramatic on its own, but it quietly multiplies everything else he does to you, so tanks swap on stacks like usual.

Apex Predator is the signature heroic mechanic. Sszorak unleashes a rapid combination of attacks, and the important part: taunts work mid-cast.
You can and must pass the boss between tanks during the combo itself. The Apex Predator combo consists of two attacks: Ravage & Mutilate.
Apex Predator is a little dance: tanks juggle the boss for Ravage, soak team one eats a Mutilate, soak team two takes the next Mutilate, and anyone who mixes up their assignment gets deleted.

Repeated slashes in a frontal cone, hitting for massive Physical damage and increasing damage taken from Ravage by 400% per hit, stacking for 25 seconds.
One tank eating the full combo alone will result in death, so the tanks taunt the boss back and forth between slashes to trade the hits. Everyone else stays out of the cone.

The opposite of Ravage. A frontal cone of venom claws where the damage gets split evenly between everyone hit, and if fewer than 5 players get struck, it deals deadly damage instead. So this cone needs a soak crew standing in it on purpose.
Everyone hit gets Mutilated Gash, a nasty Nature DoT that also splits between the players struck and increases damage taken from the next Mutilate by 500%. Translation: the same group cannot soak twice in a row. You run two soak teams and alternate.

Several players get doused in fresh venom, ticking for 10 seconds. On expiration, it detonates on the whole raid, with the damage falling off the farther you are from the detonation. Marked players run away from the group before it pops.
Each detonation also leaves behind a Viscous Cyst at the player's location, so where you run matters.

A glob of unstable toxin that sits there for 2 minutes. Touch it, or let it expire, and it bursts: knockback, a chunk of damage, and a stacking slow.
Here's where it gets interesting though: the toxin clings to players, and while the slime is on you, you stick to the ground better.

Sszorak flings toxin at player locations, hitting anyone within 6 yards of the impact and leaving pools of Caustic Residue. Standing in a pool hurts and increases your damage taken by 30%.
Dodge the impacts, don't stand in the leftovers.

Vortices of poisonous wind that spiral around the arena. Touching one hurts, DoTs you, and slows you by 30%, stacking.
Just don't touch the spinny things. They mostly exist to make everything else harder to dodge.

The altar imbues several players with roiling winds, ticking on them for 8 seconds. On expiration, the winds burst on anyone within 6 yards of them, so affected players spread out.
Then each affected player gets launched in the indicated direction and receives Turbulent Gusts.

You float. For 10 seconds, your falling speed is drastically reduced while the wind carries you.
Touching another floating player pops both your Gusts and drops you back down, so airborne players can steer into each other to cut the ride short and get back to the fight.

The main event. The altar unleashes a succession of gales across the arena, each one pushing every player in its indicated direction.
You should aim to get knocked into a cyst to get knocked back against the wind.

During Howling Maelstrom, Sszorak hunkers down and takes 30% increased damage for 25 seconds. This is your burn window.
Strategy
Sszorak is a one phase fight with an intermission at 100 energy, running on a fixed loop: Apex Predator, Venomous Surge, Raging Crosswinds, twice, then the intermission. Learn one rotation and you've learned the whole fight.
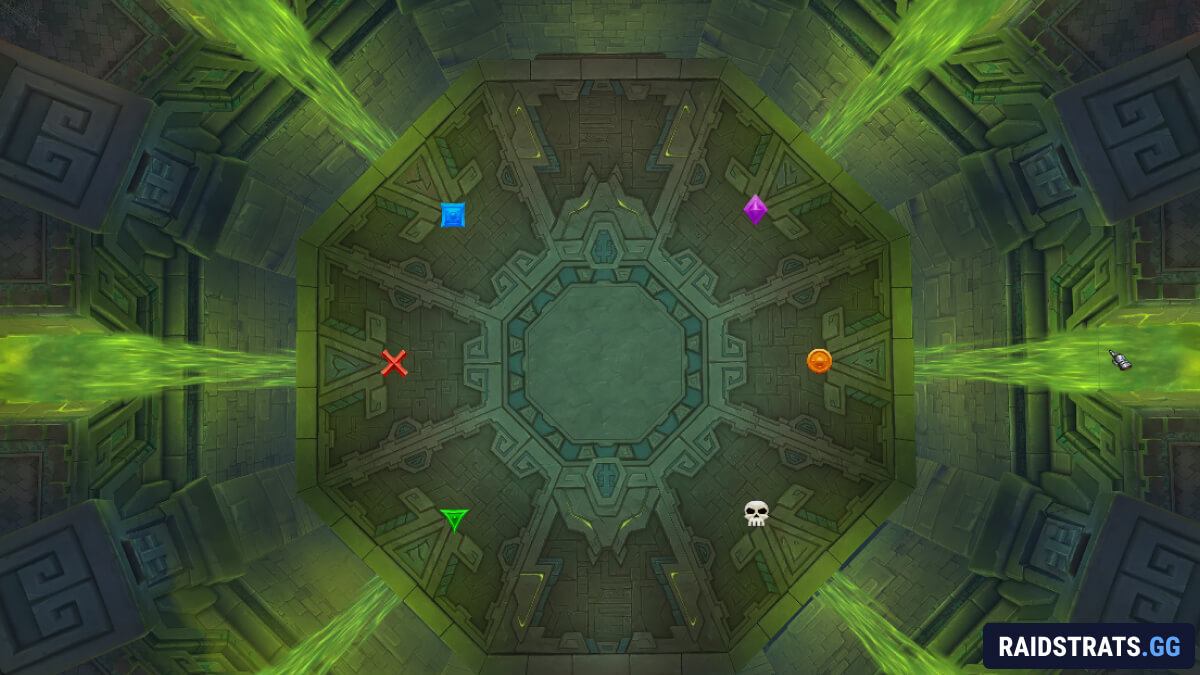
Two things before the pull. First, split the raid into two soak groups of at least 5, a melee and ranged split works fine. Second, place markers around the edge of the room at the possible wind tunnel positions, because your cyst placement during the fight depends on them.
The raid takes constant damage from Ula'tek's Presence all fight, so consider running an extra healer. Use Hero on pull, or experiment with the intermission damage amp if your raid handles the movement well.
Apex Predator
Right on pull, Sszorak starts his Apex Predator 5 attack combo: two Ravage, two Mutilate and one Tempest, in random order, with all cones aimed at the current tank.
Tank the boss near the edge of the platform with the raid behind him in your two groups. Then it's a reaction game.
Ravage is the tank frontal. Massive damage plus 400% increased Ravage damage taken for 25 seconds, so the tanks swap between the two casts and take them away from the raid at the edge.
Mutilate is the raid frontal. Its damage splits across everyone soaking, and fewer than 5 soakers means lethal damage, so a full group steps in every time. Everyone hit gets a 22 second DoT that increases the next Mutilate's damage by 500%, which is exactly why you have two groups: group one takes the first Mutilate, group two takes the second, and nobody double dips.
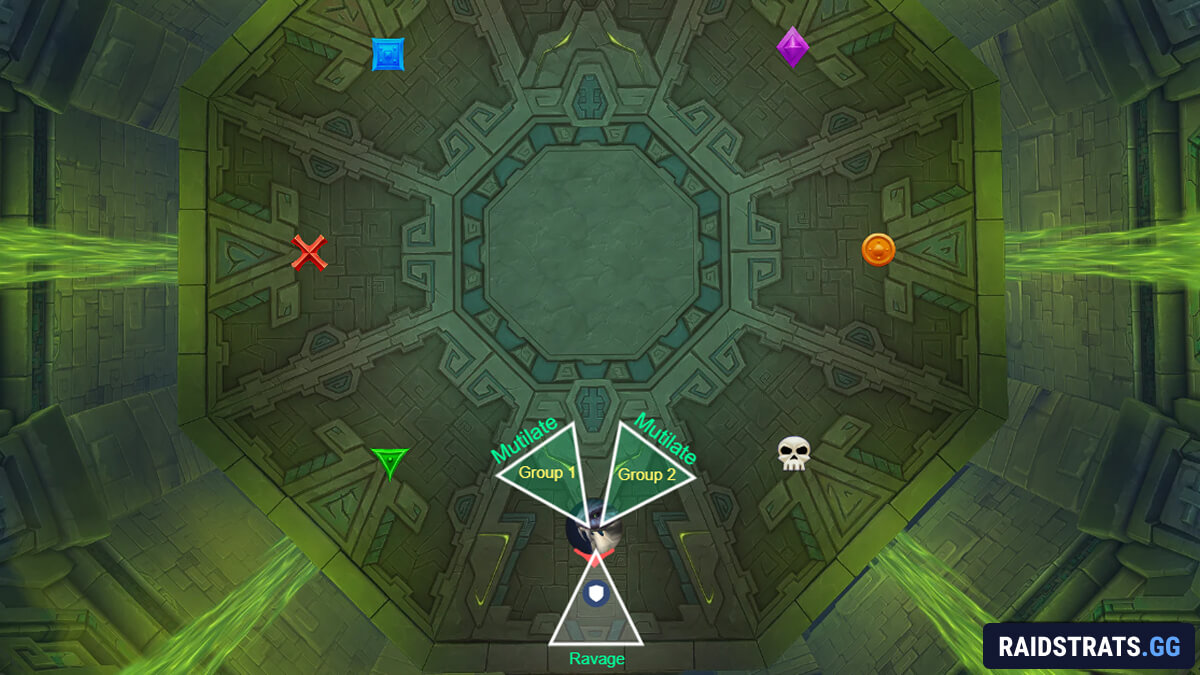
Tempest sends out several tornadoes that roam around the area, L'ura glaive style. They're not aimed at anyone in particular, just don't touch them.
Since the order is random, the tanks carry this section. The raid's only job is knowing which group soaks next and staying out of everything else.
Venomous Surge
After each Apex Predator combo, two players get a heavy 10 second venom DoT from Venomous Surge. On expiration it hits the whole raid with distance based falloff, and a Viscous Cyst spawns where the player was standing.
These cysts are the whole intermission plan. Popping one knocks nearby players back and coats them in toxin that makes them resistant to wind pushes. You get 4 cysts before each intermission, and you want them placed at the markers opposite the wind tunnels that will fire.
Reading the tunnels is easy: active ones have white orbs in them, and the orb count is the order. One orb fires first, two orbs second, three orbs third. So your Surge targets walk to the correct markers and drop their cysts there. Four cysts for three winds means you have exactly one spare, so one misplacement is recoverable and two is a wipe. No pressure.
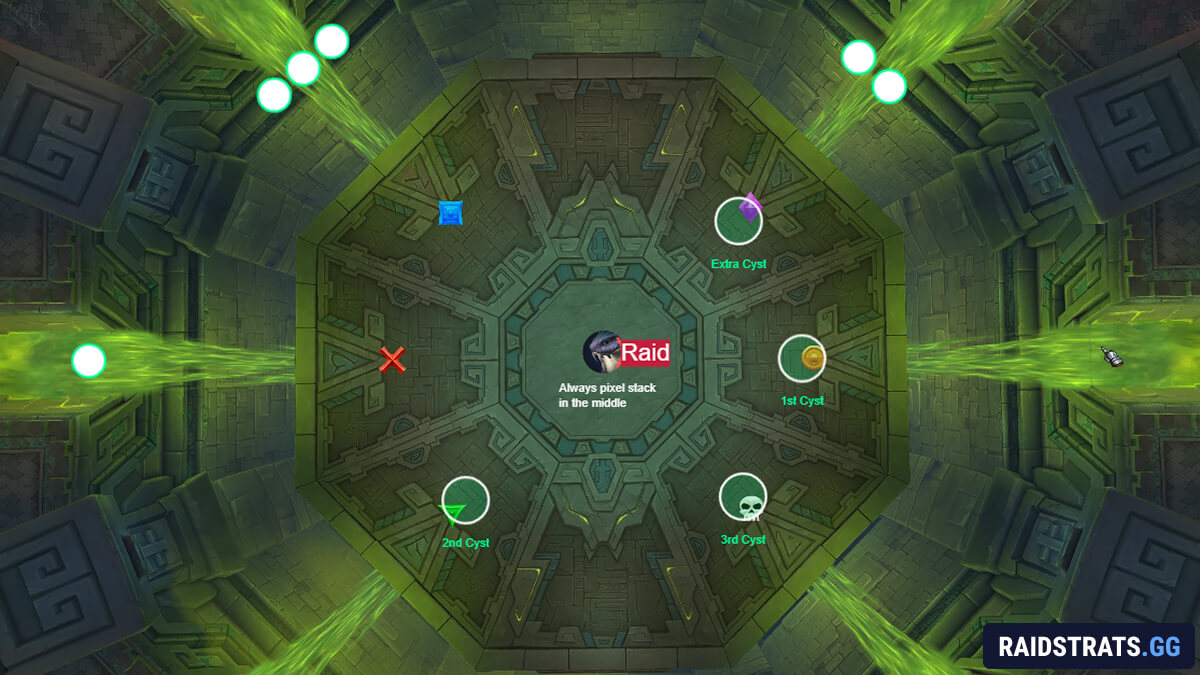
Alongside the Surge, Caustic Claws splatters puddles around the boss's current area. Dodge the impacts, and the tank moves the boss to the next clean slice of the room.
Raging Crosswinds
Raging Crosswinds: The rotation closes with several players getting arrow circles. After a short delay, each player gets launched into the air in their arrow's direction. The fix is simple: point your arrow at another marked player, collide mid-air, and both of you drop safely.
The hitbox is genuinely generous, the full size of the circle, so don't overthink the aiming. Circles touching in the air counts. Missing everyone means slowly drifting in your arrow's direction, possibly straight off the platform.
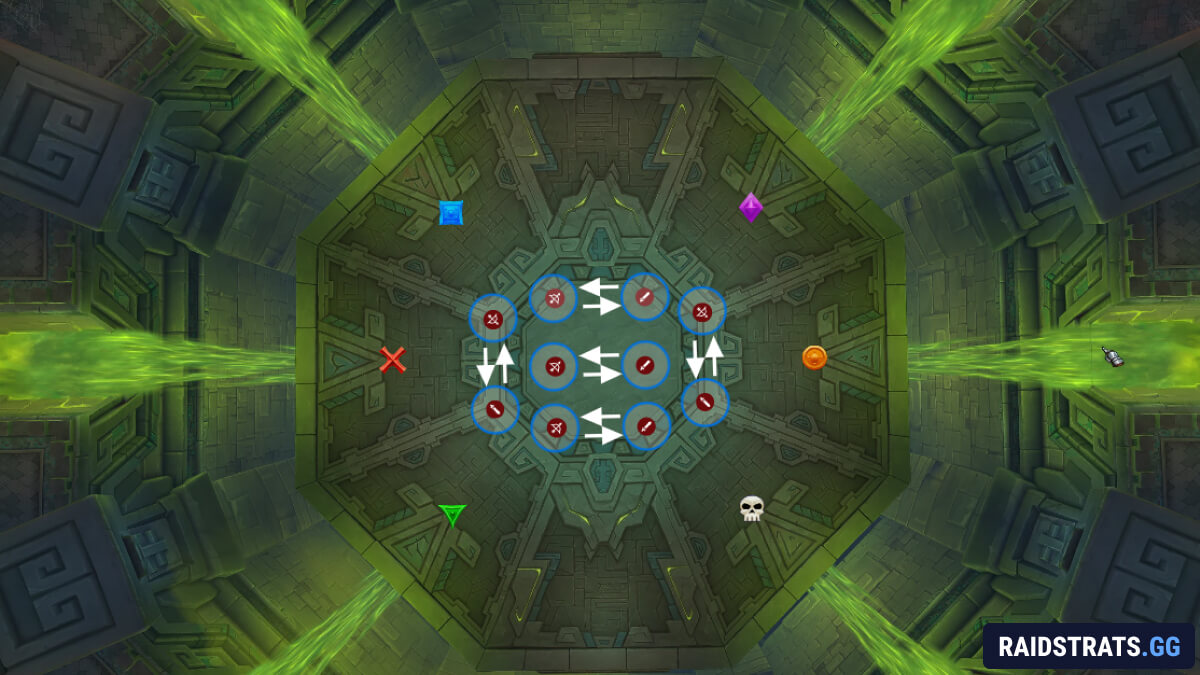
Word of warning for the immunity enjoyers: many classes can just prevent the knock-up, but doing so might strand the partner who was planning to collide with you. Coordinate it or don't use it.
Intermission (100 Energy)
After two full rotations, the intermission begins. Sszorak casts Dig In, taking 30% increased damage for the duration, while the tunnels take turns blasting wind across the arena.
The play: everyone pixel stacks in the middle of the room. The wind pushes the whole raid towards the cyst you placed opposite the active tunnel. The cyst pops, knocks everyone back towards the boss, and coats the raid in wind resistant goo, letting you plant your feet and unload during the damage amp.
Then the next tunnel fires and you do it again. Three winds, three cysts, one stack. The only way this goes wrong is someone not being properly stacked, getting shoved off at an angle, and starting a domino chain of misery. Stack means stack!
After the third wind, everyone walks to the leftover fail-safe cyst and someone pops it, clearing the board.
Then the loop restarts:
- Apex Predator
- Venomous Surge
- Raging Crosswinds x2
- Intermission
This continues until Sszorak runs out of health or you run out of platform.