Up to 84% Off VPN


Raid Setup


Introduction
Welcome to our Mythic Ula'tek guide, the final boss fight in The Venomous Abyss Raid in Midnight Season 2. This guide covers the fight mechanics and the strategy we recommend to defeat Ula’tek on Mythic difficulty.
Fight Style: Single Target with heavy add and egg control, 3 phases plus an intermission.
Recommended Setup: 2x Tank / 4x Healer / 14x DPS. Run 2 Balance Druids and 1 Shadow Priest as a baseline, a healthy melee/ranged mix, and specs that gain a lot from padding into single target during the damage amps.
Required Utilities: Blinks and teleports for egg carriers (Void Elves help), a Warlock gate, mass grips and stuns, interrupts, immunities.
Hero/Lust Usage: As soon as you land back on the main platform after Phase 2.
NSRT Addon: Strongly recommended, especially for Grasping Fangs and the intermission.
Easy Mode
General:
- Comp matters: 2 Boomies plus 1 Shadow Priest handle the Phase 1 and Phase 2 AoE, and pad-friendly specs carry the amps.
- Damage targets: 66% or lower after the 1st amp, 44% or lower after the 2nd. Anything higher makes the Phase 3 check too tight.
- Rawlings and Doomscales are padding targets. No careless AoE on them unless it's padding into the amp, and keep the add stacks to the side of the boss.
Phase 1:
- Assign 8 egg carriers, mostly ranged with blinks, at most 3 melee.
- Hardened eggs and the Blightscale Wretch are handled passively by your multi-dotters.
- Egg carriers can never touch. Overlapping Noxious Shell circles spawn a Viper.
- Everyone stands inside the Fester Burst bubble when it spawns. Tanks control where it goes by positioning the Wretch.
- On the 2nd egg set: kill the old Wretch as the new one spawns, melee pick up before the bubble, ranged right after.
- Keep dodging waves through the double Spectral Coils, then burn the amp. Split evenly and cross with the Warlock gate tech.
Phase 2:
- Assign 4 Doomscale Egg carriers (mobile healer for the far one, melee for the close one).
- Break the first 3 egg shields by 3:12, then move the Warden and melee into the next clump.
- Grasping Fangs: 1 player breaks on the NSRT timer, then the other 5 break together right after. Strongest defensive and a health potion or Healthstone for everyone.
- Kill the Warden before the next Writhing Gestation.
- Toss eggs into the Cauldron at the same time so Rawlings share HP, then kill them before Boiling Venom.
- Toss both Doomscale Eggs together, 3 kickers per add for Anguished Cry, then return to main platform, Hero and pot.
Intermission:
- 3 teams. NSRT reads the first Slam and routes everyone. Pop every egg, use healer pots and personals.
Phase 3:
- 3 Serpent's Bite teams. Arrow players must never aim a wave at the raid stack, dying is better.
- Platform 1 is the hardest: grip the far adds onto the raid twice.
- Platform 2: keep the whole team inside the bubble, taunt the Shrieker.
- Platform 3: kill 2 Shriekers.
- Platform 4: Group 3 takes the circles to the front and is expected to die. Personals, burn, jump in the water for extra seconds if needed.
Mechanics

Blightscale Spawn eggs now have a shell that absorbs a large amount of damage. While the shell is up, the egg can't be picked up, so it has to be broken before anyone can carry it.

Picking up an egg attaches Noxious Shell, which deals heavy Nature damage every second and shows as a small circle under the carrier. When it's removed, the egg breaks and leaves Rancid Yolk, which increases Noxious Shell damage taken by 200% for 20 seconds. That makes picking up eggs back to back very punishing.

If a carrier moves within 3 yards of another carrier, the egg hatches immediately. The carrier takes a big hit and a heavy DoT, and a Blightscale Viper spawns, spraying the raid with Putrid Membrane. Carriers must never get close to each other.

Rawlings now enrage 25 seconds after spawning, and Wretches and Shriekers after 30 seconds. Once enraged, they gain 100% haste and damage and can cast Acidic Expulsion. Every add on a timer has to die before it boils.

An enraged Blightscale hits the whole raid and applies a long Nature DoT. Stunning a boiling Rawling stops the cast.

Ula'tek pulls a Blightscale Wretch from the ceiling, damaging anyone near where it lands. The Wretch wakes up 20 seconds later.

The Wretch wraps itself in a festering membrane that bursts and hits everyone farther than 10 yards away with heavy damage and a DoT. Everyone needs to be inside the bubble when it goes off, and since it spawns around the Wretch, tanks decide where it lands.
A spectral Ula'tek sends a stream of venom toward the Wretch, stacking Mother's Boon on it, which gives 10% damage reduction and 15% more damage per stack. A player can step in front of the stream to block it, but takes heavy damage and stacking Toxic Burn instead.

When one Weakened Doomscale dies, the others gain 100% haste and damage. The window is fairly forgiving, but they should still be killed as close together as possible.

In Phase 3, Call Of The Serpent drops Slithering Clutches that crawl toward the scent of venom. If a wave hits one, it turns into a Viper, so they need to be gripped into the safe raid stack.

When a Serpent's Bite soaker's Volatile Purge expires, it now releases Caustic Waves in the direction shown by an arrow. Aiming those waves safely is the core Phase 3 skill.
Strategy
Like most end bosses, Ula'tek brings a real step up in difficulty. The good news is that if you got past the Coiled Altar, this boss isn't much harder. It does have specific comp requirements though, and ignoring them makes the fight much harder.
Composition
- Bring specs that gain a lot from padding, so they can do big single-target damage during the amps.
- Bring multi-dot specs like Balance Druid and Shadow Priest to handle the AoE in Phases 1 and 2.
- Keep a healthy mix of melee and ranged.
As a baseline, run 2 Boomies and 1 SP. That covers the odd AoE demands of Phase 1, which is where you'll spend most of your time.
Damage Optimization
Aim for these numbers in the two damage amps:
- 1st amp: 66% or lower
- 2nd amp: 44% or lower
If you're above that, the Phase 3 damage check becomes too much, no matter how clean you play.
The Rawlings and Doomscales in Phase 1 and the intermission are only there to give you padding for single-target damage. Nobody should use AoE abilities on them unless that damage pads into the amp. Rogues, DHs and Shadow Priests will be the first to complain if the Rawlings die too quickly. To get the most out of them, keep the add stacks to the side of the boss so passive cleave doesn't burn them down.
Potion and Trinket Timings (20 second Pull Timer)
- 16 seconds left on pull timer: Liquid Luster pot, even if it doesn't sim higher
- 4:44: Liquid Luster or other pot (on cooldown)
- 4:50: first on-use trinket if you have two, Font when available
- 9:40: first on-use trinket if you have two, Font when available
- 9:44: normal pot (Light's Potential or Potion of Recklessness)
Use Hero as soon as you land back on the main platform after Phase 2.
Phase 1
This phase is short, but it causes the most wipes.
Markers:
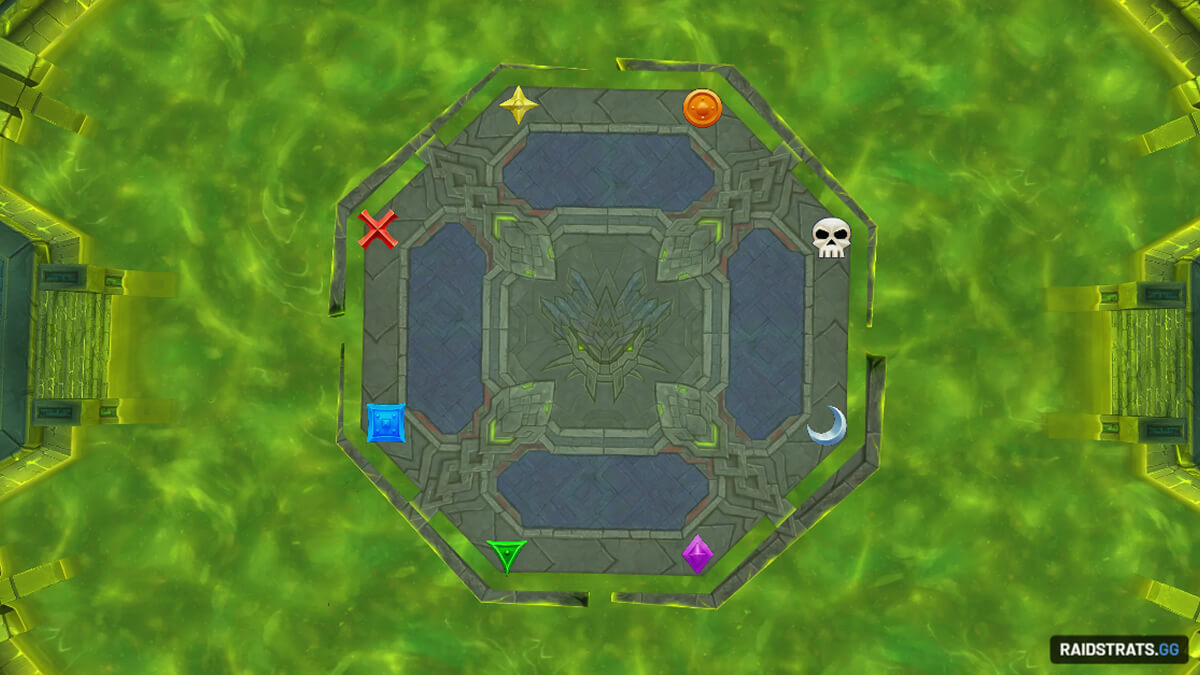
Egg Carriers
Before the pull, assign 8 egg carriers. The best picks are ranged players with blinks or teleports, and Void Elves help a lot. Use no more than 2 melee, ideally a Warrior, Monk or Rogue. Too many melee carriers creates traffic jams.
When you pull, there are 8 eggs and a Toxic Womb in the middle. The eggs are protected by Hardened and can't be picked up until it's broken, and Toxic Womb drops a Blightscale Wretch when it finishes. You don't need to target either one. With 2 Boomies and an SP, the shells break naturally and the Wretch dies in time.
Egg pickup pre-assigments:
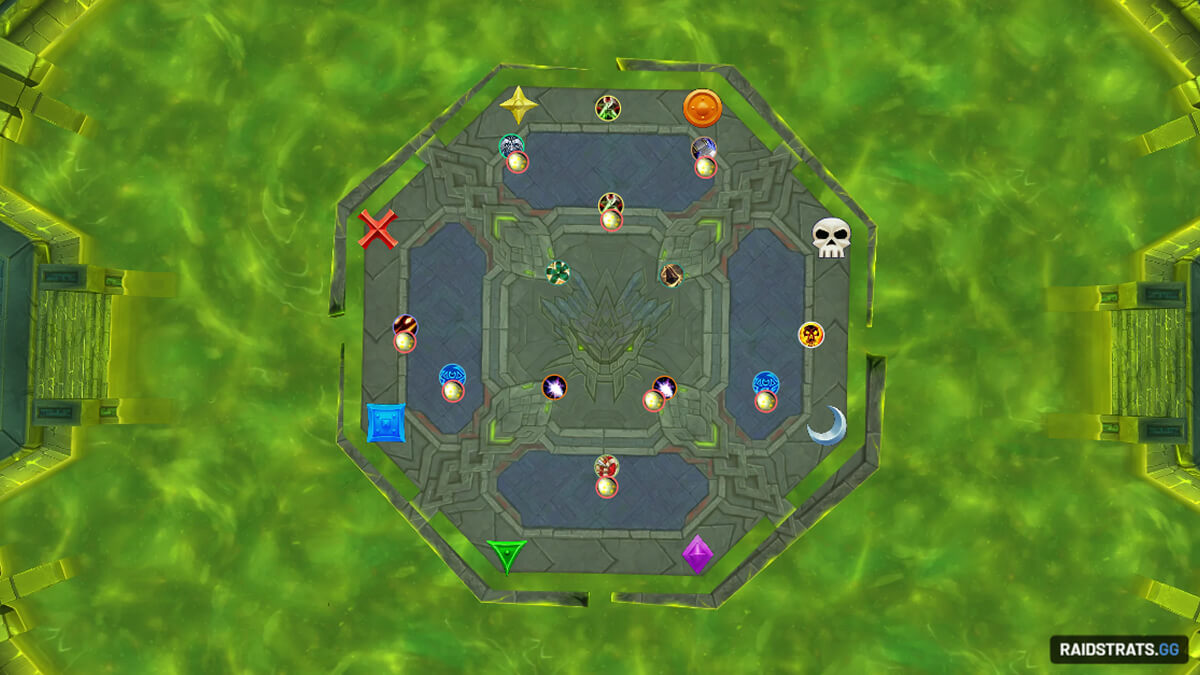
Spectral Coils with Eggs
Your first job is to pick up every egg and run into the Spectral Coils soaks from Heroic. The added challenge is that egg carriers can never touch each other. Each carrier has a small green circle under them, and if two circles touch, a Viper spawns. You never want to deal with a Viper.
The first Spectral Coils also introduces Fester Burst, a bubble created by the Wretch that everyone has to stand inside when it spawns. On the first Coils, the bubble happens first and then the tentacle slams down, so all egg carriers should be in the same soak. Standing outside the bubble deals heavy damage and applies a small DoT. The bubble spawns around the Wretch, so tanks have full control over where it goes.
There are 2 Spectral Coils hits, so as soon as the first one lands, get into the second soak quickly. The Rawlings that spawn afterward are free padding, so ignore them.
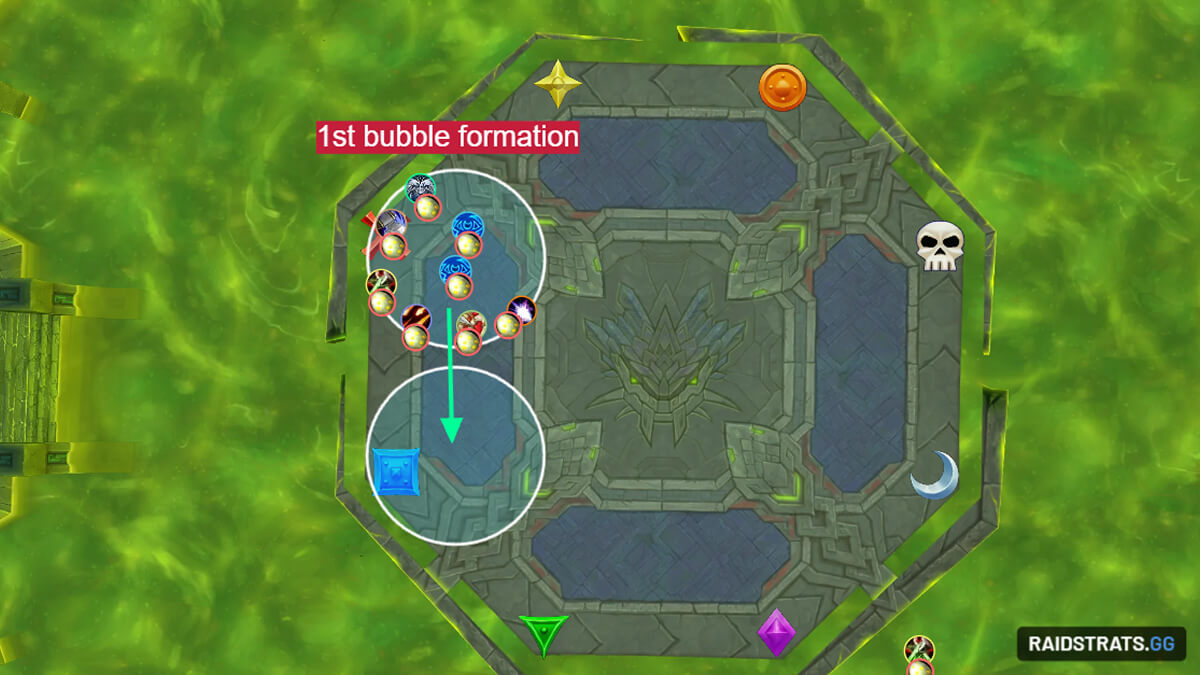
The Second Egg Set
Next, dodge 2 sets of waves and stack back in melee for another bubble.
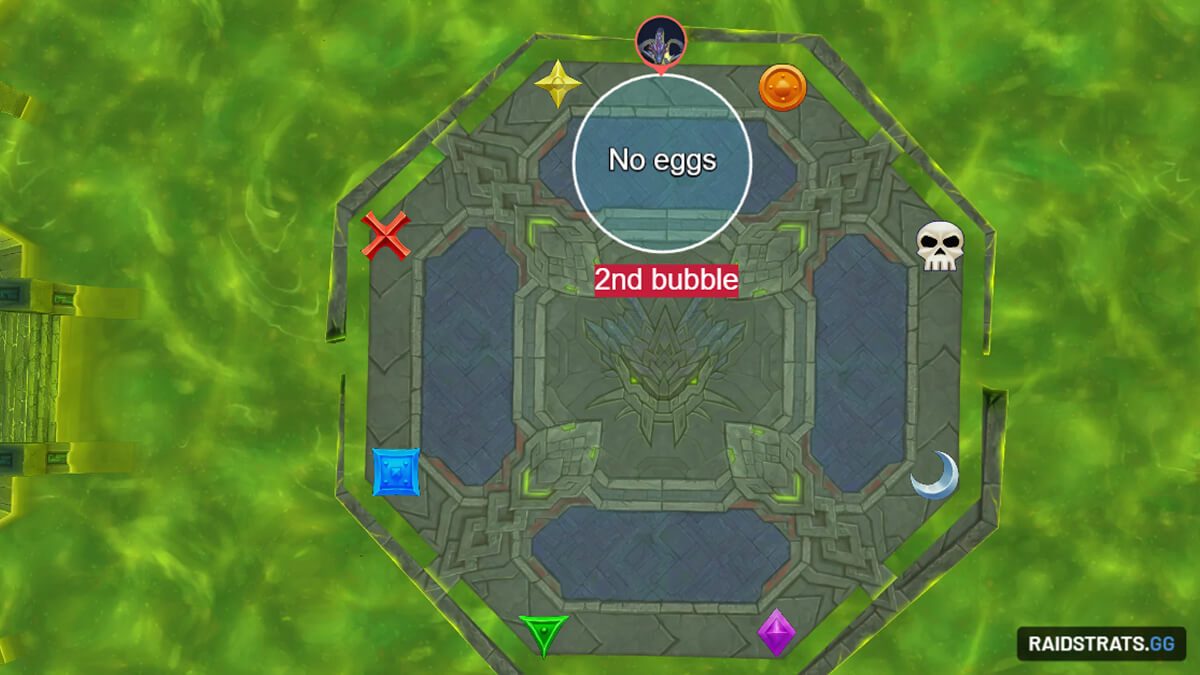
Then a new set of eggs spawns, just like on the pull, and this is the tricky part. The bubble comes before the wave dance this time, so:
- Kill the old Wretch right as the 2nd one spawns.
- Melee pick up their eggs before the bubble.
- Ranged pick up their eggs immediately after the bubble.
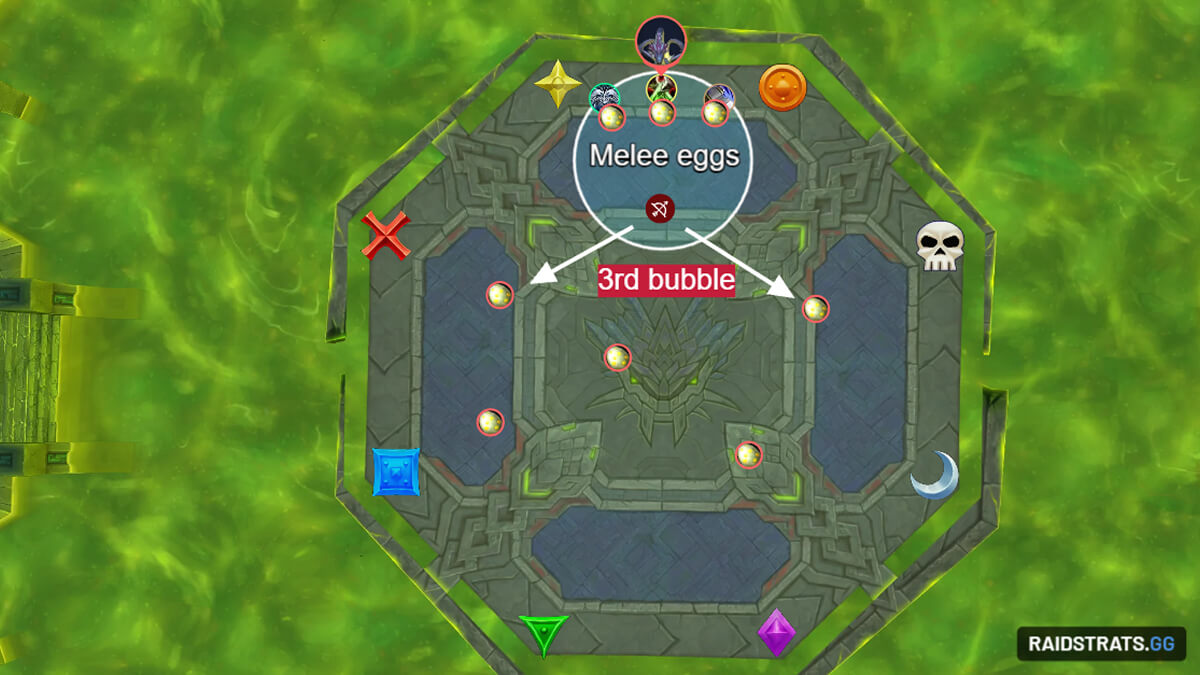
This stops eggs from crowding inside the bubble, where they could pop by accident. You have about 5 seconds to grab the eggs before the waves reach them.
The Hardest Moment of Phase 1
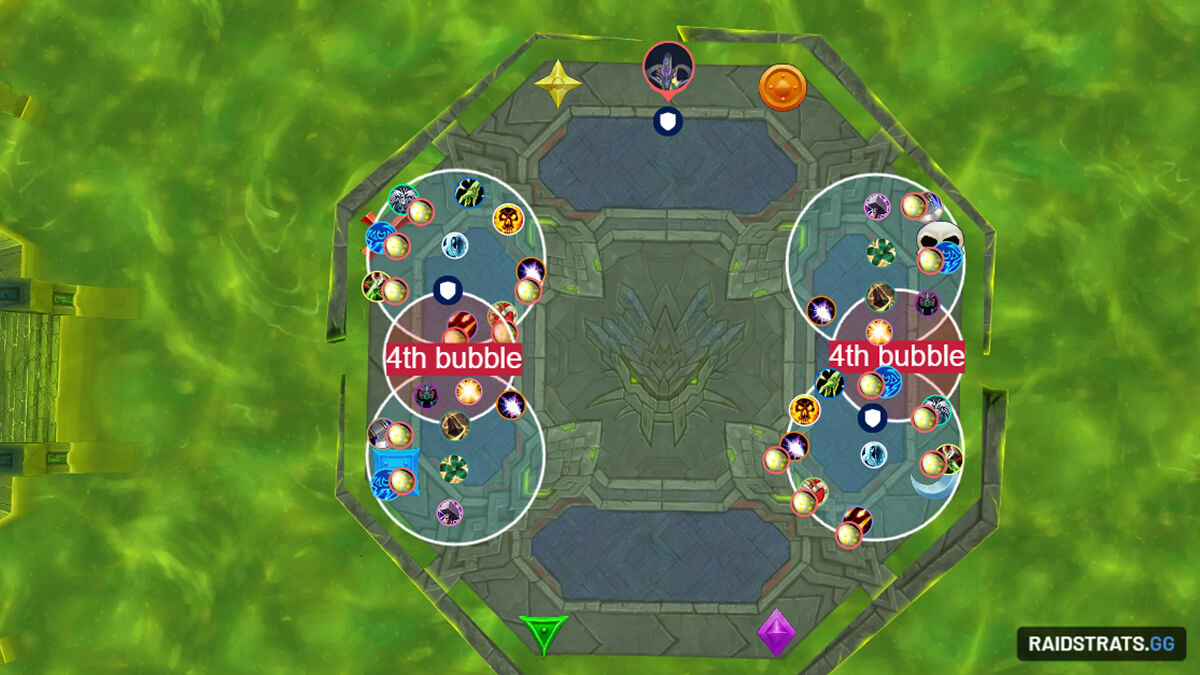
Now you're carrying 8 eggs while dodging waves and running into the double Spectral Coils. Find the route that works best for your raid and get to your soak. Keep dodging once you're in it, because a wave will always be coming toward you. After both slams land, a bubble is cast immediately, so keep the Wretch between both soaks so everyone can reach it in time.
The First Damage Amp
If you made it here without spawning a Viper, you get to burn the boss during the damage amp. Keep dodging waves and circles, because getting hit here usually means dying.
Crossing Over
Everyone now moves to their side. Split the raid evenly, since the two groups don't differ in any meaningful way apart from egg placement. If you have 1 Warlock, use this trick:
- Before the pull, the Warlock places a gateway on Group 1's side.
- The Warlock is part of Group 2.
- As soon as Group 1 takes the gate, the Warlock places a new one on Group 2's side for them to take.
Once you're across, Phase 2 begins.
Phase 2
This phase starts out a lot like Heroic, but the difference shows up quickly, and it's considered the hardest phase of the fight.
Doomscale Egg Carriers
Before the pull, assign 4 players to pick up the Doomscale Eggs before their timer hits 0. There are 2 Doomscale Eggs on each side, one in each section. Give the far one to a mobile healer and the close one to a melee DPS.
The Warden and the First Eggs
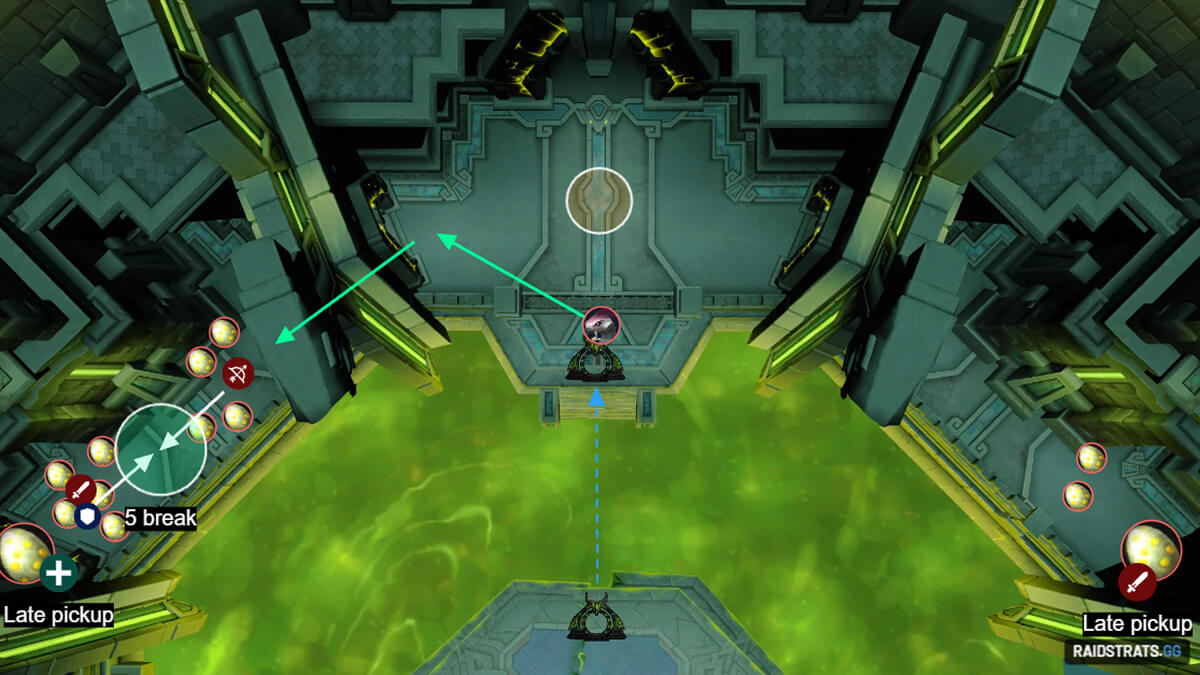
As soon as you reach the platform, pull the Doomscale Warden to the stairs to trigger the teleport, just like Heroic, and go to the same side. There are 3 shielded eggs here. Break the shields and spawn the Rawlings by 3:12 at the latest, then move the Warden and the entire melee stack into the next clump of eggs near the Doomscale Egg. This naturally puts everyone in position to bait Grasping Fangs properly. Ranged stay back, stacked near the first 3 eggs.
Grasping Fangs:
- The 1st break is done by one player on the NSRT timer. Pick someone fast, like a Mage with Blink, so there's no delay. This one doesn't hurt much, but watch for puddles on the ground.
- The 2nd break happens as soon as that debuff falls off. Here, all 5 remaining players break together. Everyone needs to break exactly on the timer, so stand at the edge of the circle. Late breaks extend the DoT and can cost you 1 to 3 extra ticks for nothing.
Everyone needs to use their strongest defensive here, including immunities, plus at least one health potion or Healthstone. Don't throw away Phase 2 pulls by holding these back, you won't need them later.
Right:
Left:
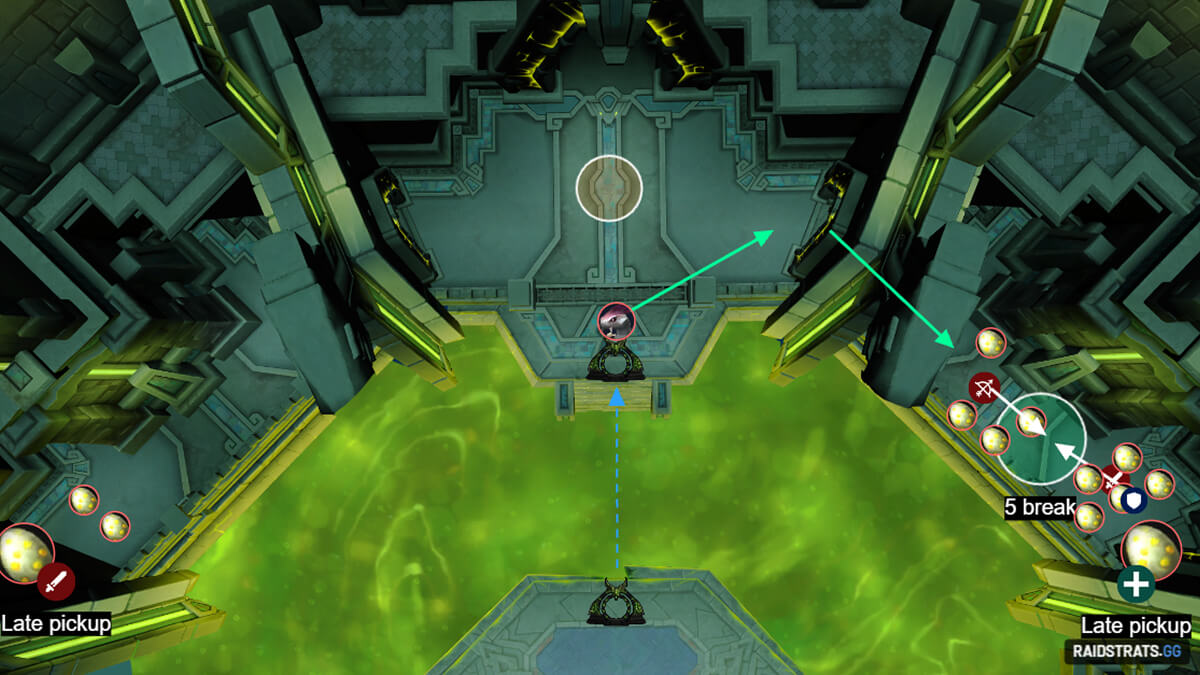
Everyone should have their egg pre-assigned so players can get used to the movement and traffic.
First DPS Check
The Warden has to die before the next Writhing Gestation. Otherwise it turns the nearby eggs into a Blightscale Clutch that you also have to kill, which delays you too much to finish the phase.
To the Cauldron
Once the Warden is dead, the assigned players pick up their eggs, but leave the Doomscale Egg for now (see picture). Follow the traffic rules carefully:
- Stay on your side.
- Don't drift left or right.
- If someone in front of you has to stop, stop too.
There are a lot of puddles, so rushing doesn't help. When the first players reach the Cauldron, don't throw your egg in immediately. Stand in front of it and wait for everyone else. Throwing them in at almost the same time gives the Rawlings the same HP and makes your AoE much more effective.
That matters because this is another DPS check: the Rawlings need to die before Boiling Venom, so everyone should main target them here. If they do enrage, stun them to stop Acidic Expulsion from hitting your raid.
The Second Section
Now move to the other section of the platform, where there are only 2 eggs and a Doomscale Egg. The assigned healers go back to the previous section to pick up that Doomscale Egg.
- Bring the Rawlings on top of the 2 eggs and break the shields.
- Once they can be picked up, the tank and a DPS take them.
- After that, you can finally pick up the Doomscale Egg.
If you're behind, pick up the Doomscale Egg before its timer runs out anyway. The only consequence is that the 2 nearby eggs start Gestation, and you just need to burn them down.
Doomscales
If everything went well, bring the Doomscale Eggs to the Cauldron, throw both in at the same time to keep the adds' HP even, and mark them. Assign 3 players per add to kick Anguished Cry. Two is enough, and the third is a backup.
It’s best to use focus macros to mark and kick marked like:
/focus [@mouseover,exist] /tm [@mouseover,exists] ~3
#showtooltip Kick /cast [@focus] Kick
As soon as the first kick is done, everyone goes back to the main platform, uses their 2nd pot and Hero, and brings the adds close to Ula'tek. Put 2 on each side for better cleave and padding. The adds gain Revenge if one dies before the others, but it's fairly forgiving and usually not dangerous. Just kill them quickly after the amp.
Intermission
This phase is short and fairly simple, and there's a good chance you'll get through it on your first attempt. If you've gotten this far without NSRT, this is the last chance to install it, because it makes the phase much easier.
Teams
- Team 1: 1 tank, 1 healer, 5 melee
- Team 2: 1 tank, 1 healer, 4 ranged
- Team 3: 2 healers and the rest of the DPS
Team 3 is a bit special. It always soaks the 3rd slam and usually only does 2 soaks, which gives its two healers more time to heal everyone. Put your strongest multi-dotters, like Boomies and SP, in this team so they have time to ramp up. That makes killing the 8 eggs easy.
Why NSRT
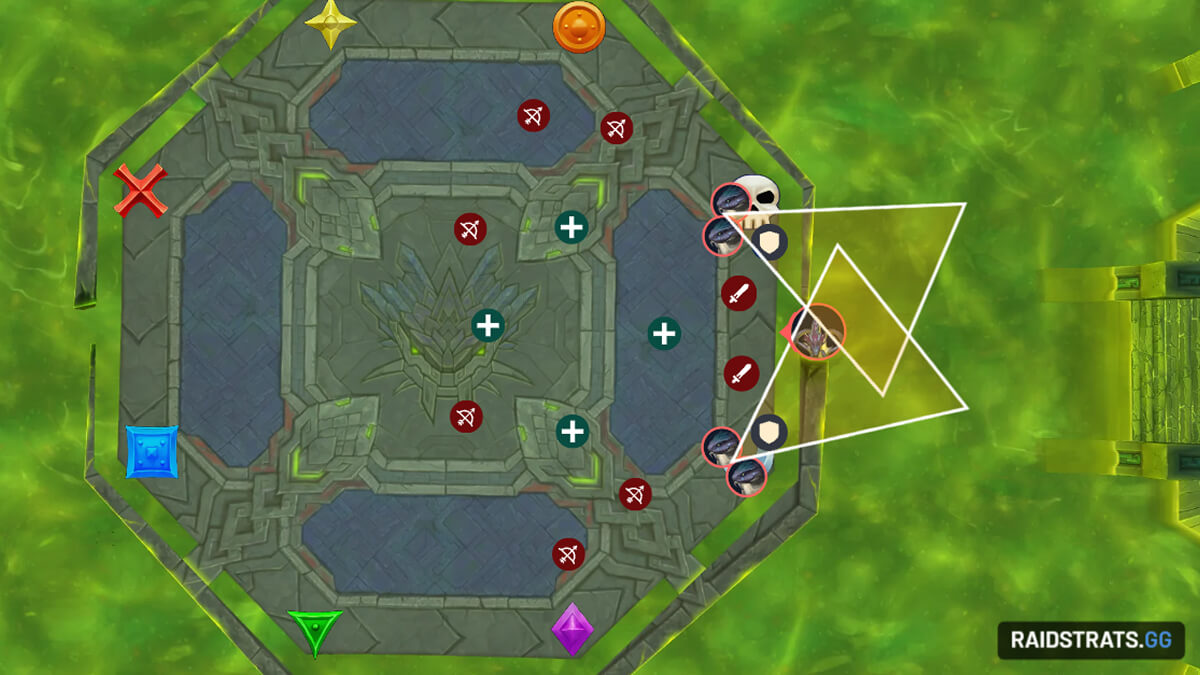
NSRT means you don't have to learn the 3 different patterns. One assigned player spots the first slam, which will be on Orange, Star or Red. NSRT works out the rest of the pattern from that and sends each group to its marker with a timer.
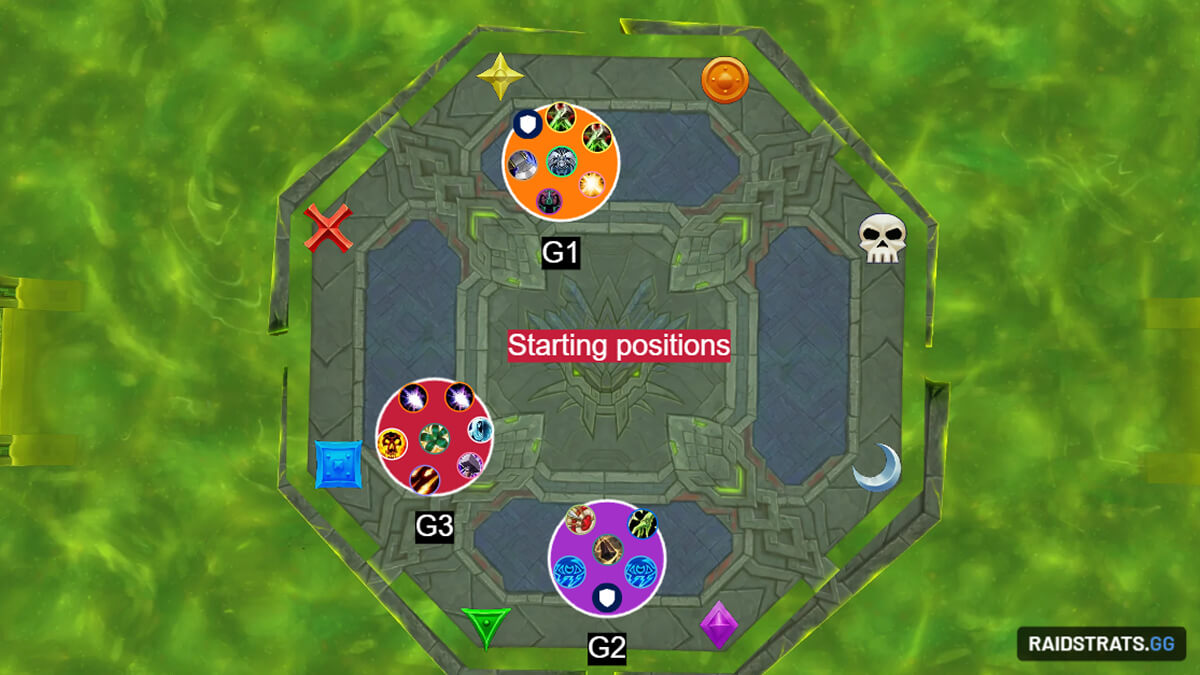
All you really need to do is pick up one or two eggs for each slam so they all get popped, and survive. Healing can get very spicy here, so healers should use their potions. Be aggressive with personals and health potions too. Once every soak is done and every egg is popped, stack up the Rawlings and finish them as Phase 3 starts.
Phase 3
The hardest part of Phase 3 is getting there with everyone alive and the boss low enough to kill. The phase itself is very simple, arguably easier than Heroic was at release, but one wrong move still wipes the raid.
First, find the bubbles in the water and move to the boss. If she's on the exact opposite platform, use the Warlock gate instead of running.
UPDATE: Due to recent changes, we suggest following formation.
Serpent's Bite Teams
- 1st set: 2 Mages, 1 Hunter, (1 ranged backup)
- 2nd set: 1 Rogue, 2 tanks (1 melee backup)
- 3rd set: 1 healers, 2 tanks (1 healer backup)
Just like Heroic, each set always targets one melee, one healer and one ranged, so you only ever need one backup per set, for example if one of your Mages gets the circle on the first set or one of your Rogues on the second.
The Main Rule
Players who get arrows (the ones who soaked but weren't originally targeted by Serpent's Bite) must never, under any circumstances, send a wave toward the raid stack in the middle of the platform. It's much better to die to place your wave correctly than to hit the raid, because that almost always leads to a wipe.
Platform 1
Surprisingly, this is the hardest one. Your tanks need to grip the 3 far adds:
- Grip the first 2 on the left/right side right away.
- Grip the one on the left/right side after the tank mechanic.
- Mass grip them on top of the raid, since that's the safe spot. If a wave hits them, they turn into Vipers.
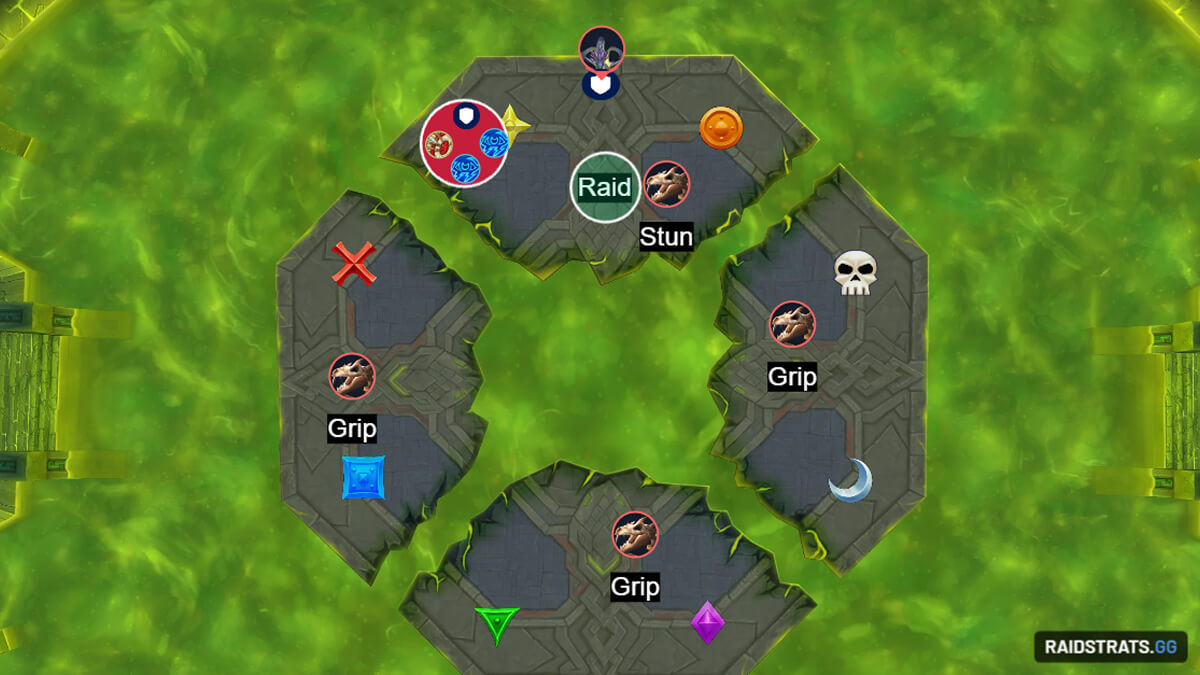
You have to do this twice, because they respawn during Serpent's Bite. Group 1 goes to the top left corner and then spreads out. Healers need to pay extra attention to everyone who soaked, since they have a nasty DoT, and those players should use big immunities or personals as soon as they drop their waves. Dodge the big wave together and cross the platform.
Platform 2
The second hardest platform. There's a Wretch here that naturally comes to the raid, so it's almost impossible not to be standing in its bubble. Group 2 moves to the top right while staying inside the bubble. Most importantly, both tanks need to stay inside the circle the whole time, which is tricky because of the tank mechanic, so make sure you're physically touching them. Self-pings are very useful here to show where you are. Tanks need to get knocked in a way that they are still in the circles.
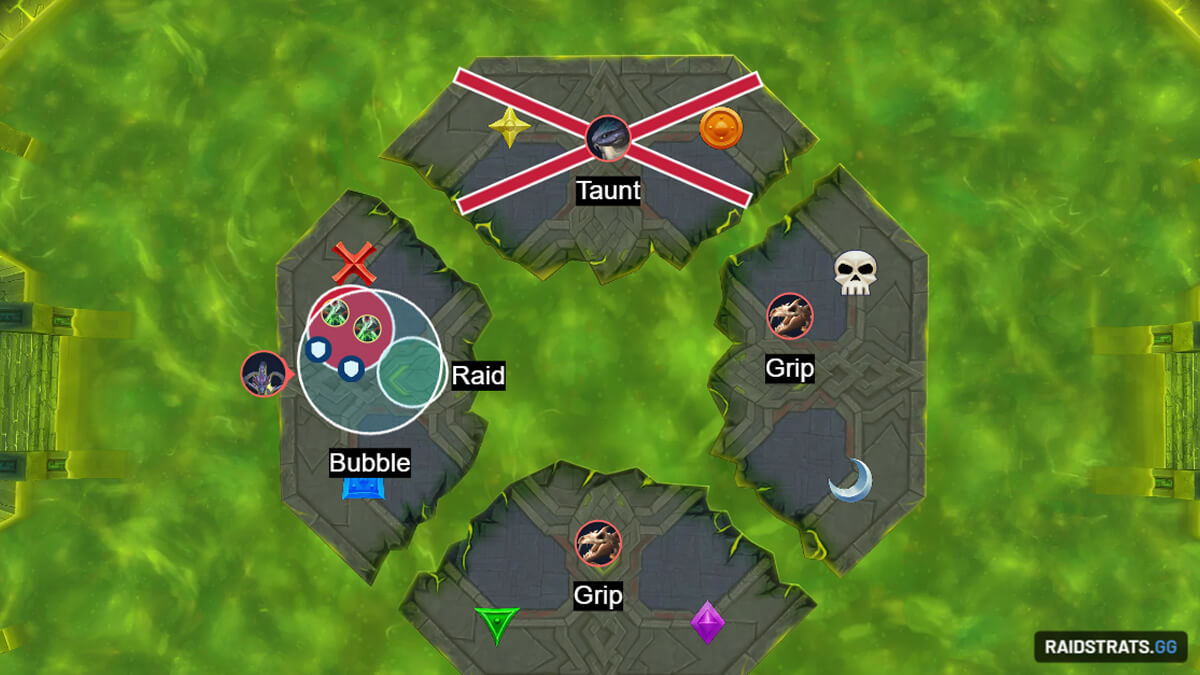
On this platform, the circle players dodge waves together and spread out afterward. The raid should stand against the back edge to give the circles room to move in front of them. Remember to taunt the Blightscale Shrieker when it spawns.
Platform 3
By far the easiest one, with almost nothing happening. There are no Serpent's Bite and only one set of waves to dodge. Just kill 2 Shriekers before you reach the last platform.
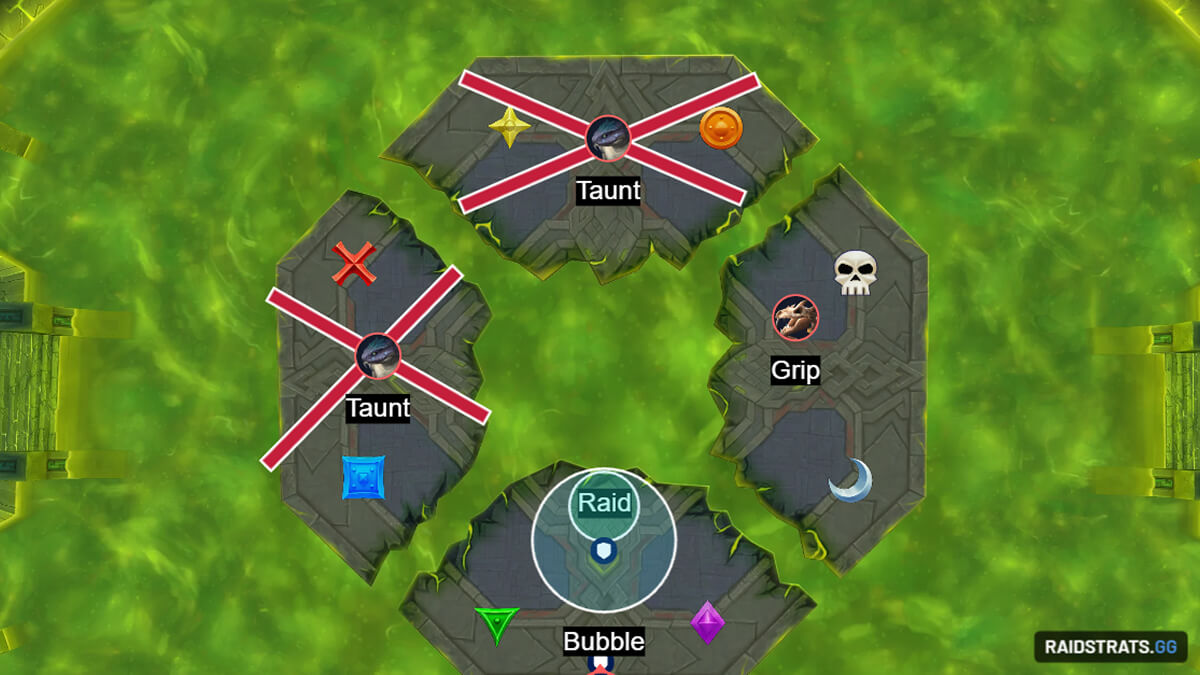
Platform 4
If you make it here, don't panic. Two moves and the boss is dead. There are no adds on this platform.
- The raid stands in the middle as usual.
- Group 3's circle players go all the way to the front, in the middle.
- Everyone dodges the wave set together.
- Once you're in the safe spot, the circle players stay there while the rest of the raid moves back.
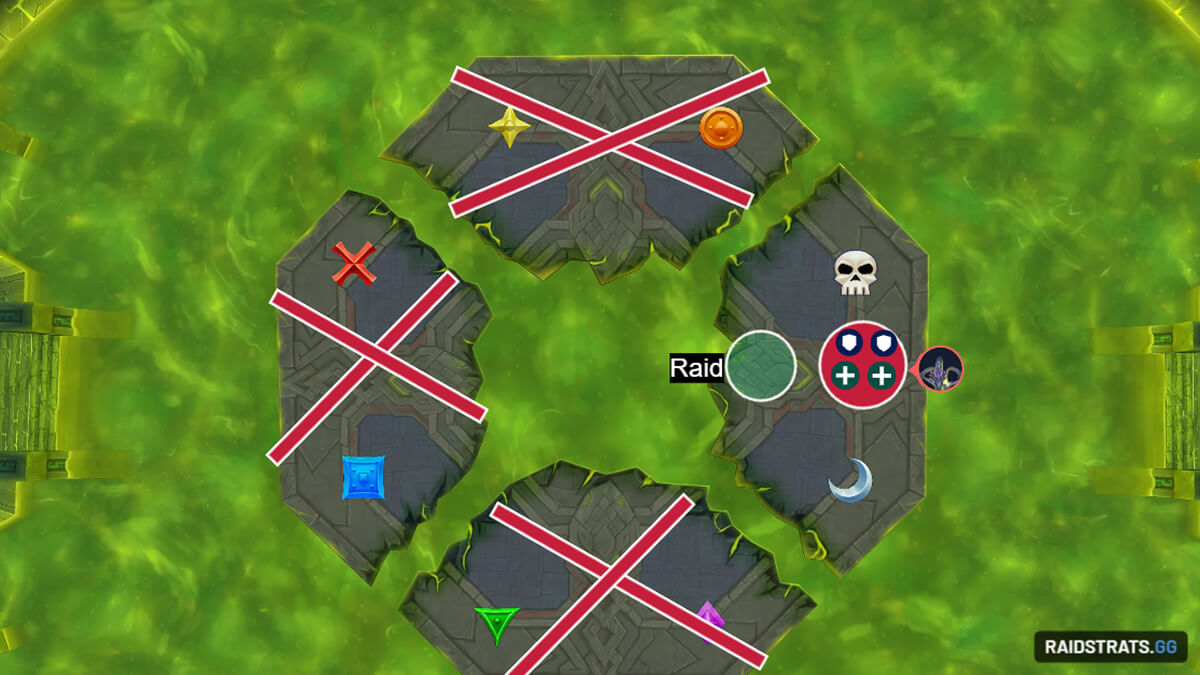
The most important thing here is that Group 3 is meant to die. Don't hesitate to walk into the water if that's what it takes to avoid hitting anyone. Use every personal for the damage amp, dodge what you need to, and kill the boss. If you need a few extra seconds, jump into the water before the platform breaks and finish her off.