Raid Setup


Introduction
Welcome to our Heroic Nek'zali guide, the first boss of the Venomous Abyss raid in Midnight Season 2. This guide covers the fight mechanics and the strategy we recommend to defeat this boss on Heroic difficulty!
Every raid tier needs a bouncer at the door, and Nek'zali is exactly that. She's not here to end your evening, she's here to check if your raid understands one very simple concept: don't let things walk into the big scary well.
Think of it as tower defense, except the tower is a hole in the ground, the creeps are zombies, and losing means the snake cultist in the middle gets a 500% damage buff. If your raid can kill adds before they finish their little journey, you're most of the way to loot.
Fight Style: Single Target with constant add control
Recommended Setup: 2x Tank / 4x Healer / 14x DPS
Required utilities: Dispels (magic) and strong AoE for the intermission
Hero/Lust usage: Phase 2
Method Boss Review
For a first boss, Nek'zali does her job really well. The core loop is simple enough that most raid groups understand it after one pull, but there's actual texture underneath: puddle placement in Phase 1 directly decides how annoying Phase 2 gets, and the corpse cleanup during the intermission is a genuinely clever bit of design. Your Phase 1 decisions follow you around the whole fight, which is more than you can usually say about a raid tier first boss.
The intermission is the highlight. Burning corpses with soak circles and Slithering Flame turns what would normally be "kill two adds, and then wait" into a small optimization game, and raid groups with strong AoE will have a great time here.
Is it hard? No, but it teaches the raid the Soulcoil Well rule on boss one, and something tells me that lesson is going to matter deeper into the Venomous Abyss.
Method Boss Rating: (3/5)
Video Guide
Easy Mode
The main rule: nothing reaches the Soulcoil Well. Every add that touches it feeds the boss energy, and 100 energy is the enrage.
Phase 1:
- Tank the boss at the entrance, facing away. Tank stands 30+ yards out for Possession Barrage, nobody stands in the line.
- Taunt swap at 30 to 40% healing reduction from Hollowing Strikes.
- Essence Rend players move to the side and get dispelled there. The DoT drops a permanent puddle, so place it somewhere harmless.
- Restless Amani march to the well from the sides. Break their shield with magic damage, then kill them before they arrive.
- Adds reaching the well cause Soulcoil Rite and Ritual Burn stacks. One is fine, several is a wipe.
- Have zero Ritual Burn stacks and prepare healing cooldowns for Soulcoil Ignition. Dodge the Anguished Echoes circles during it.
Intermission (50%):
- Don't stand in the Soul Transfer beam when it finishes.
- Melee group-soaks Hungering Pyre. Non-soakers get Slithering Flame circles.
- Both the Pyre and the Flames burn away corpses. Use them, because corpses revive as empowered adds during this phase.
- Kill both Echoes of Jawae to end the intermission.
Phase 2:
Mechanics

A well of necrotic energy in the middle of the room. Standing in it hurts, a lot, and dying inside it gets you Soulcoiled.
More importantly, this well is the whole fight. Any Restless Amani that reaches it triggers a Soulcoil Rite, so your entire job is keeping things away from it.

Every time the well gets fed, Nek'zali gains 5 energy and the whole raid takes a hit of Shadow damage plus a stacking DoT.
Heroic: each Rite also applies Ritual Burn, which makes you take 15% more damage from the next Rites for 60 seconds, stacking. Translation: letting multiple Amani reach the well snowballs really fast into a wipe.

If Nek'zali reaches full energy, she gains 500% damage, 150% attack and movement speed, and taunt immunity. This is the enrage. Don't feed the well and you'll never see it.

Nek'zali stirs the well herself, triggering the Soulcoil Rite 4 times in a row. This is your big scripted healing moment.
During the channel, Anguished Echoes shoot out of the well and crash down as small circles that deal heavy damage and knock away anyone standing in them. Just dodge.
Traps several players, pulls them in for 5 seconds, then knocks them away with a chunk of damage.
You keep a ghostly essence on you afterwards that ticks for 15 seconds. When it ends (or gets dispelled), a Latent Cultist spawns at your location, so position it somewhere safe before it drops.

A cultist spirit that explodes on spawn, hitting anyone within 6 yards, then stays on the ground as a slow zone that hurts and reduces movement speed by 40%. Don't stand in it, and don't drop it where you'll need to walk later.

Restless Amani
Spirits possess the corpses in the sarcophagi around the room and slowly march towards the Soulcoil Well. They spawn with Gravebound Advance, a magic absorb shield worth 25% of their health. While the shield is up they can't die and can't be stopped, they just fixate on the well.
Break the shield with magic damage, then kill them before they reach the water. When they die, they blow up with Corpse Blight, raid-wide Plague damage plus a stacking DoT.
Heroic: dead Amani leave their corpse behind as a Vessel Of Awakening. These get repossessed during the intermission, so where you kill them matters.

Nek'zali fires spectral echoes at her current tank that explode on impact and damage the entire raid. The farther they travel, the less damage they do, so the tank wants to be far away from the boss when this comes out. Make sure nobody is standing in the line as it will explode on the first player it hits.

Her melee attacks apply a stacking DoT that also reduces healing and absorbs received by 5% per stack. This is your tank swap trigger.

At 50% health, Nek'zali retreats to the well and becomes immune thanks to the Echoes of Jawae.
Spectral echoes with a Tether Of Awakening connecting them to the well, making Nek'zali immune. Kill the Echoes to sever the tethers and drag her back into the fight.

Jawae channels her essence into an Echo over 15 seconds, then it detonates in a big blast on anyone caught inside. Get out before it finishes.

An Echo erupts in soul fire that gets split evenly between everyone within 10 yards, so this is a group soak. Anyone who skips the soak gets chased by a Slithering Flame instead, which ignites on them with a nasty Fire DoT.
Heroic: when a Slithering Flame expires, it combusts into Cremation, exploding and incinerating corpses and Restless Amani within 4 yards.
They keep spawning during the intermission and, on Heroic, they now repossess the Vessels of Awakening you left lying around from Stage One. Reawakened Amani come back empowered with a heavy pulsing aura, so the fewer corpses near the well, the smoother this goes.

Nek'zali dumps everything into the well and it overflows, ticking Shadow damage on the raid for the rest of the fight. This is the soft enrage, from here it's a race.

She invokes the Soulcoil Rite herself and commands all Latent Cultist to perform an Entwined Step, repositioning around the well. So all the puddles you dropped in Stage One now start dancing around the room. The fewer Cultists you created earlier, the less chaos you deal with here.

The Rest
Essence Rend, Soulcoil Rite, Ritual Burn, Soulcoiled, Hollowing Strikes and Possession Barrage all carry over from Stage One and work exactly the same. The fight ends when either Nek'zali dies or her energy bar wins.
Strategy
Nek'zali is a two phase fight with one intermission in between, and the whole encounter revolves around one simple rule: nothing reaches the well. Every add that touches the water feeds the boss energy, and at 100 energy she enrages with Uncoiled Rage. So this is add control first, boss damage second.
Phase 1
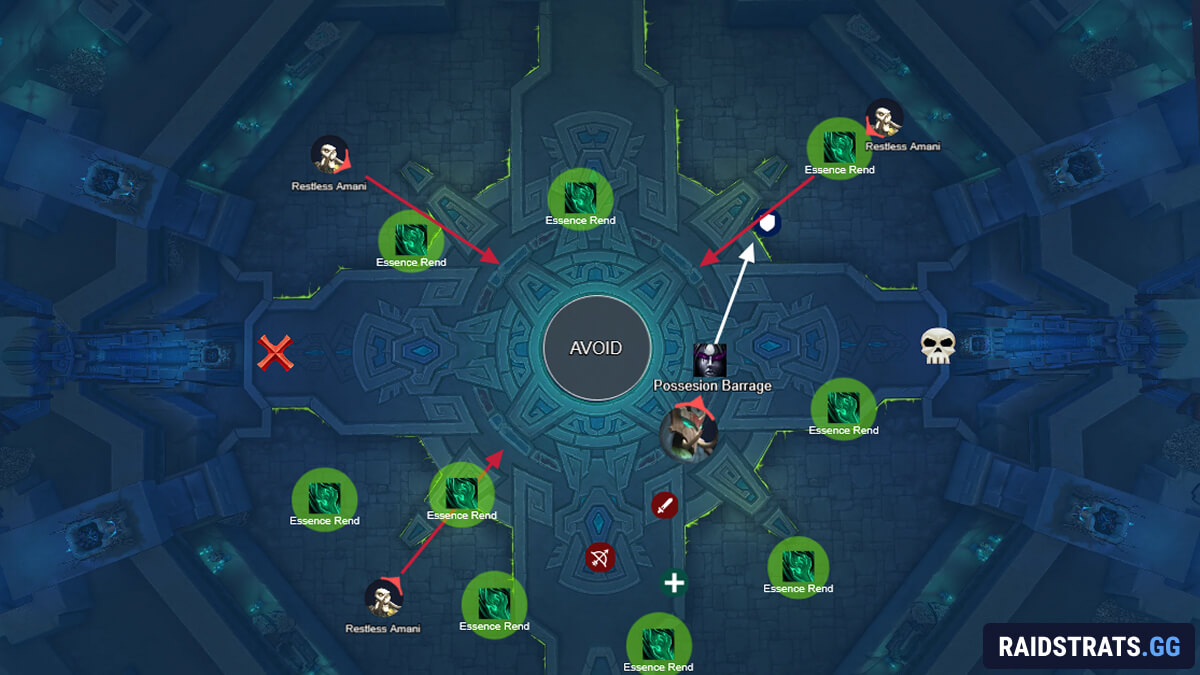
Pull the boss to the entrance area and face her away from the raid. She doesn't have a typical frontal, but she casts Possession Barrage on the current tank, sending out 4 spirits that each deal distance-based damage to the entire raid and pop on the first target they reach.
Two things to get right here:
- The tank should be at least 30 yards away from the boss when the barrage comes out, so the spirits travel far and hit soft.
- Nobody else stands in the line between boss and tank, unless you enjoy eating 4 full-damage spirits with your face.
The other tank mechanic is Hollowing Strikes, a stacking healing reduction. Nothing fancy, just taunt swap once the current tank reaches around 30 to 40% reduction.
Essence Rend
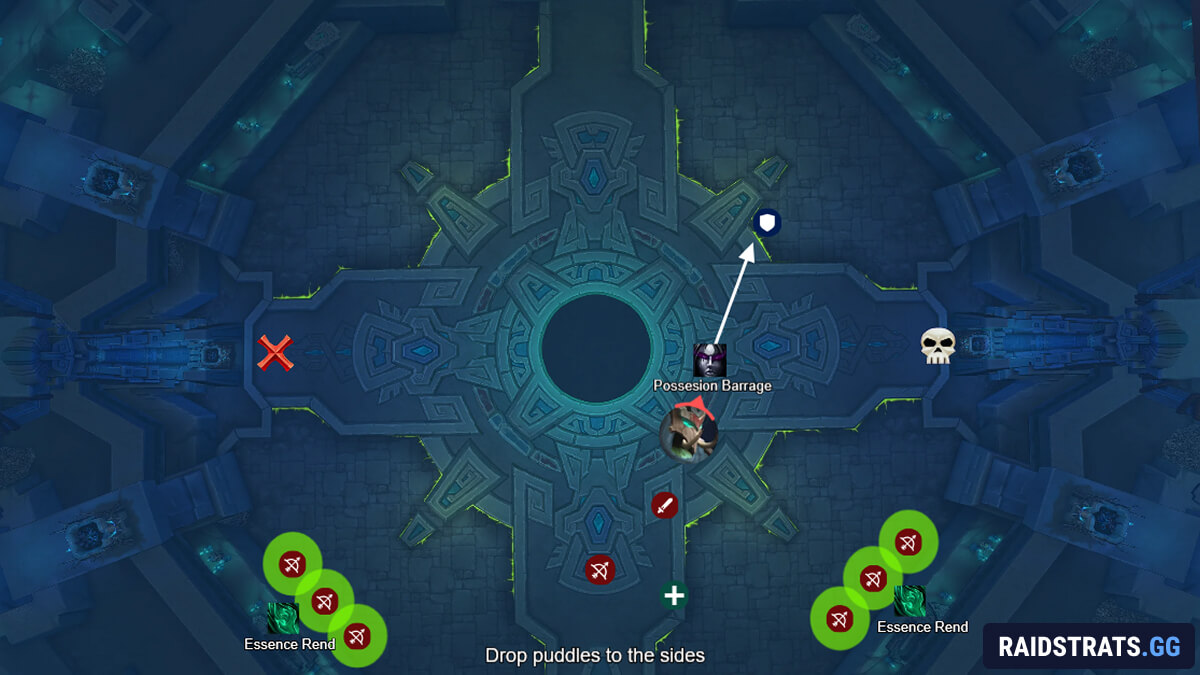
Several players get targeted by Essence Rend. It pulls you towards the middle for a moment, then knocks you away and leaves a 15 second DoT that can be dispelled. Wherever the DoT ends, a permanent Latent Cultist puddle spawns.
So the play is: targeted players move out to the side of the room, get dispelled there, and the puddle lands somewhere harmless. Stacking everyone up and mass dispelling also works if your raid prefers that. Either way, be intentional about it, because these puddles come back to haunt you in Phase 2.
Restless Amani
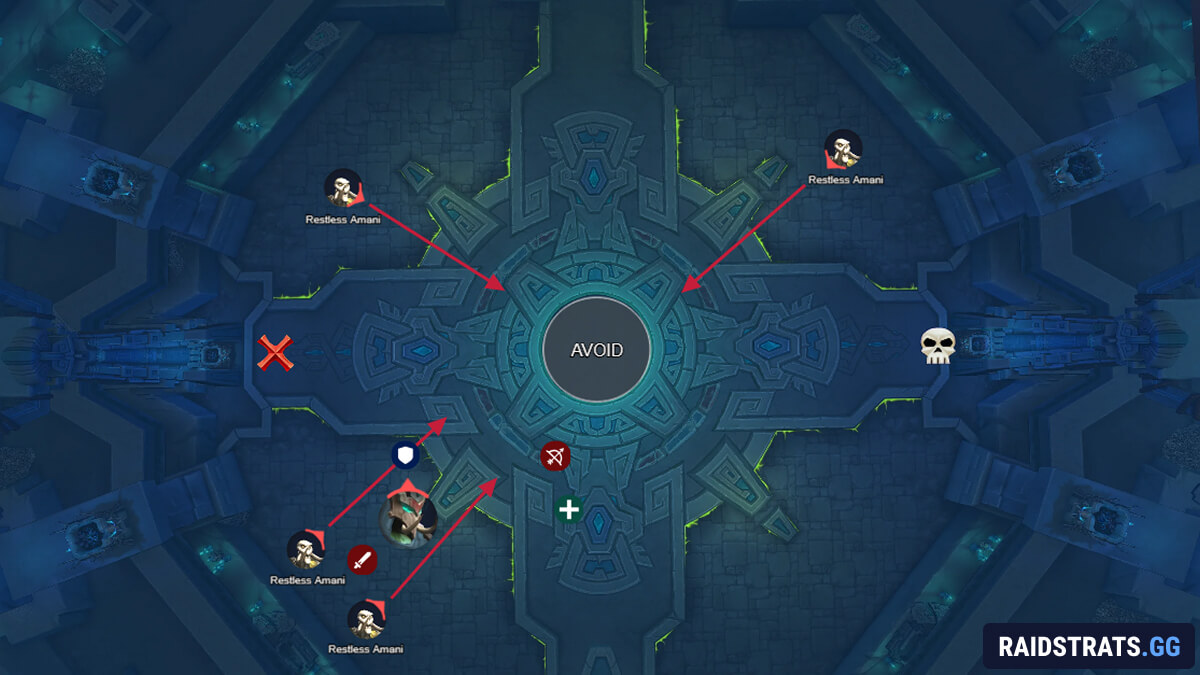
The Restless Amani spawn from the sarcophagi on the sides of the room and slowly march towards the Soulcoil Well in the middle. While their Gravebound Advance shield is up, they can't die and can't be stopped, but the shield only absorbs magic damage, so any caster can strip it. Break the shield, then kill them before they reach the water.
Every add that makes it to the well gives Nek'zali 5 energy and triggers Soulcoil Rite, a raid-wide hit with a stacking DoT. One slip is survivable. Several adds reaching the well back to back is not, because Ritual Burn makes each following Rite hit 15% harder, and that snowballs into a wipe very quickly.
Soulcoil Ignition
The boss also triggers Rites herself with Soulcoil Ignition, which is essentially 4 Soulcoil Rite in a row plus Anguished Echoes raining out of the well. Dodge the impact circles, pop a healing cooldown, and most importantly: make sure you have zero Ritual Burn stacks going into this. Ignition on a clean raid is a healing check. Ignition with Burn stacks is a graveyard run.
At 50% health, Nek'zali retreats to the well, becomes immune, and the intermission begins.
Intermission: Ritual of Awakening
Right at the start, one side of the room gets hit by Soul Transfer, a 15 second channel that spawns an Echo of Jawae. Just don't stand in the beam when the cast finishes.
The Echo casts Hungering Pyre on a random player, a large soak circle that splits its damage between everyone inside. Send the melee to soak it, and here's the neat part: the Pyre removes any corpses it's standing on. Everyone who doesn't soak gets a Slithering Flame circle instead, which you can also deliberately walk over leftover corpses to burn them away.
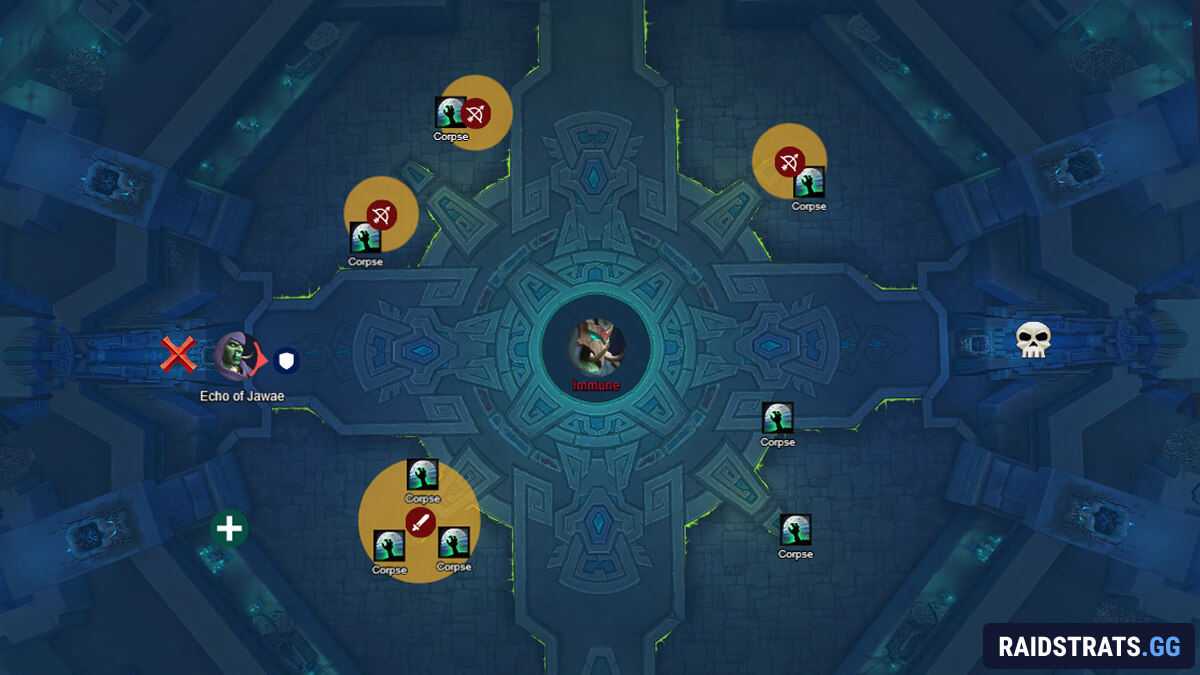
Why do you care about corpses? Because on Heroic, every Amani you killed in Phase 1 left a Vessel Of Awakening behind, and during this intermission those corpses revive as empowered adds. So the intermission is basically spring cleaning: soak the Pyres, aim your Flames, and delete as many corpses as you can while add pressure ramps up. Strong AoE makes this phase genuinely fun. Weak AoE makes it genuinely miserable.
Kill both Echoes of Jawae to sever the tethers, and the intermission ends.
Phase 2
Phase 2 is a race against the clock. Uncoiling ticks raid-wide damage every second for the rest of the fight, and the boss keeps every ability from Phase 1 on top of it.
After she casts Invoke, all the Latent Cultist puddles you placed in Phase 1 start repositioning around the well. There's no outplaying this, just dodge them as they move. This is also the payoff for playing Phase 1 cleanly, fewer puddles then means way less chaos now.
Adds keep coming and will slowly overrun you, so the game plan is simple: Hero, cooldowns, and kill the boss before she hits 100 energy. There's no Plan B.