Up to 84% Off VPN


Raid Setup


Introduction
Welcome to our Heroic Ula'Tek guide, the final boss in The Venomous Abyss Raid in Midnight Season 2. This guide covers the fight mechanics and the strategy we recommend to defeat this boss on Heroic difficulty!
By the time you kill Ula'tek, you'll know more about the hatching habits of reptiles than any biology teacher ever taught you. Turns out snake eggs don't crack from the outside, the little ones headbutt their way out with a temporary egg tooth, and they'll cook or spoil if the conditions around them go wrong. Ula'tek took that lesson to heart, which is why her whole arena is a nursery and your whole job is not messing up the incubation.
Fun fact: some snakes can go months between meals, and a few species clone themselves without a mate. Ula'tek has sixteen thousand years of pent-up hunger and an entire brood she made without asking anyone, so she's basically both of those facts stacked into one very angry five-headed final exam. Keep the eggs cozy, keep yourself off the menu, and don't hatch the big ones.
Fight Style: Single Target with heavy add and egg control, 3 phases plus an intermission
Recommended Setup: 2x Tank / 5x Healer / 13x DPS
Required utilities: Interrupts, poison dispels, mobility (grips, rescues, Warlock gate) for the Phase 2 crossing, heavy personal defensives for Phase 3
Hero/Lust usage: The first damage amp (Rage Of The Shackled) in Phase 1
Method Boss Review
This is how you end a raid tier. What makes Ula'tek special is something a lot of modern fights have lost: it actually flows. So many encounters these days are one loop repeated until a percentage, then the next loop repeated until the next percentage, and you never really feel like you're going anywhere. Ula'tek doesn't do that. Every phase moves you somewhere new, hands you a new problem, and builds on the last, so the whole pull feels like a journey with a real sense of progression from one step to the next. You're not grinding a health bar, you're travelling through her prison as it comes apart around you.
The egg system deserves special credit. We've all suffered through the bomb, crystal and seed mechanics of tiers past, the ones where one person's tiny mistake detonates the raid and the whole fight becomes babysitting. Ula'tek's eggs are refreshingly relaxed: low-maintenance, forgiving of the occasional slip, and woven into the fight instead of bolted on top of it. And the damage amps, as always, are pure fun, those windows where you get to drop everything and unload never get old.
Then Phase 3 delivers a genuinely spectacular finale, the arena collapsing beneath you piece by piece as the pressure peaks. It's dramatic, it's tense, and it earns its place as the last thing you'll fight this season. A brilliant capstone to the tier.
Method Boss Rating: (5/5)
Easy Mode
General:
- The whole fight is egg control: anything green touching an egg or its carrier hatches a lethal Blightscale Viper. A clean hatch gives a harmless Rawling you ignore. Eggs need no dedicated handlers.
- Pre-split into two equal groups for the Spectral Coils soaks and the Phase 2 sides.
Phase 1:
- Grab the 3 starting eggs as you pull (touching them pulls the boss).
- Tanks keep both boss melee and tail covered, or the raid eats Mother's Wrath / Rattler Slam. Swap during casts.
- Run opposite the wing she pulls back for Caustic Waves. She alternates sides. Find the bubbles for her resurface.
- Soak Spectral Coils in two groups (it pops your eggs, which is fine). Then Hero the Venomous Heart during the first damage amp, dodge Falling Debris.
Phase 2:
- Cross to your side with grips/rescues, save the Warlock gate for the way back.
- Kill the Doomscale Warden in the corridor, cleave its Clutch eggs. Snap Grasping Fangs in pairs, waiting for the DoT to drop between.
- Feed all eggs into the Doomscale Cauldron, small first, big egg last. Interrupt the Weakened Doomscale's Anguished Cry, then gate back and stack for the 2nd amp.
Intermission:
- Pick up every egg, run tail to tail soaking Spectral Coils (Group 1 do casts 1/3/5, Group 2 do 2/4/6). The platform shatters into 4, avoid the middle.
Phase 3 (hardest):
- Melee/tanks on the boss platform, ranged/healers counter-clockwise.
- Serpent's Bite on 1 melee, 1 healer, 1 ranged. 3 soak groups, soak fully, then spread for Volatile Purge. An untended bite becomes a lethal Calcified Corpse.
- Move off the platform before Circling Prey breaks it. Taunt and kill each Blightscale Shrieker (never over 2 stacks of its DoT), interrupt Vicious Echoes.
- The 2nd platform break is the hardest moment, use everything. On the last platform, final Bite plus wave, then race the enrage. You can jump into the venom before the break for extra seconds.
Mechanics

Blightscale Spawn
The eggs that fill the arena. They hatch when they touch venom, and what they hatch into depends on how they're handled.
Touching an egg sticks a Malignant Shell to you, a small DoT while attached, which is how you pick one up and move it.
A controlled hatch produces a weak Blightscale Rawling, but an egg hit by venom produces a lethal Blightscale Viper instead.

Blightscale Rawling
The weak version, from a controlled early hatch. They bite for a stacking poison DoT (Poisonous Bite), but they're easy to clean up.

The dangerous version, from an egg touching venom.
Every Viper that hatches sprays the whole raid with Putrid Membrane, a 20 second Nature DoT, so uncontrolled hatches stack raid damage fast. Vipers also cast Petrifying Sting, diving at a player and turning everyone within 10 yards to stone with a healing absorb, along with their Acidic Burst poison spit.
Keep Vipers to a minimum by controlling the eggs.

The defining Stage One mechanic. Ula'tek sends waves of venom across the platform, dealing heavy damage plus a stacking DoT to anyone in their path, and any egg the wave touches instantly hatches into a Viper.
So you dodge the waves yourself and keep the eggs out of their path.

Ula'tek roars and drops spawn from the ceiling, dealing damage to players near each impact. Spread so nobody eats multiple.

Tank mechanic. She knocks back and marks her target, biting them for heavy damage and injecting stacking Stone Venom plus a Hobbled slow. The catch: if her target is out of reach when this goes off, the whole raid takes it instead.
So the tank stays in melee for it. Swap on high Stone Venom stacks.

If tail cannot hit anyone, her tail slams for Rattler Slam (heavy raid-wide damage), so make sure there is always someone tanking it.

Tail sweeps the ground, inflicting Nature damage to players within 35 yards and knocking them back. In addition, players outside 35 yards are inflicted with lower Nature damage and an additional DoT every 2 sec for 10 seconds.
Simply dodge the this.

Her coils rise and crush the platform for big raid-wide damage that's reduced by how many players stack at each impact, so this is a stack-and-soak.
She also casts Soul Constrictor on the players, soaking it, preventing them from mitigating the next Coils for 6 seconds, so split into two groups.

The burn window, and your main damage check. She rages for repeated raid-wide damage over 20 seconds while Falling Debris rains on random spots (dodge the impacts). Flying into this rage exposes her Venomous Heart, which takes 100% increased damage for 20 seconds.
Because Ula'tek's Bond makes all her forms share health, every point you pour into the Heart counts. This is where cooldowns go.

If she can't melee anyone while not casting, she blasts the whole raid with Physical damage. Just keep her tanked, never let her sit idle.


A special egg. Disturbing one triggers Mass Gestation, causing the remaining Blightscale Spawn on that side to begin Writhing Gestation, and the beast inside hatches after 20 seconds into a Ravenous Doomscale.
Picking one up sticks a Doomscale Shell DoT to you while you carry it.

The beast from a Doomscale Egg. Left alone it roars with Dread Roar, a lethal raid-wide hit that also stuns everyone for 20 seconds, so it cannot be allowed to free-cast.

The Stage Two priority add. Wardens slither between eggs and cast Writhing Gestation, turning nearby spawn into a Blightscale Clutch that grows in power until destroyed.
They protect eggs with Warden's Protection (an aura that damages nearby players and forbids touching the eggs while the Warden lives), and they periodically unleash Malice, a deadly raid-wide channel you must interrupt.
They also sink Grasping Fangs into players, a DoT and slow that, when snapped, injects Blight Vein into the whole raid, forcing you to stagger the snaps in a controlled order.
Kill the Wardens to free up the eggs.

An empowered egg cluster created by Writhing Gestation. It grows stronger the longer it's left, so break it before it matures, mindful that a broken clutch still produces Rawlings or Vipers.

Ula'tek spits venom at several spots, damaging players near each impact. Standard spread-and-dodge.
The intermission is mostly a Spectral Coils check: the coils crush the platform for damage reduced by stacking, with Soul Constrictor on Heroic rotating players out, while Necrotic Vapors keeps ticking.
Groups have to run around, soaking all Spectral Coils casts, while picking up eggs on the way.

The signature Stage Three mechanic. Ula'tek destroys a chunk of the platform, pulling players in and dealing lethal damage plus knockback to anyone within 13 yards, while players beyond 13 yards also take damage.
This is what shrinks your usable floor as the stage goes.

Ula'tek fangs several players with a venom DoT that, on expiration, turns them into a Calcified Corpse. Players within 7 yards can leech the venom to remove it, but they then carry Volatile Purge.
The Calcified Corpse radiates heavy damage to the whole raid and pierces immunities, so you cannot afford to let a bite tick out, get it leeched off.

What an untended Serpent's Bite becomes: the player is turned to stone, stunned, taking massive damage, and radiating lethal damage to the entire raid.
This is a wipe if it happens, so Serpent's Bite is a mandatory soak-and-leech.

The debuff left on players who leech a Serpent's Bite. After 5 seconds it erupts for damage to nearby players and stacks, and it also increases damage taken from the venom, so the leechers spread out before it bursts.

New Stage Three adds that rip out of the ceiling eggs. They spit Acidic Expulsion (raid-wide DoT) and scream Vicious Echoes, an interruptible raid hit plus stun.
Interrupt the Echoes and kill the Shriekers.

Strategy
Ula'tek is the end boss and one of the hardest Heroic fights in recent memory. It's three phases plus an intermission, all built on one skill: controlling eggs so they hatch into harmless Rawlings instead of lethal Vipers. Run 2 tanks, 13 DPS and 5 healers, place your markers for the intermission, and save Hero for the first damage amp.
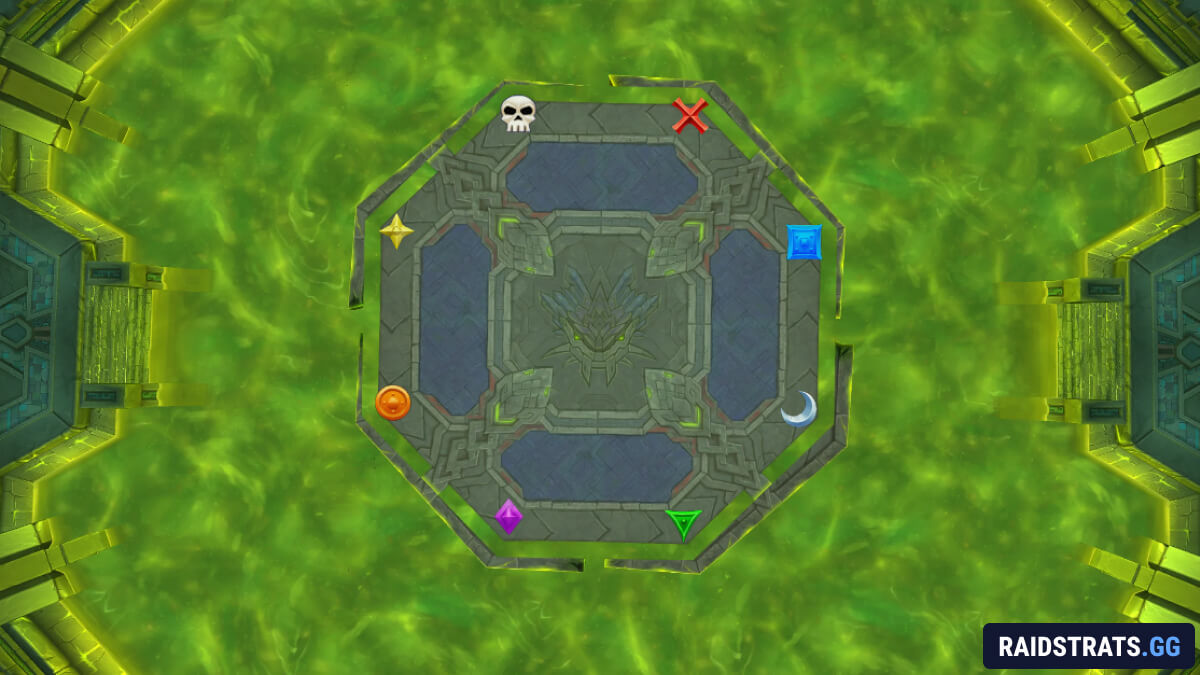
Before the pull, split into two equal groups. You'll use them for the Spectral Coils soaks and the Phase 2 side split, so set them now.
One rule underpins the whole fight: eggs are fine, Vipers are not. Anything green (a wave, a Coil, any Nature hit) touching an egg or its carrier spawns a Blightscale Viper, which sprays the raid with Acidic Burst and petrifies players. A clean hatch gives you a harmless Blightscale Rawling instead, which you ignore and farm resources off. The whole fight is just making sure the green stuff hatches eggs on your schedule. A stray Viper here and there is survivable, a habit of them is a wipe.
Phase 1: Fury of the Serpent Mother
Three eggs sit on the platform at the start, and touching them pulls the boss, so grab them as you pull, anyone can carry. The good news is eggs need no dedicated handler this fight, they're low-maintenance.
The tank job here is the hard part. Ula'tek punishes an empty melee and an empty tail: no one in boss range triggers Mother's Wrath on the raid, no one in tail range triggers Rattler Slam. So both tanks stay engaged, and swaps happen during a wave or another cast, never on open GCDs.
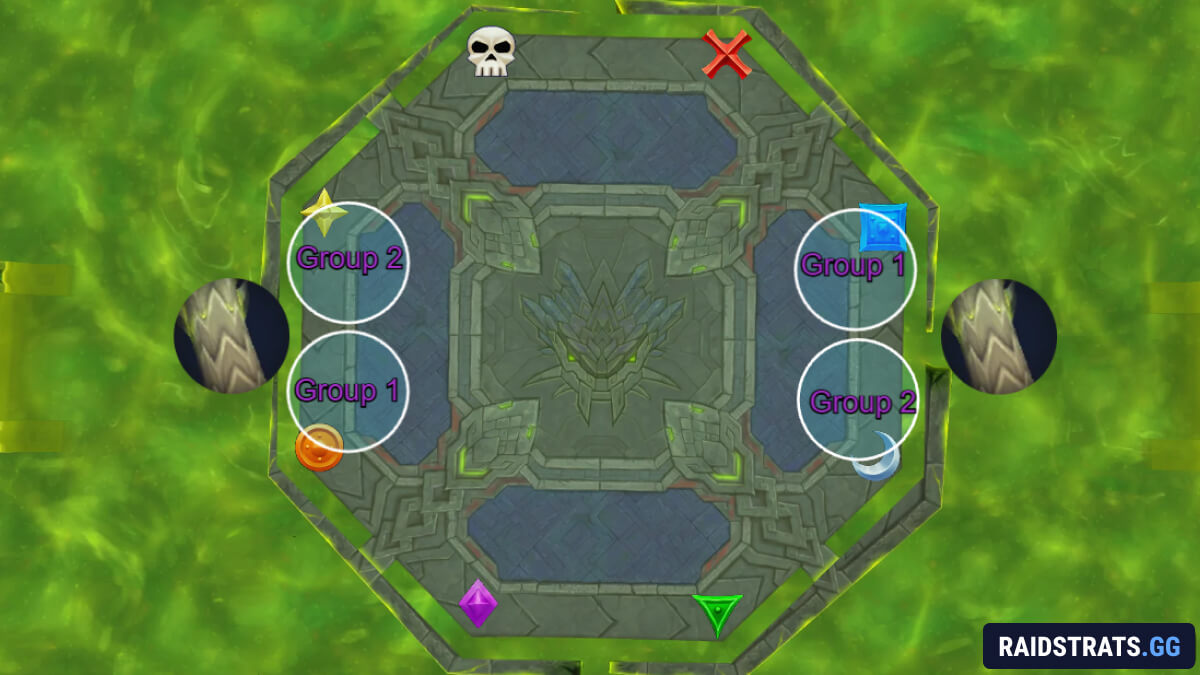
The phase runs a repeating combo:
- Spectral Coils from the tail. Your two groups soak the left and right coil to split the damage, and this conveniently pops the eggs you're holding, which is exactly what you want.
- Caustic Waves. She pulls one wing back to telegraph the swing, so run to the opposite side, dodge the wave line (the tail adds a few of its own), and because she always alternates wings, you can immediately reposition for the next one.
- She submerges and resurfaces at a spot marked by bubbles in the water. The tank needs to be there instantly to avoid an idle-boss punish.
- A wave of eggs spawns, pick up every one, and replay the combo under heavier pressure now that you're loaded with eggs. It ends on another Spectral Coils that pops all of them. Ignore the resulting adds and drag them onto the boss for cleave.
Then comes the first Rage Of The Shackled damage amp: 20 seconds of the Venomous Heart taking double damage. Hero, all cooldowns, full burn, and dodge the Falling Debris while you do it. After it ends she submerges, you re-split into your two groups, and Phase 2 begins.
Phase 2: Children of the Doomscale
Each group heads to its assigned side, and the first challenge is just getting across. Don't swim. A Warlock gate works one way, but it won't be up for both trips, so cross with grips and rescues on the way out and save the gate for the trip back.
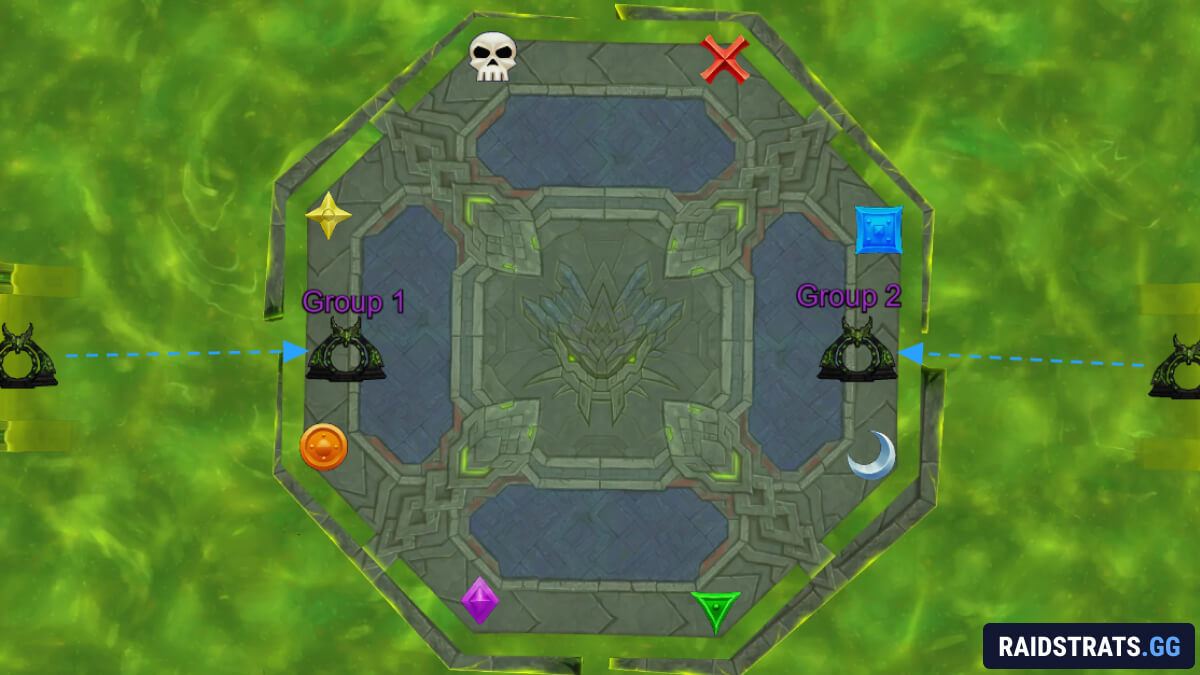
On each platform your priority is the Doomscale Warden. Pull it into the corridor and focus it down while cleaving the Blightscale Clutch eggs it keeps spawning. It will cast Grasping Fangs, tethering 3 players per side to an anchor, and snapping a tether hits the whole raid (both sides) with a heavy DoT. So snap in a controlled order: 2 players at a time, let the DoT fall off, then the next 2, until all are clear.
Once the Warden dies, collect every egg on the ground including the big Doomscale Egg at the end of the corridor, dodging ground effects while you carry. Bring them to the Doomscale Cauldron at the start of the platform and walk them in to be consumed, feeding the small eggs first and the big egg last.
Then you get trash adds you can ignore and a Weakened Doomscale, which is your priority kill, interrupt its Anguished Cry. After the kick, gate back to the main platform where both teams reunite, stack up, clean the adds, and prep for the second damage amp when she resurfaces.
Intermission: The Shattering
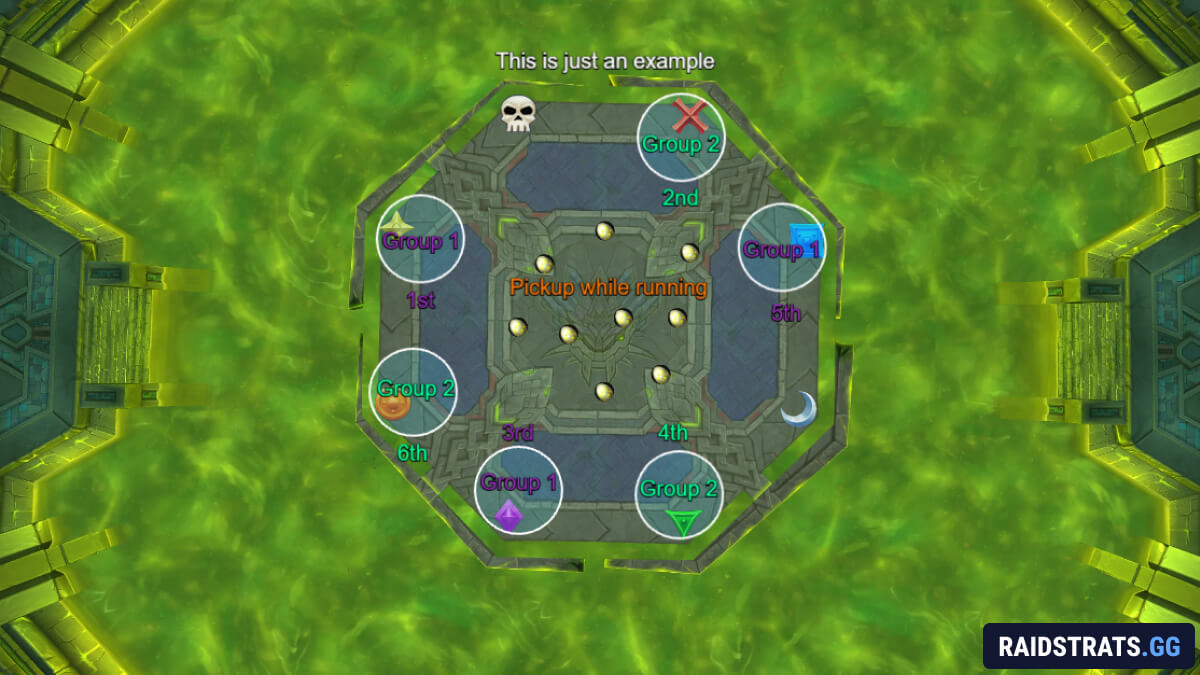
This looks chaotic on video but plays simply. Eggs spawn, pick them all up.
Spectral tails rise up around the room one after another, and your two groups run tail to tail soaking each Spectral Coils: Group 1 takes casts 1, 3 and 5, Group 2 takes 2, 4 and 6.
Keep grabbing the fresh eggs that spawn as you move, their hatchlings are the budget version, so passive cleave handles them. When it's done, the platform glows and shatters into 4 pieces, so stand to the side, avoid the middle, and ride the knock-up into Phase 3.
Phase 3: Ula'tek's Ascension
The hardest part of the fight, and it's all about shrinking space. She surfaces at a bubble-marked platform where melee and tanks play, while ranged and healers sit to the left of it, counter-clockwise.
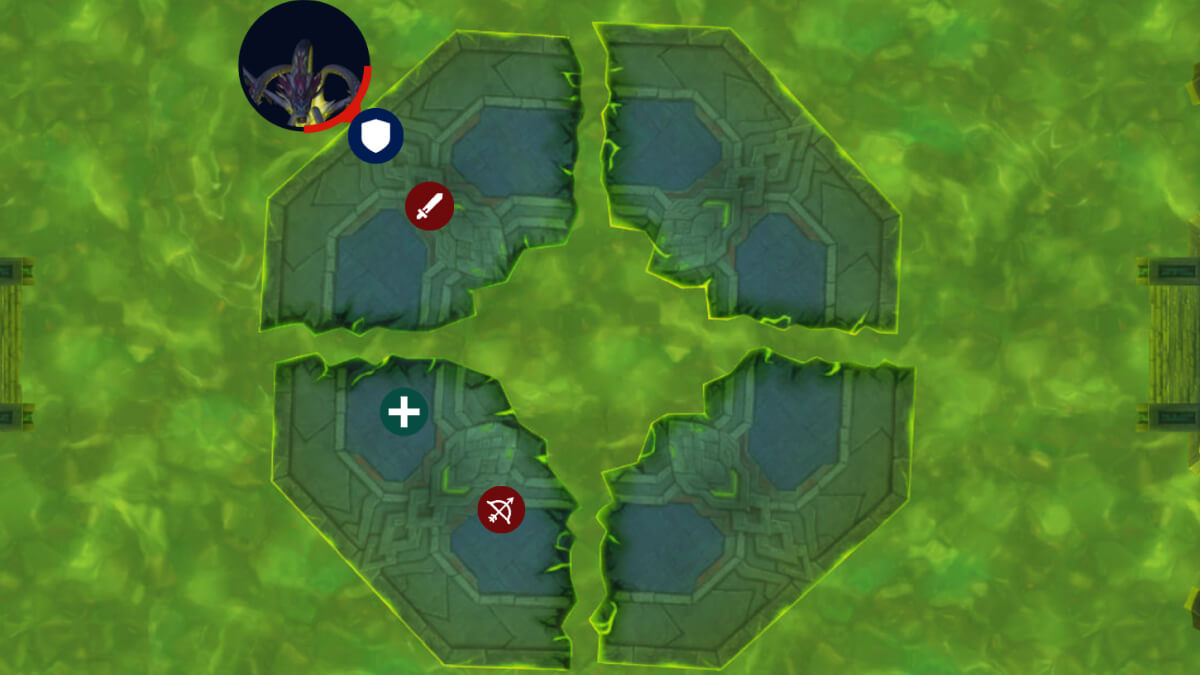
The Phase 3 Rotation
Call Of The Serpent spawns a Blightscale Clutch on each platform, so stay out of the spawn circles. Ranged focus the first set together, melee handles their own.
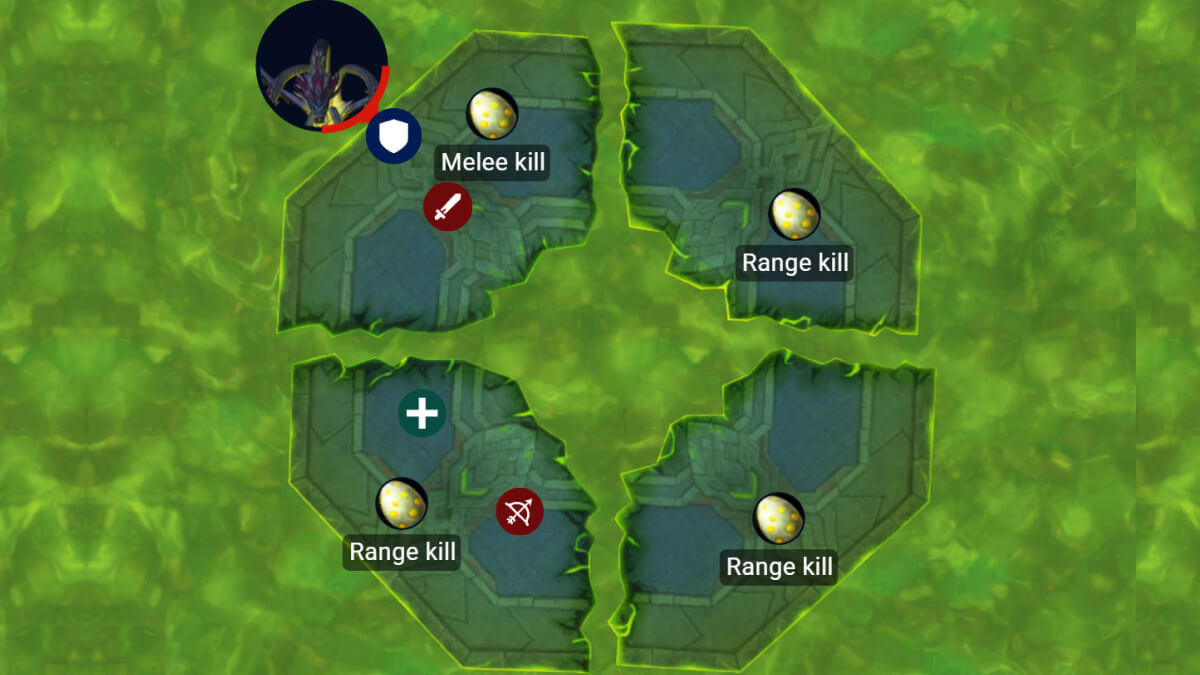
Serpent's Bite lands on one melee, one healer and one ranged, and this is the core mechanic of the phase, handle it instantly. Split into 3 even soak groups (typically all melee, all healers plus close-range like evokers and DHs, and all ranged), stay in the red circle until fully soaked, then everyone spreads because the leftover Volatile Purge erupts after 5 seconds. An untended bite becomes a Calcified Corpse that radiates lethal raid damage, so this is never optional.
Caustic Waves returns, now with gaps you weave through.
Circling Prey breaks the platform the melee are on, so move off it before it goes.
Phase 3 Repeats
From there the same abilities repeat in shifting order, with one addition: every Call Of The Serpent now also spawns a Blightscale Shrieker on a broken platform. Taunt and kill it fast, its Acidic Expulsion stacks a heavy raid DoT and you never want more than 2 stacks, and interrupt its Vicious Echoes.
Once two platforms are gone you get 2 Shriekers at a time, and oddly, the 3rd break spawns none.
The key survival call: the 2nd platform break is the hardest moment of the phase, use every defensive you have for it.
The Last Platform
On the last platform it calms down. One final Serpent's Bite, so split to 3 and soak as usual while dodging the last wave, then spread for the Purge and pop your remaining survival cooldowns.
The last damage amp follows, and you need to kill her before she crashes your final platform. If you're close, there's a little wiggle room: jump off into the water just before the break for a few extra seconds of uptime to finish her.