Raid Setup


Introduction
Welcome to our Mythic The Coiled Altar guide, the penultimate boss fight in The Venomous Abyss Raid in Midnight Season 2. This guide covers the fight mechanics and the strategy we recommend to defeat this boss on Mythic difficulty.
Fight Style: Single Target (P1) into Two+ Targets (P2, P3), 3 phases plus a damage-amp intermission.
Recommended Setup: 2x Tank / 5x Healer / 5x Melee / 8x Ranged. The fight is 4-healable, but the DPS check is generous enough that 5 healers is much safer.
Required utilities: Interrupts (Prot Paladin ideal), stuns and grips for Dreadmarch, immunities for Guillotine, mobile players for orb cleanup, Font trinkets.
Hero/Lust usage: The Soulbinding intermission.
Easy Mode
General:
- Gear check first and foremost. Heroic mechanics become much more annoying with the Mythic layers on top.
- Don't stack melee. More melee makes the Spiritcackle adds in P2 much harder.
Phase 1:
- 5 Virulent Mutation spawn each Toxic Deluge and must be cleared before the next one. Assign mobile players (tanks, hunters, mages, warlocks, druids) to set sections.
- Purple orbs must never touch other purple or green orbs. Purple carriers have priority, everyone else plays around them.
- Clear 3 purples on the first Sever, 2 on the second, plus 3-4 greens each time. Stack more greens on the first frontal, since the second one lines up with Guillotine.
- Guillotine 1: 6 players (melee, hunters, evoker for Zephyr), BoP the target.
- Guillotine 2: 2 tanks, 3 immunities, BoP the target. Stop cleanup after the 2nd Guillotine.
- Hold damage and push exactly as Fangs Of The Coiled Altar starts. Expect 10-11 stacks, cover with Darkness, Spirit Link and AMZ.
Phase 2:
- Pixel stack on the nearest edge marker if targeted by Dreadmarch. Cancel your shields and absorbs (macro below). Have a stun and a ring or grip ready every cast.
- Break each Spiritcackle shield with 2 overlapping Gloombomb. Melee take the melee add, ranged take the ranged add.
- 1st Kick timing alternates: early, delayed, early, delayed, early.
- Ghosts are only visible to their target. Hold them near the marker for Soul Sever, never let two touch (Malevolent Resonance).
- Kill both adds before 100 energy and before the next Dreadmarch.
- On the last set, hold damage until the frontal clears ghosts, then push within ~5 seconds.
Intermission:
- Soak Fragments of Malacrass in sets of 4 stacks of Spirit Erasure, let it drop, repeat. A fragment reaching Zul'jan heals him for 10%.
Phase 3:
- Target Zul'jan, swap to Malacrass only for shields. Balance HP once Zul'jan hits 10%.
- Grim Guillotine 1 in Purple corner with a strong external. Grim Guillotine 2 and 3 in Skull corner.
- The first Eternal Nightfall shield is the hardest of the fight, since your cooldowns went into the intermission.
- After the 2nd shield breaks, things get simpler. Kill the boss before the next Defilement Of The Coiled Altar, which is effectively the enrage.
Mechanics

On Mythic, some of the Coalesced Venom from Toxic Deluge turns into Virulent Mutation.
Any Virulent Mutation still on the ground when the next Toxic Deluge is cast explodes in a deadly eruption, so every one of them has to be cleared before then.

A volatile purple globule that pulses raid-wide Nature damage while it exists. If it gets near other globules, it explodes them violently and triggers 20 Venom Rupture, which wipes the raid.
Stepping on it attaches it to you as Mutagenic Venom.

The carried version of a Virulent Mutation. It deals heavy damage to everyone within 8 yards for 5 seconds and also explodes any nearby globules, triggering 20 Venom Ruptures. When it expires, it drops a new Virulent Mutation.
Carriers need clear space and priority movement.

Manifestation of Dread
On Mythic, each ghost from Dreadmarch is only visible to the player it's fixated on. That player is fully responsible for watching and positioning it.

If two Manifestations of Dread touch, both deal massive Shadow damage to their fixated players every second for 5 seconds. This kills fast, so ghosts have to be kept apart.

The Spiteful Soulcoilers from Spiritcackle now spawn with a shield that reduces their damage taken by 99%. Getting hit by 2 Gloombombs weakens it, so Gloombombs are used to break the shield.

Interrupting Wail Of Terror briefly reveals the hidden Manifestations of Dread to everyone, which gives the raid a short look at where the ghosts are.

A Fragment of Malacrass that reaches Zul'jan during Soulbinding now heals him for 10% of his max health. Letting even one through is a big loss.
Strategy
As the penultimate boss of the Venomous Abyss, the Coiled Altar packs a punch and tests every part of your raid, especially your gear. Most of the abilities are familiar from Heroic, but the way the Mythic mechanics interact with them makes everything much more annoying.
Composition
Run a balanced comp of 5 melee, 8 ranged, 5 healers and 2 tanks. The more melee you bring, the harder Phase 2 gets when you're killing the Spiritcackle adds, so be careful when building the roster. The fight can be done with 4 healers, but the DPS check is generous enough that 5 is the much safer choice.
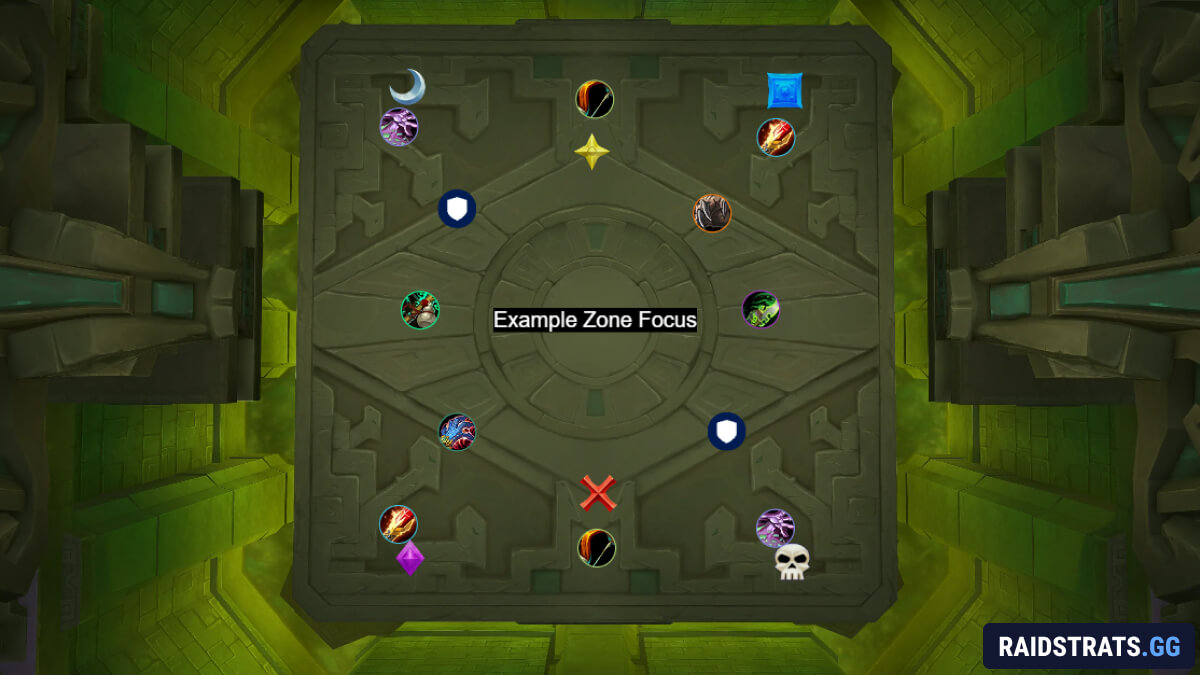
Room Markers
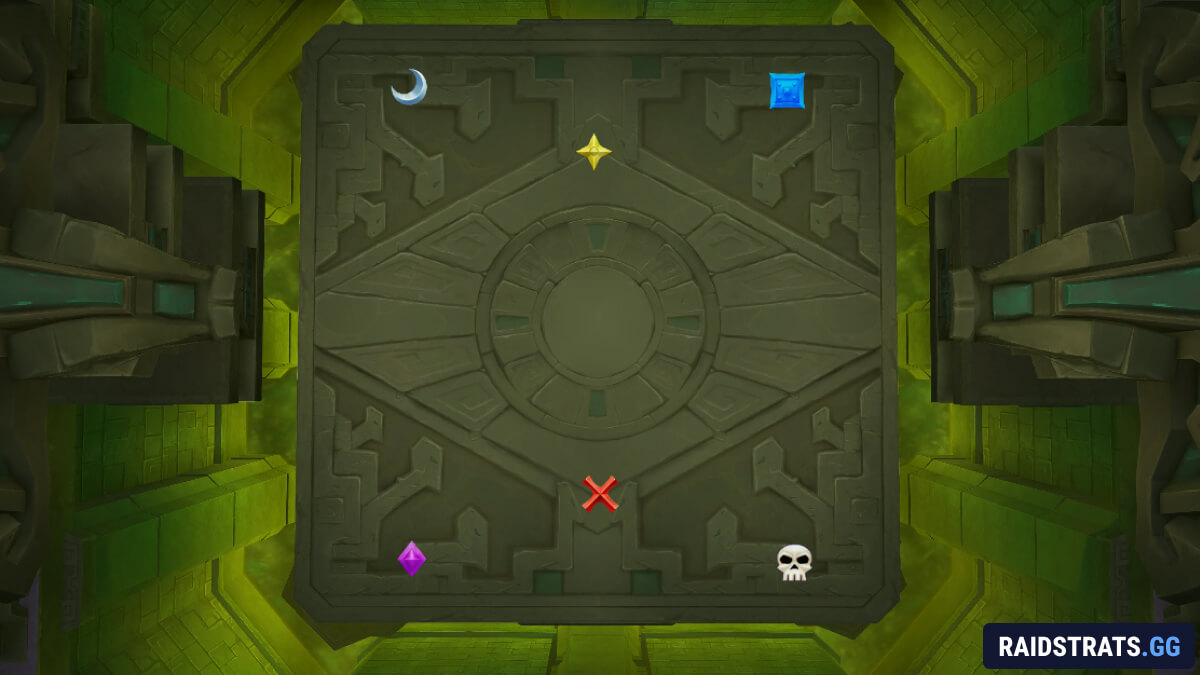
Damage Cooldown Pre-planning
- 1.5min CDs: on CD, but hold for last use in P3
- Hunters: first shield P2 (hold Explosive Shots for shields), damage amp, second shield P3
- Warlocks: first shield P2, Malevolence second shield, damage amp, on CD (adds P3), on CD
- Warrior: damage ready for second shield P2 and first shield P3
Phase 1
Phase 1 is close to Heroic, but cleaning up the floor is much harder now that you have Mythic orbs.
Orb Cleanup
Every Toxic Deluge spawns 5 Virulent Mutation that have to be gone before the next Toxic Deluge. Assign several players to this. The best options are:
- Tanks
- Hunters
- Mages
- Warlocks
- Druids
Anyone else can help, but give everyone their own section so people aren't running around like headless chickens.
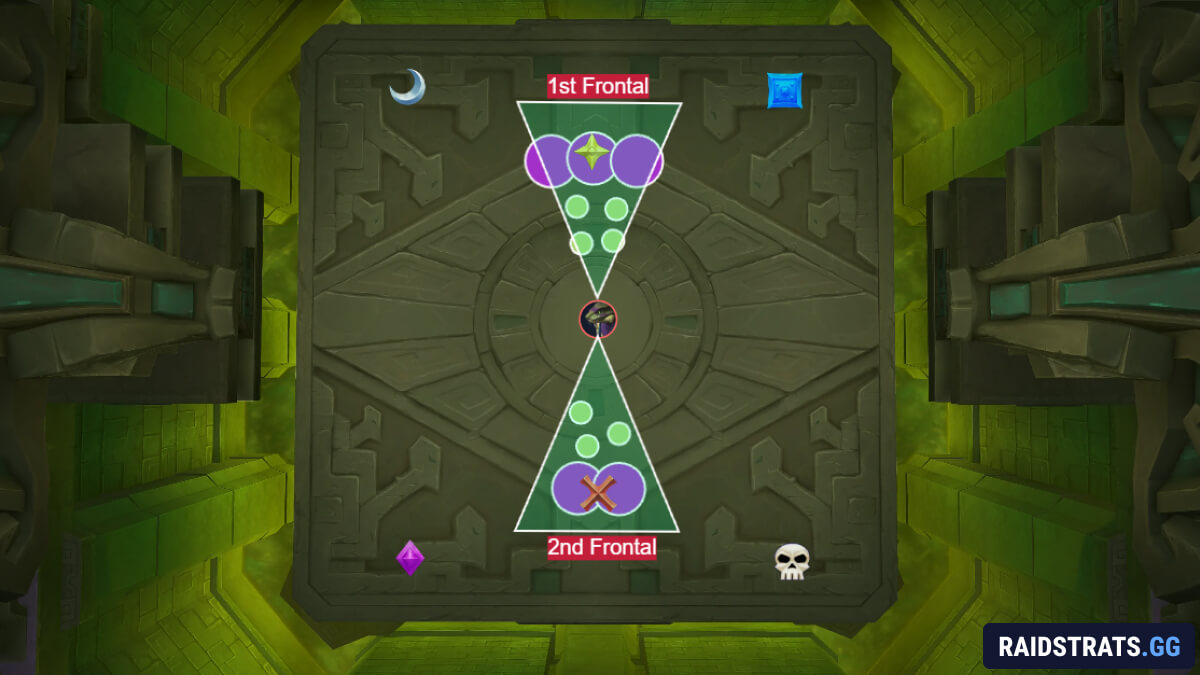
You get 2 Sever frontals before each Toxic Deluge. The ideal split is 3 purple orbs on the first frontal and 2 on the second. On top of that, clear at least 3-4 green orbs every time, or you'll end the phase with more leftovers than your healers can handle.
Traffic Rules
Purple orbs can never touch other purple orbs or green ones. If they do, they explode and wipe the raid. So you need some traffic rules: purple carriers always have priority, and everyone else plays around them.
For each cycle, put more green orbs into the first frontal than the second. The second frontal always lines up with Guillotine, so popping 3 purple orbs plus 5 greens there means 8 stacks of Venom Rupture on top of the Guillotine damage, which gets spicy quickly.
Nothing special needs to be done about the Axegrinder axes; they're very annoying, so just dodge them as well as you can.
Guillotine Teams
You need to create two assigned groups for Guillotine:
- 1st Guillotine: 6 players, preferably melee and hunters, plus an evoker for Zephyr. The targeted player always gets Blessing of Protection.
- 2nd Guillotine: 6 players made up of 2 tanks, 3 players with immunities, and the target, who gets BoP. You don't want healers worrying about these players at this point in the phase.
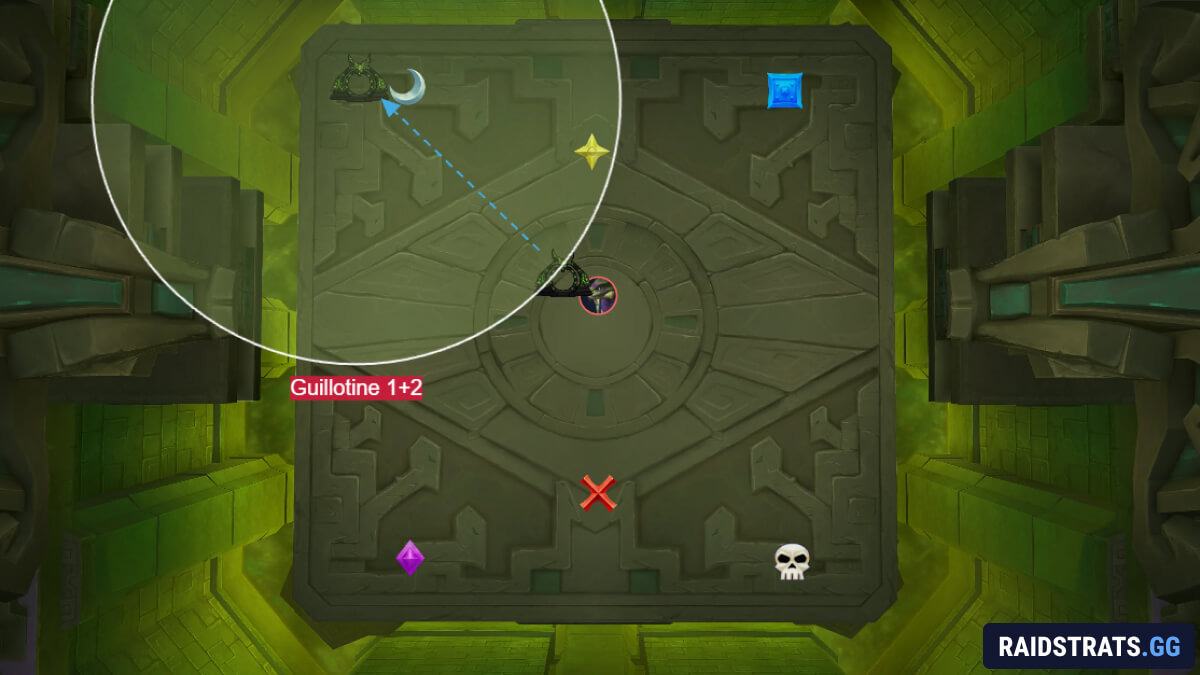
The 2nd Guillotine also ends orb cleanup for Phase 1, so nobody should pick up orbs after it. On the next frontal, the tanks should aim to hit 2-3 orbs so there are fewer stacks when everything explodes as Zul'jan hits 0%.
On both casts, always take the warlock gate in, not out; this way secures that everyone is in the soak.
Pushing the Phase
You also need to hold damage here, so your cooldowns line up for Phase 2, the intermission and Phase 3. Ideally you push the boss exactly as he starts casting Fangs Of The Coiled Altar again.
If your cleanup went well, the raid should end up with around 10-11 stacks. Use Darkness, Spirit Link Totem and AMZ, and stay in them until the last tick. If you have more stacks than that, be aggressive with defensives and health potions.
Phase 2
This phase needs kick assignments:
- Melee add: a 5-player rotation of ranged players, since it doesn't always spawn in melee.
- Ranged add: a Prot Paladin takes the first 3 kicks, then ranged players take over.
Dreadmarch
The phase starts with the first Dreadmarch cast. Depending on where you ended Phase 1, go to the closest marker on the edge. If you're targeted, pixel stack exactly on top of it, which makes the ghost spawn pattern much more consistent.
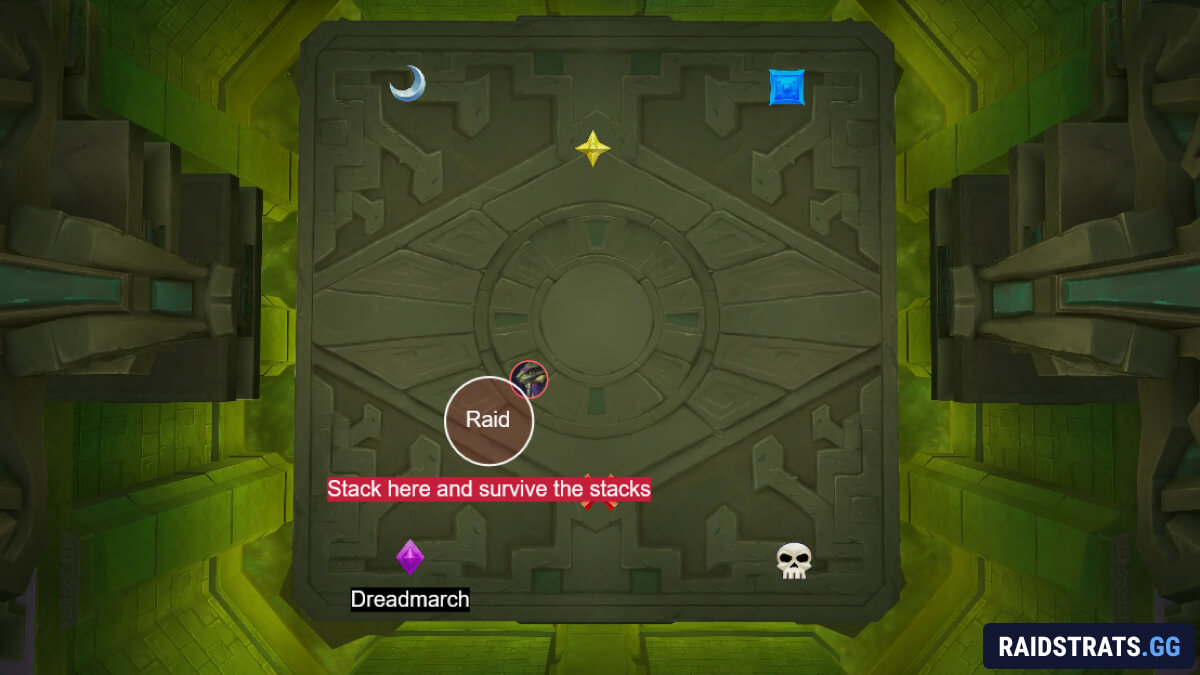
Players who get mind controlled should cancel shields, absorbs and similar auras, which makes them much easier to free. Example macro:
/cancelaura Void Shield
/cancelaura Power Word: Shield
/cancelaura Matted Fur
/cancelaura Touch of Karma
/cancelaura Soulcoil Barrier
/cancelaura Don't Look Back
/cancelaura Soul Leech
/cancelaura Prismatic Barrier
For every Dreadmarch, have at least one stun ready (Shockwave is great) plus a Monk ring, DK grip or something similar, so nobody drifts off the platform.
Spiritcackle Adds
At the same time, the boss summons 2 Spiteful Soulcoilers. Usually one spawns on top of the boss and the other in one of the 3 corners.
They now spawn with Spirit Shield, which you break by hitting the add with 2 Gloombomb, so the two targeted players overlap their circles on top of it.
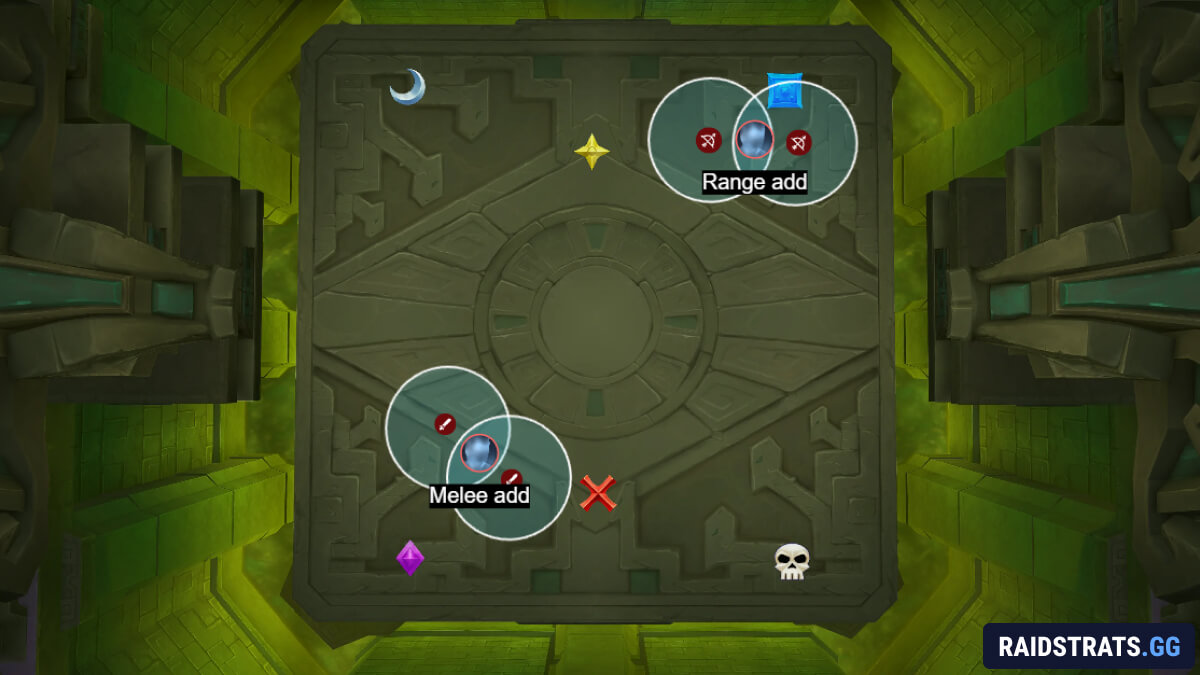
Gloombomb always targets 2 melee and 2 ranged players, so melee break the melee add and ranged break the ranged add.
Gloombomb hits hard, so use a personal if you're targeted. More importantly, once it hits you have to collect 3 souls within 10 seconds or you die. That's why nobody else should get clipped, since they'd also have souls to collect.
Kick Timing
The adds jump every time they're interrupted, so the first kick needs specific timing to stop the add from jumping away while players are setting up to break the shield. The general rule is to kick when the Gloombomb cast finishes, but whether that's early or delayed depends on the set:
- 1st set: early, right as the adds spawn
- 2nd set: delayed
- 3rd set: early
- 4th set: delayed
- 5th set: early
Killing the adds is much harder on Mythic. Both need to die before 100 energy, when they become immune to kicks. More importantly, they need to be dead by the next Dreadmarch at the latest, since that brings a new set and you don't want 4 adds up at once.
Controlling the Ghosts
While all of this is going on, several players will have their own ghost to control. Ghosts need to stay in the area around the marker so Soul Sever can hit and remove them. If two ghosts touch, both players take massive damage from Malevolent Resonance until they're separated again, and that kills fast.
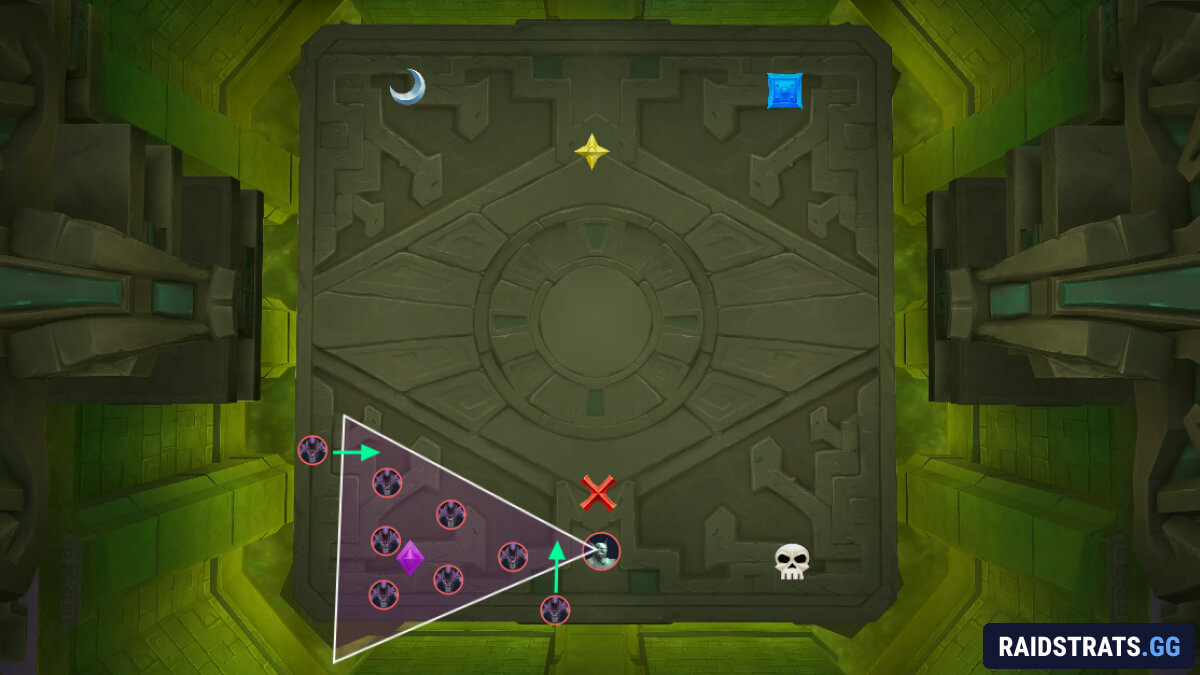
Most ghosts will already be in a good spot for the frontal if you hold them still, but there will usually be 1-2 that are too far away or too far to the side. Move those carefully before the frontal. Clearing every ghost on each frontal makes this phase much easier.
Eternal Nightfall
The shield works like Heroic, but the absorb is much bigger. Early in progression, save and use Font trinkets to make sure you get through the shield check.
Pushing the Phase
On the final set, the boss should already be low. Best practice is to hold damage until the frontal clears the ghosts. After that, you have about 5 seconds to push the boss to 0%, or the whole raid gets mind controlled and the boss resets.
If you push before clearing the ghosts, they'll despawn as long as each player is looking at their ghost when the boss hits 0%.
Intermission
The intermission is fairly simple. The main thing is having your cooldowns ready so you can do as much damage to Zul'jan as possible.
Each soaked fragment gives the raid a stack of Spirit Erasure, which deals more damage the higher it stacks and lasts 2 seconds.
Fragment soaking best practice:
- Soak up to 4 stacks.
- Let them drop.
- Repeat.
4 stacks is always safe, and doing this is enough to clear every fragment. Don't let any reach the boss, since Reclaim Essence now heals Zul'jan for 10%.
Phase 3
The good news is that nothing new happens in this phase. The bad news is that you get the Phase 1 and Phase 2 abilities at the same time.
Targeting
Always target Zul'jan and only swap to Malacrass during shields. Once Zul'jan is at 10%, start balancing the two health bars.
You'll play the whole phase in one half of the room, mostly around one marker.
Opening
Phase 3 starts with Mythic orbs and green orbs spawning, followed by Grim Guillotine.
Assigned players pick up the orbs and place them in the middle of the room, a little closer to the boss. Move green orbs out of the way, or place them into the frontal as well.
1st Grim Guillotine: 6 players plus a strong external on the target, soaked in the purple corner. The other 2 Guillotines are soaked in the skull corner.
Gloombomb just move to the side without clipping anyone.
Then comes the shield, which is the hardest shield of the fight, since nobody has cooldowns left after using them in the intermission.
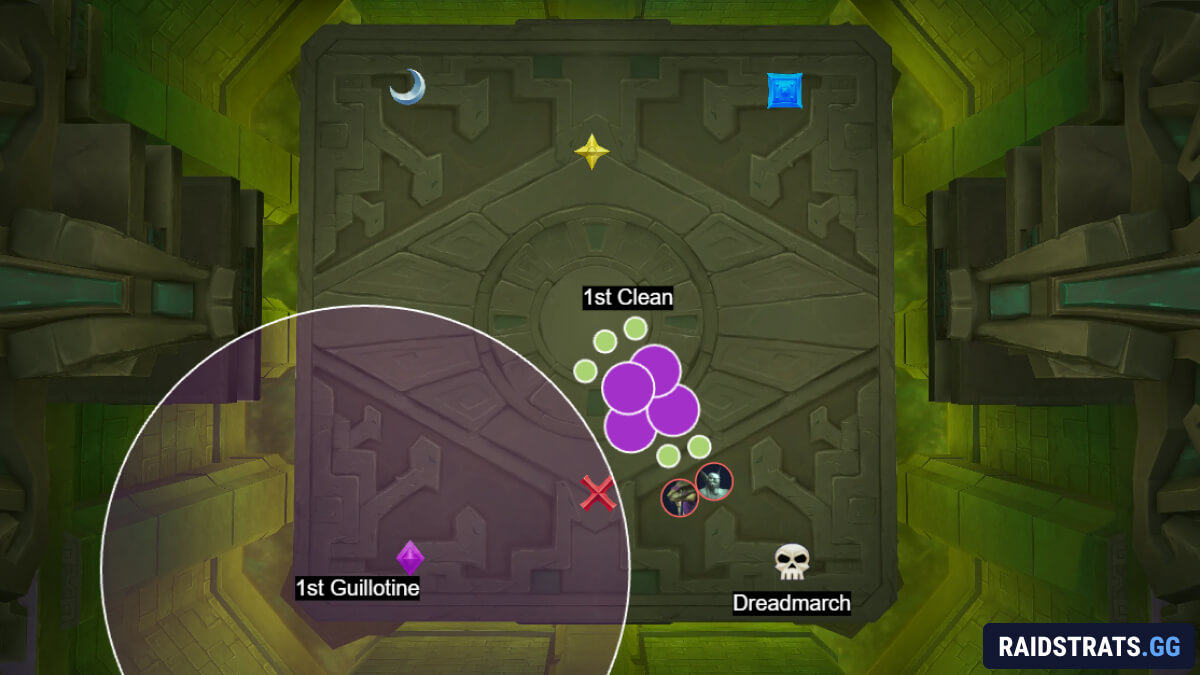
Middle Section
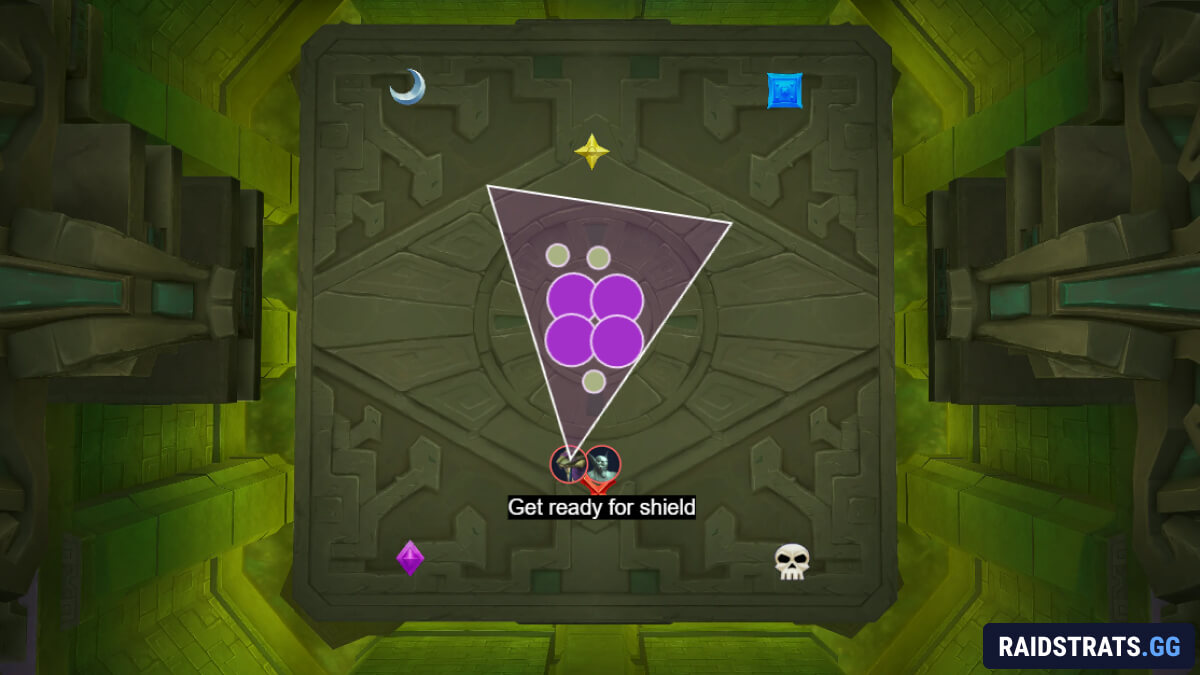
As you finish the shield, a new set of Mythic orbs will have spawned. You have 2 frontals to deal with them, so there's no rush. Place 2-3 orbs on each side of the skull marker as shown in the picture.
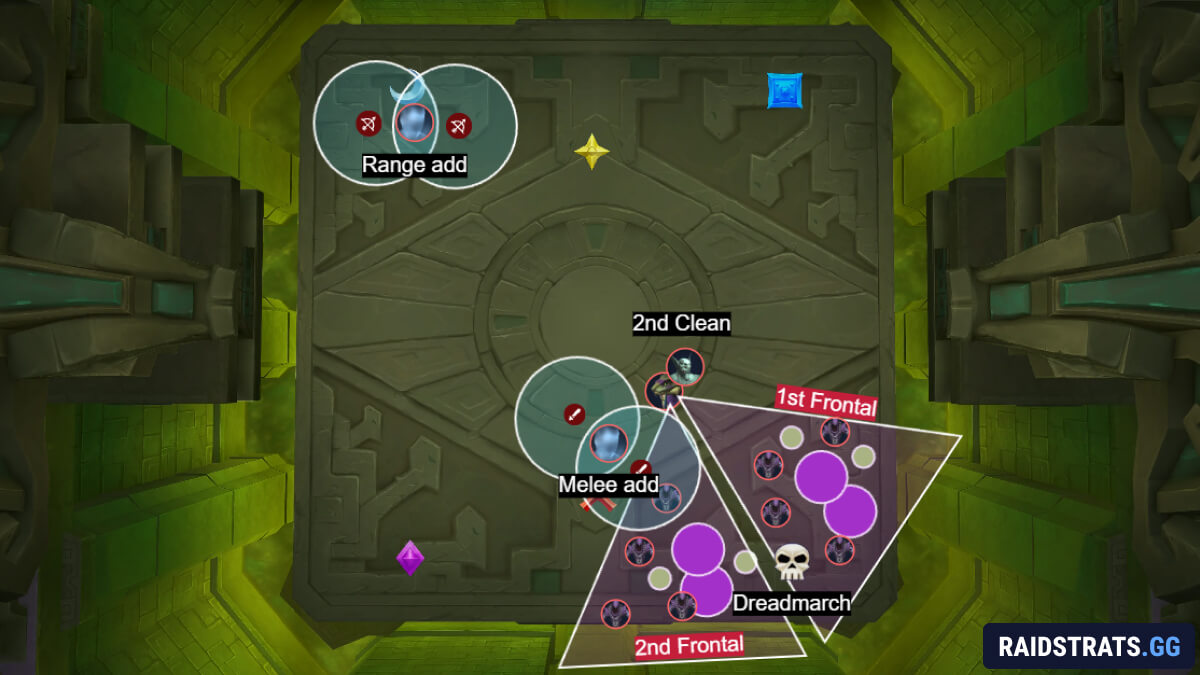
The raid and boss move to the skull marker for Dreadmarch. As soon as it's cast, move the boss back toward the middle, because the frontal comes right after.
Done correctly, the ghosts will be standing on top of the Mythic orbs, so the two Blighted Sever frontals clean up both.
Malacrass spawns 2 Spiritcackle adds at the same time as Gloombombs, so the Phase 2 rules apply: melee to the melee add, ranged to the ranged add. You need to break the shields, or the adds will enrage before you can kill the boss.
The 2nd Grim Guillotine comes right after the Gloombombs. Soak it at skull with 6 immunities: 5 players use their own, and the target gets Spellwarding.
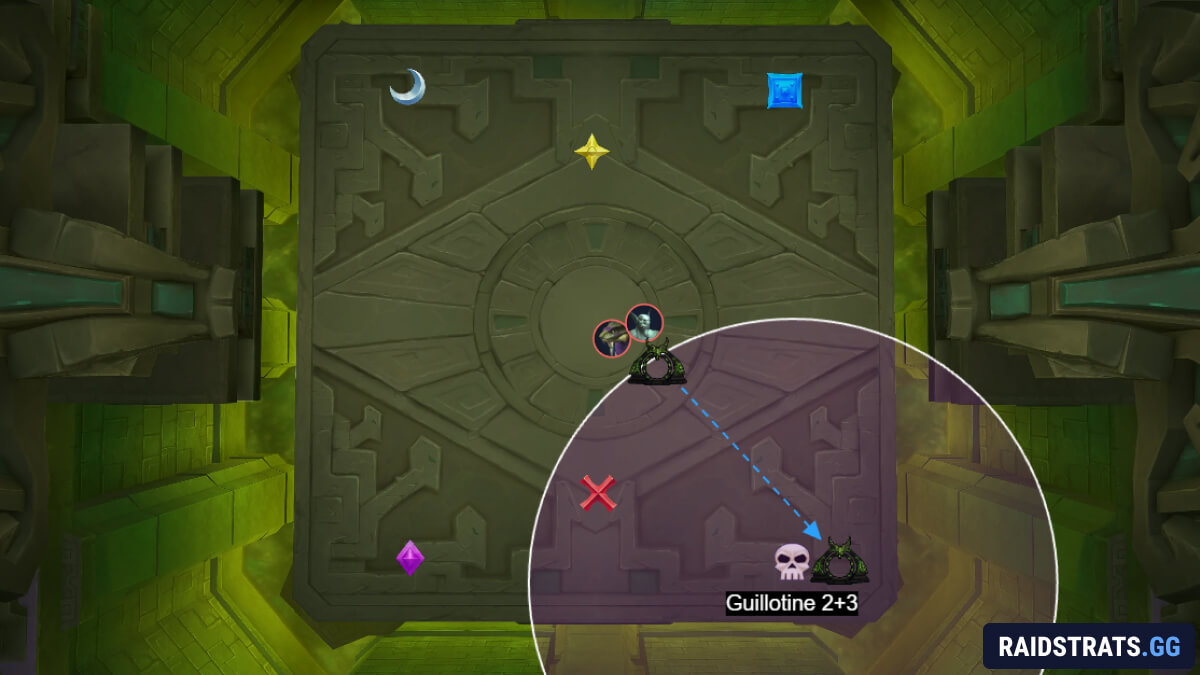
Focus the Spiritcackle adds so you're not kicking for too long. Ideally they die before the next Defilement Of The Coiled Altar.
New Gloombombs go out here, which just need to move to the side.
The last set of Mythic orbs gets placed in the middle of the room, and everyone else returns to the skull area for the 2nd shield.
The Finish Line
If you break the 2nd shield, you're close to the kill. From here on:
- Gloombombs don't need to break shields.
- Frontals don't need to clean new Mythic orbs, and you do not need to move them.
- Spiritcackle adds only need to be kicked, not killed, since they're shielded.
- For the 3rd Grim Guillotine, send 6-7 players and use every personal.
Kill the boss before the next Defilement Of The Coiled Altar, since that cast is effectively the enrage.