Welcome to Method's living 'best build' guide for Testing Station No. 136 (Fire). This guide was written by Talath, the current fastest Testing Station speedrunner, and will showcase what we believe to be the strongest current build for the Testing Station.
If you are looking for the difficulty scaling or loot tables, check out our Testing Station Info Page or if you need a walkthrough then we also have a guide available.
Note: we will update this guide whenever we find a better build or improvements to the current build, so we advise you check back often.
Quick Links:
Video Guide
Check out Talath's speedrun video below, showcasing the build in action!
Weapons & Augments
Ranged Weapon
The nerf to energy weapons that came in 1.3.5 has almost halved the damage dealt by weapons like the Lasgun and Experimental Lightning Gun against bosses. This has shifted the meta back towards weapons that can use the Attractor Field to maximum effect, such as the Perforator, Shellburster, and Tripleshot. The best build for this Testing Station is a variant of the Attractor Field build, which primarily uses shotguns (scatterguns) to deal burst damage to the boss while floating in relative safety through the air.
The Perforator or Shellburster shotguns are the best weapons for this build and can be found here in Testing Station No. 136 (Fire). Both shotguns have comparable sustained DPS, however the Perforator is the preferred shotgun for its superior burst damage.
For your shotgun, you will want the following Augments (in order of priority):
The Regis Tripleshot Repeating Rifle pairs well with the Attractor Field, allowing you to keep your distance from the boss and snipe at her or the Homing Missiles she sends toward you. The best Augments for the Tripleshot are the Heavy Caliber Upgrade and JABAL Spitdart Expander, JABAL Augments can be found in Testing Station No. 195 (Poison).
The Lightning Gun fills a niche in the boss fight, giving you a consistent strategy for dealing with adds without having to rely on parrying and slowblades. The best Augment for the Lightning Gun is the Quick Release Trigger, although Augmenting it isn't necessary unless you plan to use the gun elsewhere.
Melee Weapon
For the mobs and lock-in rooms, the highest grade melee weapon you have is usually the best, although when competing with weapons of the same grade the rapier Static Needle comes out on top. Rapiers have the longest reach during lunge attacks, allowing you to chain lunges without missing your target. Rapier slowblade attacks are 10% faster when penetrating shields compared to other top weapons like the Replica Pulse-sword or Pulse-knife. The Static Needle is chosen over Halleck's Pick, because damage over time effects (like the poison damage inflicted by the Pick) cancel crowd control effects like Compel.
Alternatively you could use a Replica Pulse-sword for its area effect parry or the Replica Pulse-knife to keep some reach.
For your melee weapon, you will want the following Augments (in order of priority):
Garments & Augments
For this Testing Station, the Forge Armor set is rightly valued for its fire mitigation, which will save your life during the lower difficulty levels, however as the difficulty increases you will reach a threshold where going down on fire means certain death regardless. The Forge Armor set is still recommended, however a hybrid setup using, Circuit Gauntlets, Power Harness, Ix-Core Leggings, or other graded gear available to you is still a viable alternative.
- Head: The Forge Helmet
- Chest: The Forge Chestpiece
- Legs: The Forge Pants
- Gloves: The Forge Gloves
- Boots: The Forge Boots
The Flame-resistant Fabrics and Radiation Absorbing Fabrics Augmentations will both give additional Fire Mitigation, although they are not necessary.
Tools
For this Testing Station you will want to run a pretty standard Tool loadout:
- Power Pack: Young Sparky Mk6 > Accelerator Power Pack
- Shield: Adaptive Holtzman Shield
- Suspensor Belt: Full Suspensor Belt
Abilities & Techniques
We will be running a different build for the pre-boss section of the Testing Station, then switching Skills and Techniques before entering the boss fight. Both builds are outlined below.
Abilities & Techniques - Pre-boss Fight
Here's our suggested Ability loadout below:
- Ability Slot 1: Knee Charge
- Ability Slot 2: Weirding Step
- Ability Slot 3: Compel
And your Techniques:
- Technique Slot 1: Disciplined Breathing or Suspensor Dash
- Technique Slot 2: Manipulate Instability
- Technique Slot 3: Center of Mass
This loadout maximises mobility, while providing as much damage as possible through Manipulate Instability and Center of Mass. Use Compel to peel one mob away when there are two together, or to set up a flurry of slow blade attacks on an enemy Heavy.
Abilities & Techniques - Boss Fight
Here's our suggested Ability loadout for the boss fight:
- Ability Slot 1: Attractor Field
- Ability Slot 2: Energy Capsule
- Ability Slot 3: Compel
And your Techniques for the boss fight:
- Technique Slot 1: Battle Hardened
- Technique Slot 2: Death from Above
- Technique Slot 3: Center of Mass
The build for this boss fight uses Spice Prescience and Battle Hardened to maximise our uptime on Attractor Field and Energy Capsule. While Spice Prescience is active you can unload two full Perforator clips during one Attractor Field and then recast it again almost immediately. We make optimal use of Death from Above during this fight by circling the boss in the air as we fire into the Attractor Field. In addition to increasing our damage, using the Full Suspensor Belt makes it much harder for the boss to hit us, because we are no longer vulnerable to splash damage except near walls.
During the add phase we land and use Compel on the boss to buy us some time to deal with the add. Shots that hit Attractor Field will not stagger the target or apply damage over time effects, like the Perforator's bleed or the Shellburster's burn, so we don't need to worry about them interrupting Compel as we fight. If you've brought a Lightning Gun you can switch to it now and quickly break the adds shield, but be mindful of your proximity to the boss because she can fire at you immediately after Compel ends.
Once the boss starts sending Homing Missiles at us, we have to be more careful about when we use Attractor Field, because the Homing Missile can block it, making the Missile invulnerable for the duration. If you find the shotgun spread unreliable for dealing with the Missile or you feel unsafe near the boss, you can switch to a Tripleshot until you feel comfortable again.
Skill Trees
Check out the images below where you can view the full skill trees for every Skill, Passive, and Technique we use. Techniques and Active Skills used in this build should be max level, before prioritising the Key Skills below.
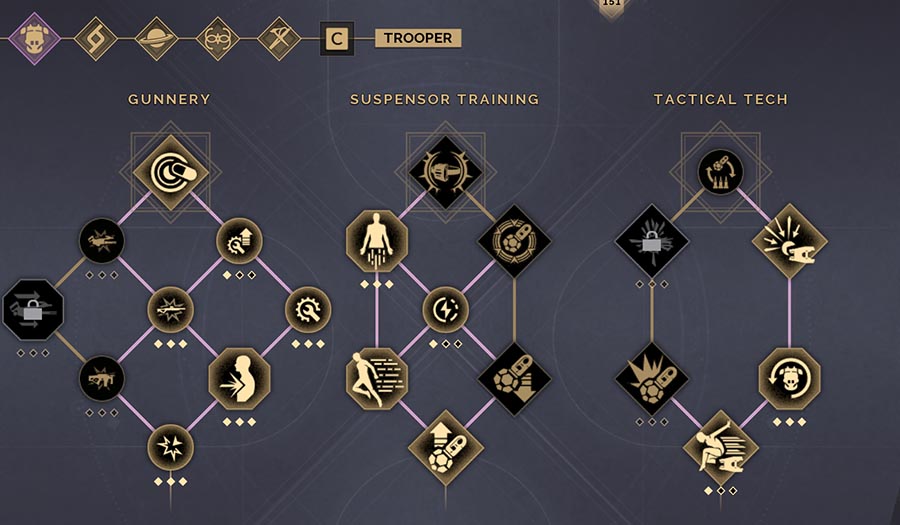
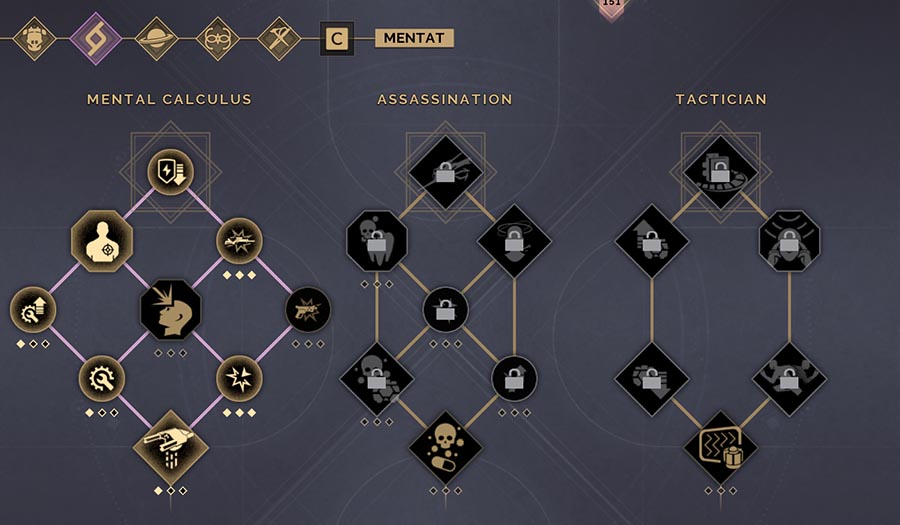

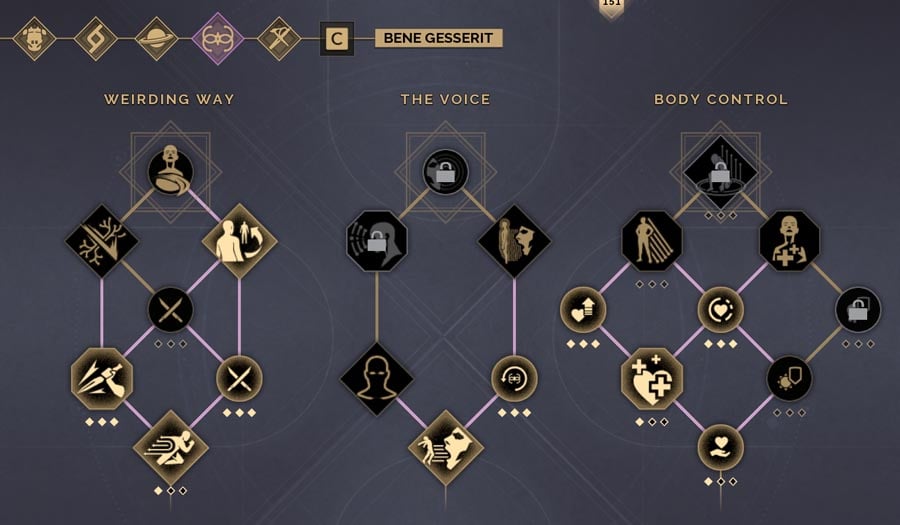
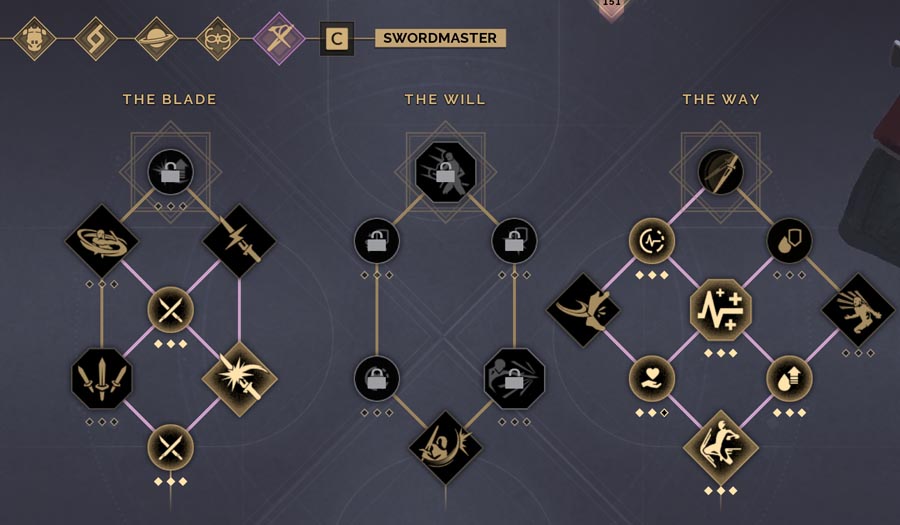
Key Skills
Below are the skills you really don't want to be without for this build.
- Trooper: Scattergun Damage (Level 3)
- Trooper: Ranged Damage (Level 3)
- Mentat: Ranged Damage (Level 3)
- Bene Gesserit: Blade Damage (Level 3)
- Bene Gesserit: Short Blade Damage (Level 3) (Only if running a Dagger or Dual Blades)
- Bene Gesserit: Vitality (Level 3)
- Swordmaster: Optimized Hydration (Level 3)
- Swordmaster: General Conditioning (Level 3)
- Swordmaster: Blade Damage (Level 3)
- Swordmaster: Long Blade Damage (Level 3) (Only if running a Sword or Rapier)
- Planetologist: Rerouting (Level 3)
If you have extra points after filling out your tree as shown in the images above, you can add points to Suspensor Efficiency.