Up to 84% Off VPN









Raid Setup


Introduction
Welcome to our Mythic Rotmire Boss Guide, the only boss within the Sporefall WoW Raid and the first Mythic Flex Raid (scaling between 15-25 players on Mythic Difficulty). Learn about the Mythic specific fight mechanics and the strategy we recommend to defeat the Rotmire boss on Mythic difficulty.
This guide focuses on a Mythic strategy, and might not explain all of the basics of the fight, so make sure you read through the Heroic version of the guide for this boss if you are unfamiliar with the encounter.
Fight Style: Cleave Fight most of the time
Recommended Setup: 2x Tank / 4x Healer / 14x DPS
Required Utilities: None
Hero/Lust Usage: On Pull
Video Guide
Easy Mode
General:
- Mythic is the same loop as Heroic, but Cross Fertilization is the whole fight.
- If a Shroomling corpse gets within 10 yards of a Fungling corpse, you spawn a Bursting Doom Shroom and you’re basically done.
Tanks:
- Swap every Putrid Fist. It stacks 75% increased physical damage taken, so don’t get greedy.
Adds:
- Sporecap is always a priority. Interrupt Poison Burst every time or the raid falls over from stacks.
- Shroomlings and Funglings fixate and don’t hit hard, but where they die matters.
The Clean Mythic Add Plan:
- First Awaken Fungi set:
- Shroomling fixates run to the first Sporecap and you kill Shroomlings there.
- Kite Fungling fixates away to a marked spot and nobody cleaves them.
- Second Awaken Fungi set:
- Shroomlings go back to the first spot again.
- Funglings go to the new Sporecap and die there.
- Result: two separate corpse piles, no overlap.
100 Energy, Fungal Bloom:
- Make sure all adds are dead before Bloom finishes, or they get Fungal Frenzy, heal to full, and become CC/interrupt immune.
- All corpses become Bursting Shroom. Split the raid into two teams and kill both piles fast.
- The Raid can live one shroom explosion, more than one usually is a wipe.
Ramp and Floor Mechanics:
- Bursting Pustules adds stacks of Rotting Pustules, so healing gets harder every loop.
- Festering Vines: step out and drop it to the side. Don’t put Writhing Vines on your kill zones.
If you keep the two corpse piles clean, kick Poison Burst, and kill shrooms fast every Bloom, the fight becomes very repeatable.
Mechanics

Fungling
A fungal minion spawned by Awaken Fungi on Mythic.
Just like Shroomlings, it fixates a random player and chases them down. By itself it’s not scary, but it matters because of the corpse rule below.

On Mythic, if a Shroomling corpse comes within 10 yards of a Fungling corpse, it triggers Cross Fertilization and spawns a Bursting Doom Shroom.
This is why Mythic is all about controlling where you kill each add type. If you let the corpse piles overlap, you’re going to create Doom Shrooms and wipe.

The Doom Shroom explodes for massive raid-wide Nature damage and also applies a heavy Nature DoT for 20 seconds.
If you see one of these spawn, you’re usually already in trouble, so the real goal is to never let Cross Fertilization happen in the first place.
Strategy
Mythic Rotmire is the same boss as Heroic, except now you’re not allowed to kill things “wherever”. The whole fight becomes a corpse placement check because of Cross Fertilization. If you keep add deaths clean, the fight feels very repeatable. If you don’t, you spawn a Bursting Doom Shroom and your pull ends immediately.
The fight is one phase with a repeating 100 energy event, Fungal Bloom. Each loop gets harder because Rotting Pustules stacks keep ramping raid damage, so you want the early cycles clean and fast. A messy first Bloom usually turns into a slow death later.
Opener and Tanks
Pull the boss where he stands and use Hero. There’s no fancy boss positioning requirement, so don’t overthink it early.
Tanks swap on every Putrid Fist. The hit is huge and the 75% increased physical damage taken debuff stacks, so trying to “hold one more” is just you volunteering to get deleted.
Add Cycle and why Mythic is Different
Rotmire regularly casts Awaken Fungi, which spawns the adds. On Mythic you get:
- Shroomlings that fixate
- Funglings that fixate
- One Sporecap that is stationary and actually matters
On Heroic, there are no Funglings, which is why Heroic is mostly just “interrupt Poison Burst and cleave everything”.
On Mythic, you have to separate Shroomling deaths from Fungling deaths. If a Shroomling corpse comes within 10 yards of a Fungling corpse, Cross Fertilization spawns a Bursting Doom Shroom, and that explosion is basically a wipe. So the entire fight is making sure you don’t create mixed corpse piles.
The Sporecap is still the add you always respect. Poison Burst is the cast that matters. It does raid damage with a stacking DoT, and if you let it stack, your healers will lose the fight regardless of how clean your add placement is. So interrupts on Poison Burst are non-negotiable. Keep in mind the Sporecap spawn is random, so you can’t play the same positions every pull.
The Clean Add Plan
Your plan is basically “two graveyards”, and it works because it keeps corpses separated and sets up the Bloom shrooms nicely.
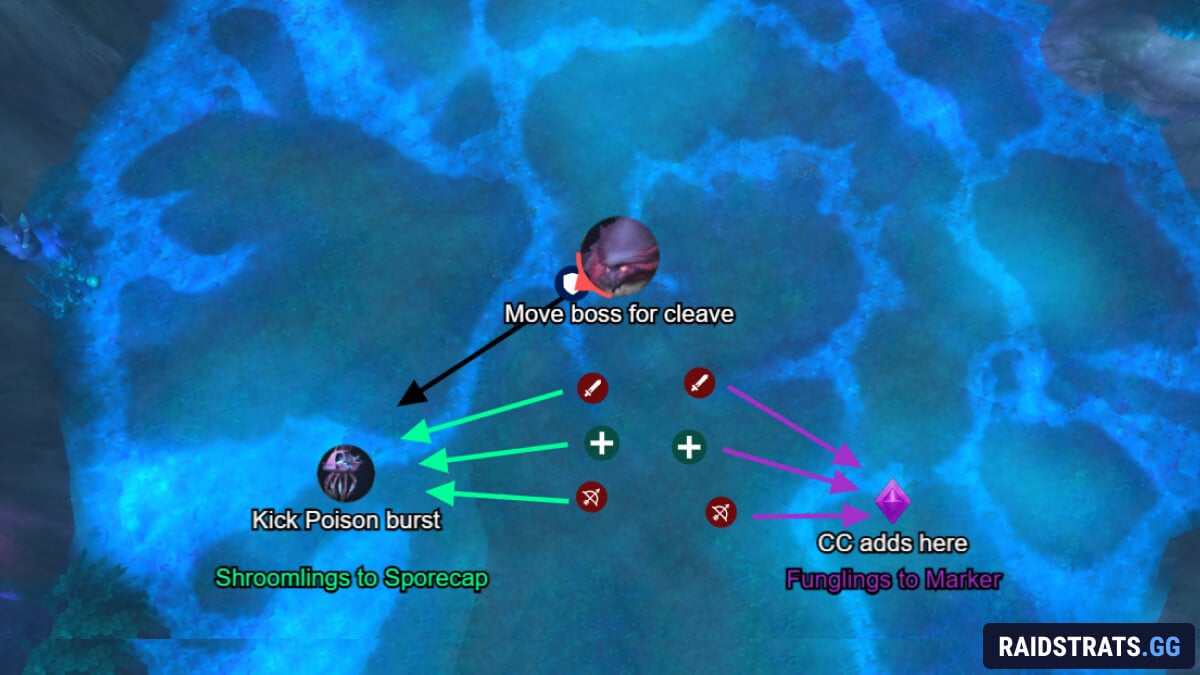
First Awaken Fungi set:
- As soon as the first Sporecap spawns, all players fixated by Shroomlings run to it and you kill Shroomlings on top of the Sporecap.
- All Fungling fixate players kite their Funglings away from cleave range. You control them with roots, slows, and stops, and nobody is allowed to randomly cleave them. Put a marker down and park them there so it’s obvious.
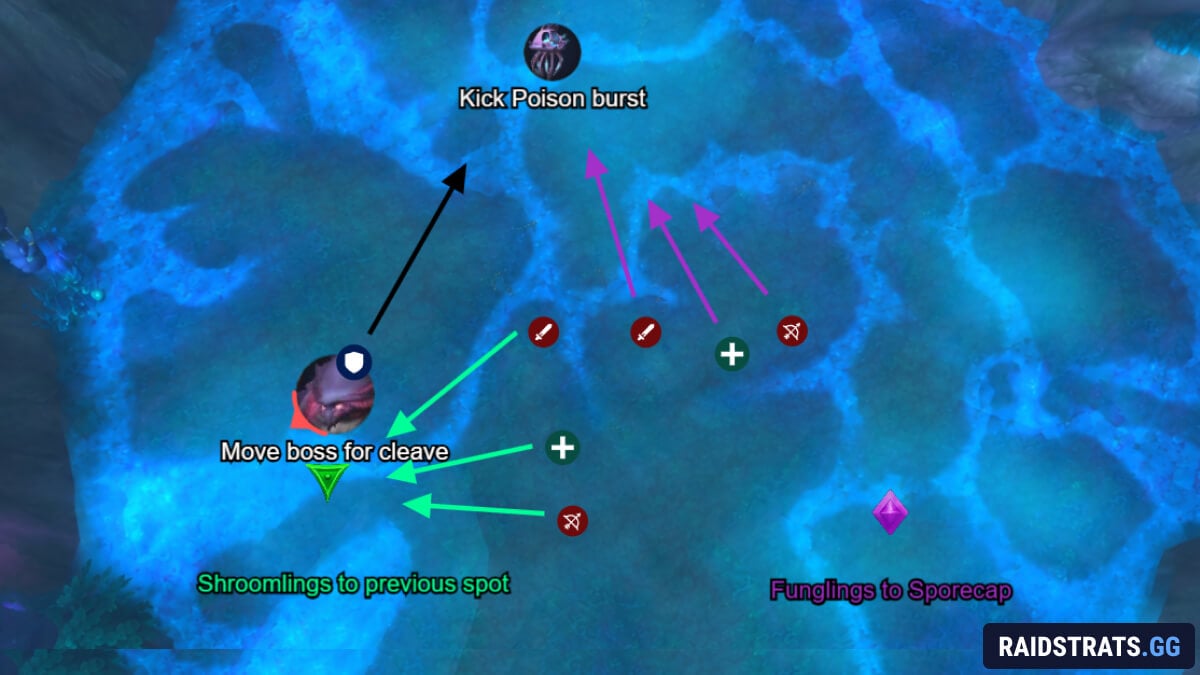
Second Awaken Fungi set:
- You get another Sporecap plus another batch of Shroomlings and Funglings.
- Shroomlings go to the original Shroomling spot again. Same pile as before.
- All Funglings, meaning the ones you’ve been controlling plus the new ones, go to the new Sporecap and die there.
If you do this correctly, you now have two clean corpse piles:
- Pile one is entirely Shroomlings
- Pile two is entirely Funglings
And because you’re killing them on top of the Sporecaps, you’re also naturally handling the Sporecap priority and keeping interrupts centralized.
100 Energy, Fungal Bloom
This is the checkpoint and the reason you cared about corpse placement in the first place.
At 100 energy, Rotmire casts Fungal Bloom. You take a big hit, then a 16 second DoT, and you get knocked back. The important part is what happens to the adds.
If any fungal minions are still alive when Bloom goes off, they get Fungal Frenzy, heal to full, gain damage and speed, and become immune to CC and interrupts. So your first job going into Bloom is making sure the room is actually clean. Living adds at Bloom is how a good pull becomes chaos instantly.
Once Bloom happens, every dead add corpse becomes a Bursting Shroom. Those shrooms need to die quickly. Your raid can usually survive one Bursting Shroom explosion, but more than one is basically asking to wipe, especially once Rotting Pustules stacks are higher.
Because you were clean with add placement, Bloom spawns Bursting Shroom in two big stacks. This is where you get rewarded.
Split the raid into two teams, usually something like melee plus a few cleavers on one pile, and ranged on the other pile. You can move the boss during this, so drag Rotmire onto the melee pile for extra cleave and let ranged handle the other pile.
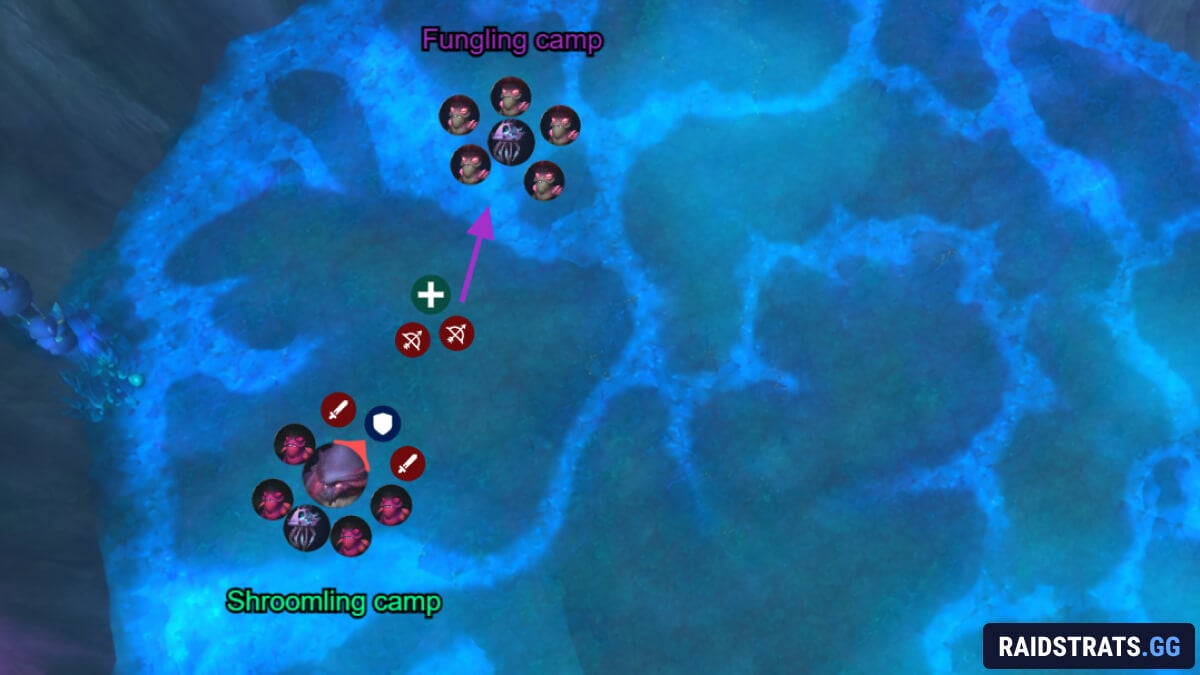
The goal is simple. Delete both shroom stacks before too many casts complete, then go right back to the boss and prepare for the next add wave.
Rotting Pustules Ramp and Healing Planning
The fight keeps getting harder because of Bursting Pustules giving stacks of Rotting Pustules. Bursting Pustules itself is also a raid hit, so it’s a double whammy for healers.
This means every later Bloom is harder than the first Bloom, even if your gameplay is identical. So healers should plan around two consistent pressure points:
- Bursting Pustules casts
- Fungal Bloom windows
If your raid is entering Bloom already low because people got clipped by random mechanics, it snowballs fast.
Festering Vines Placement
Festering Vines is the main “don’t grief your floor” mechanic.
If you get vines, step out. When it expires, it snaps and leaves Writhing Vines on the ground, which hurts a lot.
The only real rule here is don’t drop vines in places that impact your add plan. If you put vines on top of a kill zone, you’re just making fixated players miserable and forcing bad deaths later.
The Fight Loop
After Bloom, the fight repeats exactly the same way, just with higher Rotting Pustules pressure. So your goal is to keep the loops identical and boring:
- Shroomlings always die at the Shroomling Sporecap (1st spawn)
- Funglings always die at the Fungling Sporecap (2nd spawn)
- Poison Burst always gets kicked
- Adds are dead before Bloom
- Shrooms are killed fast in two piles during Bloom
- Vines get dropped out of the way
If your raid treats it like a routine, Rotmire becomes very consistent. If people start improvising and cleaving whatever is nearest, you’ll eventually spawn a Doom Shroom and get to restart the pull for free.