Raid Setup
Introduction
Welcome to our Heroic Rotmire guide for Sporefall. This guide covers the fight mechanics and the strategy we recommend to defeat this one boss raid on Heroic difficulty.
This boss is basically a comms check disguised as a fungus monster, because five pulls in, “Shroomlings” and “Funglings” will be stuck in your head and you’ll be calling them out in your sleep.
This whole instance feels like Blizzard running a test for a full fungus-themed raid, which sounds like a terrible idea when you look at the ability names on just this one boss. If an entire tier is called things like Putrid Fist, Rotting Pustules, and Bursting Doom Shroom, I don’t know what I'm going to do.
Fight Style: Cleave Fight most of the time
Recommended Setup: 2x Tank / 4x Healer / 14x DPS
Required Utilities: None
Hero/Lust Usage: On Pull
Video Guide
Easy Mode
- Swap tanks every Putrid Fist. Don’t get greedy with stacks.
- Awaken Fungi spawns Shroomlings and a Sporecap. Don’t stand near the spawn pops.
- Sporecap is priority:
- Interrupt Poison Burst every time, or healing gets out of control.
- Kill Sporecap, cleave Shroomlings on top of it.
- Festering Vines:
- If you get it, move out.
- Don’t let it expire in the raid.
- Don’t drop Writhing Vines in the middle.
- At 100 energy, Fungal Bloom happens:
- Big raid hit, 16s DoT, knockback.
- Dead adds turn into Bursting Shroom.
- Any living adds get healed and gain Fungal Frenzy, so make sure adds are dead before Bloom.
- During Bloom:
- Swap to Bursting Shroom and kill them fast.
- One shroom going off is usually survivable, multiple is not.
- The fight ramps from Bursting Pustules giving Rotting Pustules stacks.
- Later Blooms hurt way more, so play clean early and plan healer cooldowns for Bloom windows.
Mechanics
Rotmire smashes the current tank for heavy physical damage, knocks them up, and applies a 75% increased physical damage taken debuff for 14 seconds that stacks. This is a swap mechanic.
Rotmire blooms fungal growths around the room that explode quickly, dealing damage to players within 6 yards and knocking them away. It also creates fungal minions.
Shroomling
Fixates a random player and chases them down. Nothing fancy, just a little Shroomling trying his best.
Sporecap
Stationary add that hits the raid with damage.
- Blightshot hits a random player for moderate damage.
- Poison Burst is the dangerous cast. It deals raid-wide damage and applies a 16 second DoT that stacks. This should be interrupted every time.
At 100 energy, Rotmire casts Fungal Bloom, dealing big raid damage, applying a 16 second DoT, and knocking everyone away.
Fungal Bloom also:
- Heals fungal minions to full and applies Fungal Frenzy
- Creates a Bursting Shroom at each dead fungal corpse
If any fungal minions are alive when Fungal Bloom happens, they get Fungal Frenzy. This increases their damage and movement speed by 25%, and makes them immune to crowd control and interrupts. You really want adds dead before Bloom.
Spawns from dead add corpses during Fungal Bloom. If not killed quickly, it explodes and deals raid-wide damage.
Several players get wrapped in vines, taking damage every second and getting slowed by 30%. When it expires, it snaps and deals damage to players within 7 yards, and leaves Writhing Vines on the ground.
Ground effect left behind by Festering Vines. Deals heavy damage every second to anyone standing in it.
Rotmire bursts pustules, dealing raid-wide damage and gaining stacks of Rotting Pustules.
Strategy
Rotmire is a one-phase fight with a repeating “100 energy event” at Fungal Bloom. Everything you do in between blooms is basically preparation for that moment.
If your add control is clean, the boss feels very manageable. If adds are alive when Bloom happens, the fight instantly gets messy because of Fungal Frenzy and because you’re dealing with too many Bursting Shroom at once.
The other thing to keep in mind is that Rotmire ramps naturally through Rotting Pustules stacks. Even if everything is played perfectly, the longer the pull goes, the harder healing becomes.
General Positioning
Pull the boss where he stands. There’s no fancy positioning requirement, but you do want to keep your raid relatively grouped so interrupts, spot healing, and add swaps are easy.
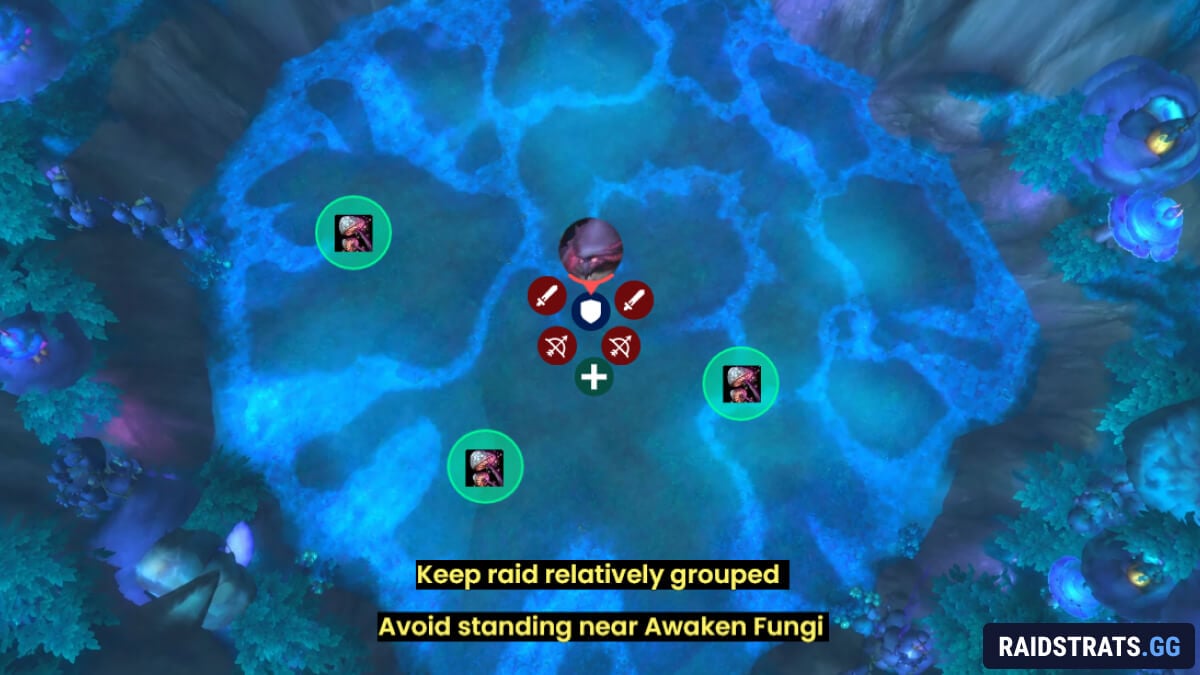
The only thing you actively avoid is standing near the Awaken Fungi spawn spots, because those explode and knock you away if you’re too close.
Tank Swaps
This part is simple. Putrid Fist is a hard-hitting tank slam that applies a stacking physical damage taken debuff.
Swap Tanks on every cast. Trying to hold multiple stacks is just asking to get deleted by the next hit.
Add Cycle from Awaken Fungi
After you pull the boss, Rotmire starts using Awaken Fungi to spawn adds. On Heroic you’ll mainly see:
- Shroomlings that fixate random players
- One Sporecap that stays stationary
Shroomlings don’t do anything complicated. The only way they become dangerous is if they’re allowed to build up and start nibbling people during other damage windows. So the rule is: don’t ignore them just because they “don’t hit hard”.
The Sporecap is the add that matters. It has two casts:
- Blightshot deals damage to random players.
- Poison Burst is the problem. It stacks, it hurts, and it snowballs the healing required fast.
So your add priority is:
- Interrupt Poison Burst every time
- Kill the Sporecap
- Clean up Shroomlings
A practical way to make this easy is to kill Shroomlings on top of the Sporecap so everything gets cleaved together. Heroic doesn’t punish corpse placement, so you’re free to do that.

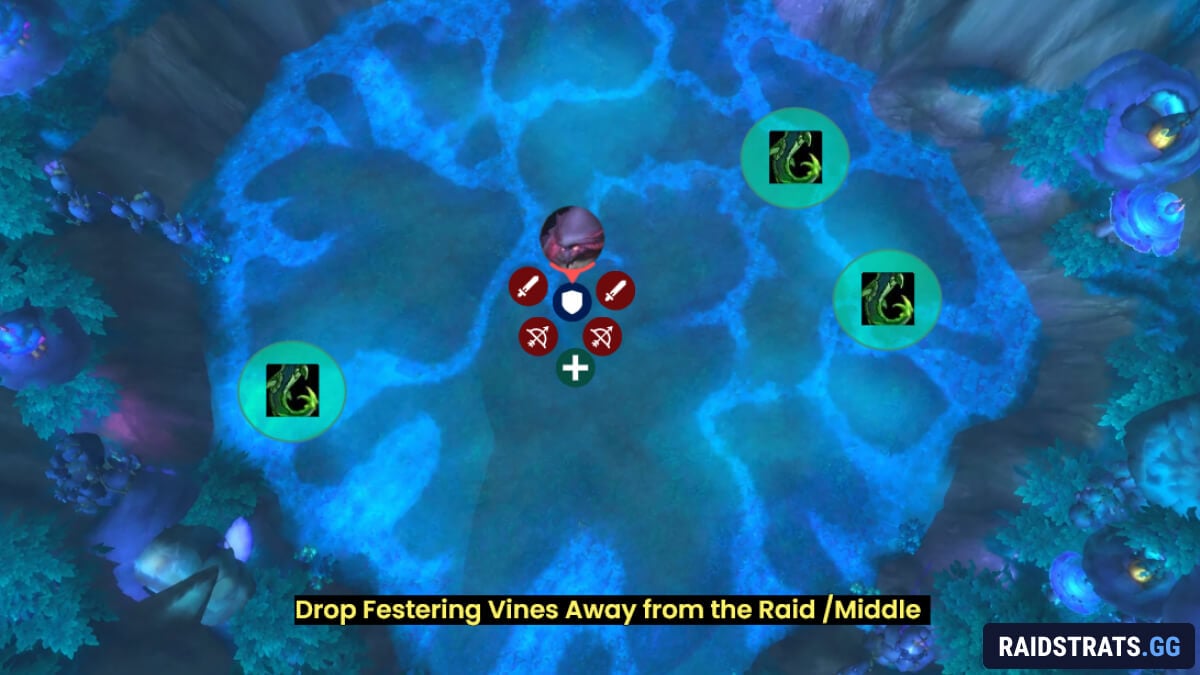
Festering Vines and Floor Control
Festering Vines goes on multiple players and ticks damage while slowing you. When it expires it does a snap hit around you and drops Writhing Vines on the ground.
This is one of the main ways you lose space on Heroic, so treat it like a placement mechanic:
- If you get vines, step out to the side.
- Don’t let it expire in the raid.
- Don’t drop Writhing Vines in the middle, where the raid wants to stand for the rest of the fight.
100 Energy: Fungal Bloom
At 100 energy, Rotmire casts Fungal Bloom. This is the big moment every cycle.
Fungal Bloom does:
- A heavy raid hit plus a 16 second DoT
- A knockback
- Turns every dead add corpse into a Bursting Shroom
- Heals any living fungal minions to full and applies Fungal Frenzy
The most important rule on Heroic: Make sure the adds are dead before Bloom finishes.
If adds are alive, they get Frenzy and become faster, hit harder, and can’t be CC’d or interrupted. On paper it’s “just 25% more damage”, but in reality it turns a clean Bloom into chaos because the raid is already taking heavy damage and getting knocked around.
Once Bloom goes out, swap your DPS onto the Bursting Shroom and kill them quickly. One shroom explosion is usually survivable. Multiple going off starts to look like a wipe, especially once Rotting Pustules stacks are higher.
Because Heroic doesn’t force you into special corpse placement, the cleanest approach is:
- Kill adds close to the boss so Bloom spawns shrooms in a tight area
- Use AoE and cleave to delete them quickly
- Get back onto the boss once the shrooms are handled
Healers should plan cooldowns around Bloom. The DoT lasts a while, and it overlaps with other background damage, so you want something rolling rather than trying to raw-heal it every time.
Bursting Pustules and the Ramp
Throughout the fight Rotmire uses Bursting Pustules, which deals raid damage and increases the stacks of Rotting Pustules. Rotting Pustules is the long-term ramp mechanic.
This means every Bloom in the fight gets harder than the previous one, even if the mechanics look identical. If your raid is barely surviving early, you’ll hit a wall later just from the stacking DoT.
So the Rotmire Boss win condition is:
- Keep Poison Burst interrupted so healing doesn’t spiral
- Keep vines placed cleanly so you don’t lose the room
- Kill adds before Bloom so shrooms are manageable
- Plan healing cooldowns for Bloom and later Pustule stacks
- Don’t fall behind, because Rotting Pustules will eventually catch up to you
If you focus on doing these things, Heroic Rotmire is a straightforward fight, and you will get your hands on some Heroic Sporefused loot.