Up to 84% Off VPN






Raid Setup


Introduction
Welcome to our Mythic Midnight Falls (L’ura) Boss Guide, the final boss of The March on Quel’Danas Raid and Midnight Season 1. Learn about the Mythic specific fight mechanics and the strategy we recommend to defeat this boss on Mythic difficulty!
This guide focuses on a Mythic strategy, and won’t explain the basics of the fight, so make sure you read through the Heroic version of the guide for this boss if you are unfamiliar with the encounter.
Fight Style: Single Target fight
Recommended Setup: 2x Tanks / 4x Healers / 14x DPS
Required utilities: Northern Sky Raid Tools (NSRT) + M33kAuras (WA Alternative)
Hero/Lust usage: In Phase 3 (Around 6:07)
Easy Mode
Before Pull
- Assign Termination Prism kicks ahead of time. Each Matrix needs 4 kicks (+1 backup is advised).
- Pre-assign Dawn Crystal holders and backups. A crystal dying is a wipe, and the only way it dies is getting hit while it’s on the ground.
- Have a plan for grips and mobility.
Phase 1
- Pull at the left pillar by entrance and keep the boss slightly off the wall so Glaive bounces aren’t instantly disgusting.
- Termination Prism: kick fast and clean. Missed kicks kill whoever is in front of it.
- When Prism ends, grip adds into boss and group crystals so they can be healed and picked up fast.
- Grim Symphony memory game splits realms:
- Normal sees rune 1 and 4
- Red sees rune 2 and 5
- Blue sees rune 3
- Use your assigned “input” players so the code is consistent every pull
- Crystal holders during memory game:
- Drop crystal shortly before your rune hit, then pick it back up immediately
- If dropping is unsafe, just hold it and eat the hit, then soak the Tears
- Dodge Heaven's Glaives the entire phase. No secret tech, just don’t get clipped.
- Dark Quasar movement: move through the beam before it spawns, then follow it. If a crystal holder gets clipped, an immunity player immediately soaks.
Intermission
- Use the spread shown in your picture and do not drift.
- The pull and spike patterns punish people who slowly wander into each other.
- Crystal holders follow the same rule as always, don’t leave crystals on the ground.
Phase 2
- This phase is “do the formation correctly” and it becomes free.
- Galvanize: 4 players get beams, place them correctly so cores get hit.
- Everyone else soaks the beams to reduce Overkill Current damage.
- After the soak you get Criticality circles on everyone, so spread into your assigned spots. Do not overlap.
- Dodge the core paths during the harvest, those lines one-shot.
- You repeat the sequence until the final spread that sets up the split for Phase 3.
Phase 3
- Starts with Severance. Raid splits into left and right dimensions based on position.
- Do not touch players from the other dimension. You instantly die.
- If one dimension loses all players, the raid wipes.
- Boss takes 100% increased damage here, so this is where you use Hero and potions.
- The phase is basically a loop:
- Handle soaks
- Do the memory game cleanly without rushing into Constellations
- Don’t get clipped by Constellation beams
- Biggest rule: do not try to “solve” runes while a Constellation set is about to explode. Wait it out, then finish the sequence.
- Tank damage is insane here. Pre-assign externals and rotate them.
Phase 4
If you get here, the boss is basically dead, but it can still wipe you if people stop paying attention.
- Pixel stack on the light carrier immediately.
- Blaze order is left, right, left.
- When moving, you need speed boosts each time.
- Adds will delete the first player they touch, then become harmless for a bit. Have an immunity intercept them right as they reach the group, not early.
Mechanics

During the memory game, the raid gets split into three realms: normal, red, and blue. This doesn’t change the overall fight flow much, but it does mean players can’t interact with other realms during the mini-game, so you need everyone doing their part.
Each realm sees different runes:
- Normal realm sees the 1st and 4th rune
- Red realm sees the 2nd and 5th rune
- Blue realm sees the 3rd rune only
When you “input” the combination, it creates the final correct order, and every rune player needs to stand in the right spot at the end.

Works like the heroic prism concept, but harsher.
Each Termination Matrix needs to be kicked 4 times. Any missed kick is lethal for players standing in front of that Matrix. Depending on how bad the angle is, that can be one person dead or half the raid gone.

Dawn Crystal
A Dawn Crystal getting destroyed is a wipe now.
The crystal can only die if it gets hit by an ability while it’s on the ground, so don’t leave them sitting there.
If the crystal is held by a player who gets hit by anything, it triggers Tears Of L'ura, which must be soaked. If those soaks are missed, it deals lethal damage to the entire raid.
If the crystal is left on the floor for too long, it will start to do raid damage, because of Radiance.

In addition to the normal pull effect you get after Galvanize soaks, Mythic adds Criticality circles on every player.
This forces the raid to spread in a specific formation. The exact formation is handled in the strategy section, but the important part is that you cannot “stack and vibe” this anymore.

At the start of Phase 3, L’ura splits into two and the raid is split into two dimensions. Which dimension you go to is decided by your position, left side of the room or right side of the room.
Rules:
- Touching a player from the opposite dimension instantly kills you.
- If one dimension loses all players, the entire raid wipes.
Also, L’ura takes 100% increased damage for the entirety of Phase 3.
Strategy
Warning: you’re about to pull one of the hardest bosses in WoW history. Proceed with caution.
Mythic L’ura is the kind of fight that can realistically take 200 to 300 pulls, not because one mechanic is impossible, but because the fight punishes tiny mistakes for a very long time. If you spend a bit of time getting your setup and assignments clean, your progression will feel way smoother later.
Suggested Composition
The “dream” setup people like for this boss is:
- 1 mass grip (mainly for Phase 1)
- 2 Demon Hunters, 2 Hunters, 2 Monks (mainly for Phase 3 when the boss splits)
You don’t need to force this, but doubling up on the good split-classes can be the difference between skipping a nasty late set of marks or dying to it for 40 pulls straight.
Pre-assignments You Want Before the First Pull
Termination Prism interrupts
Each Matrix needs 4 interrupts to fully remove it. Assign these ahead of time so it’s not chaos:
- Plan for 5 interrupts per Matrix (1 backup).
- Demon Hunters should always be assigned, because they gain DPS value from kicking anyway.
Macros for the Matrix frames:
/cast [@boss2,exists] Interrupt
/cast [@boss3,exists] Interrupt
/cast [@boss4,exists] Interrupt
Crystal Holders
You need 6 total crystal holders over the fight. Anyone can hold them, but ranged specs are generally better at it.
There is also a very real “progression cheese” here that’s worth considering. In Phase 1 the boss will always send a healer to the red realm and a healer to the blue realm for the memory game. If you have 2 of your 4 healers holding crystals in Phase 1, you can force which healers go to those realms, because crystal holders can’t be phased during the memory mini-game. That makes the code inputting cleaner with NSRT-style setups.
If you don’t care about that and you’re fine with random healers having to input codes, that’s totally playable too. Just make sure you assign who picks up which crystal each set so nobody panics and “accidentally” leaves one on the floor.
Phase 1
Pull and Positioning
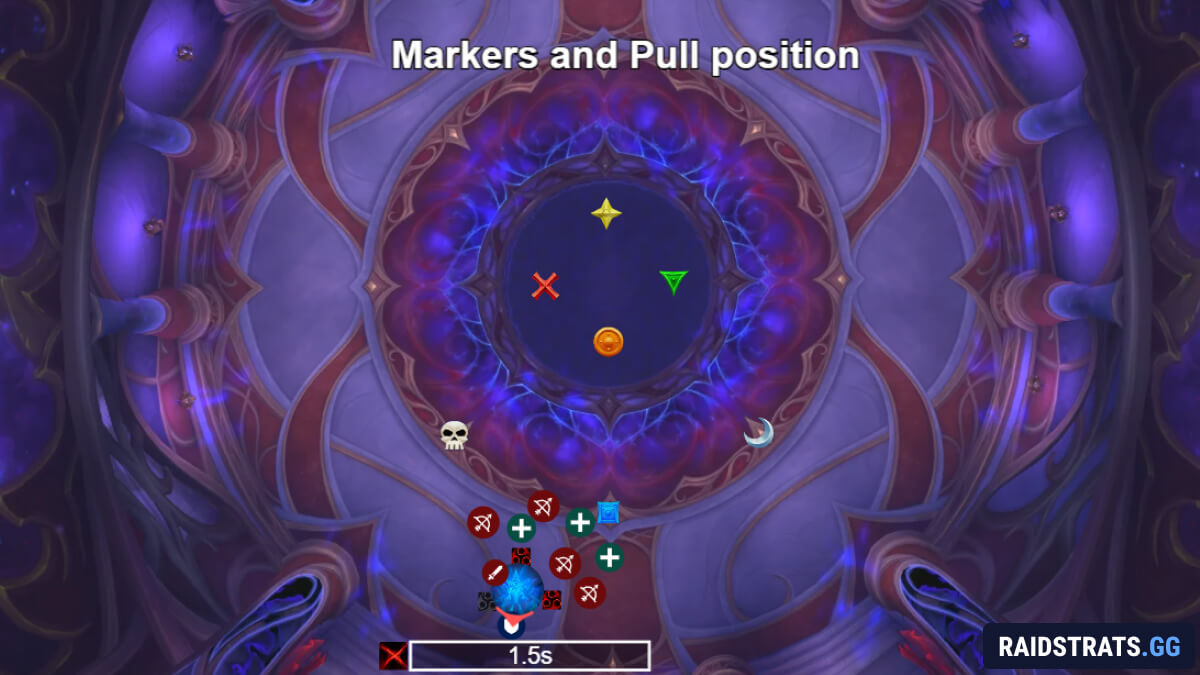
Pull the boss at the left pillar by the entrance and keep her about 5 to 10 yards away from the wall. This helps reduce the chance of instant ugly Glaives bounces right into the raid.
Termination Prism and the Crystal Spawn Moment
When you get the Matrix kick window, just kick as fast as possible. You don’t need to do fancy timing here, you just need it dead.
As soon as the Matrix is cleared:
- DK grips the adds on top of the boss immediately.
- Priest or Evoker grips the crystals together so they can be healed as a stack.
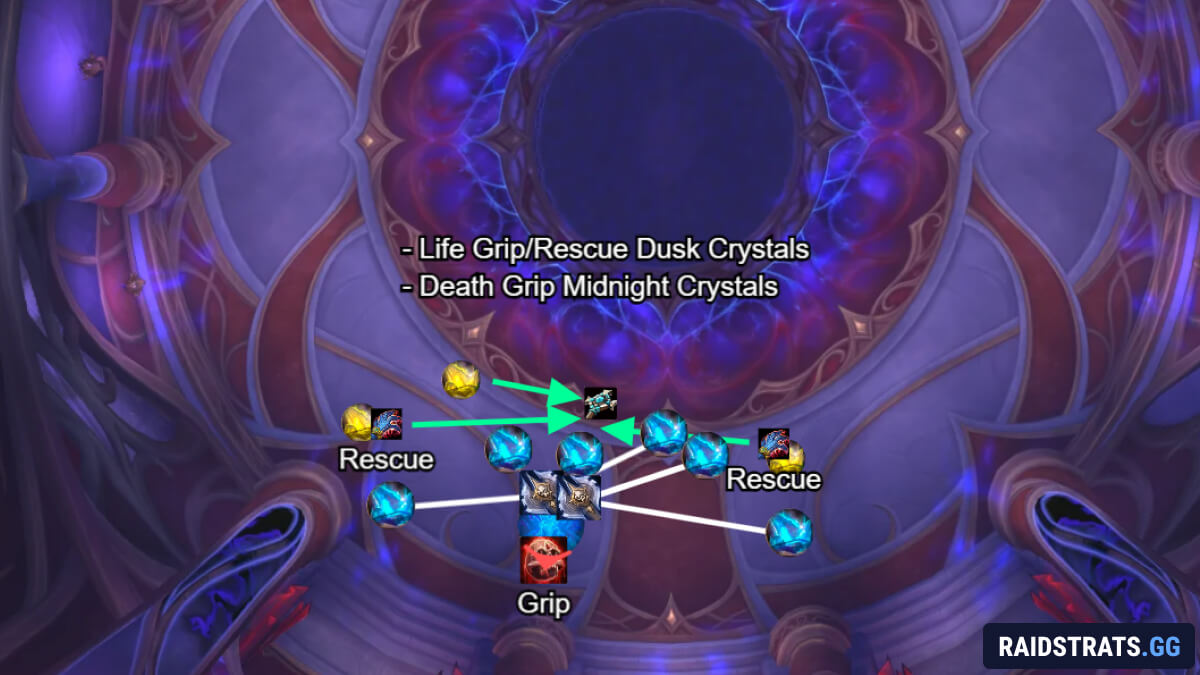
Stacked crystals are easier to heal, easier to pick up, and generally lead to fewer “my crystal got deleted by a glaive” incidents.
When a crystal gets healed to full it has a short grace window where it’s safe, but after that it can be destroyed if it’s left on the ground and gets clipped by random glaives. So the rule is simple: heal it, pick it up, and don’t leave it lying around.
Grim Symphony Memory Game
Once you hit the memory game, your realm code input should be consistent every pull.
A clean setup is:
- Tank inputs the 1st and 4th rune
- Healer in red realm inputs the 2nd and 5th rune
- Healer in blue realm inputs the 3rd rune
Once the combination is known, everyone positions for the correct order.
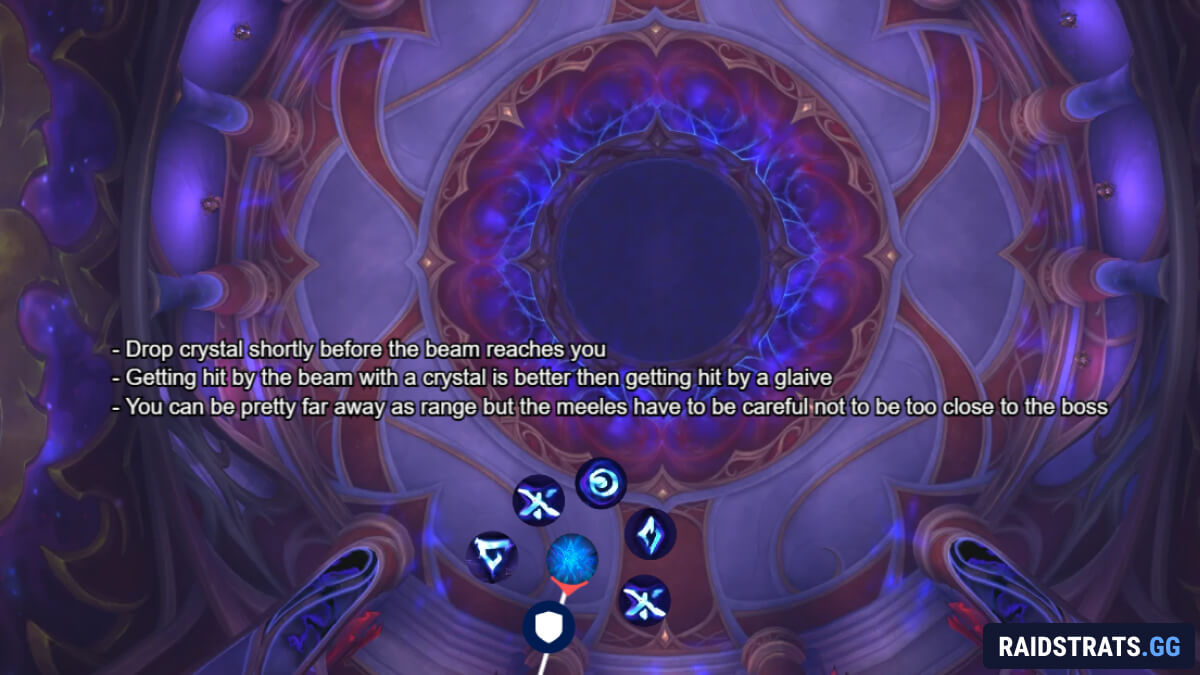
Crystal Holders During the Memory Game
This is the part that wipes raids quite often during early progress. Crystal holders will often also be marked players.
The default rule:
- Drop the crystal about 2 seconds before the beam reaches you
- Step away from your seed and take your rune hit
- Pick the crystal back up immediately after
What you must avoid:
- Your rune circle hitting a crystal that is on the ground when the beam touches you
- A random glaive clipping the crystal while it’s sitting on the ground
If you’re late, or you see a glaive coming, don’t hero it. Just hold the crystal and take the beam hit while holding it. You’ll spawn Tears of L’ura circles, but that’s recoverable. Wiping because you “tried to be perfect” is the real mistake.
Dark Quasar Movement
After the memory game, stack up in a line with the boss because Dark Quasar beams are coming.
The movement rule is:
- Cross the beam before it spawns
- Then follow it
You’ll want a movement speed buff for this. If you get caught on the wrong side, don’t try to cut through the beam. Just run away and recover.
Very important rule that saves pulls: If a crystal holder gets clipped by a beam here, 2 immunity players pop an immunity and go to soak. No questions, no debate, no “who was assigned”. Usually a Hunter solves this. Do not try to “help soak” without immunity, you’ll just die and then the crystal dies next.
You repeat this whole Phase 1 pattern multiple times. On the third Matrix kick set you won’t get any more crystals, so it’s at least slightly less stressful.
Heaven’s Glaives
Glaives look harmless and then delete your raid for five minutes straight.
There’s no secret trick here. They’re random, and you need to react. It helps to call out the really bad ones that are clearly headed into the melee or ranged camp, but otherwise it’s personal responsibility.
Intermission
Getting consistent at intermission is one of the biggest hurdles for this boss. Healers need time to learn the damage pattern, and everyone else needs time to learn how to move without drifting into chaos or sniping crystals.
L’ura, after the last set of memory game, will always be at one of the 3 markers we set at the start (moon, skull, blue), so use this as the anchor for positioning.
Use the formation shown in your picture:
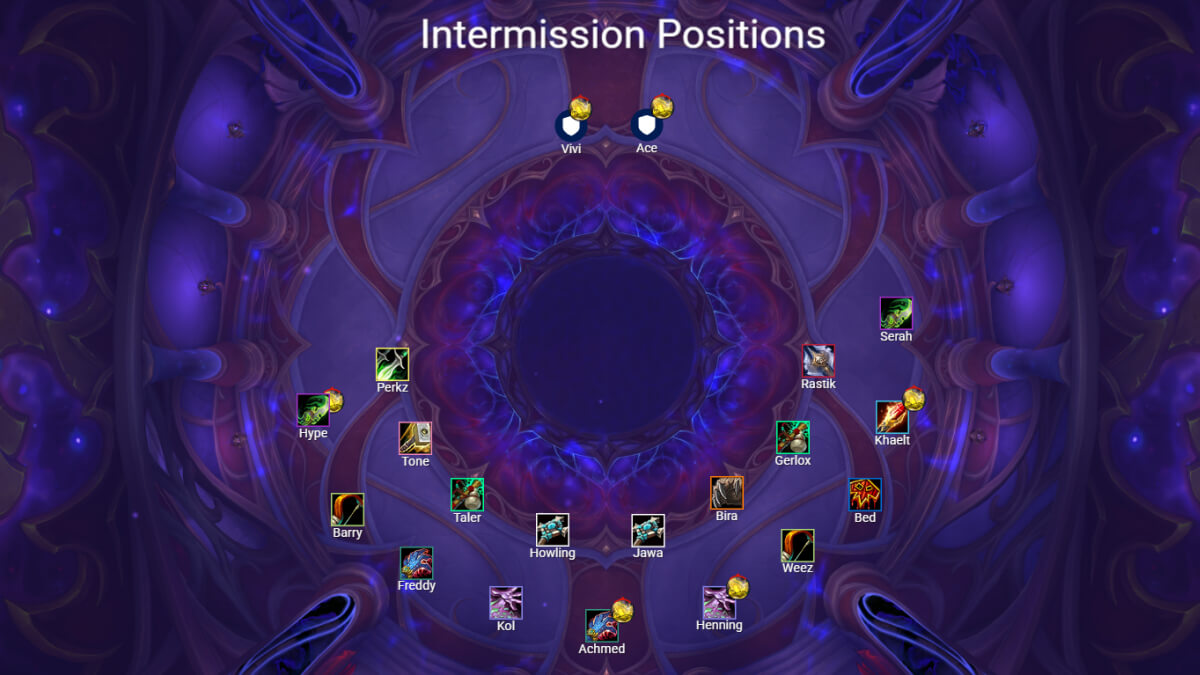
Small quality-of-life trick: give two crystals to tanks for this phase. Holding a crystal hurts, but tanks can handle it easily, and it lets them stand far out without griefing the raid’s positioning.
You can perform the swap just after Lura teleports to the middle, as everyone is running to their spots, and then when you are in P2 swap again at a predetermined location (middle is always good).
Main intermission rule: Do not drift away from your assigned spot.
Beams and spikes will force small movement, but you should always slowly re-center back to your position. That re-centering is what makes the final spike set survivable.
Phase 2
This is the easiest phase mechanically. The only “hard” part is learning the spread formations, and you can literally rehearse them on Heroic before you even reach P2 on Mythic.
Galvanize Soaks
You need a consistent formation for Galvanize. It is not RNG if everyone plays their assigned positions.
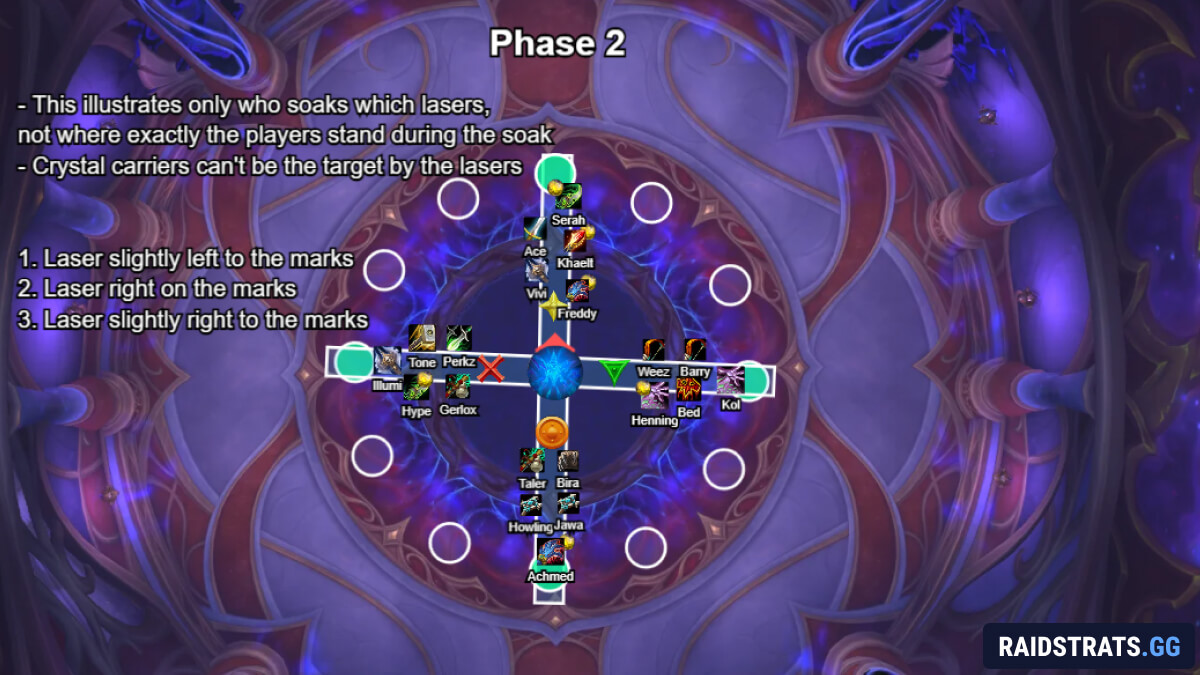
Use the rule:
- First Galvanize goes slightly left of marker
- Second goes on top of the marker
- Third goes slightly right of the marker
Galvanize is guaranteed to target a tank, a melee, a healer, and a ranged, and it cannot target the crystal holder.
Crystal holders still need to soak though:
- Drop the crystal about 1.5 seconds before the hit
- Step in and soak
- Pick it back up instantly afterward
Everyone else should already be standing in the beam when it spawns, because accidentally picking up a crystal is the dumbest way to lose a pull here.
Criticality Circles and the Pull
After Galvanize, you go into the Criticality spread formation:
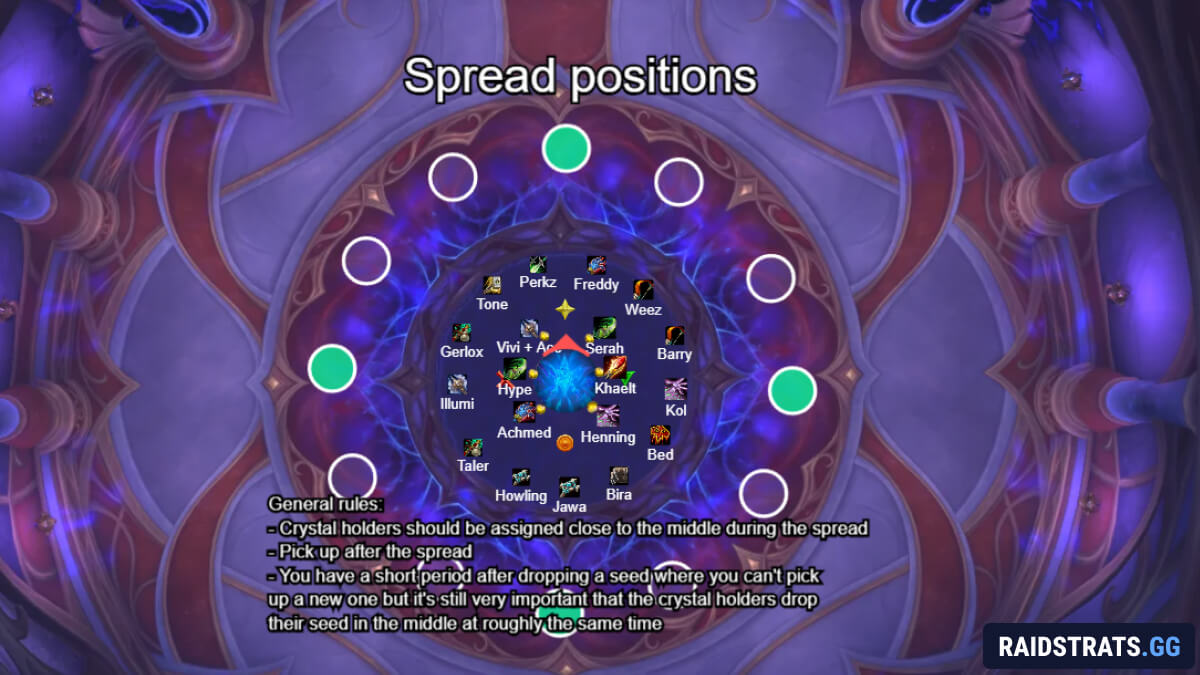
Important note for crystal holders: Do not fight the pull. Let it happen. When your “drop crystal” timer hits zero (NSRT), you drop, move to your spread spot immediately, and pick back up when you’re safe. No wiggle, no last cast, no “one more global”.
Also, never hit your crystal with your circle. That’s a wipe. If you mess up your side and you’re overlapping someone, it’s genuinely better to risk killing one person than wiping the whole raid.
After each spread, you dodge the balls that get pulled in. The safe spot is always between two markers.
You do the sequence three times, then you do the triplet spread.
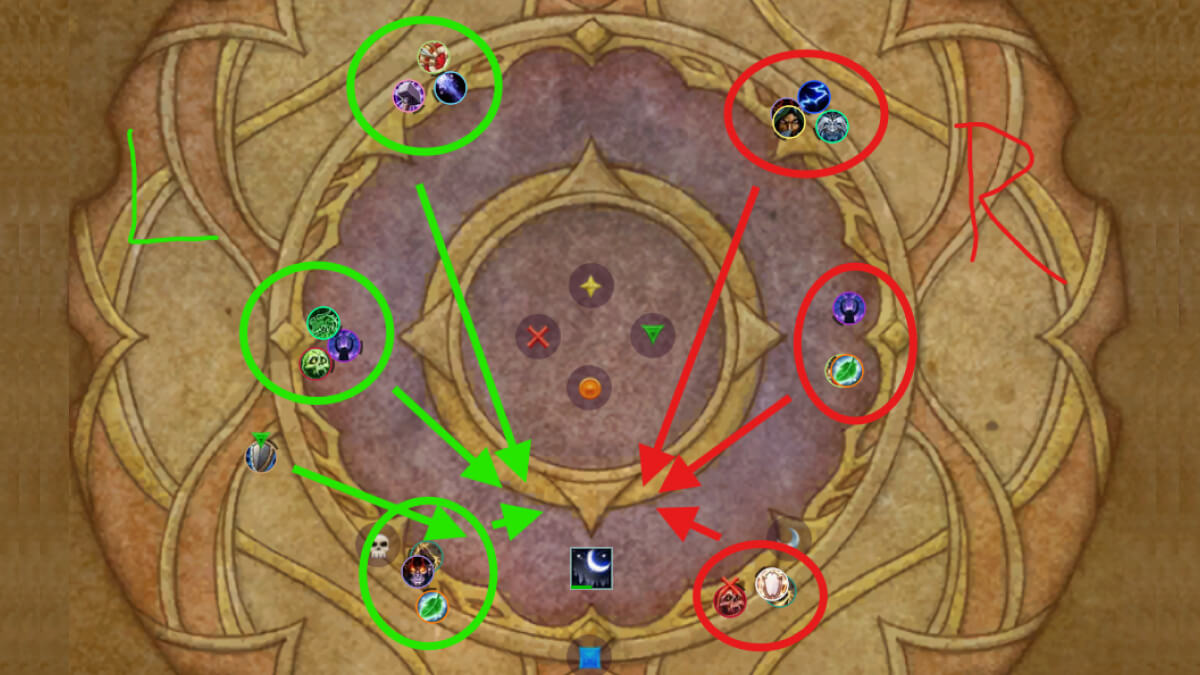
This triplet spread naturally creates your left team and right team for Phase 3 and places you correctly for the knock, so both sides have three players to grab the crystal and soak the Tears Of L'ura circles.
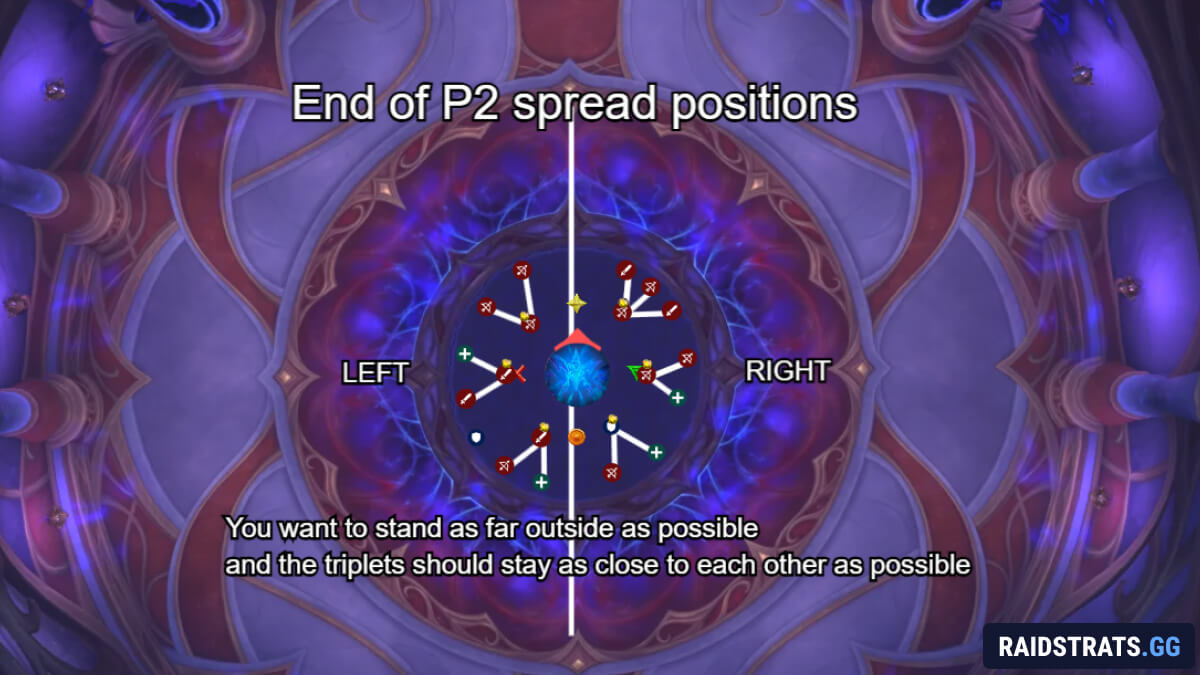
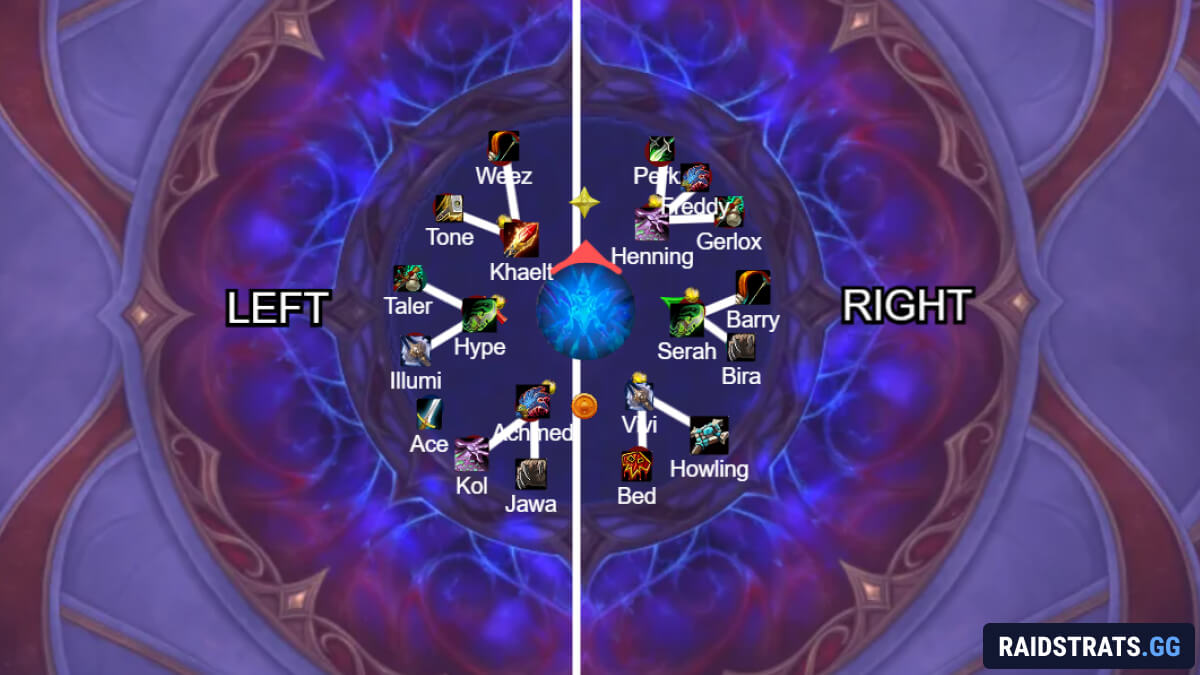
Pop a personal or immunity just before the knock if you can. It helps a lot early in progression because it stabilizes you for the soak and the Severance cast right after.
There’s no magic to Tears soaking here. Communicate and be consistent:
- The crystal carrier runs to crystal first, then soaks one Tear
- The other two players each commit to a side and soak fast
Once crystals are picked and Tears are soaked, run together toward the boss. Phase 3 starts after Severance.
Phase 3
This phase is all about positioning and personal responsibility. The memory game is not the hard part. The hard part is not getting one-shot by Constellations because you stood in the wrong pixel. Track the constellation timer and always re-check your space when new stars spawn.
Boss takes 100% increased damage in this phase, so this is where you use Hero and potions. Your timing target is around 6:07.
Cooldown Planning:
- Use Roar or a speed totem for the first Dark Archangel cast
- Use Warlock gate for the second
Both sides do the same mechanics but in a different order.
Left Side Order:
- Soaks, memory game, memory game, soaks, soaks, memory game
Right Side Order:
- Memory game, soaks, soaks, memory game, memory game, soaks
With current item level you typically only do each mechanic about twice before the boss dies, assuming people stop donating deaths to Constellations.
Soaks
Soaks are straightforward. Follow your picture formation and dodge Constellations while doing it.
Before First Archangel Cast (Crystal pop)
LEFT:
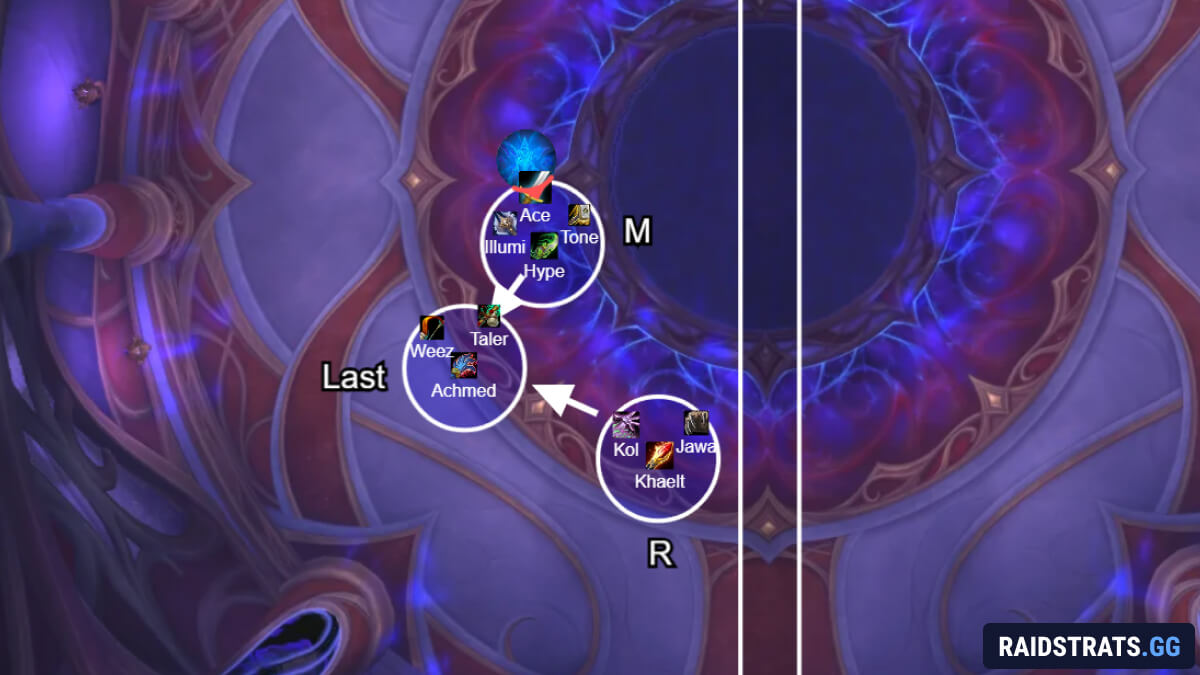
RIGHT:
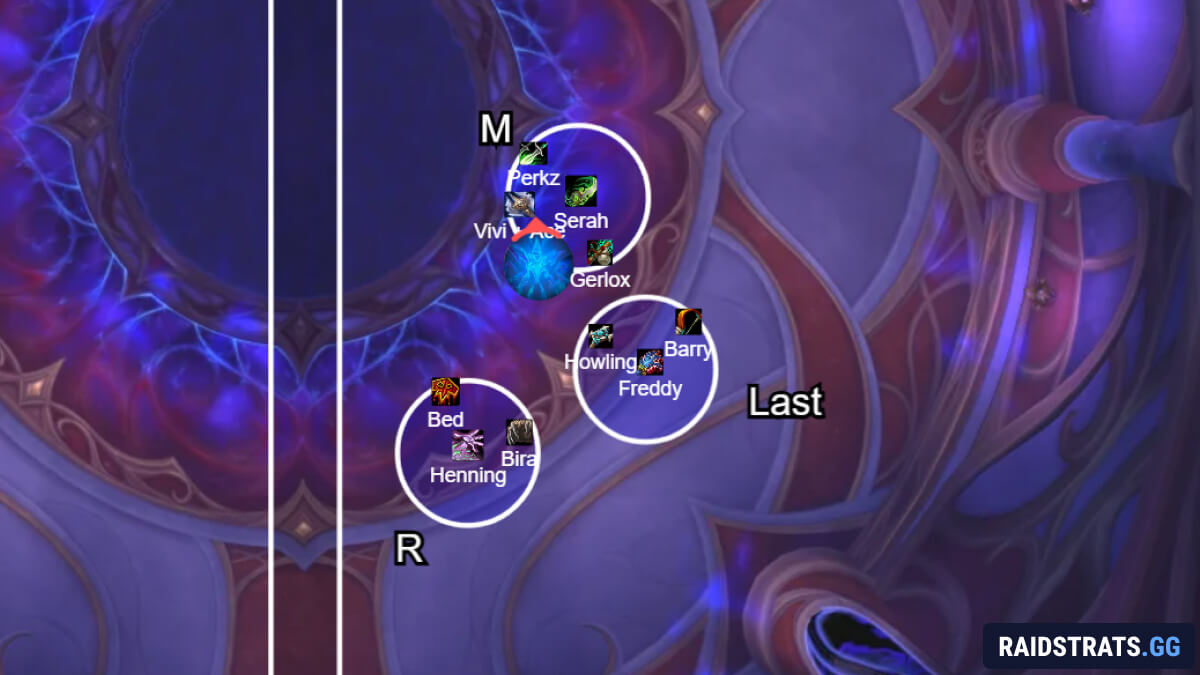
After First Archangel Cast (Crystal pop)
LEFT:
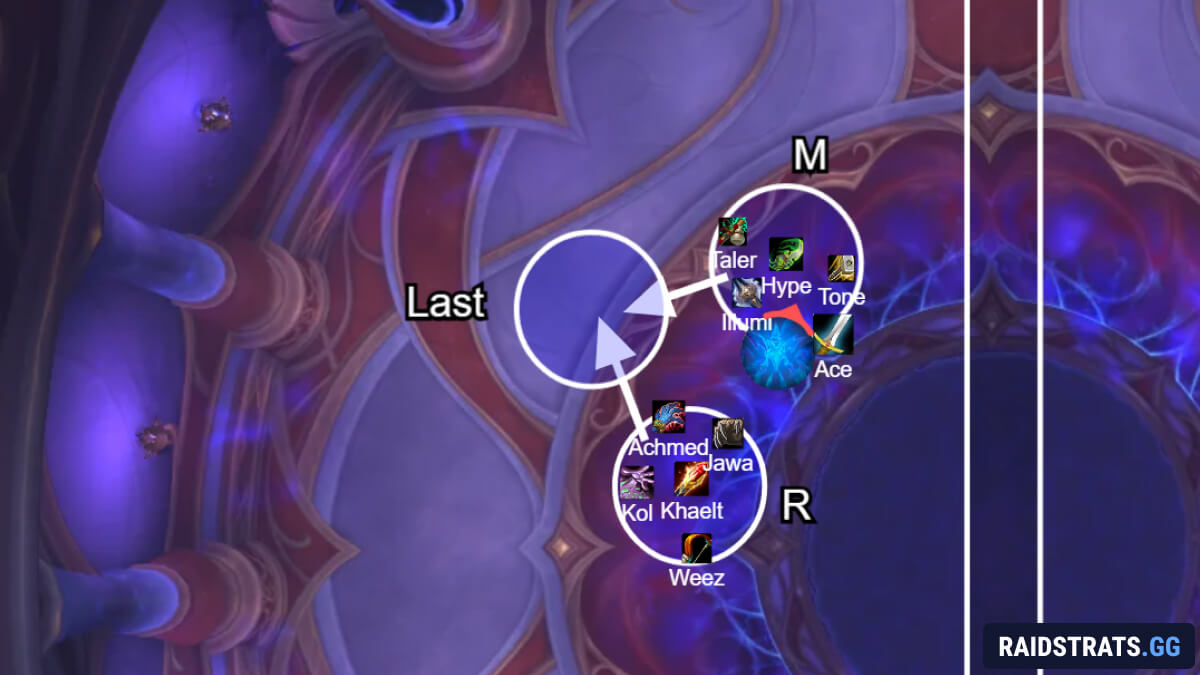
RIGHT:
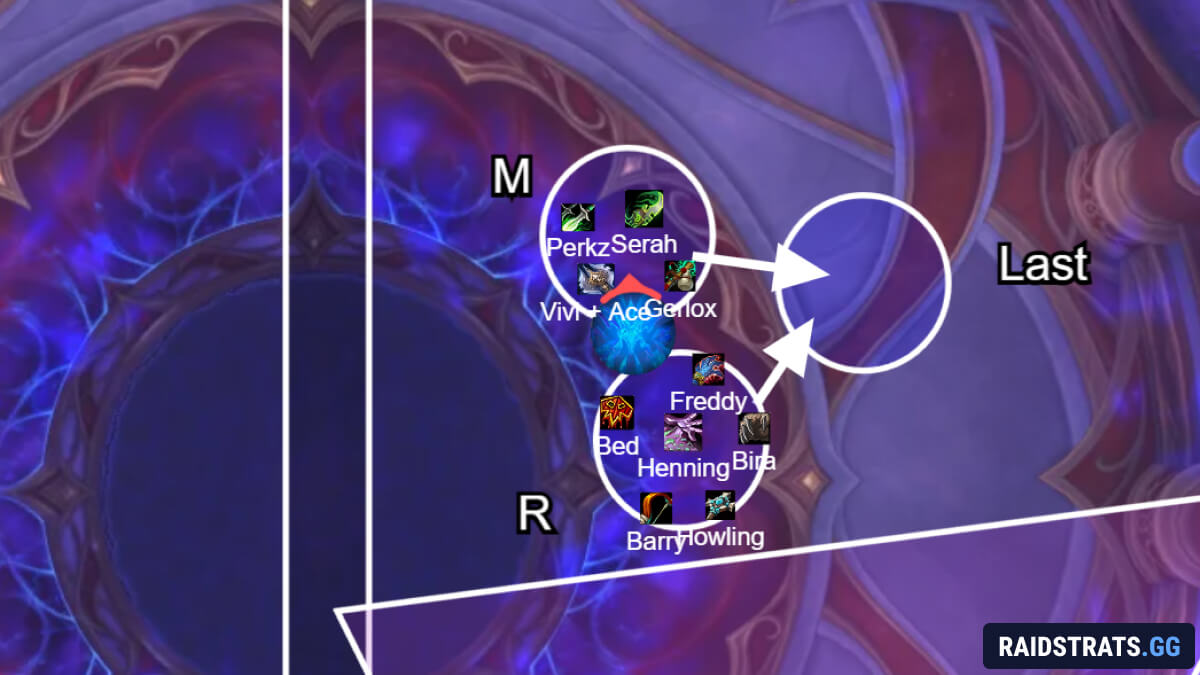
After the 2nd pop, you soak together since you only have one light.
Memory Game Traffic Rule
Memory game in Phase 3 is where raids wipe because they rush it at the wrong time.
Suggested formations are shown below.
LEFT:
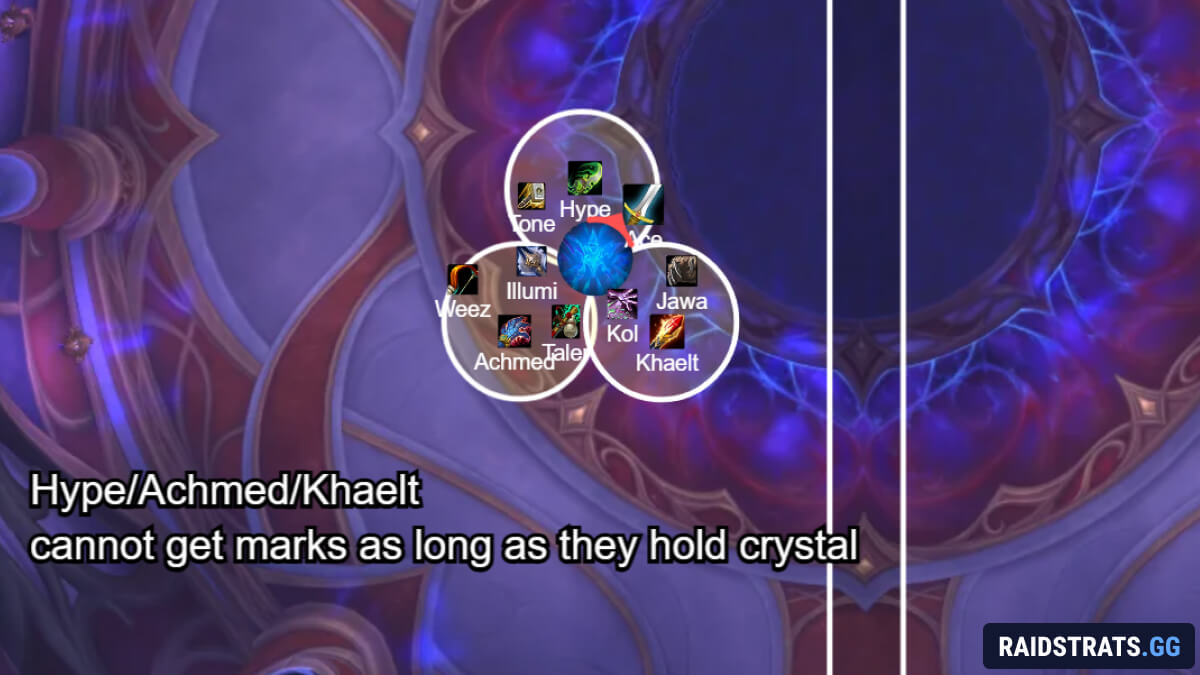
RIGHT:
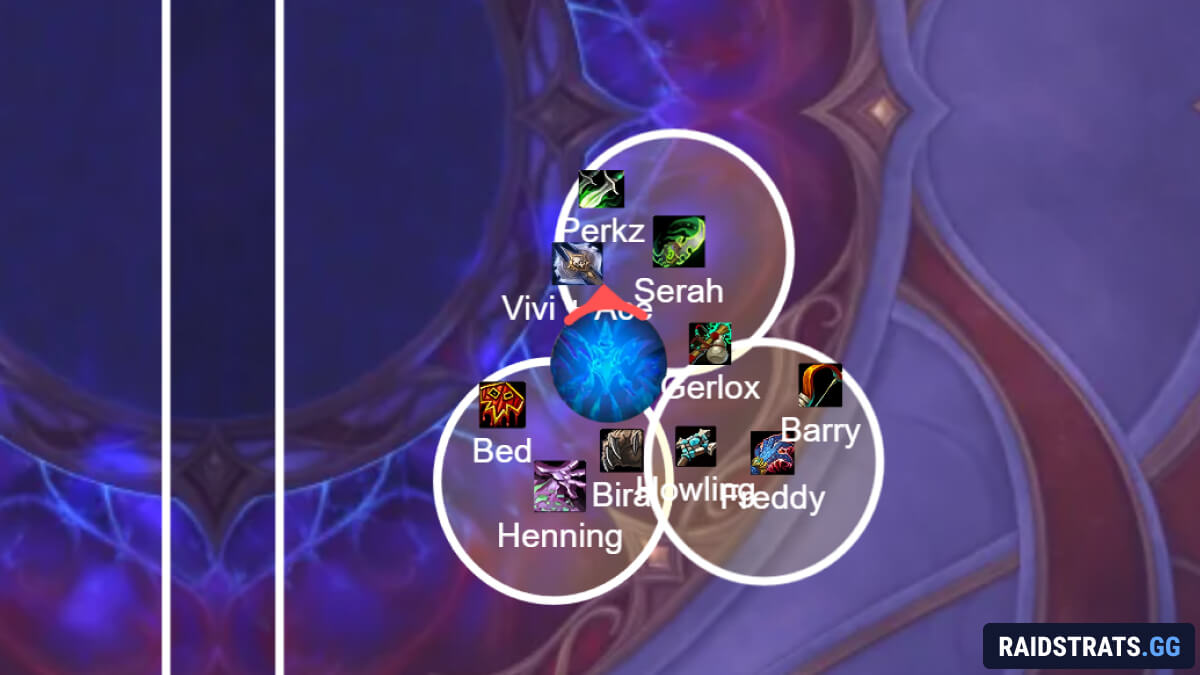
Once you have 2 lights left only, you split melee/range. Ranged players are staying in the back (hugging the frontal puddle).
Once you have 1 light left, everyone has to spread in the one circle, melees obviously closer to the boss, range to the back.
The clean rule:
- Everyone is initially spread so nobody instantly pops marks as they appear
- Constellations go off about 4 seconds after marks are applied
- If you’re not already basically on top of your rune spot, wait out that first Constellation set while slowly moving into position
- Once Constellations go off, you have about 8 seconds to finish the game
If Constellations are about to go off again and you’re not done, that’s your last chance to hail-mary and finish clean, because after that it’s a wipe.
Use personals while clearing runes. The clear hurts and dying while “solving the mechanic” is a really sad way to end a pull.
Also do not clear runes on top of a crystal holder. Triggering Tears Of L'ura here is extremely awkward because Constellations can make the soaks impossible.
If the boss is about to hit 0% before the mark timer ends, just spread and do not clear the marks. It’s not worth risking a wipe when the boss is already dead.
Tank Note: Tank deaths are another huge wipe reason in this phase. Boss damage is ridiculous. Pre-assign externals and rotate them properly.
Phase 4
If you get here, good news: the boss is basically dead. Most guilds take only a few pulls to finish Phase 4 if they follow the rules.
First tip, and it matters: Make sure everyone’s DBM or BigWigs settings are set to scream at them if they get blazes. People not realizing they have a blaze is the number one wipe reason in Phase 4.
As soon as you push the boss to 0, find each other and pixel stack on the light carrier. No exceptions.
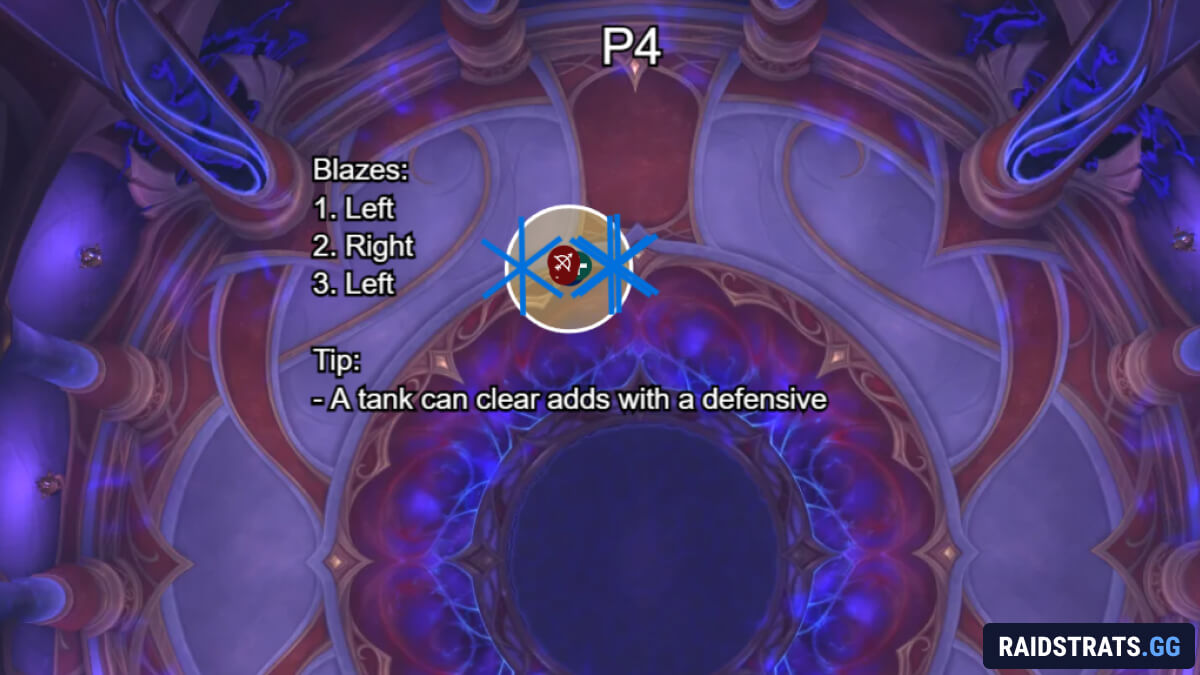
One tank gets the light, the other tank gets the mini nuke for adds. It’s random.
Blaze order is:
- Left
- Right
- Left
If you have a blaze, you move cleanly and make sure it doesn’t hit the stack. Everyone else trusts the blaze players and stops wiggling.
When the boss starts casting Heaven and Hell, you start moving immediately. You need a speed boost for each move.
Adds:
- They do massive damage to the first player they touch
- Then they become disarmed for a few seconds while walking
On the move, have an immunity class intercept the adds. Hunters, Paladins, Rogues are great. Do not touch the adds while they are walking into the light too early, because by the time they reach the middle they can become active again and kill someone. Touch them right as they’re about to hit the group.
The tank with the nuke only uses it on the massive spawn, and yes it’s RNG.
Keep doing that until the boss is dead.