Up to 84% Off VPN





Raid Setup


Introduction
Welcome to our Mythic Crown of the Cosmos (Alleria Windrunner) Boss Guide, for The Voidspire Raid. Learn about the Mythic specific fight mechanics and the strategy we recommend to defeat this boss on Mythic difficulty!
This guide focuses on a Mythic strategy, and won’t explain the basics of the fight, so make sure you read through the Heroic version of the guide for this boss if you are unfamiliar with the encounter.
Fight Style: Single Target with Cleave / Multi-DoT moments
Recommended Setup: 2x Tank / 4x Healer / 14x DPS
Required Utilities: Warlock Gateway / Grips
Hero/Lust Usage: Phase 2
Addons: Northern Sky Raid Tools (NSRT)
Easy Mode
Phase 1:
- Plays like Heroic. Your goal is to ramp damage by killing Void Droplets on top of the Sentinels. Grips help a lot.
- Kill order: Demair, Morium, Vorelus.
- On pull, melee and ranged move the same direction for Grasp Of Emptiness so beams naturally point away.
- Void Expulsion puddles get baited behind the current Sentinel, then you reverse on the next set and drop the next puddles where you came from.
- Silverstrike Arrow timing matters:
- If the Sentinel is 30% or lower when arrows appear, hit it.
- If it’s above 30%, skip that arrow set and hit it next set.
- Arrow targets use a defensive or ask for an external. Don’t be greedy.
Intermission:
- Same as Heroic intermission 2. Rotate and dodge.
- Start at Skull marker and aim to finish at Red.
Phase 2:
- Send 4 strong DPS through the gateway immediately to kill the Rift Simulacrum on the other platform.
- Main platform continues the Grasp movement and Void Expulsion puddle placement.
- Silverstrike Arrow is the objective:
- Two Images spawn.
- Hit the boss with arrows to remove 4 energy per hit, up to 8 energy per set.
- After arrows, Images pulse ramping raid damage until hit by Grasp Of Emptiness beams.
- Melee handles the far Image, ranged handles the close Image, use the movement rules from the strategy to make that automatic.
- Phase ends at 100 energy or 40% HP push into Phase 3.
Phase 3:
- Transition is Dimensional Slash. Let the first hit happen, then move in together and stack on Skull to bait Simulacrum spawn correctly.
- First tether set: ranged and melee snap fast with speed boost and defensives.
- Wait for Grasp Of Emptiness, then platform swap. Grasp targets don’t clip the group.
- On each platform:
- Keep the boss 25 yards away in the corner.
- Stack Sentinel and Simulacrum together and kill before 100 energy.
- Hardest moment is the edge stack into gateway:
- Gateway must not instantly break tethers.
- Take the gateway only when Devouring Cosmos is under you.
- Break tethers one by one, Grasp targets step aside.
- After that, it’s basically Heroic-style repeats: kill adds, handle Aspects, swap platforms when forced, finish boss.
Mechanics

When an Undying Sentinel is hit by a Silverstrike Arrow, it gains Silver Residue, taking low damage every second until it dies.
This is basically a small bonus that helps finish a Sentinel, but it shouldn’t be treated like a core mechanic you play around.

Each Silverstrike Arrow set spawns two Images of Alleria, one close and one far.
The close Image fires the arrow at a random player, and then it bounces to another player. Players still need to use these arrows to make the adds killable, but hitting the boss also matters here.
Important details:
- Hitting Alleria with the arrow removes 4 energy.
- She can be hit twice per arrow set, so 8 energy total per set if done correctly.
After the arrows are fired, the two Images start pulsing ramping raid-wide damage. The only way to stop that is to hit them with the Grasp Of Emptiness beams.

Rift Simulacrum
At the start of the phase, a Rift Simulacrum spawns on the platform furthest away from where the raid is clumped.
From that point onward, it will naturally spawn on the next platform the raid is moving toward. It is stationary and needs to die before it reaches 100 energy.
Positioning Requirement: Keep the boss at least 25 yards away, or you start getting Empowering Darkness stacks.

Undying Sentinels
In addition to the Simulacrum, each platform also has an Undying Sentinel from Phase 1 reappear.
Differences from Phase 1:
- These Sentinels do not need to be hit by an arrow to die.
The play is simple:
- Stack the Sentinel on top of the Simulacrum and kill both quickly.
- Make sure neither reaches 100 energy.
Same positioning rule applies:
Keep the boss 25 yards away to prevent Empowering Darkness stacks.
Strategy
Mythic Crown of the Cosmos is going to feel very familiar if you’ve done Heroic, because it’s basically the same fight with a few key swaps in pacing and a couple mechanics that actually matter now.
Before you start, talk to your raid and figure out who needs help swapping platforms later. Anyone who can’t reliably jump or move themselves needs a planned grip or rescue, because Phase 3 is not the time to discover that someone’s class has no mobility and they jump down the gap.
Phase 1
Phase 1 plays almost the same as Heroic. Your main goal is still to stack damage on the Sentinels by killing Void Droplets on top of them. Grips are very welcome here because the faster you ramp stacks, the faster this phase becomes a non-issue.
Your kill order is:
- Demair
- Morium
- Vorelus
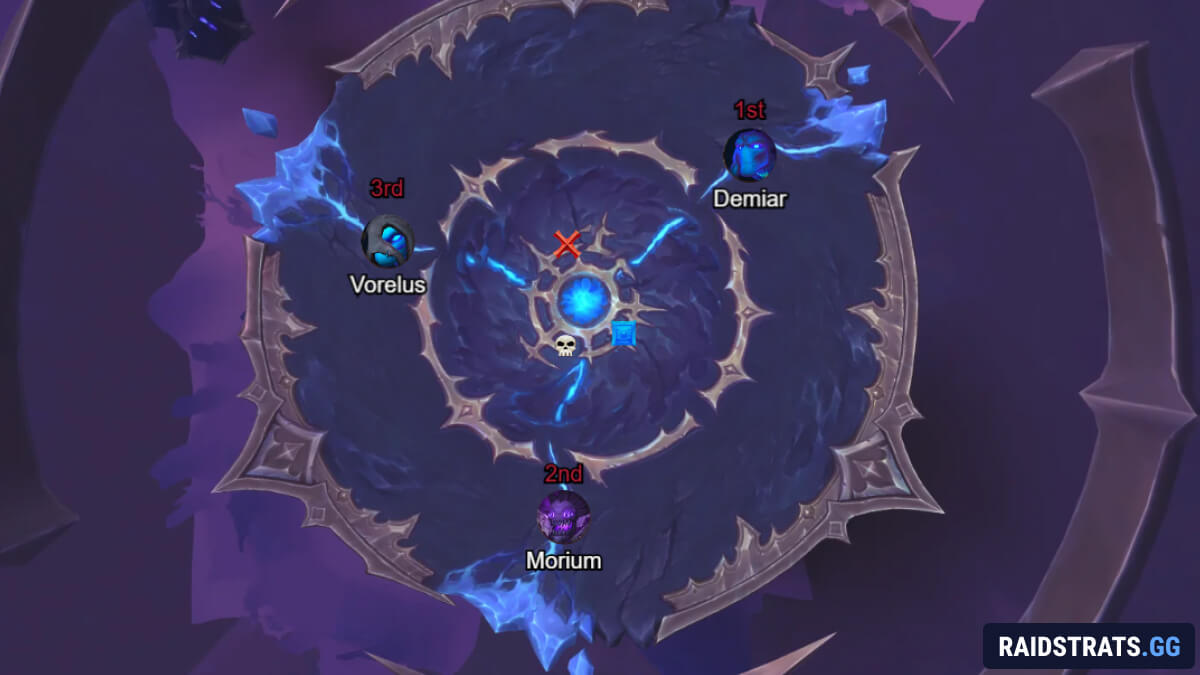
Right on pull, you want ranged and melee lined up together next to Demair. The reason is Grasp Of Emptiness. If both groups move in the same direction when the Obelisks appear, the beams naturally point away from the raid and you don’t create accidental damage.
This then flows into Void Expulsion. You bait and drop the puddles behind Demair. Next set of Obelisks, you move back the way you came and drop the next Void Expulsion there. This “forward then back” pattern keeps the early space clean and makes the first kill much more stable.
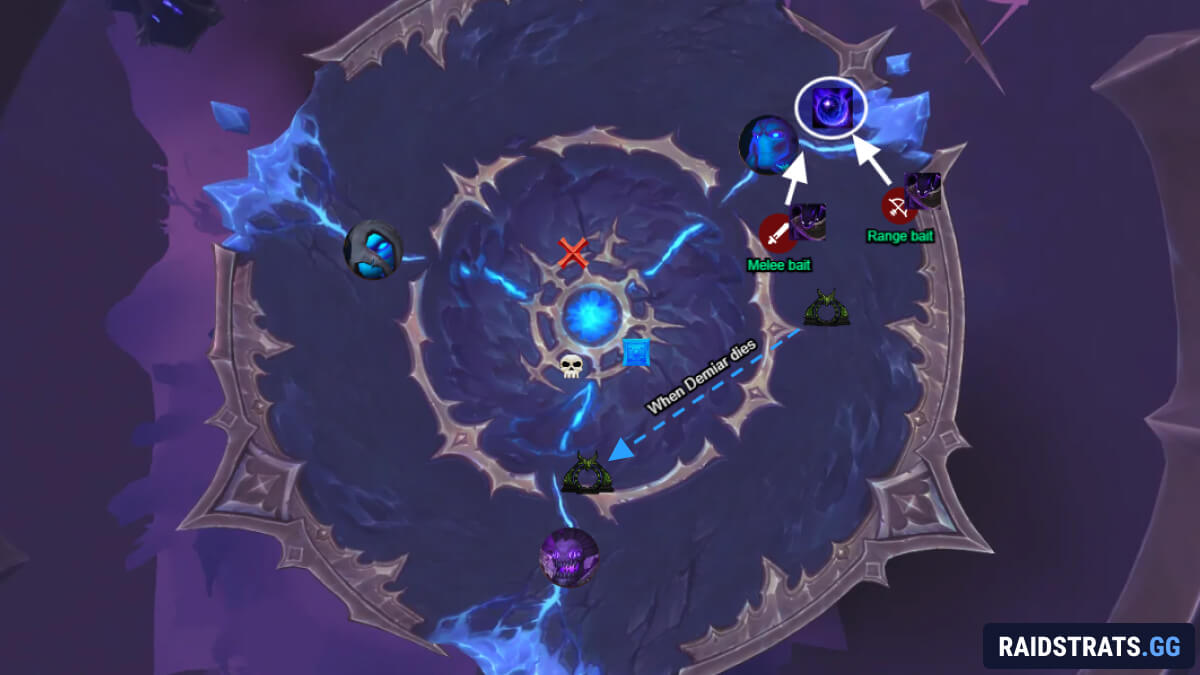
Once Demair dies, take the Warlock gate if you did not get targeted by Void Expulsion or Grasp. Then you repeat the exact same movement pattern on Morium, and then again on Vorelus.
Tank Note: You can swap tanks to the next Sentinel once the current one is around 1% HP. Don’t stand there pretending you’re required to finish the last pixel.
Silverstrike Arrow Timing
This is the part people mess up on Mythic. Hitting Sentinels with Silverstrike Arrow too early resets your stacks, and if your stacks get reset at the wrong time, you just won’t meet the damage requirement because the Sentinels have a lot of HP.
The simple rule to follow is:
- If the Sentinel is 30% HP or lower when the arrows appear, hit it
- If it is above 30%, skip that arrow set and hit it on the next one
Even if you “skip” an arrow set, people should keep hitting the Sentinel until it is basically dead.
Important note for arrow targets: Use a defensive every time you are the arrow target. If you have nothing, call for an external. Without one of them, there is a good chance you will die.
Intermission
This intermission is the same idea as the second Heroic intermission. You’re rotating and dodging. Only getting hit by every other arrow from the boss. It’s often easier to play slightly further ahead, and avoid trying to get hit by an arrow with orbs very close to catching up to you.
Start at Skull and aim to end at Red when it finishes.
Phase 2
Phase 2 will feel familiar, but it has one extremely important addition, and if you don’t do it right, you’re wasting the entire phase.
At the start of Phase 2, send a small strike team through the gate to the other platform to kill a Rift Simulacrum. This is the only one that shows up during Phase 2, so it’s free value if you handle it immediately. We recommend 4 players with strong single target or multi-dot to be assigned.
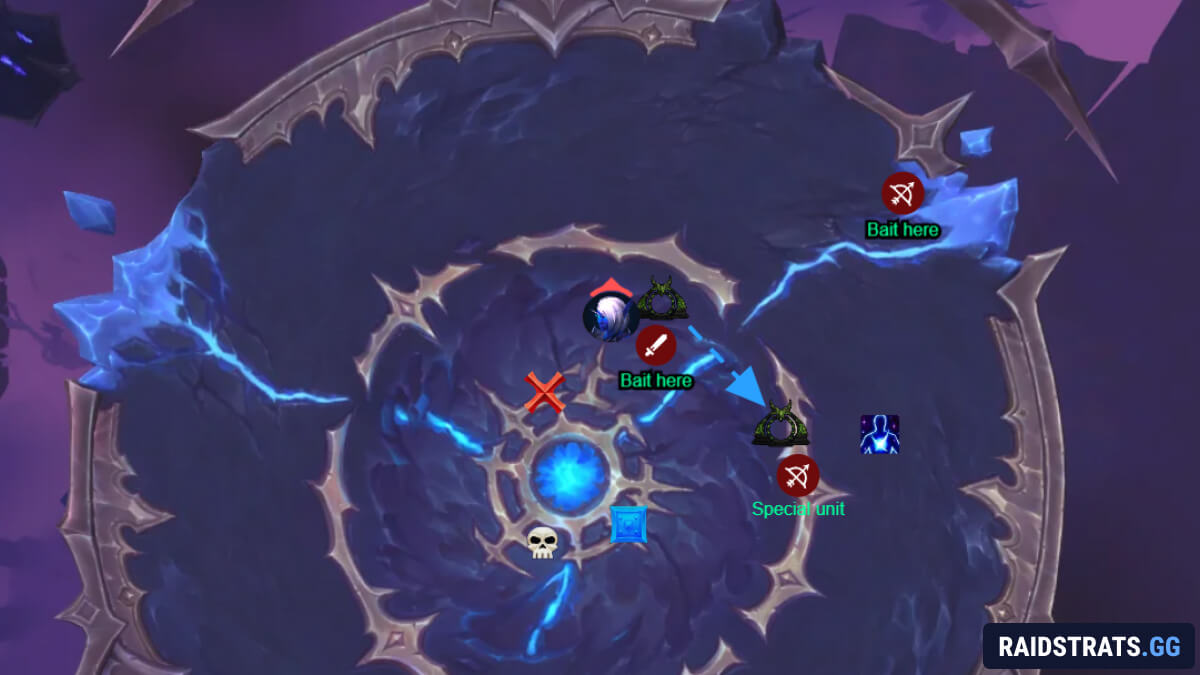
On the main platform, the rest of the raid continues the same bait-and-move game from Phase 1:
- Grasp Of Emptiness happens, melee and ranged move the same direction to point beams away
- Then you drop Void Expulsion in a clean spot
After the first bait and move, the phase starts revolving around the most important mechanic in the fight: Silverstrike Arrow, Images, and Energy Control.
Silverstrike Arrow, Images, and Energy Control
When the boss casts Silverstrike Arrow, it spawns two Images of Alleria. The close one fires the arrow.
Hitting the boss with the arrow removes 4 energy. You can hit her twice per set, so 8 energy per set total. This is easily the biggest gain you can create in the entire encounter, and you should treat it like the objective of Phase 2.
The adds still need to be hit by arrows to die, but that becomes easier because you’re already firing two arrows that can also hit the boss. If your stacking is clean, it just happens naturally.
After the arrows fire, the two Images start pulsing ramping raid damage until they get hit by Grasp Of Emptiness beams. So you need to be aiming Obelisk beams into the Images every time, or you will just rot out.
Any of the 3 beams from the obelisk count as hitting it, when you are correctly aimed at your image, it will glow differently (purple) to indicate you’re aimed correctly. Especially for the far one, small movements can shift the beam a lot, and there is a small delay for the visual to change on the Image, so don’t panic and try not to move too much when aiming at them.
Practical Movement for Images
If the close Image spawns ahead of you, move closer to it, then when Obelisks appear, move back toward the previous puddles.
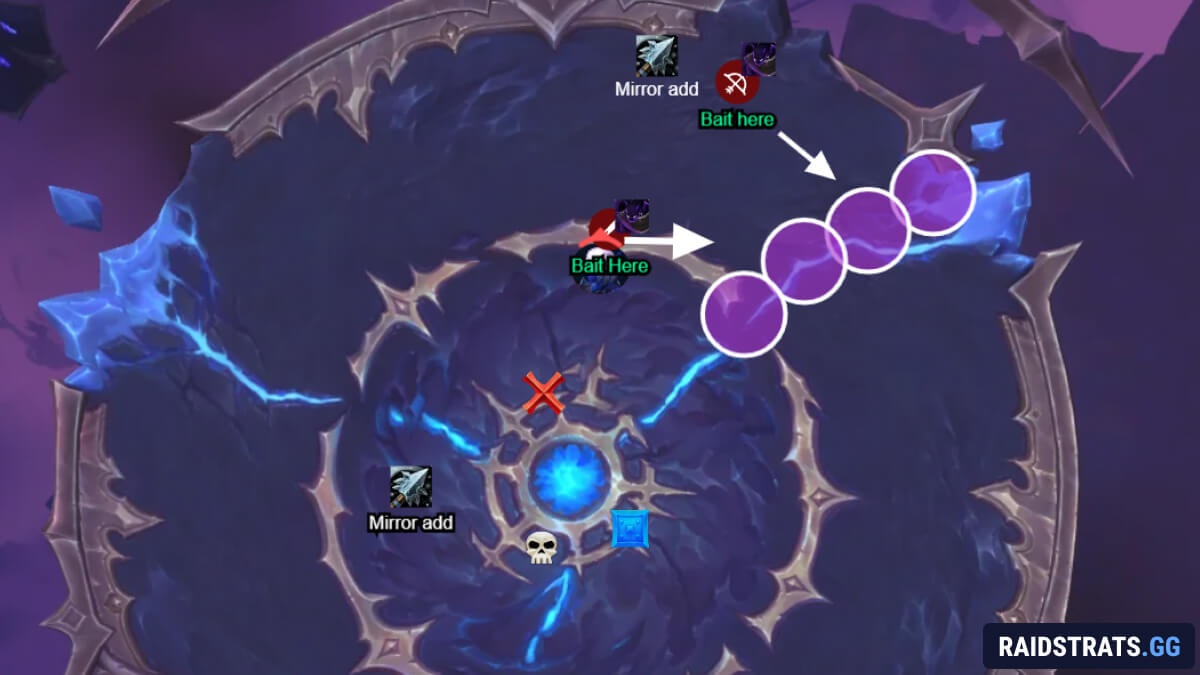
If the close Image spawns behind you, hug the puddle area and move away from Obelisks when they spawn.
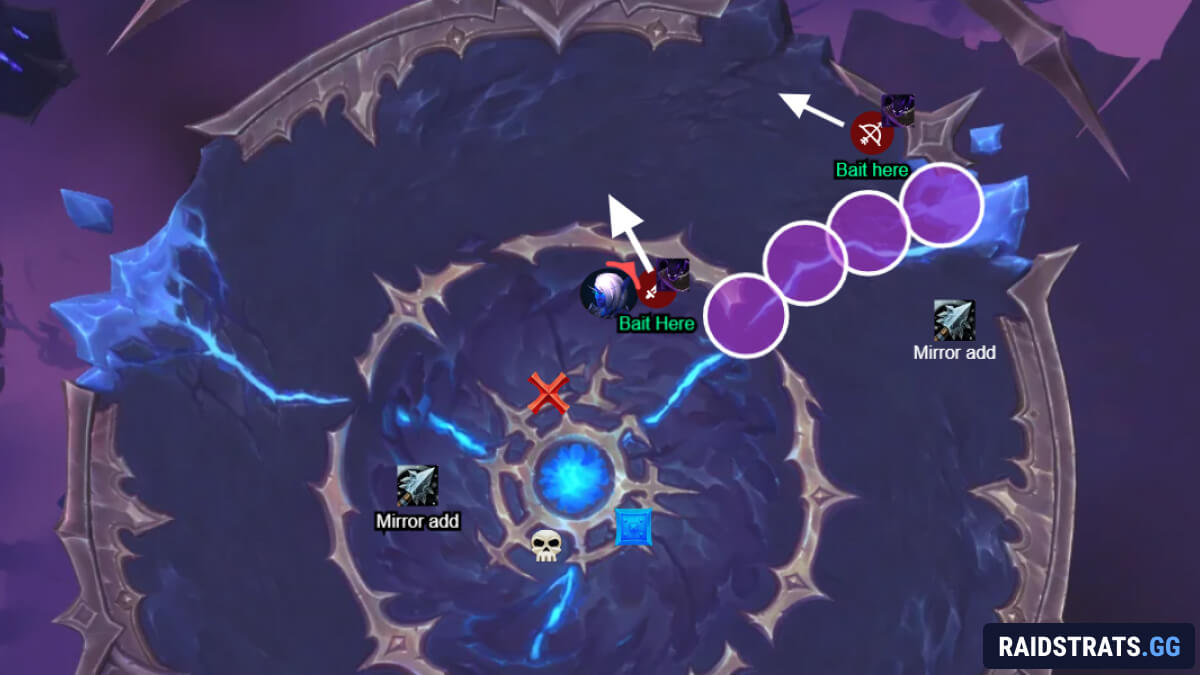
This makes it natural for ranged to hit the close Image and melee to hit the far one, without forcing anyone into weird movement. The Images will glow purple once they’re being targeted properly, so you can quickly sanity check if it’s working.
You repeat this Phase 2 “energy control” loop until the boss hits 100 energy or 40% HP, which is the hard push into Phase 3.
Tip: When you reach the end of the first platform, wait for the next Void Expulsion bait, then take the gate over. It keeps puddles tidy and stops you from dragging nonsense across the whole route.
Phase 3
At 100 energy or 40% HP, Alleria flies up and casts Dimensional Slash. This hits melee first, then ranged, so don’t instantly run into the boss the moment she lands. Let the first hit happen, then move in as a unit.
Once the first slash is done, stack on Skull. This is important because it influences where the Simulacrum spawns.
First Tether Set
When the first set of tethers happens, ranged and melee should snap quickly. Use a movement speed boost and a defensive like AMZ or Darkness, plus personals if needed, so nobody randomly falls over.
Everyone else waits for Grasp Of Emptiness, and then you swap platform.
If you are targeted by Grasp:
- Either stay on the old platform until your beams resolve
- Or jump, but stand to the side so you don’t clip people
Once you’re on the new platform:
- Move the boss to the top corner to keep 25 yards away from the adds
- Ranged bait Void Expulsion cleanly
- Ranged plus a bit of melee kill the Sentinel and Simulacrum stacked together
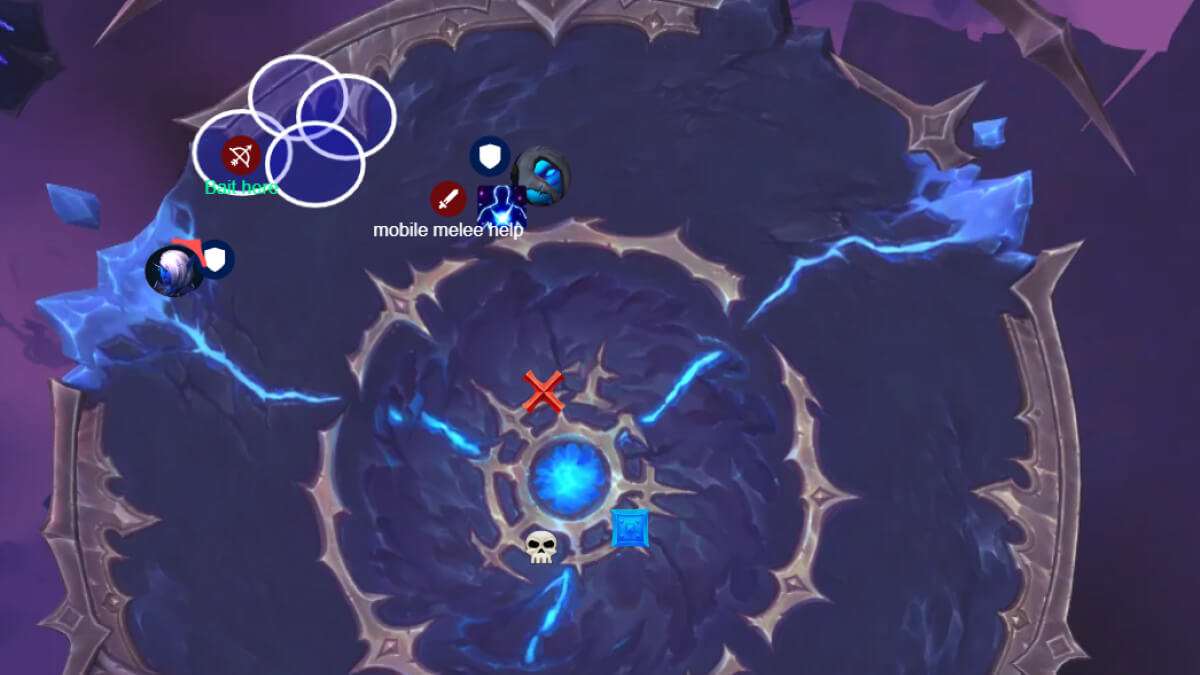
Then you get another Aspect Of The End set. Handle it in the middle, one by one. No need to rush and chain-kill your raid.
The Hardest Platform Swap
Eventually everyone stacks on the edge of a platform, and this is the hardest move in the whole fight. This is where you need real discipline.
You will get three Aspect circles again and you want to use a Warlock gate, but it must be placed so taking the gate does not instantly break the tether. Place the gateway as short as possible from your current platform to the next.
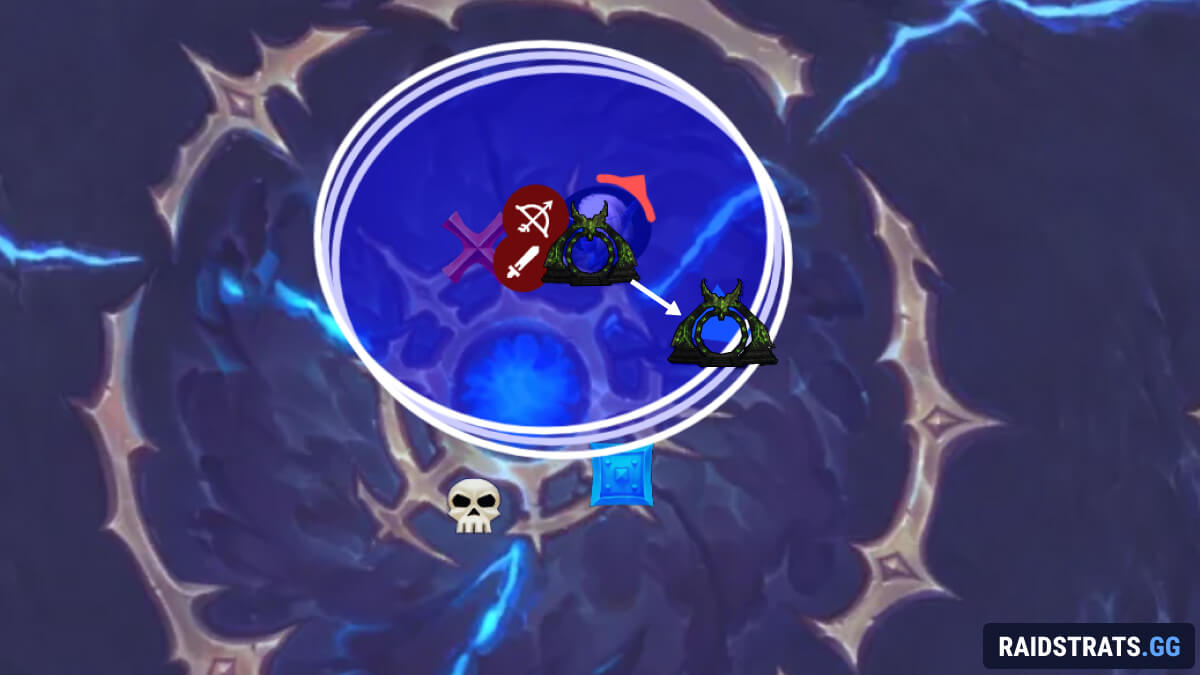
The rule is:
- You take the gateway only when the Devouring Cosmos puddle is already under you, not before.
- Then you break tethers carefully, one by one.
- This overlaps with Grasp, so Grasp targets step to the side and don’t clip the stack.
From there on out, the rest of Phase 3 is basically “play it like Heroic but with more adds”:
- Kill adds
- Pop Aspects one by one
- Swap platforms when Devouring Cosmos forces it
On the last platform, depending on boss HP, you can decide whether you commit to full clean play or just brute force the ending. There are no special new moves at that point, you just execute cleanly and close the fight.