Raid Setup
Introduction
Welcome to our Mythic Vaelgor & Ezzorak (Dragons) Boss Guide, for The Voidspire Raid. Learn about the Mythic specific fight mechanics and the strategy we recommend to defeat this boss on Mythic difficulty!
This guide focuses on a Mythic strategy, and won’t explain the basics of the fight, so make sure you read through the Heroic version of the guide for this boss if you are unfamiliar with the encounter.
Fight Style: Two-Target Fight (Multi DoT/Cleave)
Recommended Setup: 2x Tank / 4x Healer / 14x DPS
Required utilities: None
Hero/Lust usage: On Pull
Addons: Northern Sky Raid Tools
Easy Mode
General:
- Bosses stay grounded on Mythic, so it’s more consistent than Heroic.
- Keep bosses 15 yards apart and keep HP within 10% or Twilight Bond makes them do double damage.
Raid setup choices:
- 3 tanking is very viable because the enrage timer isn’t scary.
- The third tank soaks about 4 to 5 Nullbeam stacks each time.
- The third tank also tanks the intermission add until it dies.
Gloom teams:
- Make two teams of 6 that alternate.
- Team 1 mostly ranged
- Team 2 mostly melee plus mobile ranged
- Default Dread Breath safe spot is Red, except the second Breath in Intermission 1 goes to Green.
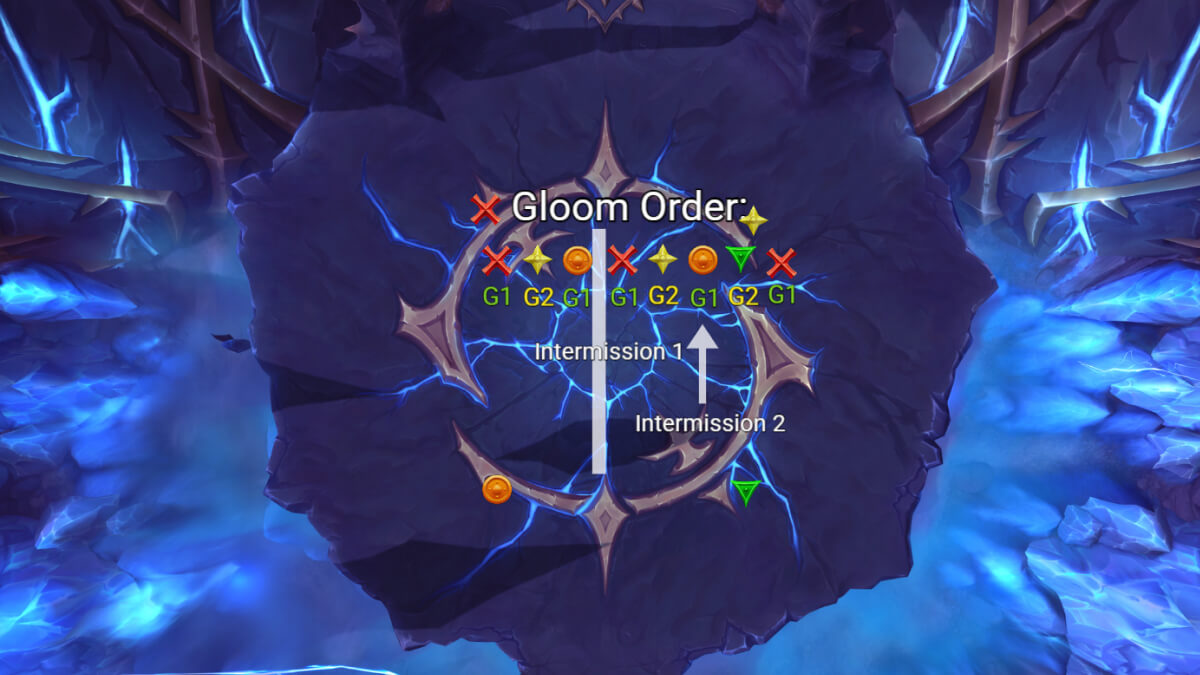
Gloom rotation:
- Gloom 1 to Red (Team 1)
- Gloom 2 to Yellow (Team 2)
- Gloom 3 to Orange (Team 1)
- Gloom 4 to Red (Team 1)
- Gloom 5 to Yellow (Team 2)
- Gloom 6 to Orange (Team 1)
- Gloom 7 to Green (Team 2)
- Gloom 8 to Red (Team 1)
Nullbeam and Void Howl:
- Nullbeam, then everyone snaps quickly.
- First snap triggers Nullscatter, dodge the circles right away.
- Void Howl, then lightly spread without overlapping so the orbs spawn grouped up.
- Grip, stun, and AoE the orbs so Voidbolt doesn’t free-cast.
- Assigned spread spots help a lot.
Intermissions on Mythic:
- Cosmosis means you still deal with signature abilities during intermission.
- Intermission 1 key moment:
- Aim tank Nullbeam toward Green.
- Second Breath during this intermission also goes Green.
- Tremor is great here.
- Kill the intermission add immediately when bosses land.
- Intermission 2 is the messy one:
Extra Tips:
Mechanics
The first tether snap of Nullzone triggers Nullscatter, spawning a bunch of circles.
These circles deal heavy damage if they hit anyone, so the play is simple: dodge them and don’t snap while you’re stacked.
Works the same as Heroic, but it also increases the movement speed of the targeted player.
This means the feared player can run out of range very quickly if they don’t get dispelled right away.
During intermission, the bosses reappear as reflections and start casting their signature abilities.
So you will still have to deal with things like Dread Breath, Nullbeam, and Void Howl during the intermissions.
Strategy
Surprisingly, Mythic Vaelgor and Ezzorak feels less chaotic than Heroic. The big reason is that both bosses stay on the ground the whole fight, so you don’t get the usual “one boss is flying, one boss is doing tank nonsense” vibe. It’s still a lot of mechanics, but it’s a lot more consistent once your assignments are set.
You still follow the two golden rules:
- Keep the bosses’ centers more than 15 yards apart because of Twilight Bond
- Keep their HP within 10% of each other, and aim to kill them almost at the same time
Setup and positioning
Before you start, place markers like this and tank the bosses as shown:
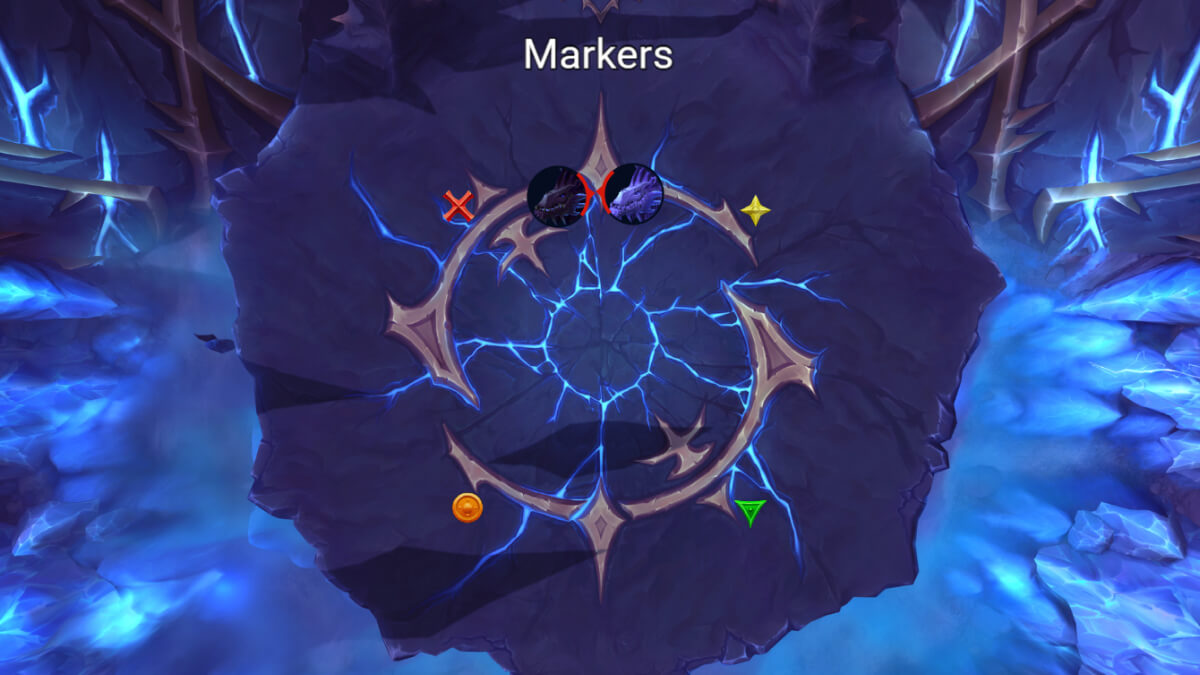
Also, friendly reminder to apply your basic debuffs and if possible keep a Hunter’s Mark on both bosses. You’re hitting two targets all fight, so there’s no reason to be lazy here.
2 Tanks vs 3 Tanks
There are two popular ways to play this boss, with 3 Tanks or 2 Tanks.
3 Tanks
Three tanking makes the fight easier, and the boss does not have a scary enrage, so this is a real option. If your third tank is a DK or DH, the extra grips are a bonus, but even without that, just having another body to handle Nullbeam and the intermission add is worth it.
If you three tank:
- The third tank soaks Nullbeam for around 4 to 5 stacks each time by standing in it
- They also pick up and tank the extra add from intermission until it dies
2 Tanks
Two tanking is still fine, it just means your main tanks need to be more consistent with movement and personal usage, because you don’t have a backup soaking beam stacks or stabilizing the intermission add.
Gloom Team Assignments
You need two Gloom teams that alternate every cast.
Make two teams of 6 players:
- Team 1 is mostly ranged
- Team 2 is mostly melee plus one or two mobile ranged
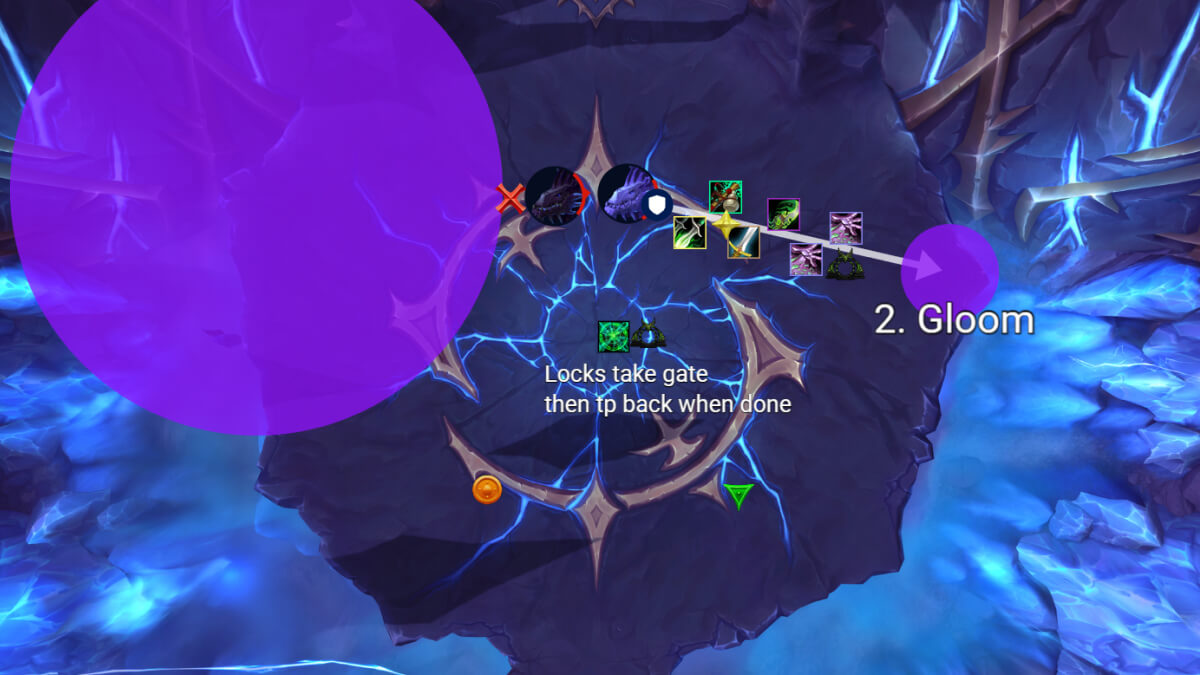
For the last one or two soaks, things like Warlock gate and then teleporting back are very useful.
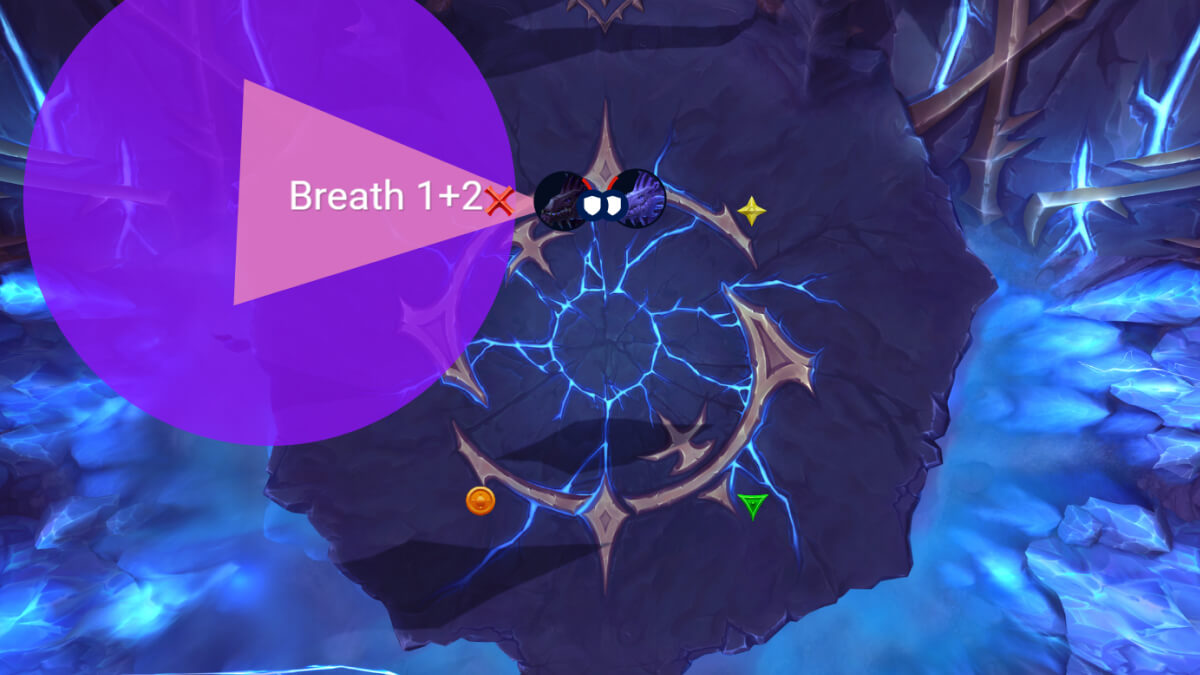
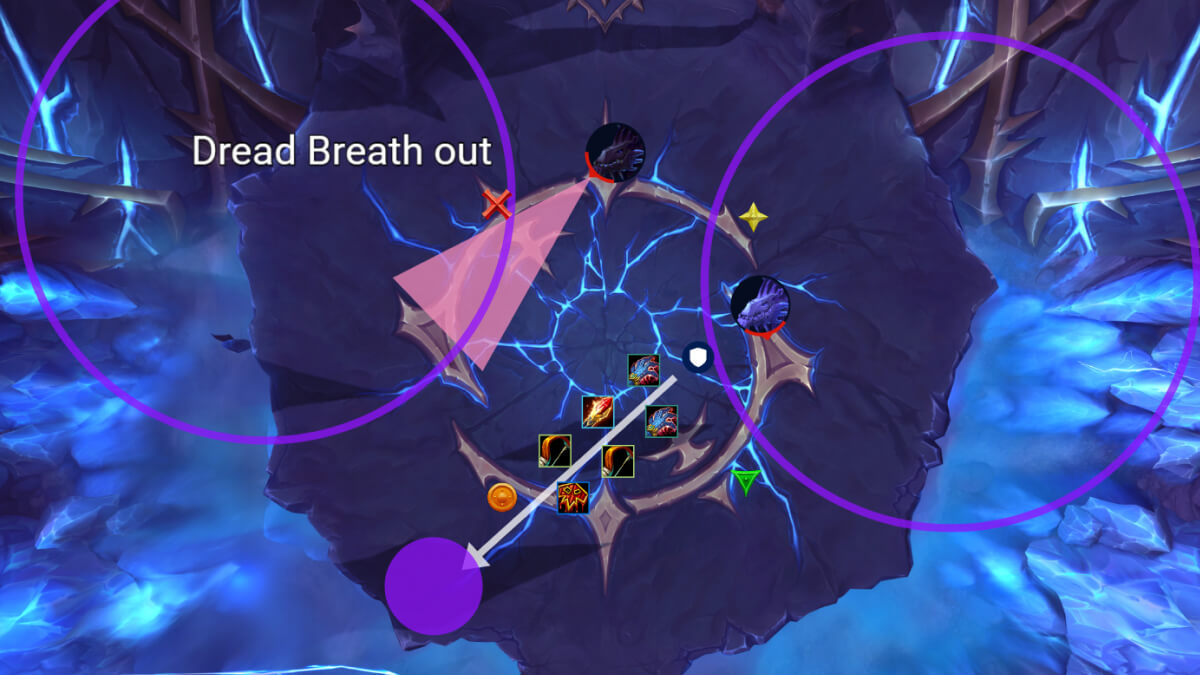
Dread Breath Rule
Throughout the fight, Red marker is your default safe spot for Dread Breath.
The one exception is the second Breath during the first intermission, where you want that Breath to go to Green instead. This is purely to stop someone from doing a full lap through the raid with a cone on them.
The Repeating Combo
Mythic still follows the same basic pattern:
- Gloom
- Nullbeam plus Nullzone snaps
- Void howl orb spawns
- Dread Breath targets
- Intermissions, but now with Cosmosis, meaning you still see signature abilities during them
Gloom 1
Just after the first Dread Breath, you get the first Gloom.
Send Team 1 to soak Gloom on Red:
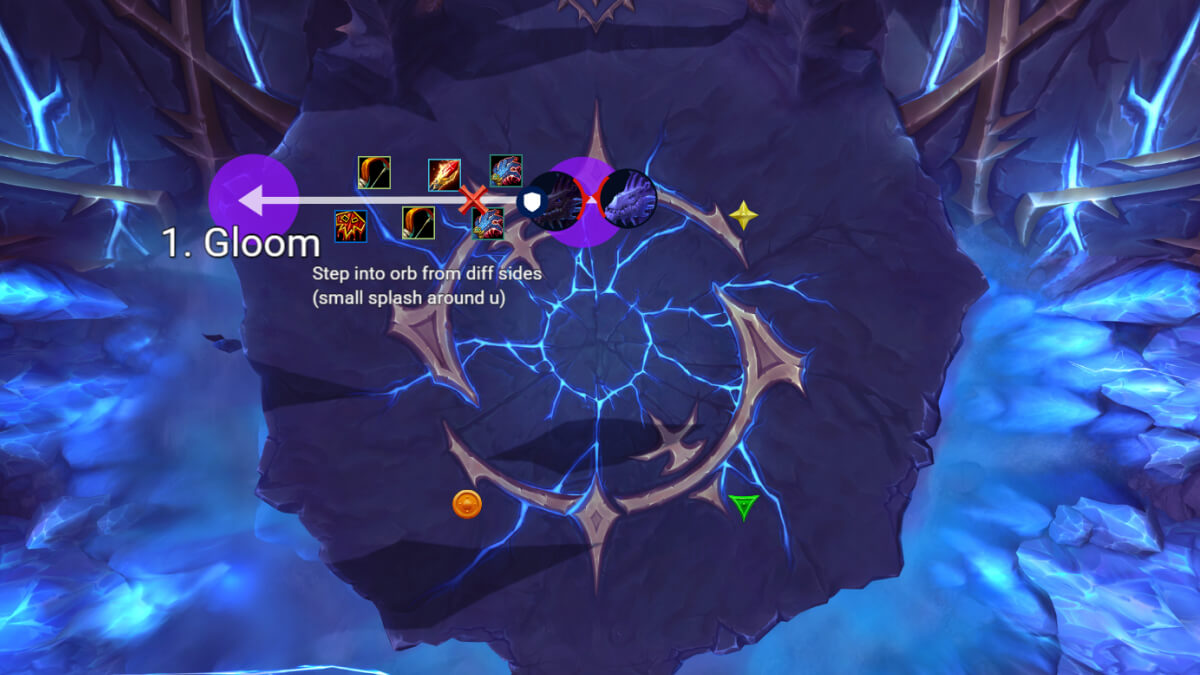
Important detail, touching Gloom splashes around the player, not around the orb. So multiple people can soak quickly as long as they touch from different sides. That being said, if your raid is dying to splash damage, just do it one at a time from opposite sides and keep it stable.
Nullbeam and Void Howl Combo
After that you start seeing the Nullbeam and orb combo. There’s nothing special, you just do the same thing every time.
For Nullbeam:
- Everyone snaps quickly.
- On Mythic, the first snap triggers Nullscatter, which spawns a bunch of circles.
- So snap and immediately dodge the circles.
For Void Howl:
- Spread near the center of the room without overlapping circles.
- Spawn the orbs as stacked as possible.
- If you have Mass Grip, use it, and spam stuns and stops so Voidbolt doesn’t free-cast forever.
It helps a lot if you use a simple formation and assign positions so people aren’t improvising every pull. Also put knock-back classes in the back so they can push the orbs into a tighter stack.
Gloom 2
Second Gloom goes to Yellow and you send Team 2 there.
One important note. This is right after a Dread Breath. If the Breath targets someone who soaked Gloom late, that player should just do their Breath on the Yellow side instead of sprinting through the raid with it.
Gloom 3
Third Gloom happens before the first intermission and goes to Orange. This uses Team 1 again.
Make sure the non-soak team is away from the middle, because Team 2 will still have the debuff and getting clipped by Gloom soaks is how you start losing players for free.
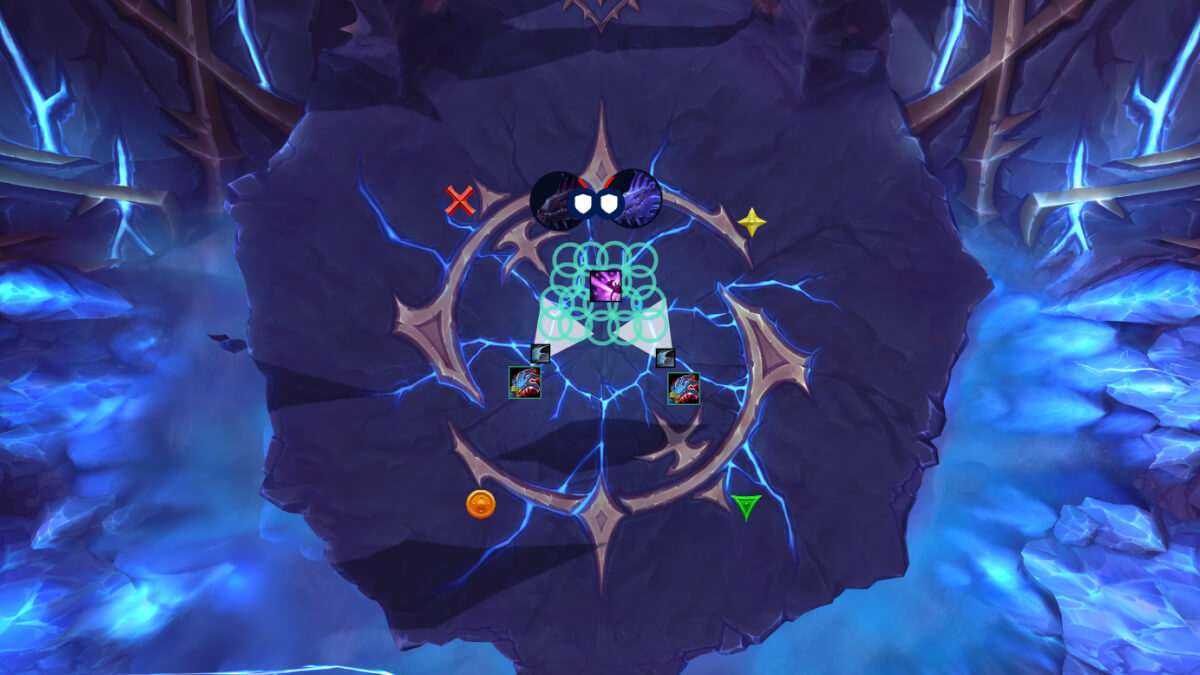
Intermission 1
The raid stacks in the middle like Heroic, but Mythic adds Cosmosis, so you are still dealing with the regular mechanics during the intermission.
Spread out for the circles from the intermission add.
Right at the start you get a Dread Breath. You can send it to Red like normal, or you can send it into one of the safer gaps so the player doesn’t have to run a marathon.
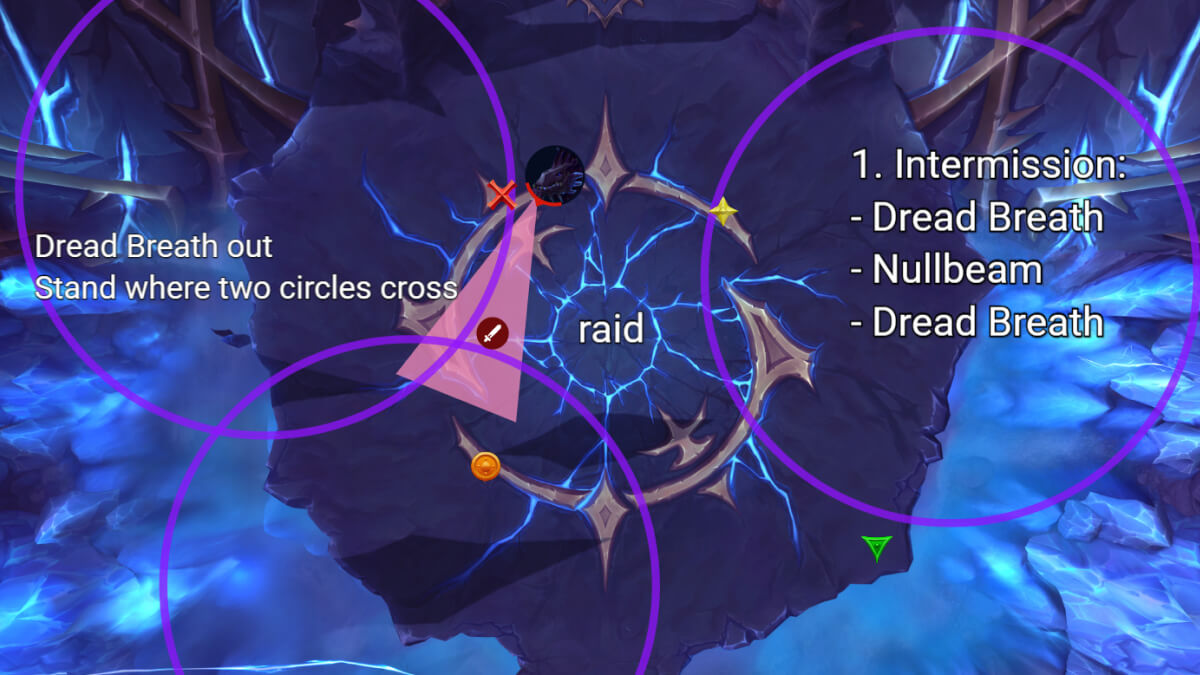
Then you get a key overlap:
- The tank that was last tanking Vaelgor gets hit with Nullbeam from the crossing point
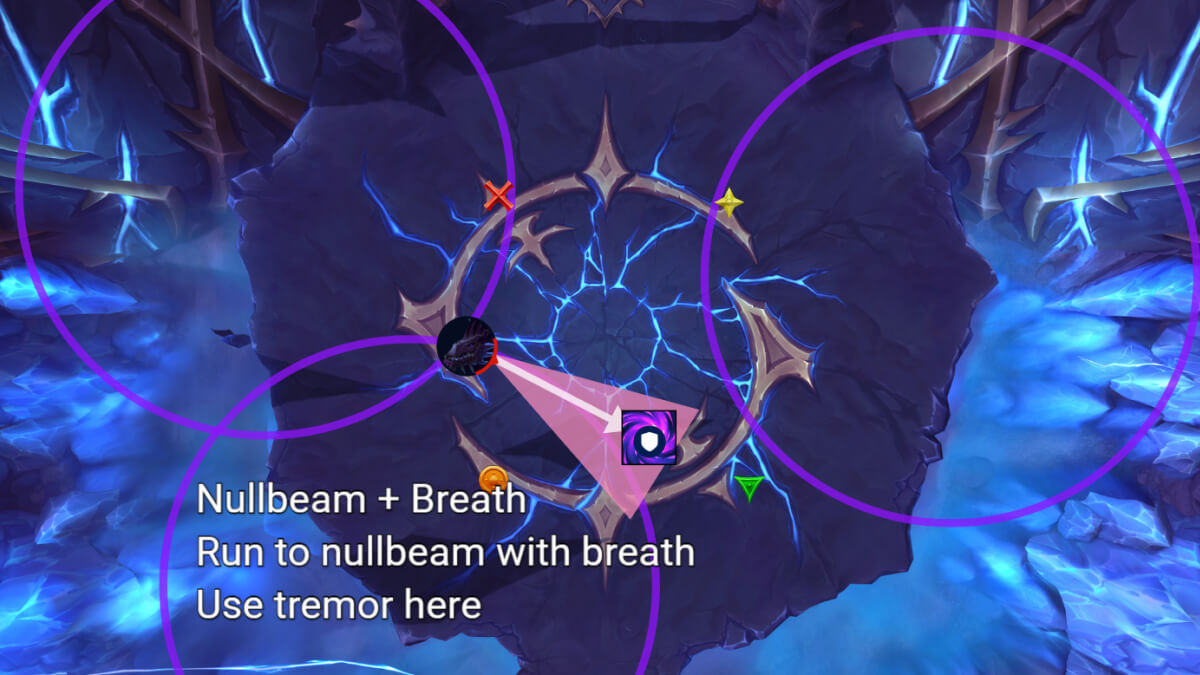
- Aim that beam toward Green
At the same time another player gets Dread Breath and should also go Green. Tremor Totem is great here because it guarantees an instant dispel for both the tank and the Breath target.
When intermission ends and the bosses land, kill the intermission add immediately. It becomes a problem if it’s allowed to live too long, and it also makes the next set of mechanics harder to handle cleanly.
Second Loop and Intermission 2
The next Phase 1 plays mostly the same, just with slightly different timing. Your Glooms still go Red and Yellow, and the third Gloom still ends up being the Orange one, but it happens during intermission.
One key note for the first Gloom after the second loop starts: It happens just after Void Howl, so players should use personals right before the circles pop, then Team 1 immediately runs to Red if they’re assigned.
Intermission 2 is the most hectic part of the fight.
Right before bosses reach 100 energy, you get Void Howl, and then shortly after you enter the intermission you get another Void Howl. Because you’re forced to be in the middle, you need to spread as well as possible and use personals, because someone getting clipped is basically guaranteed.
As the orbs spawn, a reflection appears near Yellow and casts Gloom. This is Team 1 again and it goes toward Orange. Handle it like you always do and make sure everyone else moves out of the way.
Dread Breath target runs toward Red.
Do not worry, the intermission damage stops here so you do not have to stick to the middle of the room.
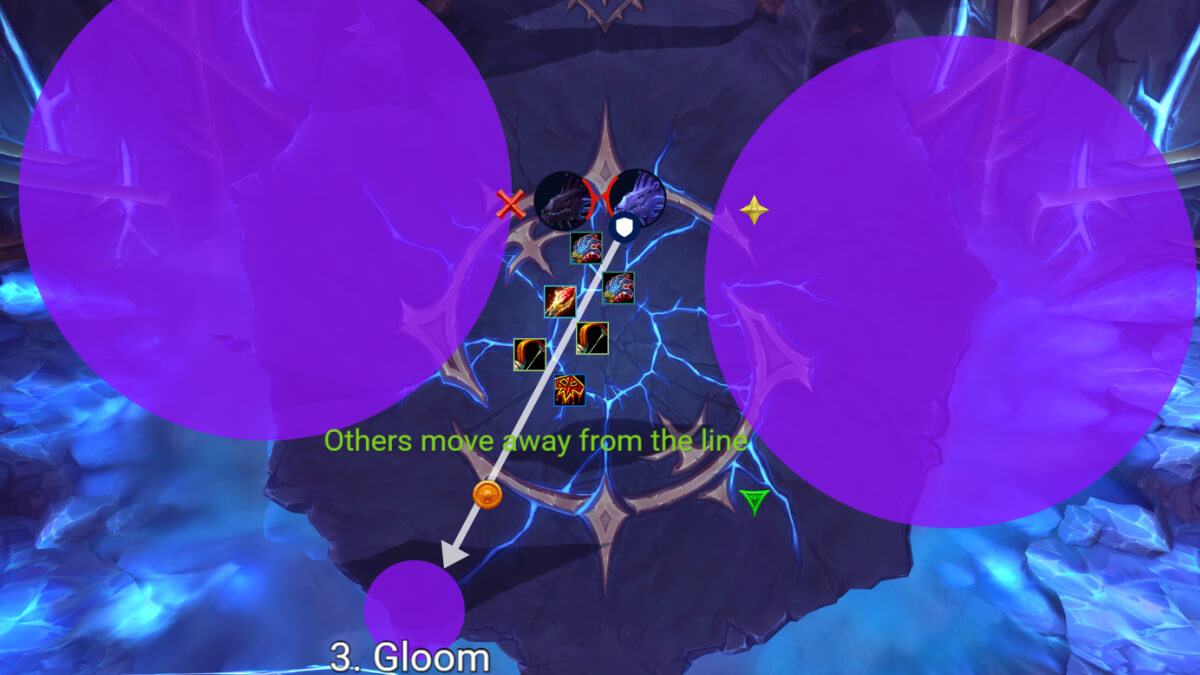
If you live through this, bosses land and you’re back in Phase 1 again. Finish the intermission add and get ready for another Gloom, but this time Team 2 goes to Green. This is the only time you do it on Green, and others should move away from the middle.
After that, Glooms go back to the normal Red and Yellow plan, because those puddles should be despawned by that point.
The bosses should be low here, so just keep handling mechanics cleanly until both die.
Extra Tips for Success
- Have a speed boost ready for every Nullbeam so people break tethers faster.
- If you are DK mass gripping, grip on the player in the middle of the room so everything collapses in cleanly.
- Third tank and healers should be backups for Gloom soaks if someone dies or a team gets messed up.
- Place a Warlock gate for the first intermission so the second Breath to Green is safe and fast.
- Gloom hurts even when done correctly. If you are not healthy, use a health pot.
Raid Leader Gloom Order reminder: