Raid Setup
Introduction
ST + AoE fight
Recommended Setup: 2 Tanks / 5-6 Healers / 12+ DPS
Useful utilities: DK/DH Mass Grip/Druid Roar + Shaman Speed Totem/Immunities/Monk’s Revival/AoE Stuns/Druid Solar Beam/Evoker Time Spiral
Easy Mode
All Eggs need to be destroyed otherwise you can’t kill the boss.
Phase 1:
- One Tank takes the boss, the other takes the adds. In Phase 2, Tank swap each Mortal Stoneclaws
- Adds and the boss need to be very far away from each other
- Split into 2 groups (send AoE players to deal with adds and single target players should stay with the boss)
- Tank the boss close to 2 eggs at all times
- Assign 2 players to get close to Greatstaff of the Broodkeeper each time it's dropped on the ground, press the extra action button and move the beam to one of the 2 eggs targeted with Rapid Incubation (1 beam per egg is 2 eggs destroyed per Greatstaff of the Broodkeeper cast)
- Nuke down Nascent Proto Drake if you fail to destroy an egg marked with Rapid Incubation
- Spread out for Wildfire cast
- Dispel or Heal the Absorb effect of Icy Shroud
Add set priorities:
- Tank + Nuke Juvenile Proto-Drake and Interrupt + Cleave down Mages
- Tank + Nuke + Interrupt Stormbringer and Interrupt + Cleave down Mages and Legionnaires
- Tank + Nuke + Dispel Flamebender + Cleave down Legionnaires
- Tank + Nuke + Face away Tarasek Earthreaver + Interrupt and Cleave down Mages
Phase 2:
- Tank swap each Mortal Stoneclaws
- Frozen Shroud will root all players, and may overlap with Wildfire. Make sure to dispel or destroy the ice-cubes to free the players
- Be extra careful to not stand under the Greatstaff of the Broodkeeper when it’s on the ground as it does ever-increasing damage in Phase 2
Mechanics
The Broodkeeper’s diligent care links her life essence to the unhatched eggs, preventing all damage below 2% remaining health. This effect stacks for each intact egg in the room. Additionally, this aura increases the damage done of nearby allies by 50%, decreases damage taken by 25%, and heals 3% of their total health every second for 5 sec. This effect stacks.
This ability will prevent you from killing the boss before you clear every egg in the room. The Aura effect it provides is just part of the fight and does not require special attention other than knowing that it exists.
Diurna grievously wounds her target, inflicting 360,812 Physical damage and 96,129 Nature damage, applying Crushing Stoneclaws and Mortal Wounds.
Mortal Wounds will reduce the effectiveness of any healing effects received by 65% for 8 sec. This effect stacks, and cannot be mitigated or avoided.
Crushing Stoneclaws will Inflicts 24,032 Nature damage every 0.5 seconds for 4 seconds. This effect stacks.
Tank swap ability with added extras. She will deal massive damage to the active tank, add a healing reduced effect which cannot be avoided and apply a DoT.
The Tank should swap each Mortal Stoneclaw cast.
Greatstaff of the Broodkeeper
The Broodkeeper embeds her Greatstaff nearby, inflicting 10,815 Nature damage to players within 50 yards every 1.5 sec for 10.5 sec.
Additionally, Diurna immediately gains 2 applications of Greatstaff's Wrath, increasing Greatstaff of the Broodkeeper damage done by 10%. This effect stacks.
Players can cast Focus Greatstaff while near the embedded weapon, consuming one application of Greatstaff's Wrath and causing a beam to pursue the player.
The focused beam inflicts 48,065 Nature damage to players within 3 yards every half-second during pursuit, shattering any egg in its path and terminating the beam. Shattering an egg incurs Clutchwatcher's Rage.
Yes this is a very long description but in reality this is pretty simple:
- The boss will stick her Weapon to the ground, doing raid-wide damage.
- Players that get close to the Weapon, will have an extra action button and take ticking damage.
- Pressing that button will activate a beam that connects to the player and follows them around.
- If a player touches an egg with the beam, the egg will shatter.
A maximum of 2 players can make use of the beam. Assign 2 mobile players that will always do this and kill 2 eggs every time the boss uses the Greatstaff of the Broodkeeper ability.
The Broodkeeper enters a raging frenzy inflicting 12,016 Elemental damage to all players and increases damage done from Clutchwatcher's Rage by 200% for 10 sec. This effect stacks.
Each time an egg is shattered, she does raid-wide damage. Since you will always be killing 2 eggs at the same time (and you can’t kill more), this is just part of the fight and healers should be ready to do extra healing.
The Broodkeeper infuses magic into the nearest 2 eggs. After 15 sec, these eggs hatch exposing the enemy within.
It’s important to understand that no matter where the boss is standing, she will always find 2 eggs to ‘connect’ to. This will first mark the eggs infused with a glow effect, and eventually add a 15 seconds timer. If not destroyed, the egg will hatch and spawn a Nascent Proto Drake. If the egg is properly destroyed, it will instead spawn a mini proto-drake that will simply die to Boomkins existing in WoW (seriously, do not worry about the little ones).
Diurna unleashes flame, igniting players within 50 yards, inflicting 12,016 Fire damage and an additional 7,210 Fire damage every 1 second for 9 sec to players within 4 yards of the impact location. This effect stacks.
Moments later the flames reignite, applying Wildfire to players who remain within 4 yards of the impact location.
Players will get marked with a red circle that explodes in a 4 yard radius, so spread out with it. Once dropped, a swirl will stay behind. If you get hit by it when it re-explodes, it will re-apply Wildfire to you, making you repeat the process (spread and dodge swirls).
Diurna expels a surge of frost inflicting 36,081 Frost damage to players within 50 yards, reducing their movement speed by 30% and causing their next 84,114 healing to be absorbed.
This will apply a slow + absorb to the entire raid, but is dispellable. One word: Revival! (otherwise use mass dispel, racials and such).
The mage hurls frozen ice at a target, inflicting 72,097 Frost damage and up to an additional 60,029 Frost damage every 0.5 seconds for 4 sec.
Make sure to interrupt this when Primalist Mages are up (stuns also work).
The Earthreaver charges their current target (a player), inflicting 192,392 Physical damage and reducing their armor by 20% for 10 sec. This effect stacks.
The Tank taking Burrowing Strike needs to pay attention to their stacks. If you are going to get hit by Mortal Stoneclaws while having multiple stacks of Burrowing Strike, it’s gonna hurt a lot!
The Earthreaver sends out rumbling tremors that explode upon contact, inflicting 96,129 Nature damage to players within 5 yards. Afflicted players suffer 12,016 Nature damage every half-second and are stunned for 4 seconds. This effect stacks.
Make sure this add is faced away from the raid as it sends out tremors in the direction it is facing.
The Flamebender erupts, striking allies and players within 50 yards. This effect inflicts 20% of each target's health as Fire damage, then heals the target for 200% of the damage done over 9 sec.
It will hit all players and adds, dealing 20% of each target’s HP as fire damage, then heal a friendly target (boss or add) for 200% of the damage done as a HoT over 9 sec. The HoT is dispellable and should be dispelled as soon as possible!
The Flamebender conjures Flame Sentries nearby which rotate for 20 sec. Players suffer 108,146 Fire damage every half-second while inside the sentry's effect.
Spinning Fire beams that should be avoided.
The Juvenile fiercely bites at their target, inflicting 192,259 Physical damage and bleeds their target for 36,048 Physical damage every 0.5 for 12 sec. This effect stacks.
This add needs to be picked up quickly, otherwise it will nuke down a player pretty fast with the initial hit and the bleed.
The Proto-Dragon thrashes around for 6 sec, inflicting 24,032 Frost damage every 1 second to players within 50 yards, reducing their movement speed by 10% for 3 seconds.
The Stormbringer zaps a targeted player, inflicting 120,162 Nature damage, stunning them for 4 sec.
This additionally empowers the Drakonid, increasing movement speed by 30% for 15 sec. This effect stacks.
This should always be interrupted, since it deals a large amount of damage and applies a stun.
The Stormbringer electrifies afflicted players with lightning energy, jolting players within 5 yards for 13,218 Nature damage every half-second for 8 sec.
Players affected by this spell need to spread out to avoid hitting other players.
Diurna's Fury knows no bounds, increasing damage done by 15%, and empowering abilities with additional power. Additionally, this doubles the duration of Mortal Wounds. This effect stacks and increases in intensity every 30 sec.
Empowers all of her personal abilities.
Empowered Greatstaff's Wrath
The Broodkeeper embeds her Greatstaff, inflicting 14,419 Nature damage every 1.5 sec for 9 sec. Additionally, Diurna immediately gains 2 applications of Empowered Greatstaff's Wrath.
Increases Empowered Greatstaff of the Broodkeeper damage done by 30%. This effect stacks, beginning at 2 charges.
Diurna empowers the embedded weapon, invoking its wrath, consuming one application of Empowered Greatstaff's Wrath for each targeted player, causing a beam to pursue them.
The focused beam inflicts 72,097 Nature damage to players within 3 yards every half-second during pursuit, shattering any egg in its path and terminating the beam. Shattering an egg incurs Clutchwatcher's Rage.
It's basically the same Greatstaff ability from Phase 1, but it does more damage now, and you cannot remove the stacks, meaning every time she drops her staff, it will do more damage, and the boss will deal more damage, making it a soft-enrage. Pay attention to players breaking the egg with the beam, they take more damage now and will need extra healing. Players will also need to make sure not to stand under the staff when it's down, the Boss should be moved to make it easier for melees to attack.
The Broodkeeper enters a raging frenzy, inflicting 12,016 Elemental damage to all players and increases damage done from Clutchwatcher's Rage by 200% for 10 sec. This effect stacks.
Diurna expels a surge of ice, inflicting 48,036 Frost damage, immobilizing them within an attackable rime, causing their next 120,162 healing to be absorbed.
It replaces Icy Shroud from Phase 1 and will spawn Ice cubes on top of players, rooting them in place. The ice cubes are attackable, so nuking them down or dispeling will do the trick.
Diurna unleashes flame, igniting players within 50 yards, inflicting 12,016 Fire damage and an additional 7,210 Fire damage every 1 second for 9 seconds to players within 4 yards of the impact location. This effect stacks.
Moments later the flames reignite, applying Wildfire to players who remain within 4 yards of the impact location.
Players will get marked with a red circle that explodes in a 4 yard radius, so spread out with it. Once dropped a swirl will stay behind, getting hit by it once it re-explodes will re-apply Wildfire to you, making you repeat the process (spread and dodge swirls).
Diurna grievously wounds her target, inflicting 360,812 Physical damage and 96,129 Nature damage, applying Crushing Stoneclaws and Mortal Wounds.
Mortal Wounds will reduce the effectiveness of any healing effects received by 65% for 8 sec. This effect stacks, and cannot be mitigated or avoided.
Crushing Stoneclaws will Inflicts 24,032 Nature damage every 0.5 sec. for 4 sec. This effect stacks.
Strategy
Positioning and egg kill order:
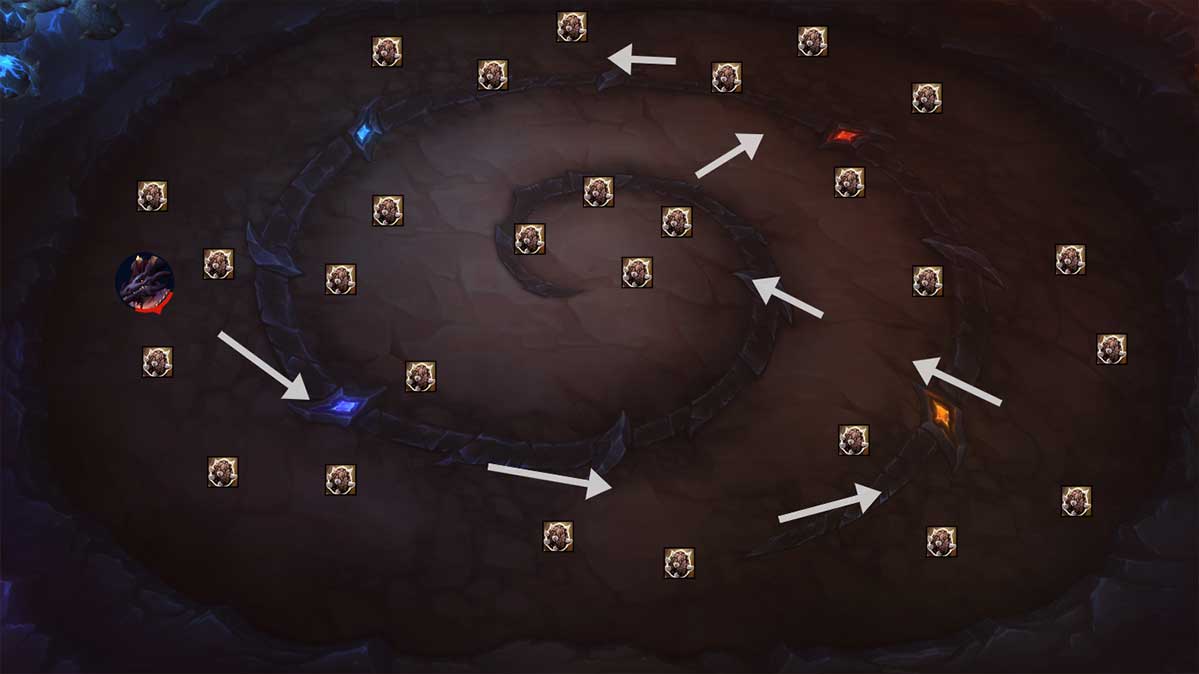
(This is the approximate position of the eggs. I may have missed some, but know that you have to destroy them all regardless).
Split the raid into 2 groups:
- Players with good AoE should take care of the adds
- Players with good ST should deal with the boss.
Boss group will always follow the boss and break the eggs.
Adds group will always follow the off-tank to the next add pack and focus on dealing with them. Occasionally you will kill the adds fast and boss might be close so you can attack the boss a bit, but generally you should just focus on killing the adds all the time.
Make sure that both groups have enough healers.
Phase 1
Tanks
Pull the boss left of the middle, moving counter-clockwise as you kill eggs. The boss will always drop the staff close to her.
Main Tank (DK is good) should tank the boss solo, for pretty much the entire fight.
Off Tank should tank the adds for the entirety of Phase 1 and help on boss in Phase 2.
Make sure that the add packs and boss are always far apart from each other, otherwise the adds will heal!
Egg Destroyers
Designate 2 players to deal with the eggs. It is totally up to you who you want to do that. Typically specs that do not get punished by movement a lot are the best. We suggest one melee and one ranged (Beast Mastery Hunters are good).
The egg destroyers should move under the staff when Greatstaff of the Broodkeeper is cast, press the action button and move behind an egg that is affected by Rapid Incubation (the 2 nearest eggs to the boss). Those players should focus on the eggs, no matter what, at all times.
Make sure to assign a healer to take extra care of those players as they will take additional damage every time they go under the Staff to pick up the beam. The beam itself will damage them, especially in Phase 2, where externals and personals will be necessary.
Rest of the raid
Spread to the side or behind of the boss. A lot of abilities will force you to spread 4-5 yards from each other, so make sure you always maintain this distance to reduce potential issues.
Wildfire will be your main ability to deal with. Every time this ability is used, make sure you spread enough so that everyone can find a spot to safely drop the swirl and dodge it afterwards.
Icy Shroud will put a large absorb on the entire raid. If you have a Mistweaver, a simple Revival will fully negate this ability, without it, you will be forced to commit large healing cooldowns to remove the absorb. You should use mass dispel or personal abilities that can dispel.
Adds
You will get 4+ sets of adds, each set will bring different abilities to deal with. The sets will always happen in the same order with the same type of adds. So you will slowly learn how to deal with each pack. The Boss will use its abilities as usual, meaning it will overlap with the add abilities all the time.
It’s very important to remember that if at any point of the fight you spawn a Nascent Proto Drake because an egg was not properly destroyed, it becomes your absolute number 1 kill priority, no matter what. That add needs to be picked up by the off tank and moved away from the boss.
Set 1 (Juvenile Frost Proto-Dragon + 2x Primalist Mage)
This is a rather simple set.
The Proto-Drake needs to be tanked as it deals a lot of physical damage with Rending Bite and applies a bleed, it will also passively deal raid-wide damage and apply a slow to all players with Chilling Tantrum.
The 2 Mages will cast Ice Barrage and need to be interrupted to reduce damage spikes on random players.
Your target priority in this set is:
- Proto Drake
- Mages
The Mages can be cleaved down easily, just make sure they are interrupted.
Set 2 (Drakonid Stormbringer + Tarasek Legionnaire + Primalist Mage)
This is a double interrupt set.
Stormbringer’s Static Jolt needs to be interrupted at all times as it will deal large amounts of damage to random players and increase Stormbringers movement speed by 30%. It will also cast Ionizing Charge, which marks several players with a lighting circle that damages all nearby players, forcing them to move away.
Primalist Mages, just like in the last set, need to be interrupted.
Tarasek Legionnaire will simply do physical damage to random players.
Your target prio in this set is:
- Stormbringer
- Primalist Mage + Tarasek (passive cleave)
Set 3 (3xTarasek Legionnaire + Flamebender)
A simple set, but you could potentially destroy a pull if you forget to dispel Cauterizing Flashflames.
The Flamebender will hit all players and adds and deal 20% of each target’s health as fire damage. Afterwards, it will heal the target (boss?) for 200% of all damage done as a HoT over 9 sec. This needs to be dispelled as soon as possible, since the amount of healing per second will be insane, especially on a sloppy pull with additional dragons/adds alive.
Fire sentry will also spawn and spin around, simply dodge those.
The 3 Tarasek Legionnaire here will simply add additional random damage to players.
Your target prio in this set is:
- Flamebender
- Tarasek (passive cleave)
Set 4 (Tarasek Earthreaver + 2x Primalist Mage)
The Earthreaver needs to be picked up by a tank as soon as possible, and then faced away from the raid as it does a frontal cone (Tremor). The Burrowing Strike ability will reduce the tank’s armor by 20% per stack, so the Tanks need to pay extra attention to their HP as it will overlap with boss abilities. They should ask for externals if necessary.
Interrupt Primalist Mage’s as usual.
Your target prio in this set is:
- Earthreave
- Boss
- Primalist Mage (passive cleave)
The fight will either enter Phase 2 once all eggs are destroyed. The add sets repeat after the 4th one.
Phase 2
You will have no adds to deal with here.
Players need to be extra careful with the Empowered Greatstaff of the Broodkeeper, since every time the Boss drops her weapon, it will do more damage to players standing close to it and also to players using the beam to destroy the eggs. The stacks cannot be removed in Phase 2.
Wildfire is still the same as it was in Phase 1, however, it will most likely overlap with Frozen Shroud, which now roots every player in place until freed (with damage or dispels). You need to make sure to deal with Frozen Shroud quickly.
This phase overall is a burn phase. Make sure you have your strongest offensive cooldowns ready and pop hero/lust. Remember that every egg needs to be destroyed. And that each egg adds a 2% shield that cannot be destroyed. If you have 10 eggs up for example, you won't be able to pass 20% HP remaining until you kill more eggs. My assumption is that Blizzard will tune the boss in a way that on a good pull once you kill all the eggs, the boss will have around 20-40% left and this is where you simply pop everything and nuke down the boss.