Raid Setup
Introduction
Welcome to our Heroic Vaelgor & Ezzorak guide for The Voidspire. This fight is a full nostalgia trip, because it’s a double dragon encounter, which means all the boomers in your raid finally get their moment to go “back in my day, every dragon had a Tail Lash”.
And honestly, they’re not wrong. If you stand behind either of these two for even a second, you’re getting launched, and you will deserve it.
Fight Style: Two-Target Fight (Multi DoT)
Recommended Setup: 2x Tank / 4x Healer / 14x DPS
Required utilities: None
Hero/Lust usage: On Pull
Method Boss Review
This fight has some genuinely cool ideas, especially the whole Gloom shrinking mechanic, but there are also a couple things that make the experience a bit worse than it needs to be.
The big one is how much it feels like it requires a Mass Grip to stack the Voidorbs for AoE. You can play without it, sure, but it definitely feels like the fight is silently judging your comp the whole time.
And then there’s the intermission, which is… a glowing pancake in the middle of the room. It’s not doing much besides glowing. I also don’t love how severe the punishment is for a 10% HP difference, even on Heroic. It’s fine early on, but once people get geared and damage starts getting uneven, that part is going to become pretty annoying.
Method Boss Rating: (3/5)
Easy Mode
General:
- Two bosses, not shared health. Split damage so they die at the same speed.
- Keep them more than 15 yards apart and within 10% HP, or Twilight Bond gives them 100% extra damage until fixed.
- Tank them near where they spawn, close to the 15-yard limit for cleave value.
- Raid stands between them and hits from the sides. Do not stand behind either boss because Tail Lash will launch you.
Dread Breath:
- The targeted player with Dread Breath steps to the side so the cone doesn’t hit the raid.
- Get dispelled after it hits.
Main Repeating Combo:
This always repeats in the same order.
Void Howl + Voidorbs:
- During Void Howl, stack as tight as possible without overlapping circles so the orbs spawn stacked.
- When Nullzone tethers everyone: Everyone snaps their tether right away and the Tank snaps last, because the last snap triggers the raid DoT.
- Mass Grip the orbs if you have it, stun them, and AoE them down fast so Voidbolt doesn’t free-cast.
Gloom:
- Aim the first Gloom to the blue marker.
- Have 5 ranged players soak it on the way to shrink the puddle.
- Rotate markers and rotate soak teams each time, because Diminish lasts 1 minute and stops you soaking twice.
Tank Swaps:
- Swap bosses after each Gloom. Just run over to the other boss, don’t drag them around.
Intermission:
- At 100 energy, stack in the Radiant Barrier for Midnight Flames.
- Players with purple circles move out to the side.
- Kill Manifestation of Midnight fast so it doesn’t ramp.
- After intermission, put bosses back to the same spots and repeat until dead.
Mechanics
If the bosses are within 15 yards of each other, or if there is a 10% HP difference between them, they gain a 100% damage done buff until the issue is fixed.
So keep them separated and keep their health roughly even, or the raid gets punished immediately.
At 100 energy, both bosses fly into the sky and start dealing heavy damage to anyone not standing inside the Radiant Barrier.
Spawns in the middle of the room during the intermission and protects players from the unavoidable Midnight Flames damage.
Manifestation of Midnight
This add spawns during the intermission and targets players with a circle that forces them to move out to the side so they don’t clip others.
Every 30 seconds that it stays alive, it gains: 75% increased attack speed and 50% reduced effectiveness of slowing effects.
The dragon that is currently flying, grips their current target, dealing damage based on distance. The further away the target is, the more damage it does.
The bosses alternate flying stance after each intermission.
A frontal beam on the current tank that deals damage for 4 seconds and applies a stacking DoT to everyone hit.
The tank wants to soak enough stacks to reduce the pull strength of Nullzone, usually aiming for around 8 (max) stacks before stepping out.
Spawns at the location where the tank soaked Nullbeam. It tethers every player and slowly pulls them in.
Players need to snap their tethers. The tank should be the last one to snap, because the final snap triggers Nullzone Implosion, which applies a heavy raid-wide DoT for 6 seconds.
Targets a random player with a large frontal cone and fears anyone hit.
Move the cone out to the side. The targeted player is guaranteed to get feared, so plan to get them dispelled after the hit
A physical tank hit that ramps up in strength with each strike, and resets when the boss hits a new target.
Also, players standing behind the boss get hit by Tail Lash, which knocks them back and applies a bleed.
Fires a large orb in the direction Ezzorak is facing. When it reaches the edge of the area, it explodes and leaves a massive puddle.
The puddle shrinks based on how many players touch the Gloom on the way, up to a maximum of 5.
Players who touch Gloom gain a 1-minute debuff called Diminish. If they touch Gloom again while they have it, they take massive damage. Alternate groups for soaking.
Marks all players with a circle that, after a short delay, deals damage to anyone standing in it and spawns a Voidorb.
Voidorbs permanently cast Voidbolt at random players. This can be interrupted.
You want to group up the Voidorbs and stun plus AoE them down quickly. This always happens together with Nullbeam.
Strategy
This is mainly a one-phase fight with a short intermission. It’s a two-target encounter with big AoE burst moments. The bosses do not share HP, so based on your comp you want to split damage fairly evenly to make sure both bosses die at roughly the same time.
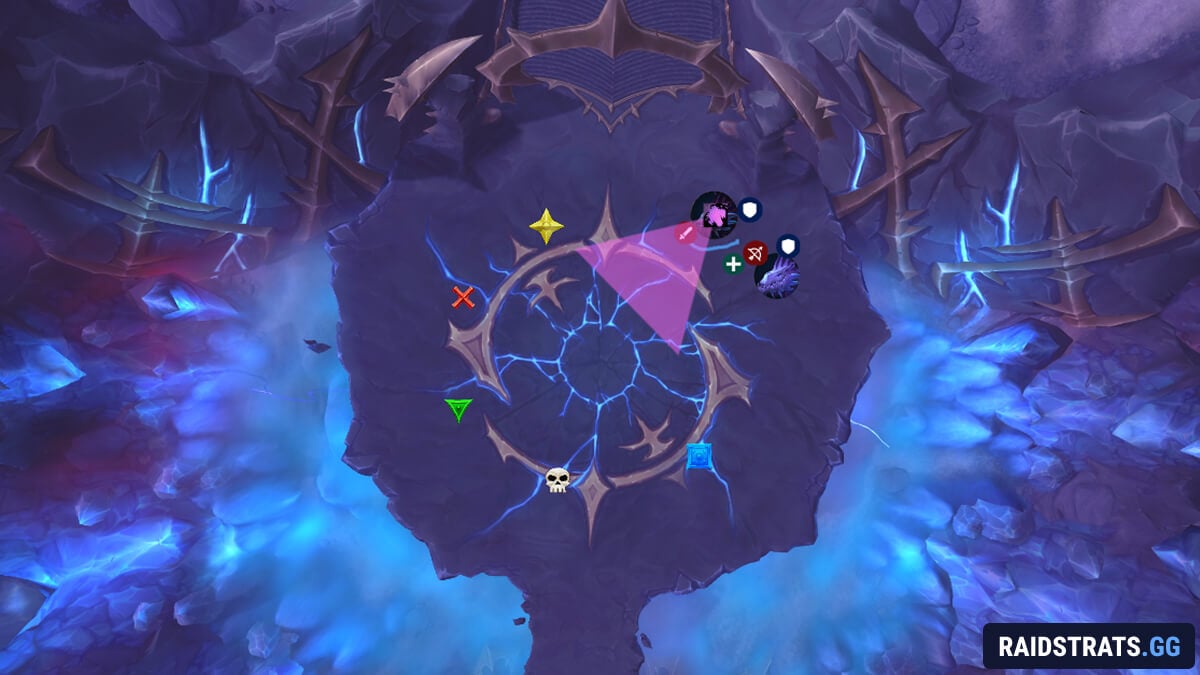
Place the markers like shown here:
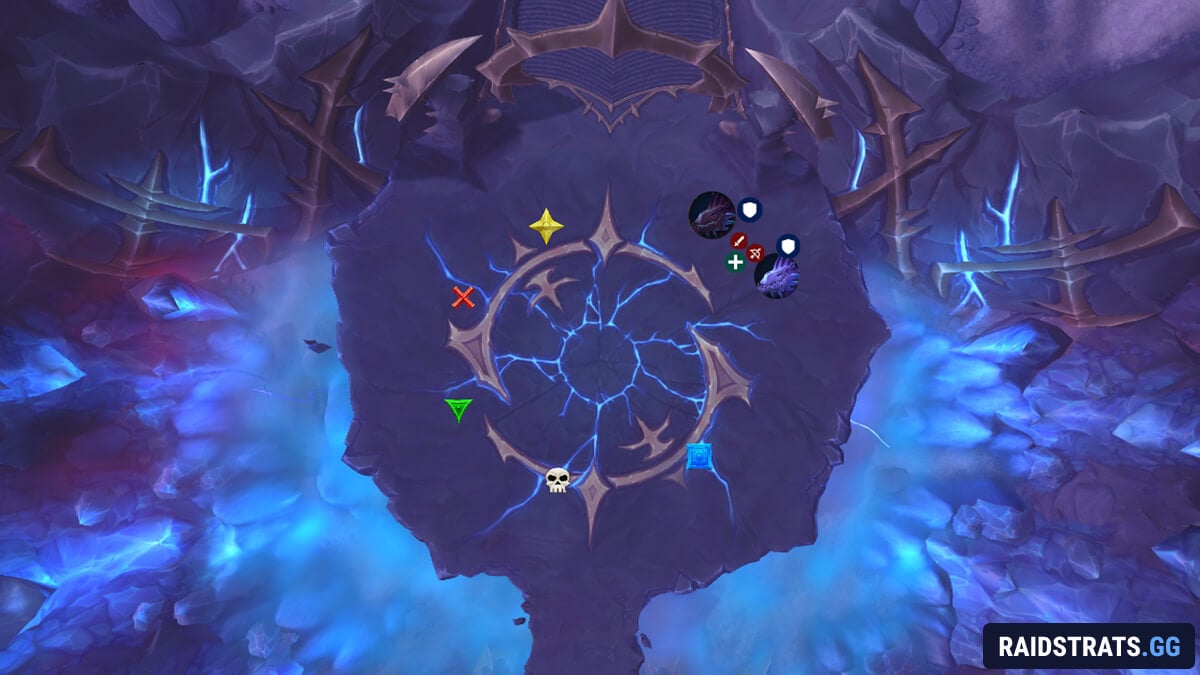
You want to tank the bosses pretty much where they stand, close to the 15-yard limit. That keeps them separated so Twilight Bond doesn’t happen, but still close enough that cleave and multi-dot value is good. The bosses don’t really move, so keeping them locked in place is easy.
The raid should stand between the two bosses, attacking from the sides. Standing behind a boss is not allowed. Tail Lash is still a thing, and it still hurts.
Always Watch Boss HP
Make sure the bosses stay within 10% HP of each other, or Twilight Bond gives them a 100% damage buff until you fix it.
Dread Breath
If you get targeted by Dread Breath, step out to the side so you don’t clip the raid, then get dispelled after it hits.
The Main Repeating Combo
The fight has a consistent combo that repeats in the same order:
- Void Howl on all players (spawns Voidorbs)
- Nullbeam on the tank (spawns Nullzone and tethers everyone)
- Gloom about 10 seconds later
Void Howl + Voidorbs
During Void Howl, everyone should stack as close together as possible without overlapping circles, so the orbs spawn as stacked as you can make them.
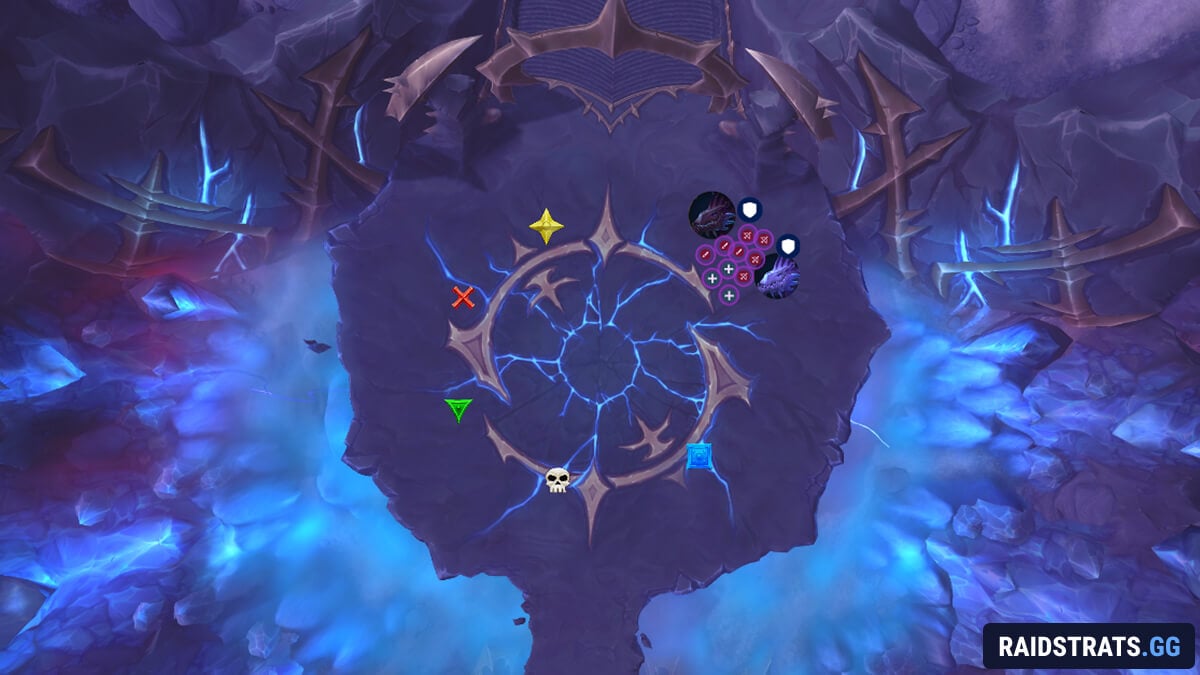
As soon as the orbs spawn:
- Everyone breaks their tether immediately, by moving away from the anchor, except the tank.
- The tank breaks last, because the final snap triggers the raid DoT.
Right after the raid breaks:
- Use a DK Mass Grip if you have it, or any other grips.
- Press every AoE button in the game.
- Stun the orbs to stop Voidbolt casts.
- Once the raid is stable, the tank snaps last.
Gloom Handling
Now you get Gloom.
Aim the first Gloom toward the blue marker, and have at least 5 ranged players touch it on the way to shrink the puddle as much as possible.
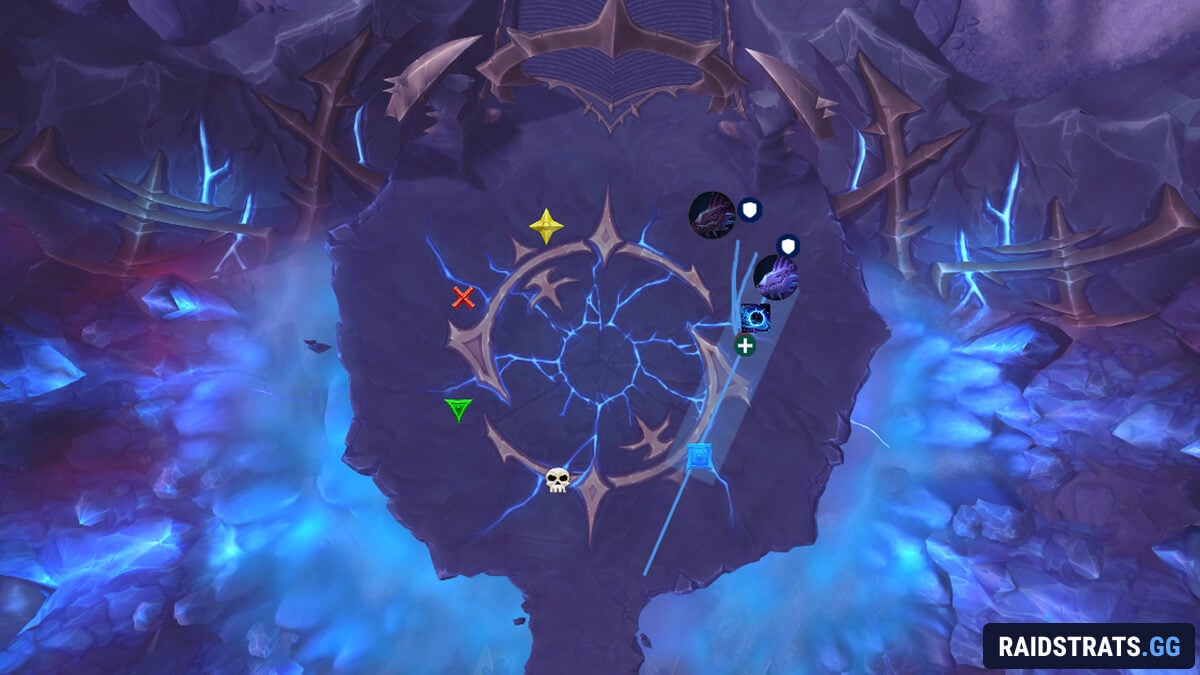
For each following Gloom, rotate to the next marker and have a different set of 5 people stand in its path. You need different people to soak, because anyone who soaks gets Diminish for 1 minute and cannot safely soak again until it's gone.
You should get two Gloom casts before the intermission.
Tank Swaps
Tanks should swap bosses after each Gloom cast. Don’t drag the bosses around, just run over and pick up the other one.
Also, pay attention to which boss is flying during that phase. The boss that is flying has an additional ability called Grappling Maw which grips the tank and deals damage based on the distance. Their flying stance swaps after each Intermission.
Intermission
At 100 energy, both bosses fly up and cast Midnight Flames.
Everyone stacks in the middle, inside the Radiant Barrier, and anyone with the purple circle moves out to the side so they don’t clip others.
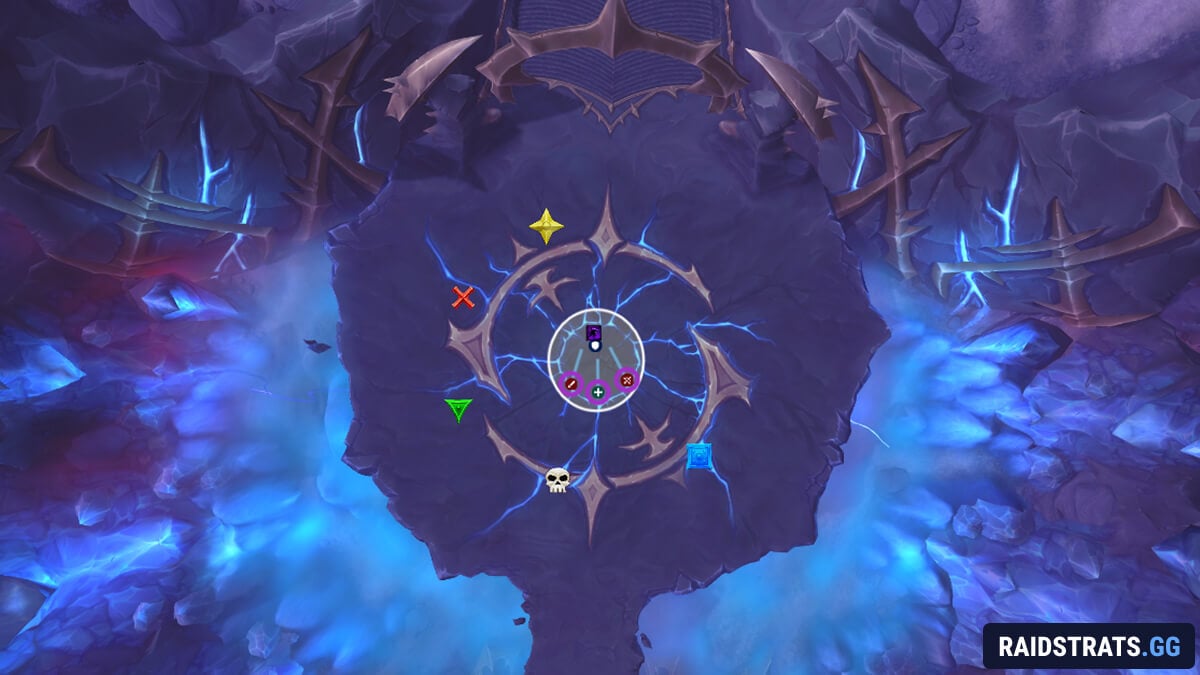
A Manifestation of Midnight spawns during the intermission. Kill it quickly. If it stays alive too long, it ramps up attack speed every 30 seconds and slows stop working as well, which turns it into a real problem.
Once the intermission ends and the bosses land, put them back in the same tanking spots and repeat the fight from the start.