Raid Setup
Introduction
Welcome to our Heroic Vorasius guide for The Voidspire Raid. This guide covers the fight mechanics and the strategy we recommend to defeat this boss on Heroic difficulty!
This boss is basically Void Godzilla. Big angry monster in the middle of the room, stomping the floor, yelling at the raid, and occasionally firing a laser that makes you question every wall you didn’t break.
Fight Style: Single Target fight with occasional add cleave
Recommended Setup: 2x Tank / 4x Healer / 14x DPS
Recommended utilities: None
Hero/Lust usage: Pull
Method Boss Review
A very disappointing fight. This boss definitely makes the list of some of the worst and most boring encounters ever designed. There’s absolutely nothing fun about it, and the Mythic version is basically the same thing with bigger numbers.
The good news is it’s only the second boss of Voidspire, so just kill it, move on, and try to forget it ever existed.
Method Boss Rating: (1/5)
Easy Mode
General:
- Stack in front of the boss on pull for Primordial Roar healing. Do this every loop.
- After every Roar, you gain a stack of Primordial Power. It stacks, so the longer the fight goes on, the worse it gets.
Shadowclaw Slam Tank Plan:
- The first two Shadowclaw Slam hits apply Smashed (150% more physical damage taken for 2 minutes) and it stacks.
- Tank 1 intentionally takes the first two hits and then plays super safe for 2 minutes.
- Tank 2 takes the boss and soaks every other smash circle for the rest of that cycle.
- Nobody else soaks smash circles unless it’s an emergency call. Immunities do not stop Smashed on the first two hits.
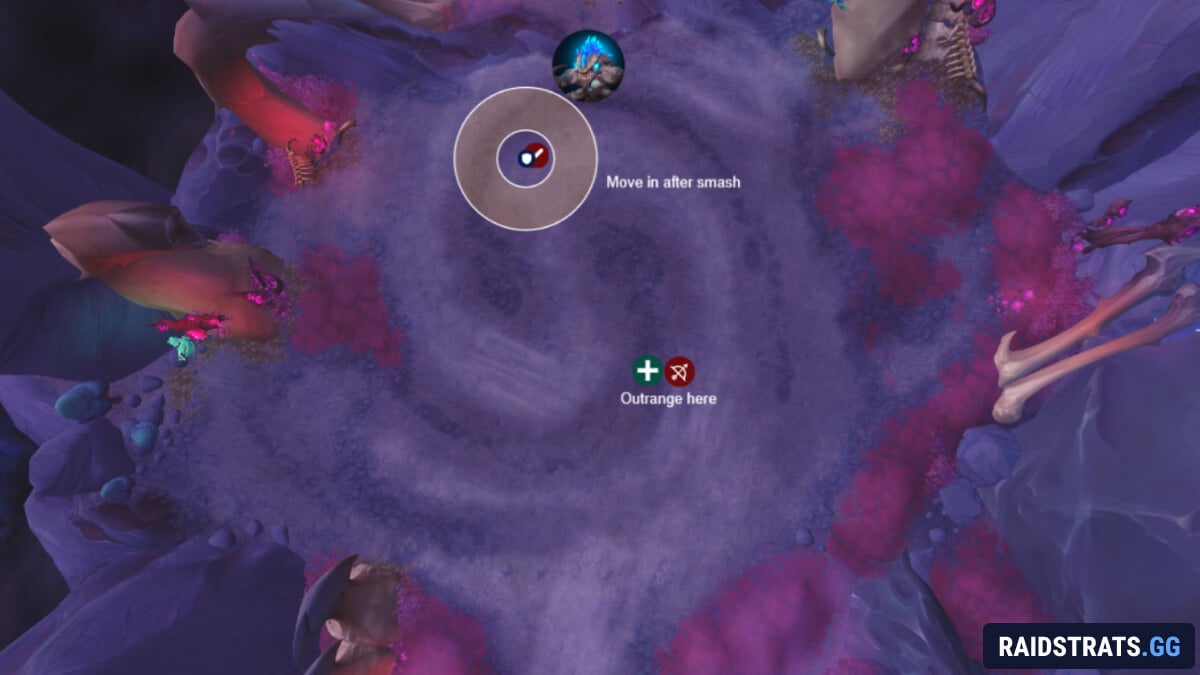
Aftershock:
- Expanding rings happen after every Aftershock smash.
- Melee: stand with the tank, then step into the smash spot right after it lands, the middle becomes safe.
- Ranged: either play with melee if you’re mobile, or outrange the rings completely.
Blistercreep Phase and Walls:
- Boss spawns Blistercreeps, dodge the ground swirls while they spawn.
- Adds fixate players, split them by role:
- Melee drag their Blistercreeps to the left wall
- Ranged drag theirs to the right wall
- Kill them on top of the wall so their death explosion clips it.
- Do not stand in the explosion circle, it gives a nasty 30s debuff.
- You need two Blistercreep explosions per wall to break it.
Void Breath Laser:
- About 30 seconds after creeps start spawning, the boss fires Void Breath from one hand.
- Spot the hand, run in the opposite direction.
- Breaking walls is what gives you space to outrun it. If you only broke one wall, you’re coin-flipping which hand the boss uses.
Reset:
- After the laser, go back to your starting position and repeat.
- Keep in mind raid damage ramps hard once you’re on 2+ stacks of Primordial Power.
Mechanics
Pulls everyone slowly in toward the boss, then at the end deals heavy raid-wide damage and knocks players away.
This happens at the start of the fight and after every “laser” phase.
After each Primordial Roar, the raid gains a stack of Primordial Power, a DoT that deals damage every 2 seconds.
This stacks over the fight, so the longer it goes, the more everything starts to hurt.
The boss smashes the ground, dealing heavy damage to anyone standing in the impact.
The first two smashes apply Smashed, a 2-minute debuff that increases physical damage taken by 150%, and they also spawn a wall on each side.
Every smash after that still hits hard, but does not apply Smashed. This pattern repeats again later when the boss spawns new walls.
If nobody gets hit by the smash, the entire raid takes the damage instead.
After every Shadowclaw Slam hit, the boss sends out expanding rings that deal heavy physical damage to anyone caught.
Ranged players can outrange this completely, so in most cases only melee need to actively dodge it.
Spawns multiple Blistercreep adds. While they’re spawning, the raid takes damage and players need to dodge Creep Impact swirls on the ground.
When a Blistercreep dies, it creates a circle explosion that:
- Damages anyone within 10 yards
- Applies a 30-second debuff increasing Shadow damage taken by 50%
- Also deals moderate raid-wide damage
If the explosion clips a wall, it damages it. You need two Blistercreep explosions on top of a wall to shatter it.
About 30 seconds after the Blistercreeps spawn, the boss casts Void Breath, a massive laser that is lethal if it hits you.
The laser comes from one of the boss’s hands. Whichever hand it comes from, you run the opposite direction to dodge it.
Strategy
While this fight is basically one long phase, it’s easier to explain it as two parts: Phase 1 and the Blistercreep phase.
Shadowclaw Slam Tank Plan
Let’s start with Shadowclaw Slam, because this is easily the most confusing mechanic in the fight and the dungeon journal does a terrible job explaining it.
Here’s the simple version: the first two hits of Shadowclaw Slam apply Smashed, increasing physical damage taken by 150% for 2 minutes. This stacks.
So the play is:
- Tank 1 takes the first two hits on purpose. That puts them at 2 stacks, so 300% increased physical damage taken for 2 minutes.
- After those two hits, Tank 2 with 0 stacks takes the boss and soaks every other smash circle for the rest of that cycle.
Then later when the fight “resets” and the boss spawns new walls again, you repeat the same thing.
Yes, this means your 300% tank is about to have the most boring two minutes of their tank career. Their job is basically to exist safely and not get clipped by anything. Find them a podcast to listen to, whatever works.
For everyone else:
- Don't get hit by the smash circles unless your raid leader specifically calls for it.
- If something goes wrong, anyone with a big personal or an immunity can soak a hit in an emergency.
- Immunities do not prevent the Smashed debuff from being applied on the first two hits, so you can’t cheese the mechanic.
Phase 1
Since the boss is not movable, stack up in front of him on pull for extra healing during Primordial Roar. Make this a habit, because it starts mattering a lot more later once Primordial Power stacks ramp up.
After that, the fight starts with Smashing Frenzies. Tanks do the plan above, everyone else avoids the circles unless you get told otherwise.
Right after each smash you’ll get Aftershock rings. These hit hard, but they’re honestly so easy to deal with.
- Melee: hug the tank circle when they soak Shadowclaw Slam. The moment the smash lands, step into the impact spot. That’s where the rings are coming from, so the middle becomes safe instantly.
- Ranged: either play with melee if you’re mobile, or just outrange it completely by standing far enough away that the ring never reaches you.
After a few smashes, you’ll move into the Blistercreep part of the fight.
Blistercreep Phase
The boss starts spawning several Blistercreeps and you’ll need to dodge the ground circles while they come in.
Each Blistercreep then fixates a player, usually splitting fairly evenly between melee and ranged. One tank is also guaranteed to get a fixate.
Your job is to use these adds to break the walls:
- Melee bring their Blistercreeps to the left wall
- Ranged bring theirs to the right wall
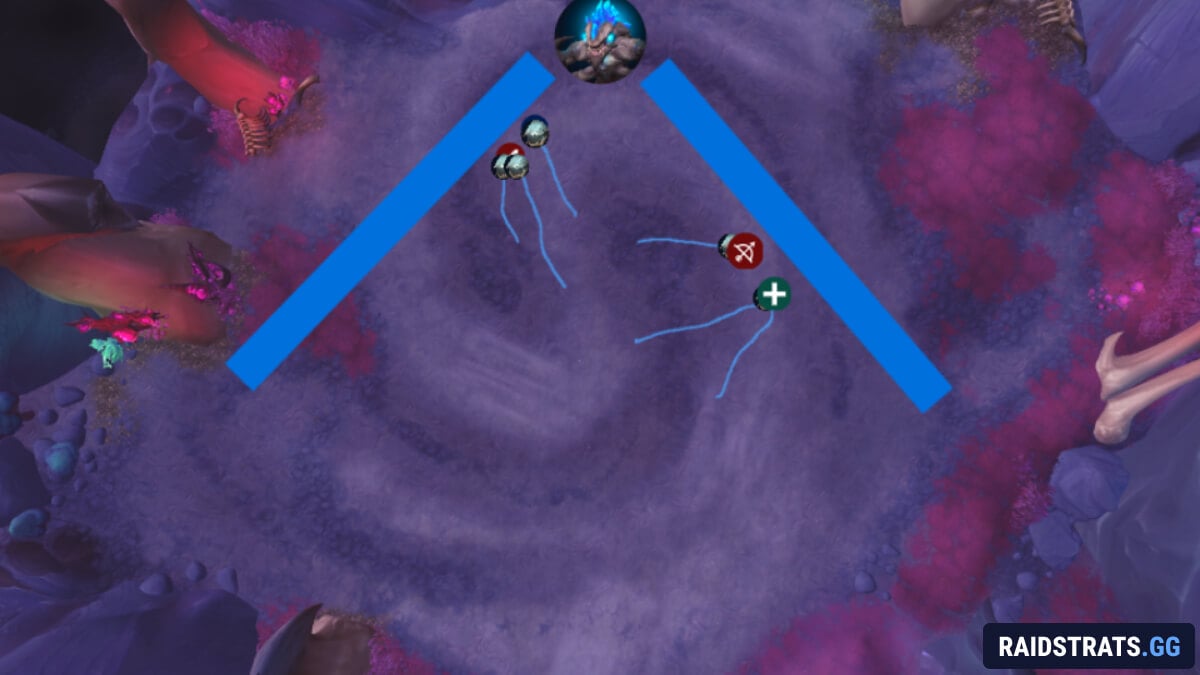
Start killing the adds on top of the walls. When they die, they leave the explosion circle behind. You want that circle to clip the wall, but you do not want to stand in it, because it applies the nasty 30-second debuff.
You need two Blistercreep explosions per wall to break it.
About 30 seconds after the creeps start spawning, the boss casts the laser, Void Breath, from one of his hands. Just spot which hand it comes from and run the opposite direction.
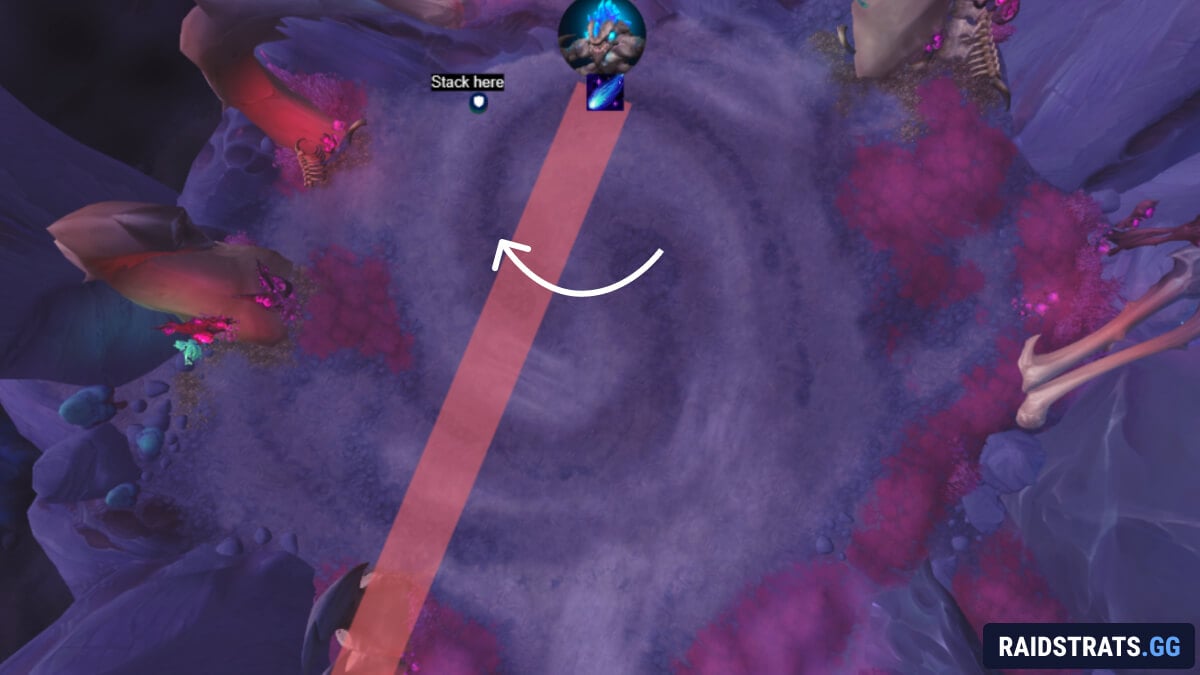
This is why breaking walls matters. If you don’t break the wall, you might not have enough space to outrun the laser. You do have a 50% chance to get lucky if you only break one wall and the boss picks the “good” hand, but I wouldn’t build a strategy around hoping the boss feels nice today.
Once you’re in the safe spot, wait for the laser to end, then move back to your starting position like on pull and the fight repeats from there.
Just keep an eye on the boss HP and the raid damage, because going into the second loop means you’ll now have 2 stacks of Primordial Power, and that’s where healers start feeling it.