Raid Setup
Introduction
Welcome to our Heroic Crown of the Cosmos guide for the final boss of The Voidspire Raid. Before we even talk mechanics, turn on some epic music, because this fight is basically Hans Zimmer doing a live set while your raid tries to survive and defeat Alleria Windrunner.
The main mechanic is basically “get hit by the thing on purpose”. Finally, a boss designed around running into something, instead of spending the whole pull dodging swirlies to avoid getting shouted at by your raid leader.
Fight Style: Cleave Fight until Phase 3
Recommended Setup: 2x Tank / 4x Healer / 14x DPS
Required Utilities: None
Hero/Lust Usage: Phase 3
Method Boss Review
Visually, this boss is insane. It brings a bunch of brand new mechanics and it actually feels like a proper final boss for Voidspire.
The flow is great too. Some pulls you genuinely start feeling like you’re playing Elden Ring, just with more people yelling and less dignity.
It’s also proof that if the visuals are good enough, you can make two intermissions feel unique even when they’re basically the same idea on paper.
Absolute must-have is music enabled. Trust me.
This is going to go down as one of the best first-tier end bosses ever designed.
Method Boss Rating: (5/5)
Easy Mode
Overview:
- This is a heavy HPS and DPS check. Add a Healer if you need to.
- 3 phases, 2 intermissions. You always hit Phase 3 at the same boss percent because of the Simulacrum link, you can only speed up how fast you get there.
Phase 1:
- You start on 3 Undying Sentinels. Kill order is Morium, then Demair, then Vorelus.
- One Tank stays on Vorelus and collects Void Droplets there. Keep a Healer in range for them.
- Rest of raid stacks on Morium. Ranged stand slightly outside to bait Void Expulsion puddles.
- Void Droplets can be gripped into the stack for cleave value and the damage taken debuff they apply when they die.
- Sentinels cannot die until they are hit by Silverstrike Arrow because of Umbral Tether.
- Try to hit all three Sentinels early with Silverstrike Arrow so Corrupting Essence stacks can build, but do not hit it twice otherwise you reset the stacks.
- Dodge Grasp Of Emptiness beams and avoid getting clipped by random arrows.
- Null Corona is a big absorb. Heal it and only dispel if the target is about to die.
Intermission 1:
- Room splits into 3 slices. Stay in your slice and stand near the middle of it.
- You get pulled in and gain Stellar Emission stacks that ramp damage and pull strength.
- Silverstrike Barrage resets Stellar Emission, but makes you take 300% more damage from arrows for 8 seconds.
- Get hit early, avoid getting hit twice, then get hit again as soon as your debuff drops.
- Dodge Singularity Eruption puddles.
Phase 2:
- Play stacked near the outer edge of your slice and keep Ranged baiting Void Expulsion near existing puddles.
- Call Of The Void spawns 2 Undying Voidspawns. They must be hit by Ranger Captain's Mark (similar to Silverstrike Arrow) to remove Umbral Tether, then you can kill them.
- Kick Void Barrage. If they reach 100 energy they become uninterruptible and do huge damage.
- Move counter-clockwise between slices when space gets tight. Crossing Volatile Fissure gives a stacking DoT, so move fast.
- Tanks swap at 2 to 3 stacks of Rift Slash.
Intermission 2:
- Same Stellar Emission and Silverstrike Barrage rules as Intermission 1.
- Orbiting Matter forces you to rotate slices during the intermission. Don’t move while everyone has the arrow damage taken debuff if you can avoid it.
Phase 3:
- Use Hero/Lust, Potions, cooldowns and blast.
- Everyone stacks near Alleria because of Aspect Of The End.
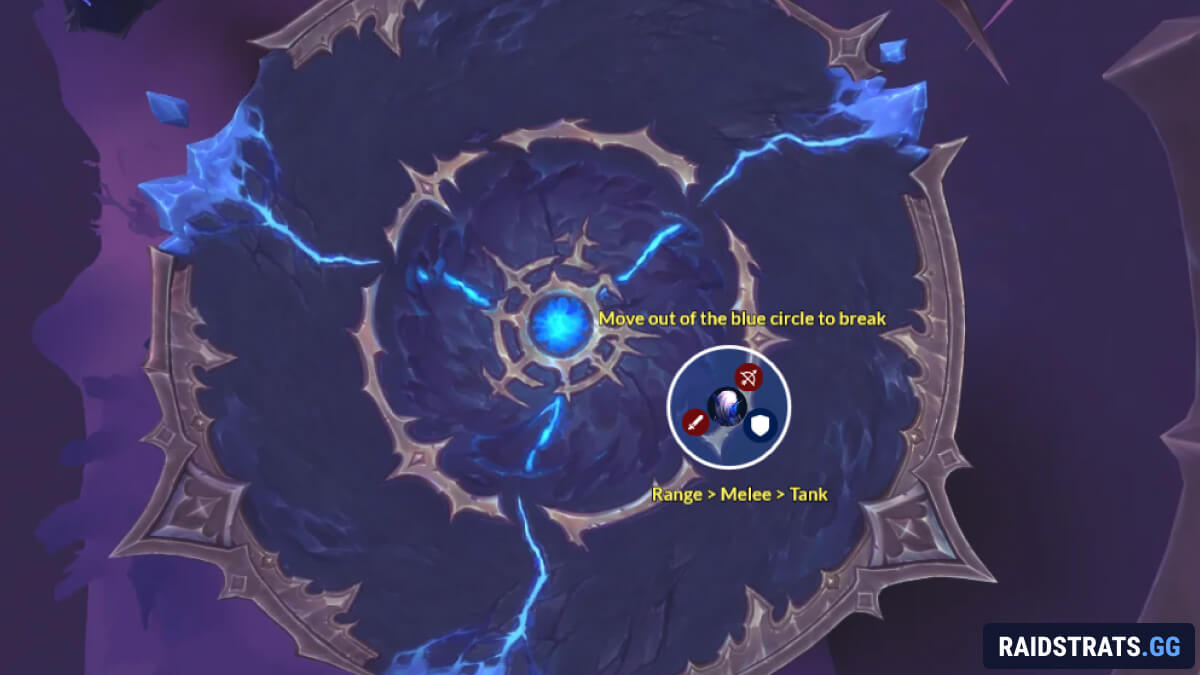
- Aspect tethers 1 Tank, 1 Melee, 1 Ranged. Breaking at 30 yards triggers Gravity Collapse and a 300% physical damage taken debuff.
- Break order is Ranged, then Melee, then Tank. Tanks swap around the Tank break because of the physical damage taken.
- Grasp Of Emptiness obelisks return. Move as a group away from their beams.
- Devouring CosmosCosmos covers the current slice and prevents healing. Use Dark Rush feathers to glide to the next slice.
- Repeat until the boss dies or the platform is fully covered.
Mechanics
Marks a player with a Silverstrike Arrow that fires through them, dealing damage and removing all Void Effects from players and Voidspawns hit. The Arrow fires through the marked player so you just need to point it at a Voidspawn. Others should dodge it.
The arrow fires through the marked player, so you don’t need to be standing behind a Sentinel to hit it with the arrow. You can stand in-line with it as the arrow travels a long way beyond your character.
In Phase 1, you don't want to hit a Sentinel with a Silverstrike Arrow twice, doing so will reset any stacks from the Void Droplets.
Slightly different versions of this mechanic is used to solve multiple mechanics throughout the fight.
Anchors players to three Obelisks, reducing their damage done and dealing damage every second.
When it expires, the Obelisks shoot beams in the direction they’re facing, dealing damage to anyone hit. The player has full control over the direction, so try to avoid moving at the last second.
Targets Ranged players only.
Spawns a circle near several players that, after a delay, explodes and deals damage to the entire raid. It also leaves a puddle on the ground that expands over time.
Places a large absorb on a player.
Null Corona can be dispelled, but dispelling makes it jump to another player with whatever absorb was left. In most cases you want to heal it and only dispel if the player is in danger of dying.
Void Droplet
Undying Sentinels
Three adds anchored to their portals. If you move one more than 25 yards away from its portal, it teleports back.
All three share Echoing Darkness and Umbral Tether, and each one also has its own signature ability:
- Morium (Tank) - Heavy physical plus Shadow hit on the Tank that also knocks them back.
- Demair - Casts Interrupting Tremor, dealing damage to all players within 40 yards and interrupting spellcasts.
- Vorelus - Casts Ravenous Abyss, dealing damage in a 15-yard radius and reducing damage done by 70% for anyone hit.
Deals a small amount of damage to the entire raid every 2 seconds.
This damage increases by 4% whenever there are no players in Melee range. It resets when hit by Silverstrike Arrow.
Prevents the Sentinel from dying unless it has been hit by Silverstrike Arrow.
Same Silverstrike Arrow idea as Phase 1, but this also increases damage taken from arrows by 300% for 8 seconds.
A DoT that deals low damage every 2 seconds, but increases with each tick.
It also increases the intensity of the boss pull by 25%. Getting hit by Silverstrike Arrows resets this DoT.
Alleria and Rift Simulacrum share Health, meaning the boss will always have the same HP once Simulacrum is defeated, you can only improve the speed at which this happens due to raid comp and gear.
Grants Alleria and all allies 10% reduced damage taken and 10% increased damage done for every 1 second they are within 25 yards of the Simulacrum.
This stacks, so letting things sit near it gets out of hand fast.
Places a barrier on the add equal to 11% of its max HP.
While the barrier is up, it deals damage to the entire raid every 1 second.
Same as Phase 1.
Large absorb that can be dispelled, but it jumps with remaining absorb. Heal it and only dispel if someone is about to die.
Splits the area into three slices with cracks in the ground.
Crossing a fissure applies a stacking DoT that deals damage every second for 12 seconds.
A Silverstrike Arrow style mechanic that now ricochets between the marked players, dealing extra damage.
It also removes all Void Effects from players and Voidspawns hit. You need to hit the Voidspawns with this mechanic in order for them to die.
Same as Phase 1.
Targets Ranged, drops expanding puddles after the raid-wide explosion.
Spawns two Undying Voidspawns that attempt to cast Void Barrage.
If Void Barrage isn’t interrupted, it deals damage to a random player.
If a Voidspawn reaches 100 energy, it gains 500% increased damage and can no longer be interrupted.
These adds can only be killed once they have been hit by the Silverstrike Arrow because of Umbral Tether.
Same as the first intermission. DoT ramps, increased pull, reset by Silverstrike Arrow.
Same as the first intermission. Increases damage taken from arrows by 300% for 8 seconds.
Drops an orb in the middle of the current section, covering that entire section with a void puddle.
It deals heavy damage every second and prevents healing.
After three casts, the entire platform gets covered, which is basically the hard enrage.
Tethers three players, one Tank, one Melee and one Ranged, to their current location.
It reduces healing received by 10%, increasing in intensity every 2 seconds.
If a player moves 30 yards away, it triggers Gravity Collapse, dealing damage to the entire raid and making them take 300% increased physical damage for 12 seconds.
Recommended break order is Ranged, then Melee, then Tank.
Same as Phase 1.
Anchors players to three Obelisks, reduces damage done, deals damage every second, then fires beams on expiration.
Same as Phase 1 and 2.
Large absorb that can be dispelled, but it jumps with remaining absorb. Heal it and only dispel if someone is about to die.
Same as Phase 2.
Targets random players, dealing damage every 1 second for 25 seconds.
Strategy
This fight is a big HPS and DPS check, so depending on what your raid struggles with, you can absolutely add or drop a Healer. If your DPS is strong but healing is sketchy, bring the extra Healer. If healing is fine but you’re slow, drop one.
It’s a 3-Phase fight with 2 very similar intermissions.
One important note about pacing: Because of Voidlink between Alleria and the Rift Simulacrum, you will always enter Phase 3 at basically the same boss health. The Simulacrum dies when Alleria hits 62%, so you can speed up how fast you reach Phase 3, but you can’t have the boss lower in Phase 3 in terms of health percent.
Phase 1
At the start you’re fighting three Undying Sentinels, and you want to kill them in this order:
- Demair
- Vorelus
- Morium
Positioning and Add Handling
Send one Tank to permanently handle Morium. Keep Morium near its portal and have that Tank collect the Void Droplet adds that spawn around that area.
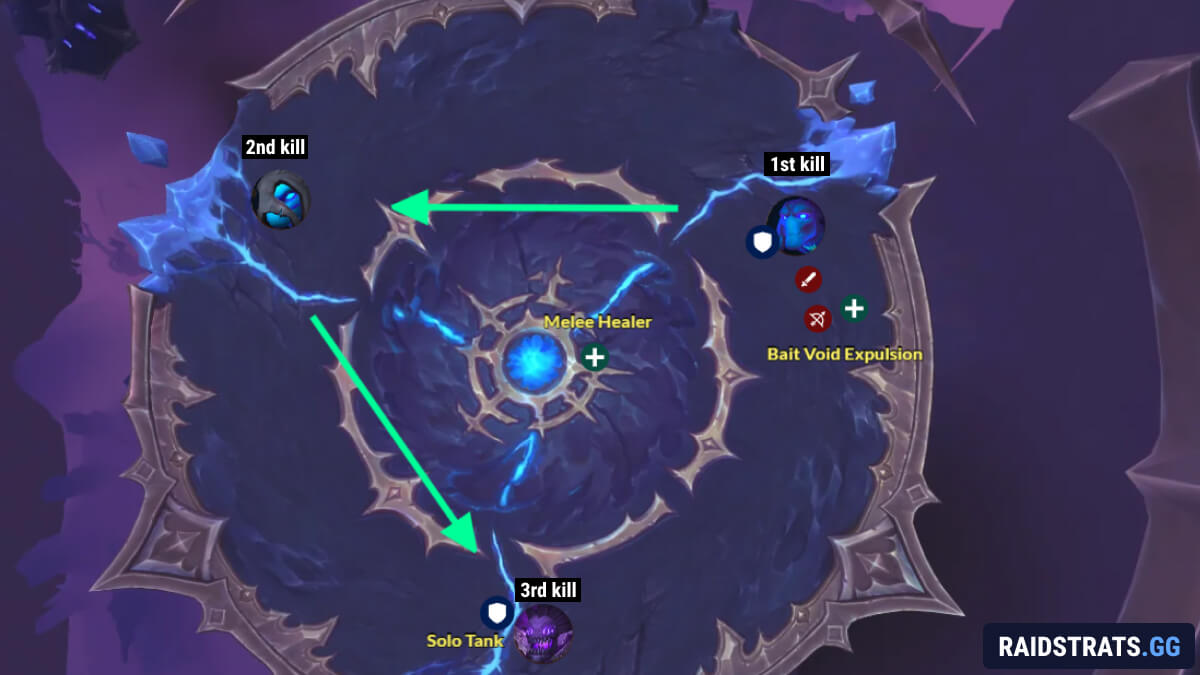
This does not require a Tank swap, but make sure that the Tank has a Healer in range, ideally a Melee Healer, because that Tank can’t safely bait Void Expulsion.
Your other Tank and most of the raid stack on Demair. Ranged players should stand slightly outside the stack to bait Void Expulsion puddles away from the group.
The Demair group can freely grip the Void Droplets into the stack. This is good because when a Droplet dies it splashes damage and also applies the 30% increased damage taken debuff to everyone hit (including the Sentinels), which helps kill the Sentinels faster.
The Tank can move the adds a bit, to try to soak up all the puddles that Void Dropplets leave behind but if moved more than 25 yards away from their anchor, the Voidspawns teleport back. So the better solution is to bring the adds to them.
Silverstrike Arrow Planning
The Sentinels cannot die until they’ve been hit by Silverstrike Arrow because of Umbral Tether.
You get enough arrows to hit all three each set, but you want to hit them early for two reasons:
- It gives you safety later if an arrow misses
- More importantly, early hits let Corrupting Essence stacks build up to increase damage taken.
Note: Getting hit by another arrow resets the Corrupting Essence stacks, so you do not want to keep re-hitting the same Sentinel for no reason.
If the Vorelus Tank gets their add hit early, it can sit there stacking Corrupting Essence while you’re killing the other two. By the time the raid swaps over, Vorelus will melt.
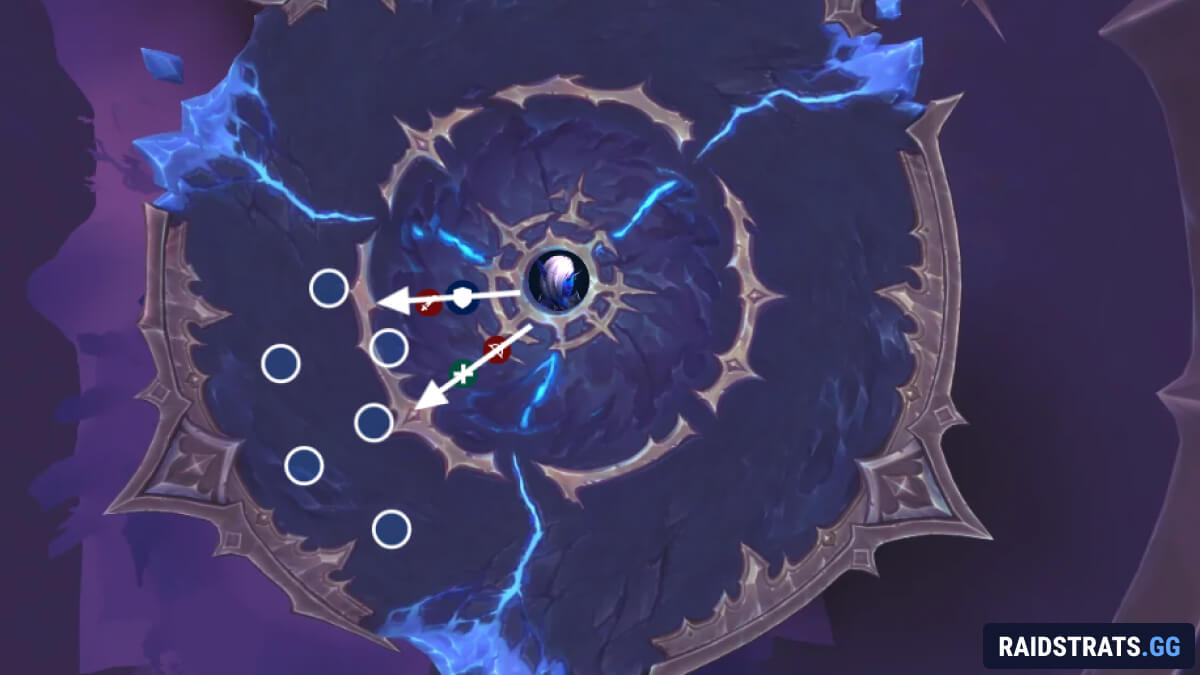
Ideal Silverstrike Arrow Plan
First Silverstrike Arrow set:
- Hit Demair as priority
- If possible, also clip Vorelus as a bonus
![]()
Second Silverstrike Arrow set:
- Hit Vorelus if it wasn’t hit already
- If possible, also hit Morium as a bonus
![]()
Third Silverstrike Arrow set:
- Ideally you don’t need it for Sentinels
- If something was missed, fix it here
Also remember the arrow fires through the marked player, so you don’t need to do really specific positioning like standing behind a mob to hit it.
While you’re doing all this, keep dodging Grasp Of Emptiness beams and do not get clipped by random arrows.
Healing Notes
Healers need to watch Null Corona. It’s a huge healing absorption. You can dispel it, but dispelling just makes it jump to another player with whatever absorb amount was left.
Most of the time, just heal it. Only dispel if that player is in danger of dying. Also be vocal about when the current target has plenty of HoTs running so you don’t waste it with a dispel and call for them to use a Health Potion if it's needed.
Once all three Sentinels are dead, Intermission 1 begins. If a Sentinel happens to reach 100 energy, it will start one shotting people, which usually means you didn’t buff it with the little adds enough, or the damage on them was just low in general.
Intermission
Alleria Windrunner knocks everyone up and the room splits into three slices. In the first intermission you do not need to rotate slices. Just stay in your slice and stand near the middle of it.
You will get pulled toward the center. If you let the pull win, you die.
You also rapidly gain stacks of Stellar Emission, which ramps damage and increases the pull strength. You reset Stellar Emission stacks by getting hit by the arrows, but this intermission uses Silverstrike Barrage, which applies a debuff that makes you take 300% increased damage from arrows for 8 seconds.
So you should get hit early, avoid getting hit twice in a row, and then get hit again as soon as your debuff drops. Repeat until the intermission ends.
While this is happening, dodge Singularity Eruption puddles. They hurt a lot and are not worth testing if you can survive one.
Use movement cooldowns to help people fight the pull, especially when their Stellar Emission stacks start ramping.
Then you get knocked up again and Phase 2 starts.
Phase 2
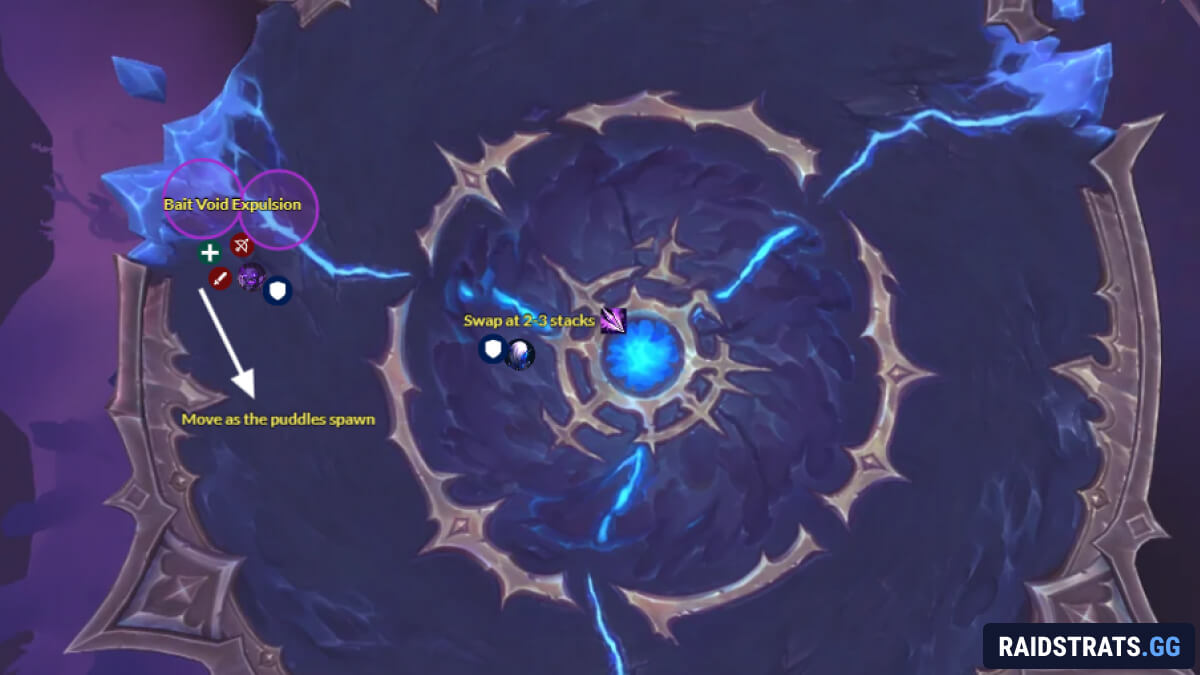
Right away, hug a fissure on the left side of your slice. If you prefer rotating clockwise, hug the right instead, just be consistent.
Ranged should bait Void Expulsion near the edge, and ideally near previous puddles, since Void Expulsion targets Ranged only. Keeping puddles stacked makes the slice of the room playable for longer.
It’s recommended that the raid plays fairly stacked near the outer edge of the slice as it makes Silverstrike Arrow handling easier and keeps movement cleaner.
Targets and Arrows
It doesn’t matter if you hit Alleria or the Simulacrum because of Voidlink, but cleaving both will speed up the Phase.
Silverstrike Arrow is now Ranger Captain's Mark, and it bounces between the marked players. You can still use it to remove Void effects and to make adds killable.
When Call Of The Void happens, two Undying Voidspawns spawn. They must be hit by Silverstrike Arrow (Ranger Captain's Mark) to remove Umbral Tether, otherwise they can’t die.
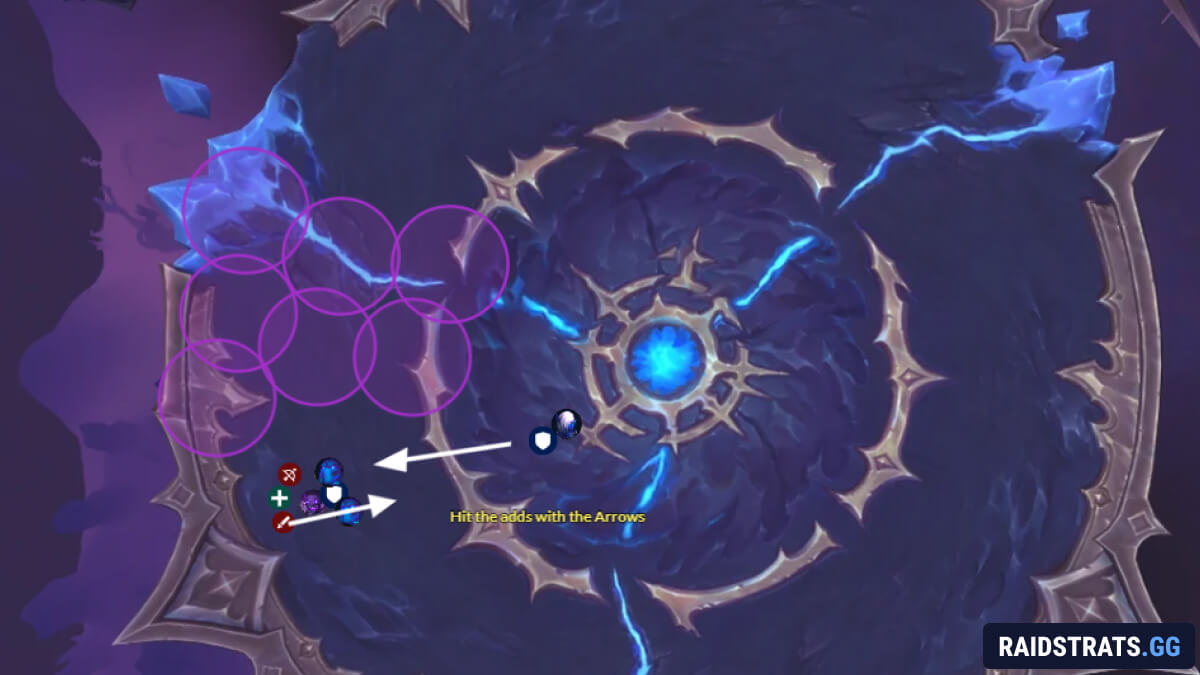
Grip them into the group, kick Void Barrage, and kill them quickly. If they reach 100 energy they get a massive damage increase and become uninterruptible, and that’s where pulls fall apart fast.
Moving Between Slices
As you run out of space, rotate counter-clockwise to the next slice.
Before you move, bait the last Void Expulsion puddles in the current slice, then cross the fissure.
Crossing Volatile Fissure gives you a stacking DoT, so make the crossing quick. Use movement abilities here so you don’t waddle through and take extra stacks for no reason.
Tank Swaps
Tanks swap based on Rift Slash stacks. Usually 2 to 3 stacks are fine.
The taunt swap is simple since the boss and add leap to whoever taunts, so if you want it to look clean, do a quick countdown before each taunt.
Once Alleria hits 62%, the Simulacrum dies and Intermission 2 begins immediately.
Intermission 2
Same idea as Intermission 1 with Stellar Emission and Silverstrike Barrage, so you are still doing the same arrow rules.
The difference is Orbiting Matter. You get a moving line of orbs that blocks space and pulls you in if you get too close.
Because of that, you cannot just sit in one slice the whole time. You will have to rotate to another slice during the intermission.
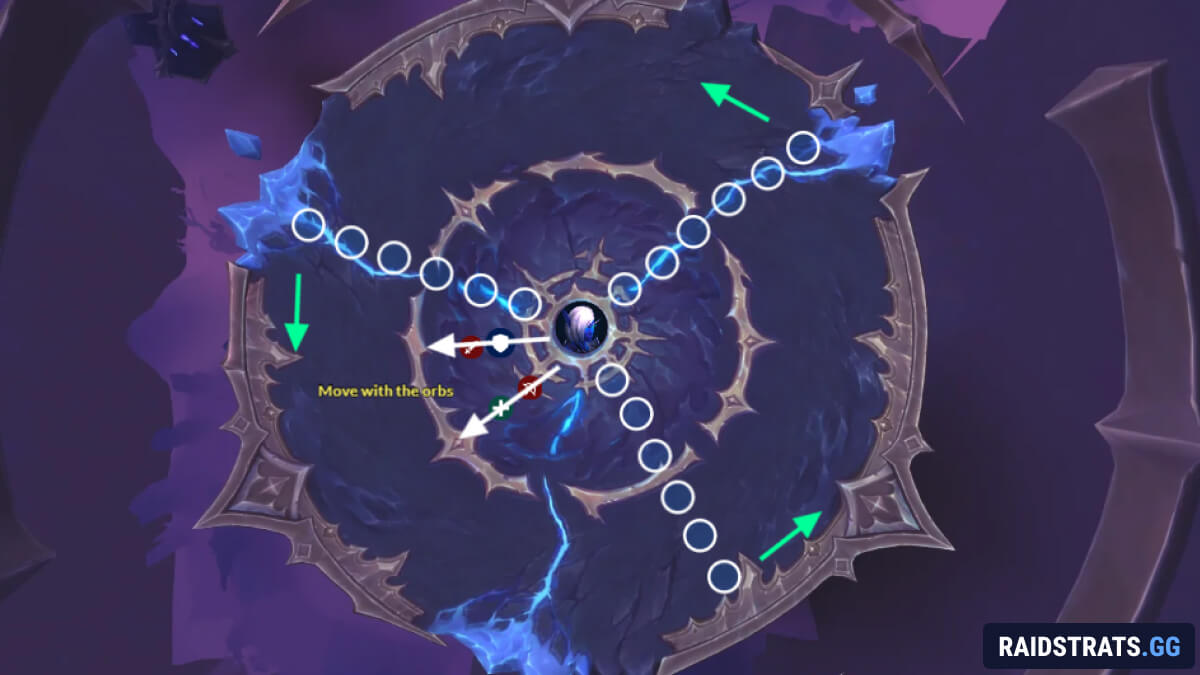
Try to time your movement so you are not rotating while the entire raid has the 300% increased damage taken from arrows debuff. Moving during that window just makes it way easier to get clipped and randomly die.
Phase 3
Alleria lands and you can Tank her in the middle at the start.
This is your burn phase. Use DPS cooldowns, potions, and Hero/Lust here, and just blast.
There is no baiting in this phase. Everyone wants to stay stacked around Alleria because of the Aspect of the End mechanic.
Aspect of the End
This tethers three players: one Tank, one Melee and one Ranged to their location.
If you move 30 yards away, you break the tether and trigger Gravity Collapse, dealing raid damage and applying 300% increased physical damage taken for 12 seconds.
It doesn't apply a debuff, so break whenever you feel healthy enough.
Recommended break order is:
- Ranged first
- Melee second
- Tank last
The tethered players will see the blue circle around them. Everyone else will see faint circles and don't need to do anything.
Tank Note: This also works as a hidden Tank mechanic, because when the Tank breaks their tether, they take the 300% increased physical damage for 12 seconds. So once Aspect Of The End goes out, you can pre-swap Tanks and let the non-debuff Tank hold the boss.
Grasp of Emptiness
Grasp Of Emptiness obelisks return in Phase 3. Since everyone is stacked, you just move as a group away from where they are pointing. Don’t let the beams cut through the stack.
Devouring Cosmos and Platform Jumps
Eventually Alleria casts Devouring Cosmos, covering the entire current slice of the room in a puddle that deals heavy damage every second and prevents healing. You cannot stay there.
Right before the slice gets covered, Dark Rush feathers spawn at the edges. Touching a feather gives you the glide buff for 12 seconds so you can jump to the next slice.
Warlock Gateway, disengages, leaps and similar movement tools also help, but the feather is the intended play. And you can fall down, so play it safe and don’t try any fancy tricks.
Once you’re on the next slice of the room, repeat the same process until the boss dies, or until Devouring Cosmos covers the whole platform and you wipe.