Raid Setup
Introduction
Welcome to our Heroic Chimaerus, the Undreamt God guide for The Dreamrift Raid. This guide covers the fight mechanics and the strategy we recommend to defeat this one boss raid on Heroic difficulty.
This is the “one boss raid” in Midnight Season 1, with the intended difficulty to be similar to a middle boss of The Voidspire. It’s one of those encounters that will test your raid groups communication skills and patience. “Swap.”, “No, not that.”, “Who has the thing?”, “Why is that add immune?” or “Stop feeding him!”. It’s chaos, but the fun kind, once people stop standing around admiring the scenery.
Fight Style: Single target boss with heavy add pressure and frequent target swaps
Recommended Setup: 2x Tank / 4x Healer / 14x DPS
Required utilities: None
Hero/Lust usage: On Pull
Method Boss Review
If we ignore the excessive amount of trash you have to kill just to reach this boss in a one boss raid instance, this is a pretty solid early-tier encounter.
There aren’t any brand new, crazy-unique mechanics, but the overall flow feels good and the fight stays busy without being obnoxious. The Mythic version does a lot of heavy lifting by making it more challenging and interesting, which is why this lands as an overall “good” boss.
Method Boss Rating: (3/5)
Easy Mode
General:
- Hero/Lust on pull.
- Before you pull, split the raid into two even groups:
- Group A: 1 tank, 2 healers, 7 DPS
- Group B: 1 tank, 2 healers, 7 DPS
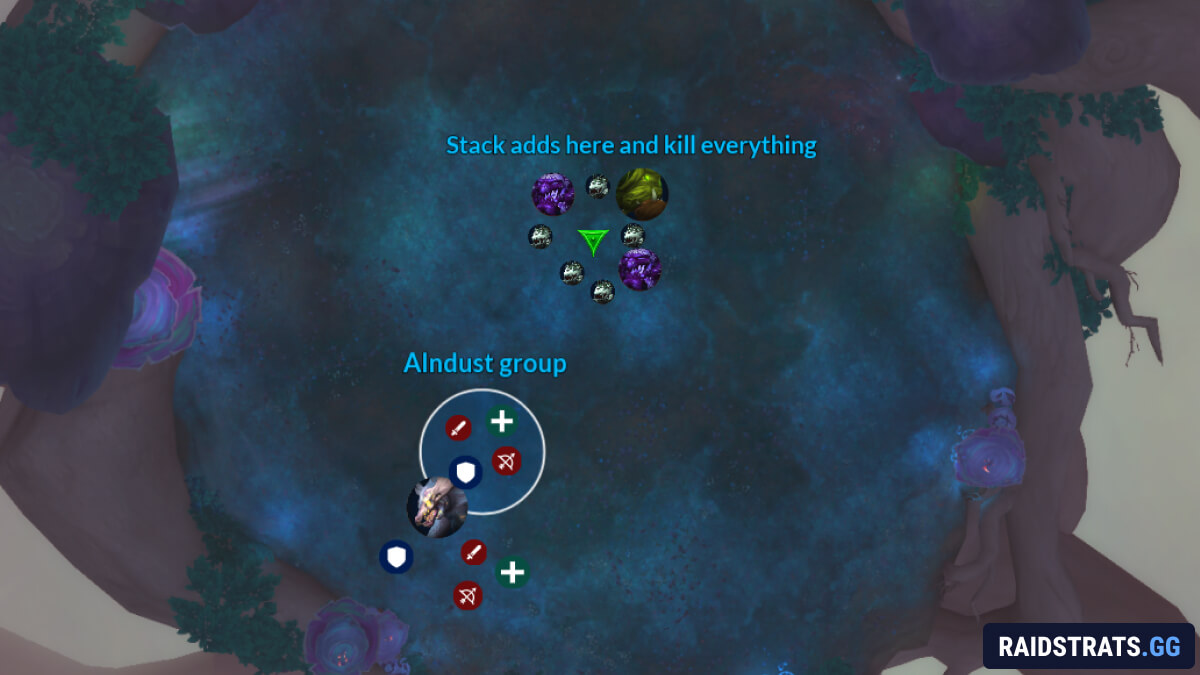
- First Alndust Upheaval happens early:
- Put the circle off to the side.
- The assigned group soaks it together to get Alnsight.
- While the boss phase is going:
- Alnsight group goes down, follows their tank, and starts on the big add.
- Let the small adds stack up near the big add so you can AoE them together.
- Kick and dispel Haunting Essence casts so the raid doesn’t fall apart.
- Normal group starts on the boss, then swaps to adds the moment they become properly killable.
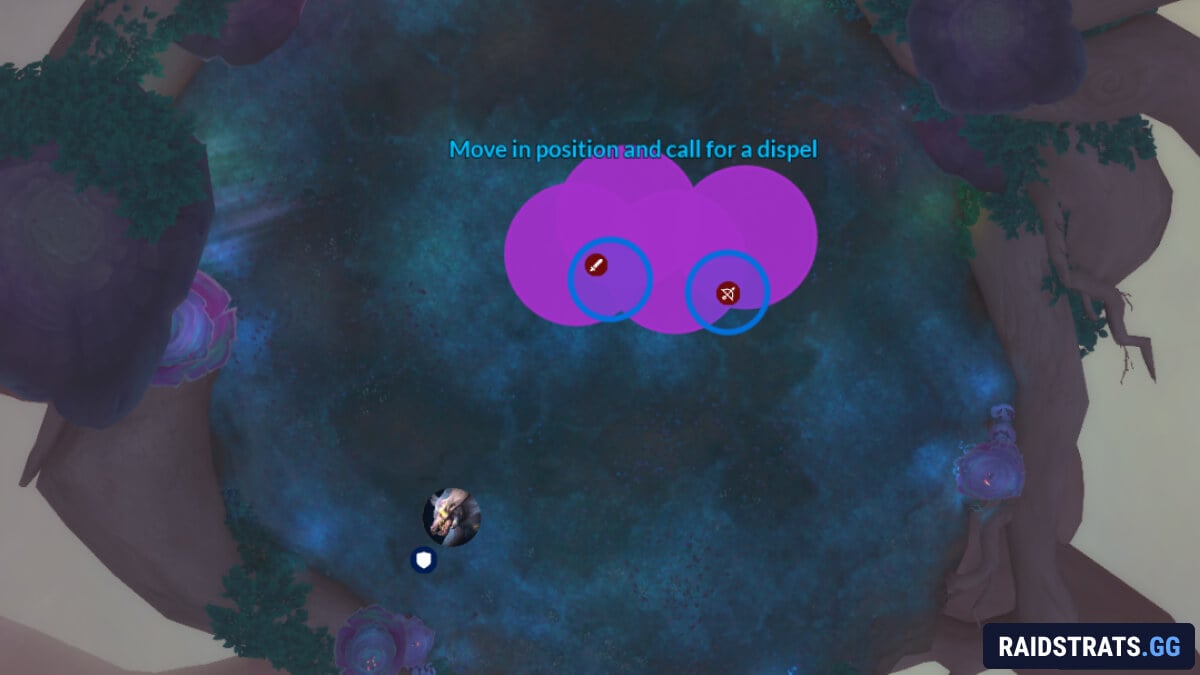
- Consuming Miasma players:
- Move to a puddle, call for dispel, and clip a puddle with your circle to clear it.
- Do not dispel in the raid, it splashes damage.
- Rending Tear happens: If it’s aimed at you, step out. Don’t donate a bleed to the group.
- Biggest rule of the fight: Do not let adds reach the boss. One mistake can snowball fast.
- At 100 energy, the boss casts Consume: The Knockback happens, then intermission starts.
Intermission:
- Dodge the fly-through line (Corrupted Devastation) and don’t stand in the puddles it leaves.
- Kill the Manifestations and keep clearing puddles with the Miasma dispels.
- Make sure all adds are dead before Ravenous Dive, or they get eaten.
Then you’re back to Phase 1 and repeat the same loop until the boss falls over.
Mechanics
The boss targets the current tank, dealing heavy Nature damage split between players standing in the circle.
Players that get hit will be knocked up and gain Alnsight, which lets them attack Manifestations for 40 seconds. When Alnsight expires, players get Rift Vulnerability, causing them to take heavy damage from Alndust Upheaval for 1.5 minutes. This forces you to alternate soak groups.
Spawns Manifestations and hits the entire raid with an absorb called Rift Sickness.
It also applies Alnshroud to the adds as an absorb shield. Breaking Alnshroud makes Manifestations targetable by players without Alndust effects as well.
Each add that dies leaves behind a puddle that: Slows players by 50% and deals damage over time if you stand in it.
Colossal Horror, Haunting Essence and Swarming Shade
Colossal Horror (Tank add) - Needs to be tanked. It just hits harder over time with each strike.
Haunting Essence - Casts Fearsome Cry, which fears several players. This can be dispelled and interrupted. It also casts Essence Bolt, flat damage on a player. This can be interrupted too.
Swarming Shade - No real abilities. Their entire job is to reach the boss and ruin your night.
The boss eats any Manifestation that reaches him, which:
- Deals raid-wide damage
- Heals the boss for 200% of the Manifestation’s missing health
- Increases the boss’s damage done by 100%
This stacks, so if multiple adds reach the boss, you’re usually wiping immediately.
Several players get a large circle that deals damage every 1.5 seconds for 1 minute unless dispelled.
When dispelled, it clears puddles left behind from adds if the player is standing in them. It also deals damage to players nearby on removal, so don’t stack when you’re getting dispelled.
A raid-wide damage over time effect lasting 12 seconds. Healers need to pay attention here, especially during overlaps.
A frontal cone targeted at a random player. Deals heavy damage and applies a bleed to anyone hit. This should be dodged.
At 100 energy, the boss consumes any remaining Manifestations, even if they are not at the boss yet.
This knocks everyone away and starts the intermission.
Breath-style mechanic where the boss flies through the area in a line, dealing massive damage and stunning anyone hit.
This also spawns Manifestations and leaves behind a puddle.
Strategy
This encounter is mechanically simple, but it really punishes making mistakes.
Before you begin, split the raid into two equal groups, each with: 1 Tank, 2 Healers and 7 DPS.
Phase 1
Shortly after you pull the boss, you will get your first Alndust Upheaval cast. Place the circle off to the side, so the assigned group can soak it cleanly.
From here, you basically have two groups doing different jobs.
Alndust Group
As you go down, run toward the big add with your tank and start on it first.
Do not touch the small adds yet; you want them to naturally group up near the big add so you can kill everything when they are stacked. The small adds start moving to the boss after you break their absorb shield, so opening on the big add helps keep the pack together as the shields fall off.
Several players should handle interrupts on Haunting Essence.
Normal Group
This group mainly attacks the boss at the start.
Once several players get Consuming Miasma, move to a puddle and call for a dispel. All it takes is your circle barely touching the puddle to remove it, so you don’t need to stand in the middle of it.
Some players will get targeted by the frontal. Just dodge it.
Eventually, adds will become targetable in the normal world. At that point, everyone swaps and kills them fast, because even one add reaching the boss can be lethal.
Your goal is to kill all of the adds before the next group has to go down. When the next Alndust Upheaval happens, you repeat the process.
The boss will eventually hit 100 energy and cast Consume, eating any remaining adds even if they aren’t at the boss yet. Everyone gets knocked away and the intermission starts.
Intermission
This is a simple, repetitive phase.
The boss places a large line that he flies through, spawning Manifestations and leaving puddles.
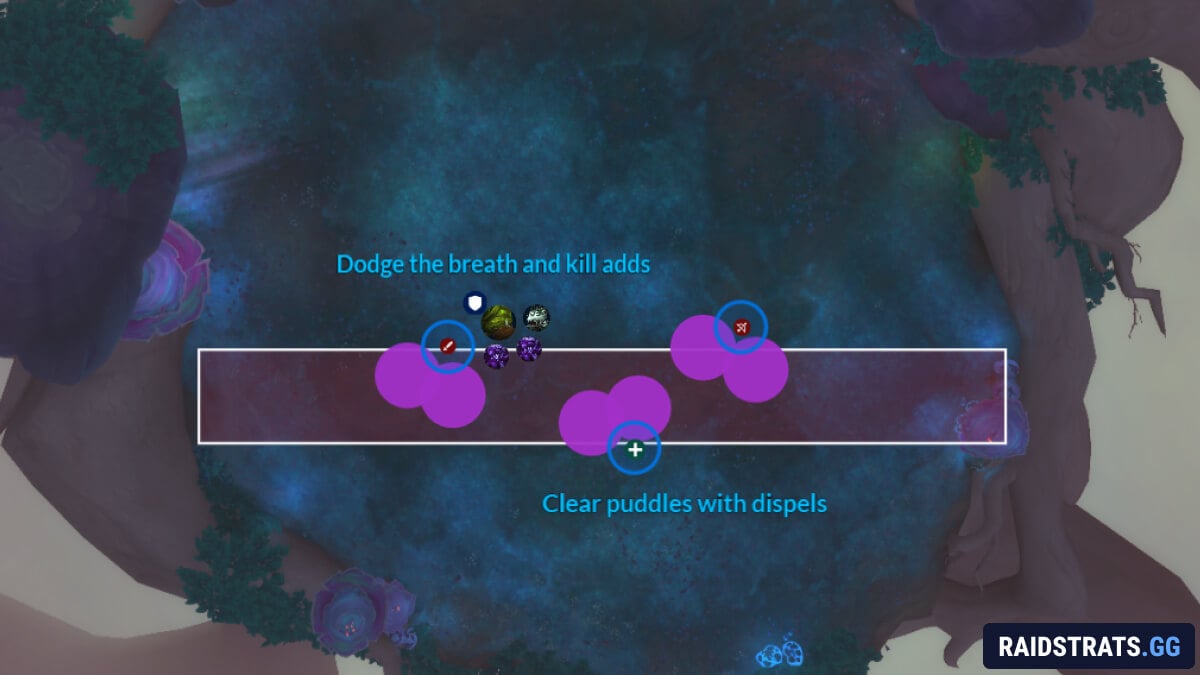
The raid kills Manifestations and removes puddles using the dispel mechanic from Phase 1.
Eventually the boss casts Ravenous Dive and slams into the ground. Make sure that all adds are dead before this happens, otherwise they get consumed.
Then the fight restarts and you do exactly the same thing again until the boss dies.