Raid Setup
Introduction
Welcome to our Heroic Fallen-King Salhadaar guide for The Voidspire Raid. This guide covers the fight mechanics and the strategy we recommend to defeat this boss on Heroic difficulty.
This fight is one of those “looks familiar, but plays way better” encounters, where the room slowly fills up with nonsense, orbs are trying to speedrun into the boss, and you’re juggling interrupts, puddle placement, and a big damage amp window that makes DPS players suddenly pretend they’ve always been mechanics enjoyers.
Fight Style: Single Target Fight with Orb Cleave / Multi DoT
Recommended Setup: 2x Tank / 4x Healer / 14x DPS
Required utilities: None
Hero/Lust usage: On pull or during damage amp
Method Boss Review
Usually I’m not a fan of recycled bosses that we literally just fought a season ago, but this one actually turned out amazing. They reused some familiar ideas, but redesigned them enough that it doesn’t feel like you’re just doing the same fight again with a different coat of paint.
The overall flow feels great, and the added damage amp window is definitely going to make DPS players happy.
Now I’m just hoping it ends up being a proper challenge on Mythic, because it would be pretty epic to watch a guild kiting a bunch of orbs around the room, trying to kill them at the last second before they reach the boss.
Method Boss Rating: (4/5)
Easy Mode
This is a one-phase fight on a repeating script. It only gets harder if puddles are placed badly.
Bloodlust can be used on pull or during Entropic Unraveling for the 25% damage amp.
Orbs are the only real wipe condition:
- On pull, the boss marks 2 of the 3 gates with lightning beams. That’s where the orbs will spawn.
- Void Convergence spawns two orbs that move toward the boss.
- If an orb reaches the boss, it triggers Void Infusion and you wipe.
- Drag the boss toward a marked gate and kill an orb while you kite.
Don’t stack Dark Radiation for free:
- Killing an orb gives the raid Dark Radiation for 8 seconds.
- Wait for the debuff to fall off before killing the second orb.
- If you must kill both close together, use big healing cooldowns.
Shattering Twilight:
- Shattering Twilight hits the tank first, then jumps to several players.
- When it expires, it shoots spikes in the direction your arrows are pointing.
- Point arrows away from people, and never toward the boss.
Despotic Command:
- Despotic Command puts a circle on several players.
- After 10 seconds it drops a puddle and puts a big absorb on you.
- Move out and drop it on the edge.
Fractured Images:
- Stationary images cast Shadow Fracture.
- Any CC stops it and kills the image.
- If a cast goes off, it leaves a permanent puddle, and the room turns into a disaster.
Entropic Unraveling burn window:
- At 100 energy, the boss is stationary for 20 seconds (Entropic Unraveling).
- Heavy raid damage, spinning clockwise Umbral Beams, and a giant puddle after.
- Boss takes 25% increased damage, so send DPS cooldowns here.
- Tank positions the boss to the side before it starts, so there’s room to rotate with beams.
- After Unraveling, the boss casts Void Convergence again and you repeat until dead.
Mechanics
Two orbs spawn from the Riftlabs and move toward the boss.
If an orb reaches Salhadaar, it triggers Void Infusion, which wipes the raid. Orbs also hurt players on contact by applying Void Exposure.
When an orb is destroyed, it explodes and applies Dark Radiation to the entire raid for 8 seconds.
This stacks if another orb is destroyed while the DoT is still active, so back-to-back orb kills can get nasty fast.
At 100 energy, the boss triggers Entropic Unraveling for 20 seconds, dealing heavy raid-wide damage.
During this window, the boss takes 25% increased damage and spins with Umbral Beams that deal heavy damage to anyone they touch.
When the cast ends, it leaves behind a large puddle.
Initially this is a tank mechanic that sends out waves of Twilight Spikes in multiple directions, and after hitting the tank, it then affects several players giving them the same debuff.
The spikes deal heavy damage to anyone they hit.
Fractured Image
The boss spawns multiple Fractured Images around the room that attempt to cast Shadow Fracture.
If the cast goes through, the image despawns and leaves a permanent puddle behind. Interrupting the cast removes the image.
Several players receive a circle that expires after 10 seconds.
When it expires, it drops a puddle at the player’s location and applies a large absorb shield to that player.
Unavoidable raid damage that happens throughout the fight.
It jumps between several players and applies a DoT that lasts 23 seconds.
Strategy
This is a one-phase fight with a set order of abilities that repeats until the boss dies. Unlike a lot of encounters, it doesn’t really ramp up over time, unless your puddle placement is bad and the room becomes a nightmare to move in.
Depending on your comp and timers, we suggest using Bloodlust either on pull or during a damage amp window.
The fight mainly revolves around handling the Concentrated Void orbs. This is the only thing here that can instantly wipe you.
Orbs and Void Convergence
When you pull, the boss will mark two out of three gates on the side of the room with a lightning beam. That’s your warning that the orbs will spawn there.
Two orbs spawn and follow the boss. If one reaches him, it triggers Void Infusion and you wipe.
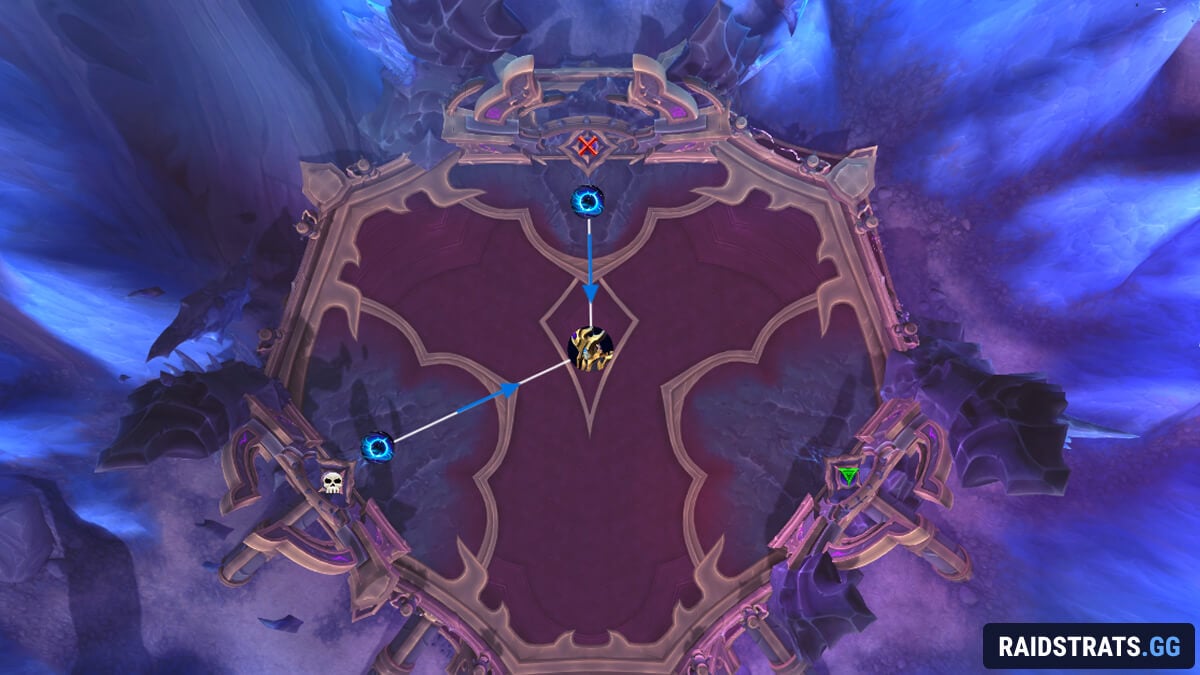
Move the boss toward one of the marked gates and kill or cleave down an orb while you kite the boss along. The boss is movable most of the time, except during Shattering Twilight, where he’s forced to stand still for a few seconds.
When you kill an orb, the whole raid gets Dark Radiation for 8 seconds. The goal is to let that debuff fall off before killing the second orb. If you can’t, you’ll need to commit healing cooldowns to survive the overlap.
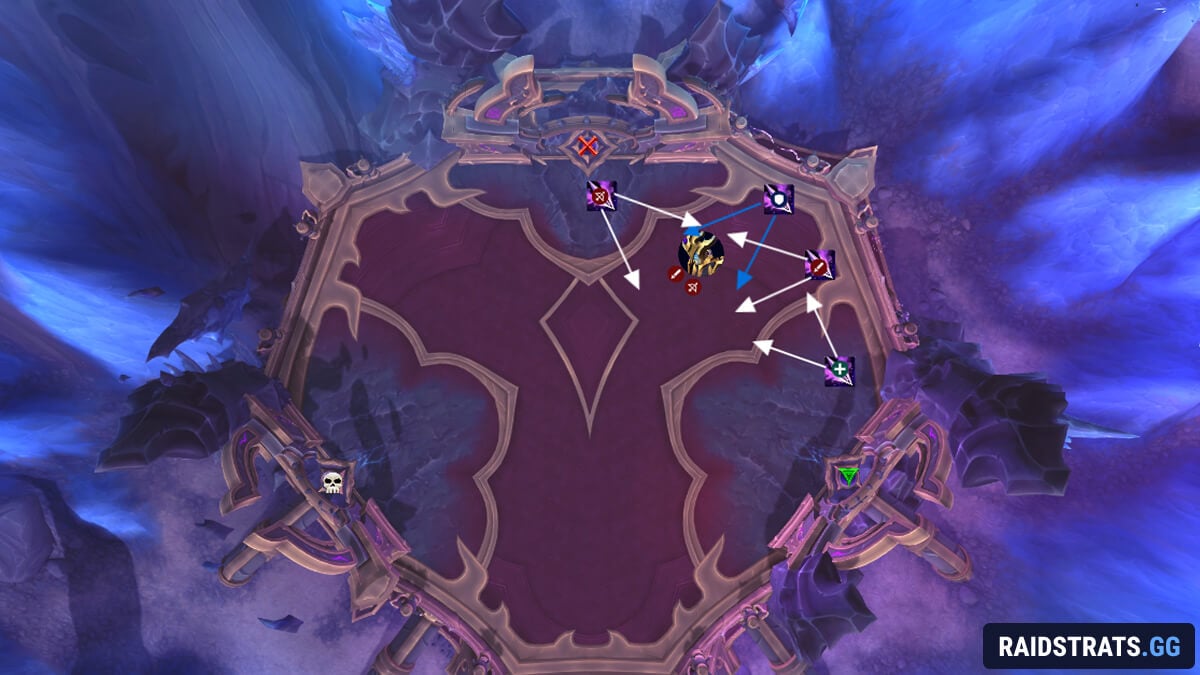
Shattering Twilight
The boss casts Shattering Twilight on the tank first. When it expires, it sends out spikes in the directions your arrows are pointing.
After that, it jumps to several other players and does the same thing, just with smaller spikes.
The rule is simple: Aim your arrows away from other players, and never point them toward the boss.
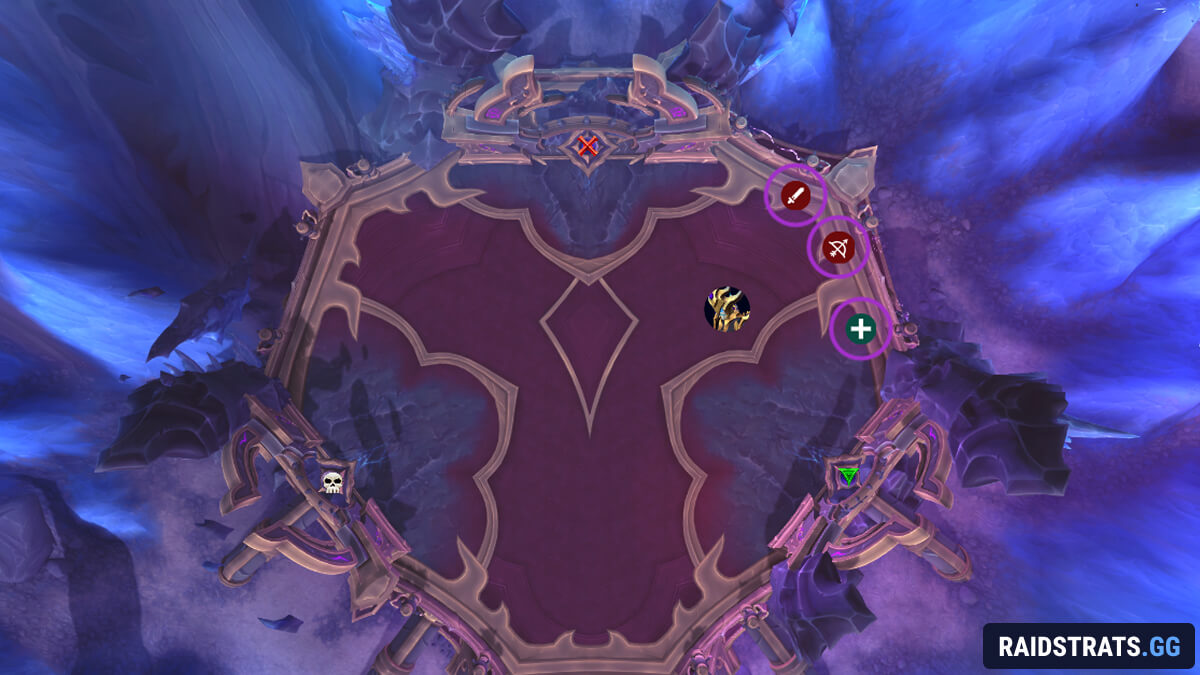
Despotic Command
Several players get Despotic Command, giving them a small circle for 10 seconds.
When it expires, it drops a puddle and puts a big absorb on you. So if you get this, just step out to the side before it expires and drop it somewhere that will keep the room clean.
Fractured Images
The boss spawns Fractured Images, stationary adds that attempt to cast Shadow Fracture.
Any form of CC interrupts the cast and kills the image. If an image finishes the cast, it despawns and leaves a permanent puddle where it stood.
This is the part that makes the fight annoying if your group is asleep, because letting casts go off turns the floor into permanent bad.
Entropic Unraveling
At 100 energy, the boss casts Entropic Unraveling for 20 seconds.
During this:
- The boss is not movable.
- Raid-wide damage ramps up hard.
- The boss spawns Umbral Beams that spin clockwise and delete anyone they touch.
- The boss takes 25% increased damage, so this is your big burn window.
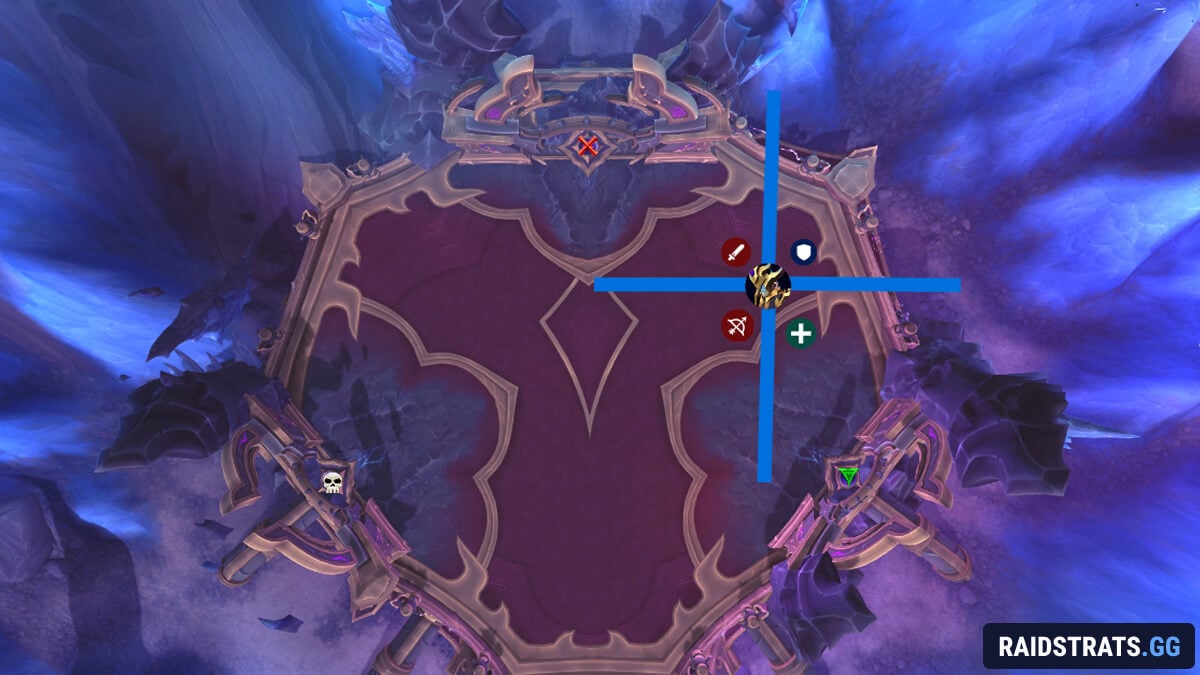
At the end, it leaves behind a massive puddle.
Tank Tip: Move the boss to the side before this starts, and make sure there’s plenty of room around him so the raid can rotate with the beams without getting boxed in.
Once Unraveling ends, the boss casts another Void Convergence and the whole loop repeats.
Handle puddles cleanly, kill the Images and don’t stack Dark Radiation. Focus on this, and you should have no problem killing the boss… unless an orb reaches him because a DPS player decided to pretend they don’t exist.