Raid Setup
Introduction
Fight Style: Single Target Fight with frequent add spawns (4 targets)
Recommended Setup: 3 Tanks / 4 Healers / 13 DPS
Useful utilities: Blessing of Protection (Paladin), Grips (DK), Curse of Exhaustion (Warlock), Immunities, Guardian Spirit (Priest), Intel 13900K + Nvidia RTX 4090
Easy Mode
- Main-Tank moves the boss around the sides of the room
- 3rd tank pops Shrapnel Bombs
- Players targeted by Unstable Embers should move away from others
- Avoid touching active traps
- Dodge Dragon Statue Frontal at 100 energy
- Kill Golems, loot tools and use them to de-activate several traps
- Be ready for the Blast Wave knock-back and don’t get knocked into traps
Mechanics
Golems become immune to CC (but not interrupts) when they reach 50% health or full energy.
Players that were just targeted by Unstable Embers get hit by a beam which increases damage taken from this ability by 500% for 30 seconds (if you get hit twice in a row, you die).
Strategy
The most recent changes to this boss remove the Trap RNG while following the route. This essentially means that if the tanks are placing the boss correctly, according to the plan, you will always get the 2 ‘extra’ traps spawn at the same spot.
Additionally, Tools last for 2 minutes once picked up.
Essentially, what this means is that in an ideal scenario, where you have killed the Golems properly, without them getting a cast off, and tanks were moving the boss correctly, you should have way more Tools at hand then you actually need, as most of the active traps won’t be a hindrance.
There is also room for errors with the changes, meaning that if you are to place the boss on the wrong spots several times, especially early into progression, you will still be able to recover from this if players with Tools clear the correct traps (the correct traps are always the one that are in the way of you executing this strategy).
As long as you stick to the optimal route presented in this guide, and deal with the Golems as described here, you should have no problems killing this boss.
The Strategy
Zskarn on Mythic presents a formidable mechanical challenge, emphasising the significance of executing the mechanics flawlessly and ensuring your raid's survival until the end, rather than relying solely on exceptional DPS/HPS numbers.
We suggest that you run a 3 tank setup, this will make dealing with the traps significantly easier, as it won't require you to assign up to 10 sets of bombs. With a third tank, they will just solo every bomb set.
Trap Disarm Squad
Before we get into the detailed movement of the boss, let’s deal with this first, as it's often one of the most confusing parts of the fight.
Generally, you should not assign 4 players specifically to do the Disarming, instead you should have almost half of your raid paying attention to this. Trap’s spawn RNG and Golem kill spots will make it much harder for only 4 players to run around and pick up all the traps, which will often result in missing pickups and therefore less traps disarmed.
You want to pick up the tools as soon as possible, afterwards you can hold them for a minute.
This is the area you want to focus clearing, removing a trap in this area will never be wasted, as this is your play-area for the majority of the fight.
Towards the end of the fight, around Dragonheads 3, 4 and 5, you will always need to clear at least 1-2 traps around the Red marker in order to bait.
Knockbacks
You will get around 9-10 knockbacks throughout the fight. Given the predetermined movement of the boss, you will always be in the correct spot for a knock. However, one thing you really have to pay attention to is not getting knocked into a Trap!
There is also a certain amount of RNG when it comes to beams and knocks. Sometimes you will get the beams first, then knock afterwards, and sometimes you will get knocked first then beam instantly afterwards. The knock into the beam overlaps are much harder and you need to make sure you are already standing correctly before the knock happens.
Embers and Lasers
Getting hit by those twice in a row (or by 2 beams at the same time) will kill you unless you use an immunity. The beams will always go to players that had embers previously, basically the 4 players marked with a circle. It's important to understand that Embers and Lasers are 2 different abilities, that simply happen one after the other and share the same circle. Embers do AoE damage around the player and you should always spread away from others to avoid clipping them. Once done, the player will keep the circle and get hit by the lasers shortly after.
So once the initial ember targets are picked, those players want to get away from others, to reduce damage taken. There is plenty of time to move, get in a nice cosy position and wait for the lasers.
The main rule is, DO NOT MOVE and DO NOT MOVE the boss when there is 3 seconds or less remaining on the lasers cast
Note: If you got hit by the lasers on the previous set, and you get embers on you on the next one, you will very likely die if you don’t use a big personal/external or an immunity. Make sure to call this out in order to save Combat reses.
Golems
They will always overlap with Dragonheads, forcing you to kill them, interrupt and dodge Dragonheads/get knocked at the same time. Since you can always interrupt them, you should not panic too much if they are running around, but you want to do the grips/knocks as early as possible, as they get immune to them at 50% health or at 100 energy.
Golem (1)
For this set of Golems, we are standing close to the side. You want to grip the 2 close Golems as soon as possible and nuke them down. Then you will dodge dragonheads and run into the other 2 golems coming from the opposite side of the room, grip those as well and kill them.
Golem (2)
Make sure to initially ignore the 2 golems on the boss’ side of the room, they will run towards the side of the room where you go anyway; if they get nuked down instantly, you won’t be able to grip them after the Dragonheads.
Grip the 2 golems you just run into instead, kill them, then finish/grip the 2 other ones.
Golem (3)
Ignore pretty much all golems at the start, wait for the knockback out of the Dragonheads.
Once knocked, you should have all 4 Golems in grip range as they are mostly running towards the raid anyway, because there are no other traps to activate. Stack them up and kill all 4.
Golem (4+)
All the late sets are pretty much the same, you want to first deal with everything else (dragonheads, knocks, embers), then once safe, grip them all and kill. Just make sure you are interrupting and players should not randomly nuke a golem, to avoid making it immune to crowd control.
Dragonheads (new version)
The recent change to Dragonheads is pretty bad, and hopefully blizzard will hotfix it to the old version. Currently the Dragonheads will be baited on the largest clump of players, however, it seems to often prioritise the ranged clumps. Meaning you will simply have to cuddle up at the assigned position (marker).
Boss Movement
Now that we sorted all the mechanics, let’s take a look at the hardest one, moving the boss. Jokes aside, there is really not much to it, and after some pulls it becomes very clear how you need to move the boss.
The guide that I'm about to show you is an approximate pattern of movement, which you can safely follow as long as you keep in mind that sometimes, due to trap activation RNG, you might need to find a gap on your own.
For example, if you are supposed to go place traps around Yellow, and afterwards you go to Red to bait Dragonheads, but you see a nice gap on green where you can squeeze in 2 traps, you can simply go there and then move to Red, because what matters the most is that you end up on the correct bait spot. How you get there will be heavily influenced by the RNG gods.
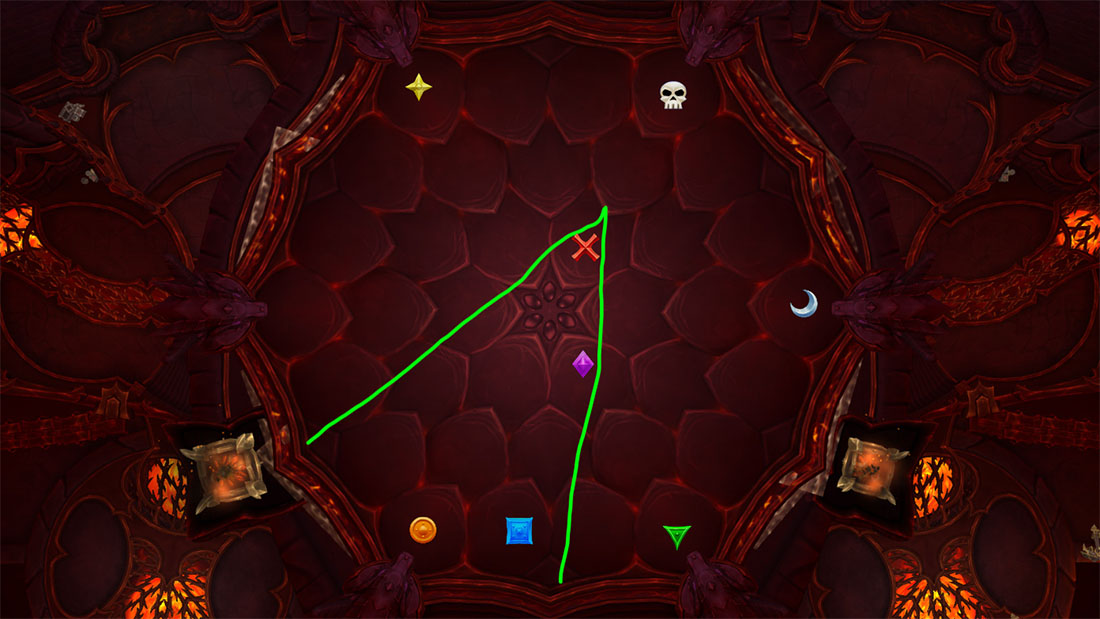
Opener
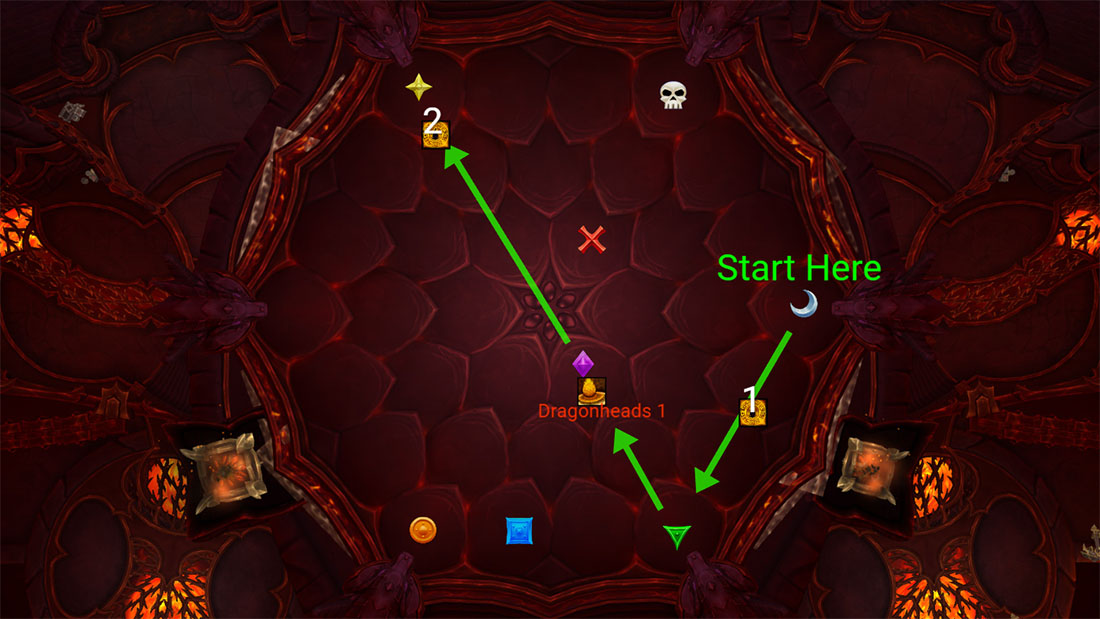
A few seconds into the pull, the boss will activate the first traps (those are counted as Trap 0).
You will start on the Moon marker and go down towards the green marker, placing traps 0 and 1, making a trap line there.
Once placed, you will move the boss behind purple and wait for Adds/Dragonheads.
After running away from Dragonheads, you will move the boss to Yellow and place Traps 2 there.
Traps 3 + 4 + Dragonhead 2
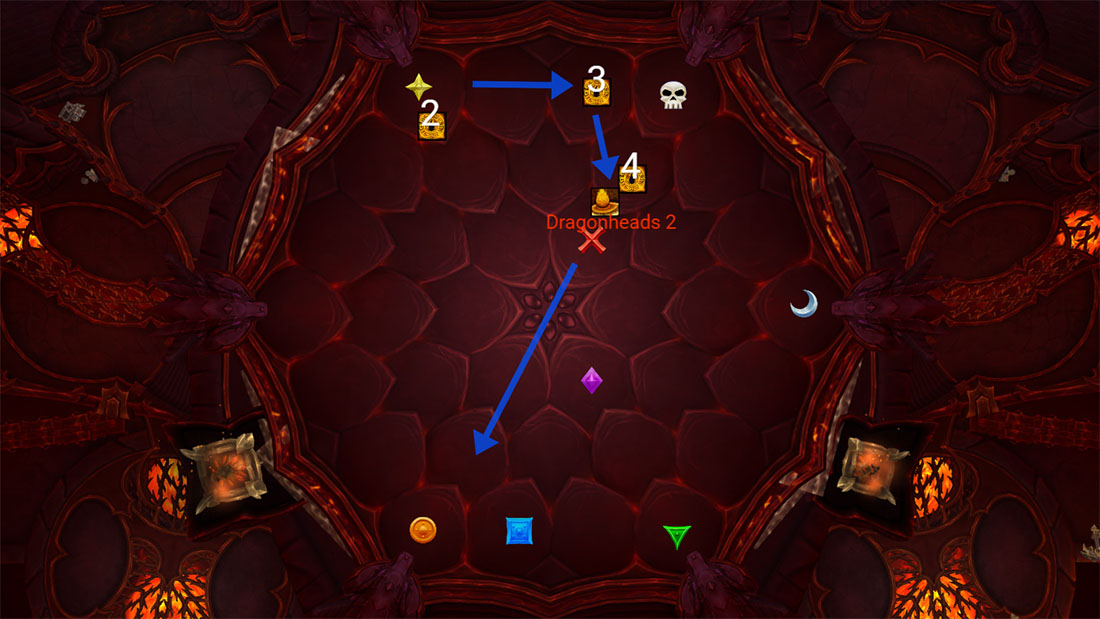
After yellow, you will move the boss close to Skull, and place Traps 3 in a gap there.
Afterwards, you move the boss slightly, just outside of traps towards Red and find a nice spot for traps 4 there. The Raid Baits on Red.
Note: When here, you have to delay moving the boss as long as possible, because you want him to use the traps in his current location. If you move the boss instantly after Tactical Destruction cast, the boss will randomly spawn 2 traps in the room and you will be forced to clear those.
Traps 5 and 6 and Dragon Head 3
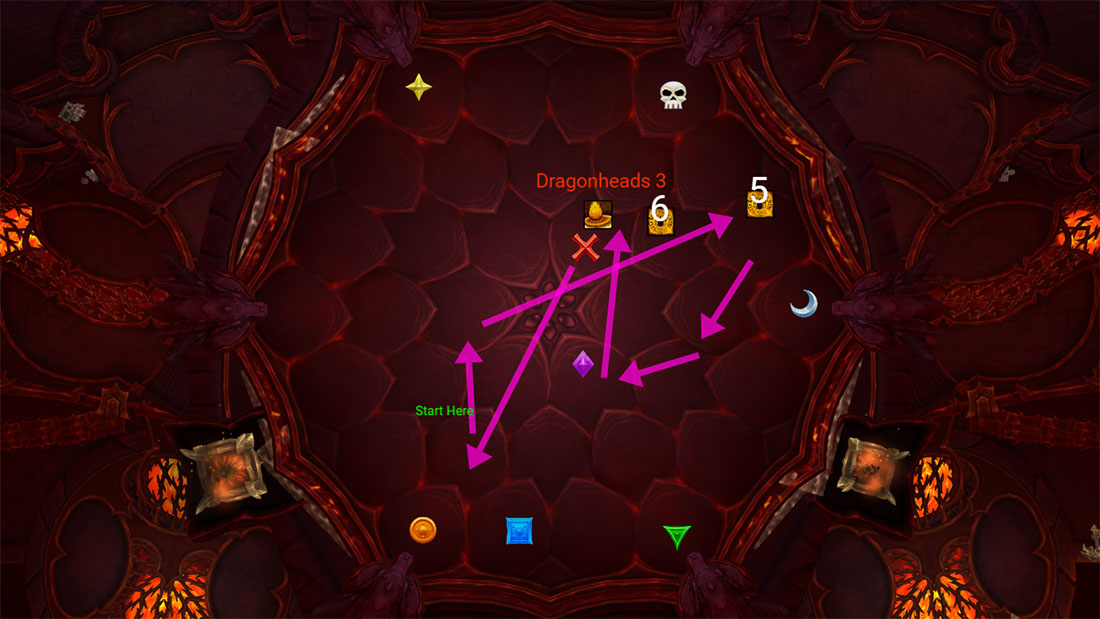
This one looks a bit wild I know, but it's not, I promise!
Basically, you are on Orange here after the knock, there is plenty of time till the next traps, as you just dropped the 4th trap close to red.
Move the boss to any side, whatever makes it easier to cleave golems, dodge random traps or deal with embers. But you eventually want to run into the gap between skull and moon. However, the same rule applies, if you find a better gap for Traps 5, feel free to drop it there and then go to Red for Trap 6 and Dragonheads. The Raid Baits on Red.
Traps 7 and 8 and Dragon Head 4

Again, you end up close to Orange after the knock, and you have about 20 seconds to decide where you want to place Traps 7.
Most likely, it's either going to be between Orange and Yellow, or between Blue and Green. It does not matter where you go, as long as you go to Red afterwards.
For Traps 8, you should hold 1-2 tools to disarm a trap around Red, so you can fit it in better.
This also overlaps with Embers, so it's like:
- Make a gap
- Move boss quickly
- Avoid embers
- Bait on red
Traps 9 and 10 and Dragon Head 5
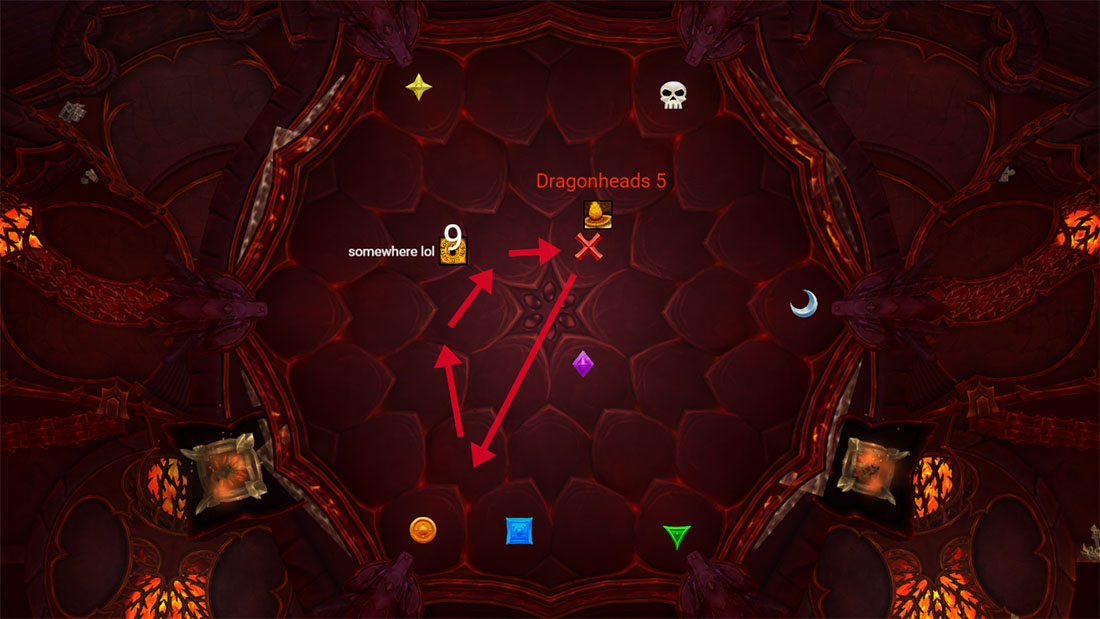
Here the space is super tight, and after the Dragonheads 4 + Knock, you will end up on Orange.
You will get Traps 9 happen shortly after, and those will end up somewhere in the room randomly. Feel free to disarm 1-2 traps that are in the way, but hold at least 1 tool for the 10th set.
The boss will be at Red, and it's basically super hard to find a spot to bait there. Wait for the boss to cast traps 10, then disarm 1-2 traps at red so you can squeeze in and bait. Try to not get knocked into a trap, but it will be almost impossible. Using Gateway to prevent the knock here is pretty good.
Afterwards
If you made it this far, you will realise that there is a lot of fire around you. Basically, the 4 golems will be on top of you because they will try to activate the last few traps. Nuke them as soon as possible and instantly clear any traps you can around you so you can spread for embers and lasers. But save at least 1 tool for if you have many dead, but the boss is low, because you can still grind it down if you can create 1 gap on traps 12, which are in like 30 seconds.
You have around 1 minute from here to kill the boss.