Raid Setup
Introduction
The Vigilant Steward, Zskarn is a dynamic, one phase fight that demands heavy movement, add-cleave, and multi-dotting from players. To succeed in this encounter, players will need to effectively crowd-control several golem-constructs, defeat them, and use the tools they drop to deactivate traps scattered throughout the room. The boss will frequently unleash a heavy knock-back attack, testing players' positioning skills and ability to avoid deadly traps. Beware of the elegant dragon statues on the side of the room, as they will unleash a fierce fire attack that covers almost half of the room, putting players at great risk.
Fight Style: Single Target Fight with frequent add spawns (3 targets)
Recommended Setup: 2 Tanks / 4-5 Healers / 13+ DPS
Useful Utilities: Druid Roar / Shaman Totem / Evoker Time Spiral / (Mass) Grips / Warlock Gateway
Easy Mode
- Main-Tank moves the boss around the sides of the room
- Off-Tank pops Shrapnel Bombs
- Players targeted by Unstable Embers move away from others
- Avoid touching active traps
- Dodge Dragon Statue Frontal at 100 energy
- Kill Golems, loot tools and use it to de-activate several traps
- Be ready for the Blast Wave knock-back
Mechanics
Zskarn will activate a few Dragonfire Traps close to him, and one randomly in the arena.
The traps pulse fire in a 10 yard radius, and touching one will apply a DoT that ticks for 46,806 fire damage every 1 second for 6 seconds. This DoT stacks.
Several Golems will spawn (we think 3), which target random inactive traps and try to activate them by casting Activate Dragonfire Trap. This ability is interruptible and should be your biggest priority.
Once dead, you are able to interact with the Golem and loot Salvage Parts, which you can then use to deactivate an active trap by pressing the extra action button when you are close to the trap.
Golems can be slowed, stunned and gripped.
When the boss reaches 100 Energy, the Boss will activate several Dragon statues close to him. The Statues cast a pizza slice shaped (but badly cut slice) ability that deals 780,096 fire damage to all players hit.
The frontal covers nearly half of the room, so make sure to get to safety as soon as possible.
The boss spawns 3 bombs that need to be soaked by the tank or a player with an immunity. If not soaked, the bombs will explode after 30 seconds and deal 280,835 physical damage to all players and apply a DoT that ticks for 46,086 physical damage every 1 second for 10 seconds.
Triggering a Bomb will instead inflict 624,077 physical damage to the player soaking them, and apply a DoT that ticks for 46,806 physical damage every 1 second for 8 seconds.
The off-tank should be able to handle all the bombs on their own. However, immunities are still great and should be used when possible.
The boss targets several players (shown with a red arrow); those players pulse for 53,047 fire damage to all players within 5 yards. Just spread, and don’t hit other players with it.
A knock-back ability that hits everyone, deals 124,815 fire damage and applies a DoT that ticks for 18,722 fire damage every 0.5 seconds for 6 seconds.
While it might seem chill, this is the most problematic ability in the fight as the knock-back can knock you into active Traps or players targeted by Unstable Embers. Be aware of your positioning when the boss uses this ability.
Strategy
Opening position
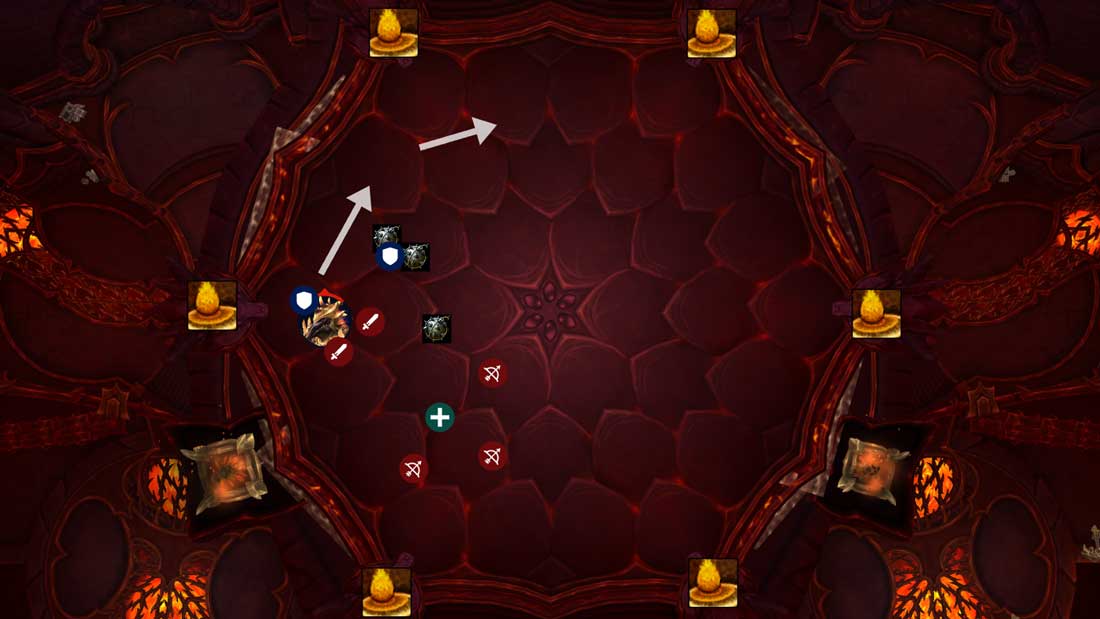
The tank should pull the boss to one of the Dragon Statues at the side of the room and stay there until the first traps become active. Afterwards, move clockwise and keep the boss fairly close to active traps. Positioning will be very random overall, as there is some RNG to where traps will activate.
The off-tank should focus on soaking the Shrapnel Bombs as soon as they are up. Make sure to call for healer externals or players with immunities to soak them instead. Especially towards the end of the fight, once the room becomes filled with active traps, as some bombs might be hard to reach without taking lots of stacks from running through the traps. This is a very good spot to call for an immunity to soak instead. Keep in mind that its physical damage, so for example, Rogue’s Cloak of Shadows won’t work.
Players targeted by Unstable Embers should move away or have others move away from them. But in general, be loosely spread at all times as this ability is used frequently.
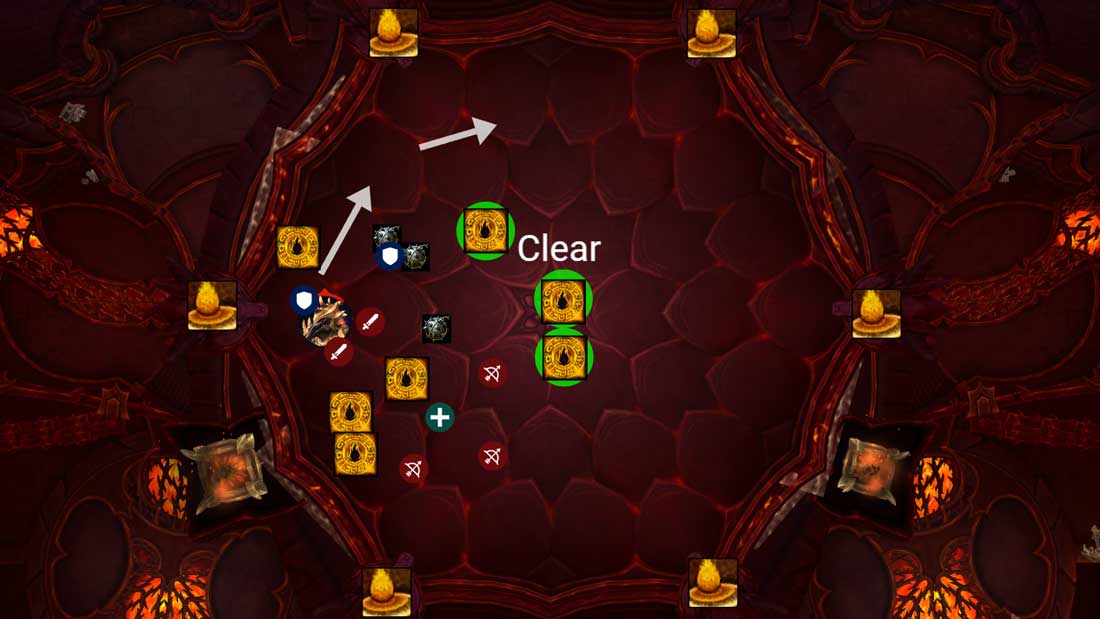
When Golems spawn, you should always try to get them to the boss for extra cleave damage, using grips, knocks or by moving the boss on top of them. Golems should be your highest priority when they are active. Interrupt their cast and kill them as quickly as possible. Once dead, have several pre-assigned players (with good mobility) pick up the tools and deactivate a trap. You want to always prioritise the traps around the middle of the room as the knockback will mostly knock you towards the middle. The Golems don’t need to be tanked, as they are fixated on running towards traps.
Trap Clearing Example
Position yourself properly for the Blast Wave, avoid getting knocked into a trap or getting clipped by Unstable Embers targets. Healers should be prepared for the extra raid damage and the DoT; players that get knocked into an active trap will need extra attention, as they will have 2 different DoTs ticking at the same time.
You cannot get knocked off the platform, so don’t worry about that.
At 100 Energy, the boss will activate several Dragon Statues that are close to him. Instantly move away to a safe spot (opposite side of the room), otherwise it will one-shot you.
The amount of Dragon statues getting activated at the same time and the range of them appear to increase as the fight progresses.
This fight has no phases, but it becomes progressively harder because more traps will spawn than you can destroy, limiting the space to dodge knockbacks and the Dragon Statue's frontal.
As long as you use all 3 tools to disable a trap, and do not let a Golem finish casting Activate Dragonfire Trap, then you should be fine, as there is nothing more you can do to control the traps.