Raid Setup
Introduction
Fight Style: Single-Target / Cleave
Recommended Setup: 2 Tanks / 4 Healers / 14 DPS
Useful Utilities: Barrier (Priest), AMZ (DK), Spirit-Link Totem (Shaman), Darkness (DH), Spatial Rift (Void-Elf racial), Unravel (Evoker), Wrecking Throw (Warrior), Various teleport abilities
Easy Mode
Phase 1
- Stack up tightly behind the boss
- 1 player targeted by Rushing Darkness create a gap in the wall, the other 2 just avoid hitting the raid or breaking the walls
- Volcanic Heart targets go to their designated spots (Check strategy)
- Tank’s create a gap in the wall on one of the sides with Calamitous Strike
- Just before the boss reaches 100 energy, move him to the back of the section (number 5) and drop Echoing Fissure there
- Dodge Swirls
- Stand in AMZ / Barrier / Darkness / Spirit-Link for Fissure 3 and 4
Phase 2
- Destroy the shield on the Void add if you are Corrupted (Corruption)
- 3 players targeted by Surrender to Corruption do not use AoE abilities
- Non-Corrupted players do not use AoE/Cleave abilities when others are corrupted
- Players with Rushing Darkness just move to the side, no need to destroy walls
- Volcanic Heart targets go to their designated spots (Check strategy)
- Tanks break the wall where they cross to create a large gap
- Everyone move to another add and repeat the process
- Dodge Swirls
- Use Defensives or Raid Cooldowns for Umbral Annihilation 2, 3 and 4
Phase 3
- Boss will turn closest walls to Portals with Sunder Reality
- Portals will spawn adds and protect you from Ebon Destruction
- Players with Rushing darkness avoid hitting the portals/raid
- Kill Adds
- Step into the Portal before the Ebon Destruction cast is finished, but avoid standing in them before the cast, as they deal damage and reduce damage done by 99%
Mechanics
On Mythic, each piece of wall that you destroy will apply a raid wide DoT that ticks pretty hard. Players will mostly have to pay attention to this in Phase 1, other phases the players will be avoiding the wall and tanks just have to break the middle cross twice in Phase 2.
A player breaking the wall in Phase 1 needs to be in between the boss and the wall in a straight line. Standing to the side will make the player ‘slide’, so they will break an entire line of the wall.
This is not cool.
Strategy
![]() Awakened Note for Season 4 of Dragonflight.
Awakened Note for Season 4 of Dragonflight.
With the release of Awakened, Blizzard has changed the amount of Volcanic Heart targets from 5 to 4 players on Mythic Difficulty.
The images showing Volcanic Heart safe spots still show the 5 best placements. With the reduction to 4 Volcanic Heart players per cast, you can still follow the guide and simply use the additional space in a way that suits your raid group. Our recommendation is to still use the spots 3, 4 and 5 as the guide describes.
This battle demands mastery in mechanics, damage, and healing. It will test your coordination, personal defensive usage, and overall output.
Before we begin, there are several WeakAuras that will make your life less stressful in this fight.
The WeakAuras:
The Liquid package contains the order number WA which determines which number you are when targeted by volcanic heart (the 2nd WeakAura is just so you can move the auras).
- Liquid WA Pack: https://wago.io/LiquidAberrus
- Liquid WA Anchors: https://wago.io/LiquidAnchors
The famous Honolulu Guild Neltharion Bomb Map WeakAura. This serves as a reminder on how each Volcanic Set looks approximately: https://wago.io/XJ6e07pAV
Bonus: Honolulu Defensives Reminder. It will remind you to use personals during the most dangerous moments of the fight. However, in order to follow all assignments, 2 Holy Priests are necessary with perfectly assigned Symbol of Hope casts. It will still work great as a reminder though! https://wago.io/ZsDEhx1Sh
BDG Portal map for Phase 3: https://wago.io/eRFlpIgGY
Several important rules that persist throughout the fight
Traffic Rules
Alright, so, you are familiar with the Volcanic Heart mechanic on Heroic, it's a large fire circle that deals heavy damage to anyone standing in it. On Mythic, guess what? Yes the circle is even bigger and deals even more damage and applies a hard ticking DoT. This is the core mechanic of the fight in Phase 1 and Phase 2, and will cause 90% of all your wipes.
The Liquid WA is perfectly sorted by default, meaning there won’t be much RNG on who gets which number. There is still RNG of who gets targeted by the Volcanic Heart, but, most of the time players will always run to the same numbers because of how it’s sorting the players.
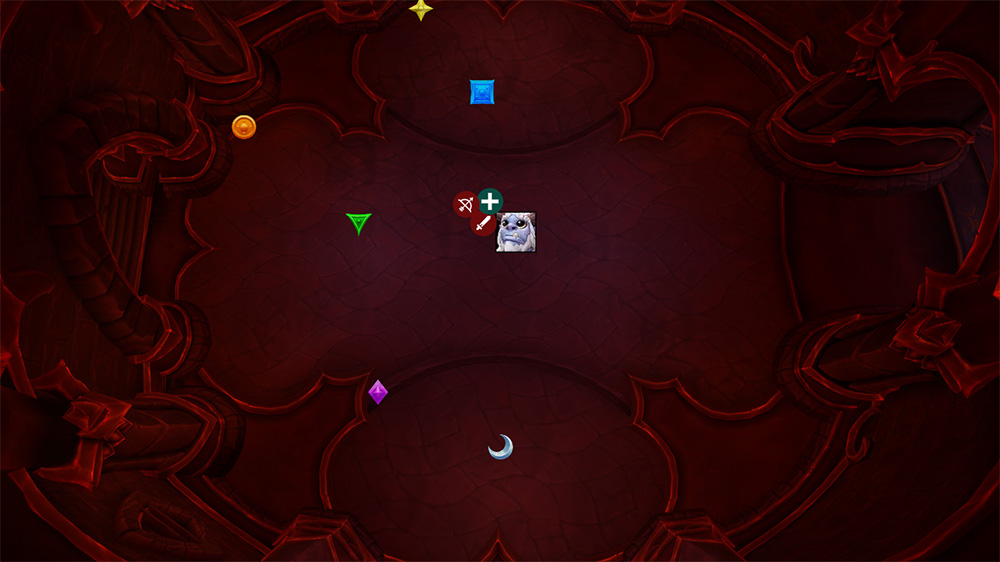
There are several Traffic Rules that will apply throughout the fight. Let’s use the first Volcanic cast as an example.
Note: It’s suggested to place the markers like this so it's easier for you to follow the guide.
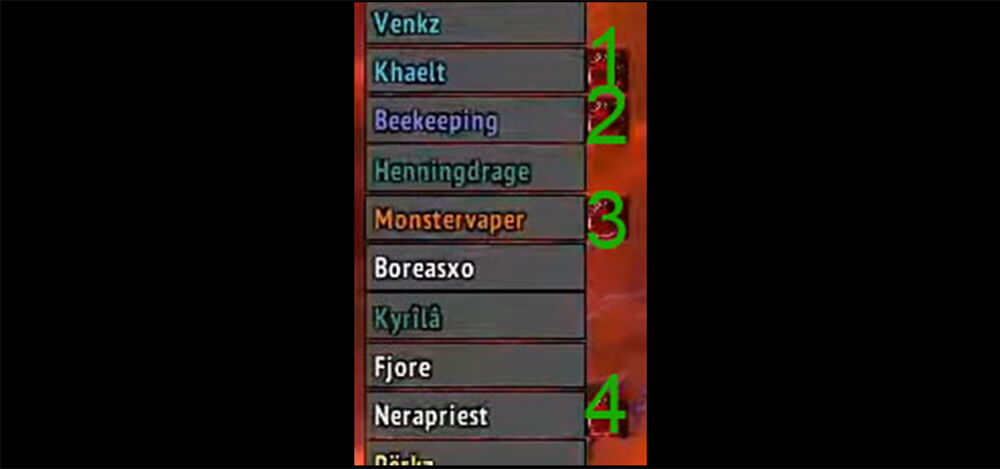
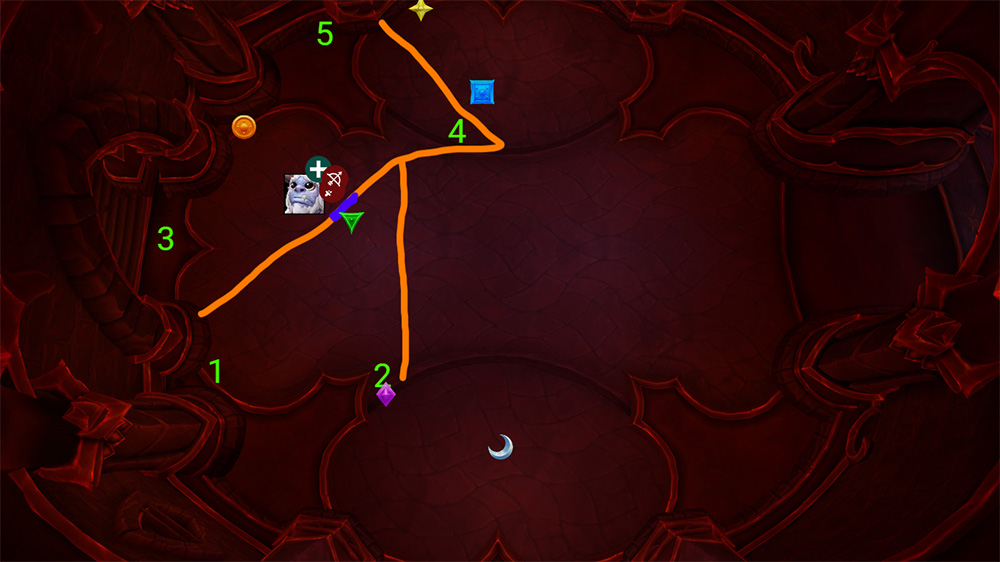
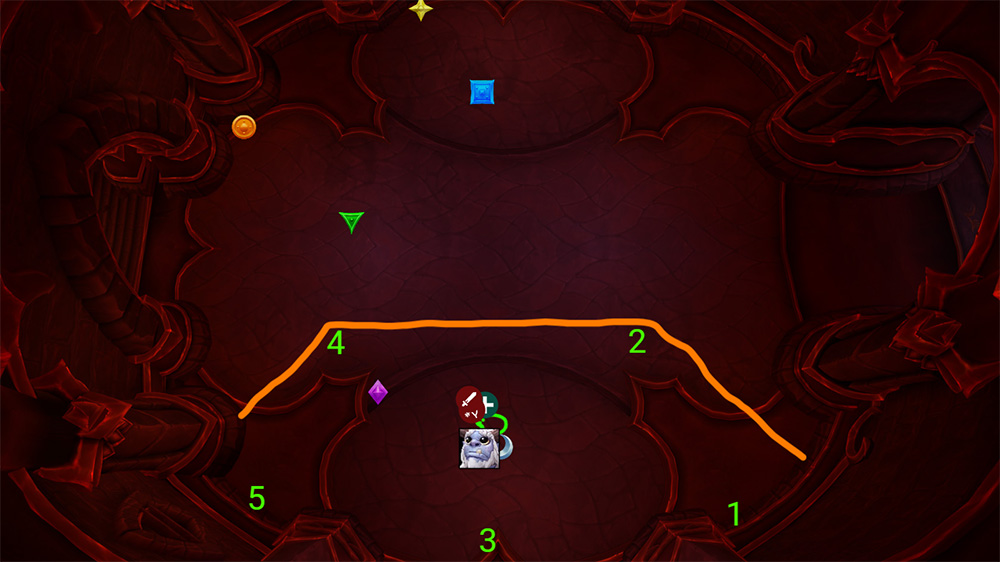
Volcanic Heart (1)
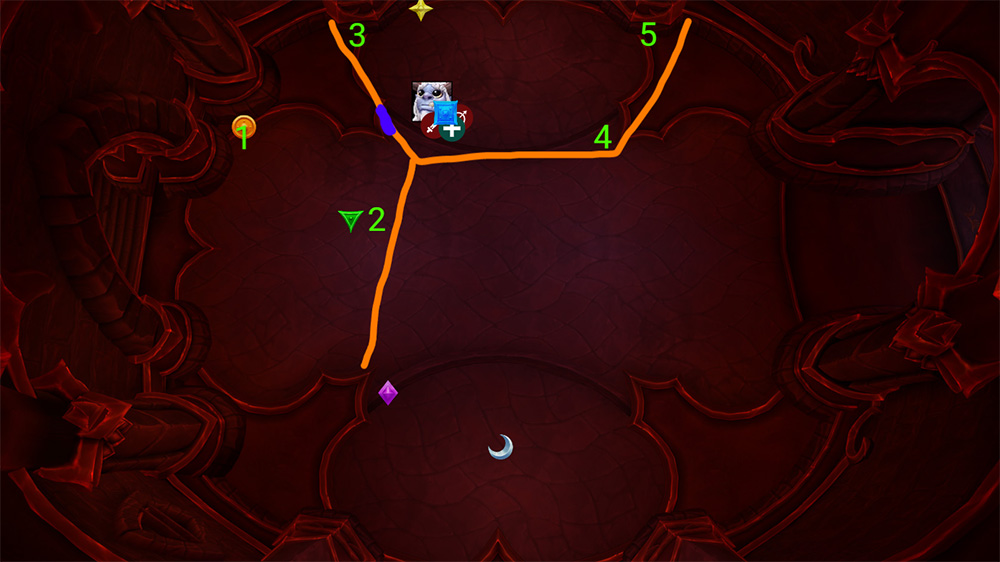
- 1 - Is always on the left side of the room and closer to the room-wall
- 2 - is always on the left side of the room and closer to the middle
- 3 - is always the special spot in each room
- 4 - is always on the right side of the room and closer to the middle
- 5 (Mostly melees) - is always on the right side of the room and closer to the room-wall
Knowing this, you can instantly start running to the correct side as soon as you know your number, while running you can then think about which spot is yours if you are still unsure.
Tank Rules
Tanks will always move the boss close to the marker in each section of the room. The markers are mostly standing on top of the wall, so just put the boss a few yards away from the wall so there is a gap for a player with Rushing Darkness to squeeze in and break the wall.
The only exception to the marker rule is the 7th Volcanic (Gateway) in Phase 2! Here, you will hold the boss close to the gateway, essentially in-line with the entrance of the room.
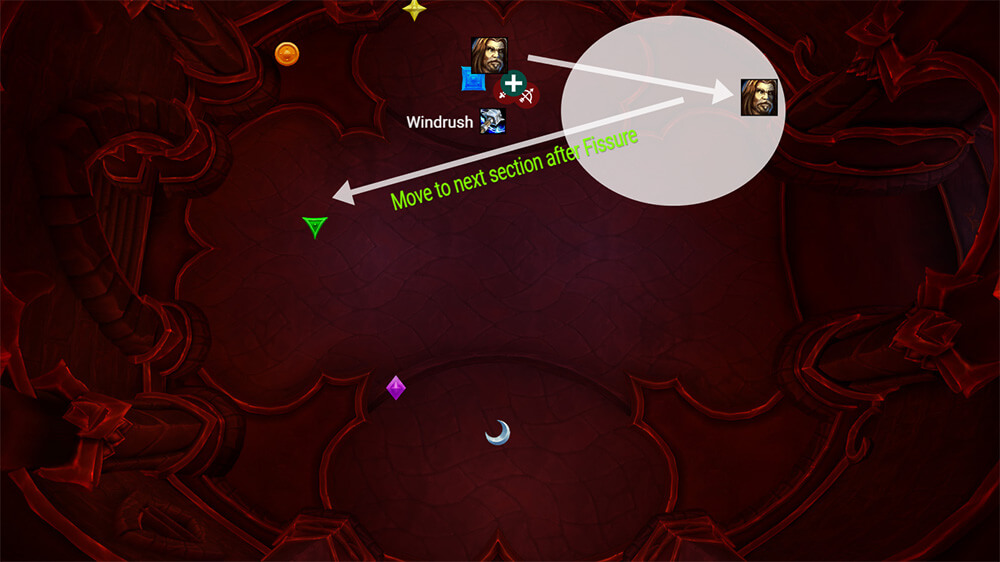
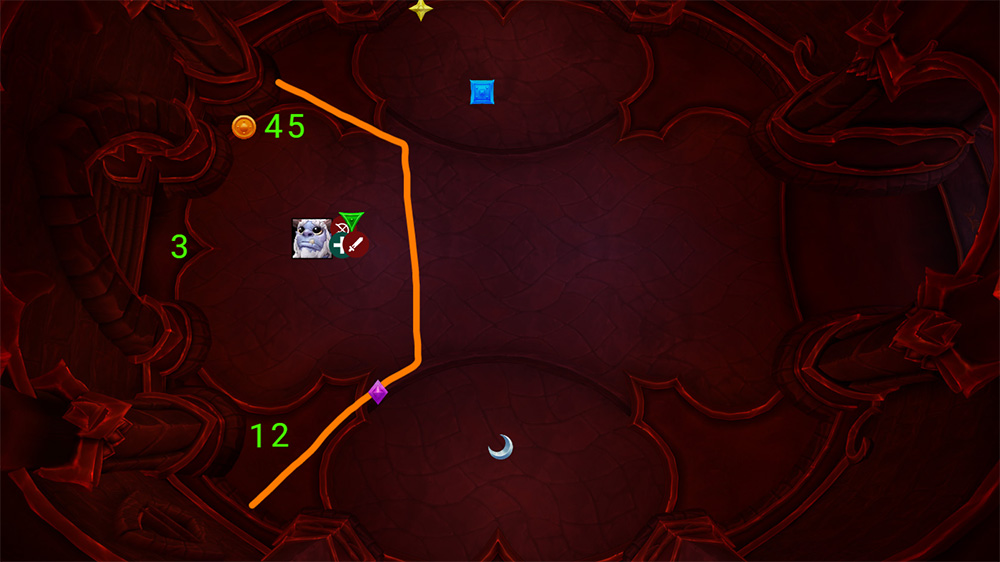
The tank combo in Phase 1 is always the same:
- Player breaks wall
- Tank places the boss so he is pointing straight to unbroken wall after
- Tank gets knocked into the wall and the off-tank Taunts
- Move the boss to Fissure Location (number 5 always)
- Run to the next section of the room
- Repeat
Example:
The tank combo in Phase 2 is always the same:
- 1st Shadow Strike is towards a room wall
- 2nd Shadow Strike is breaking the middle cross
- Boss is moved to another section
- Repeat
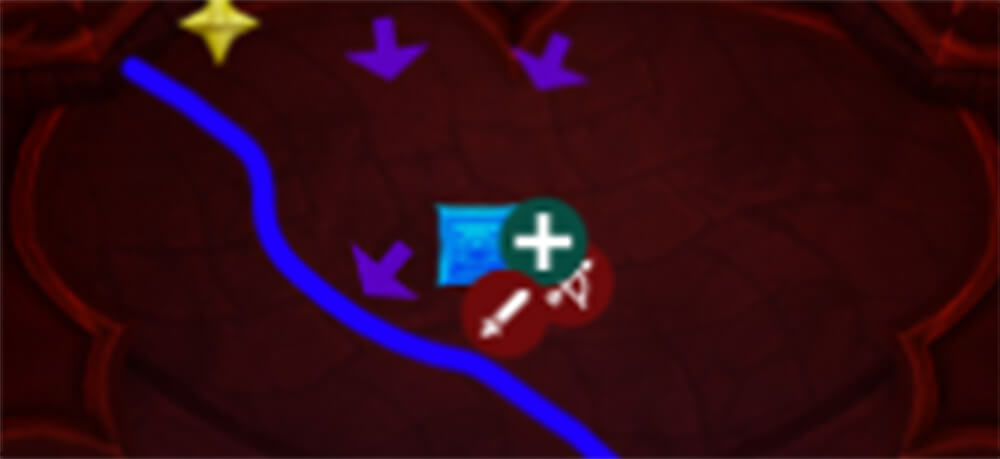
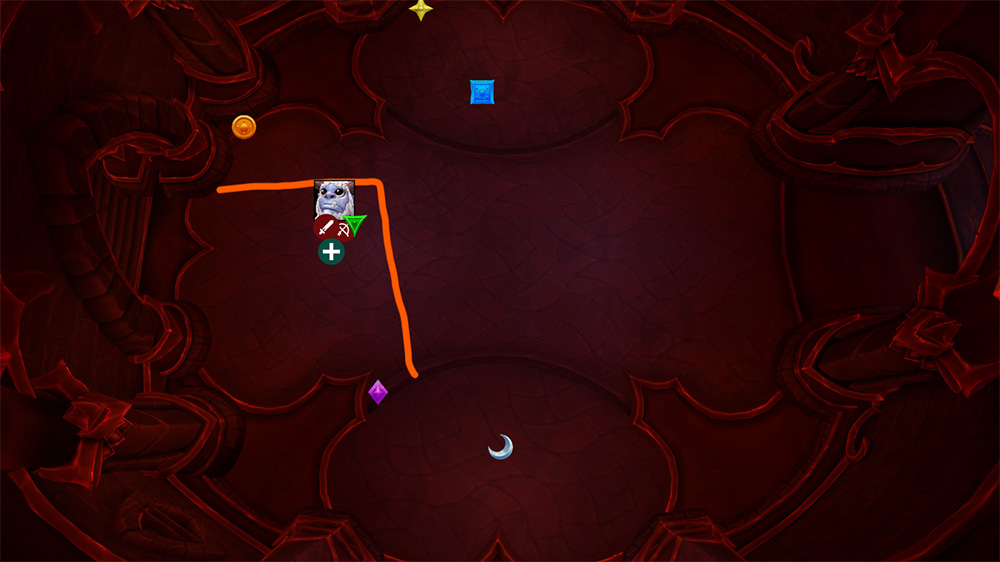
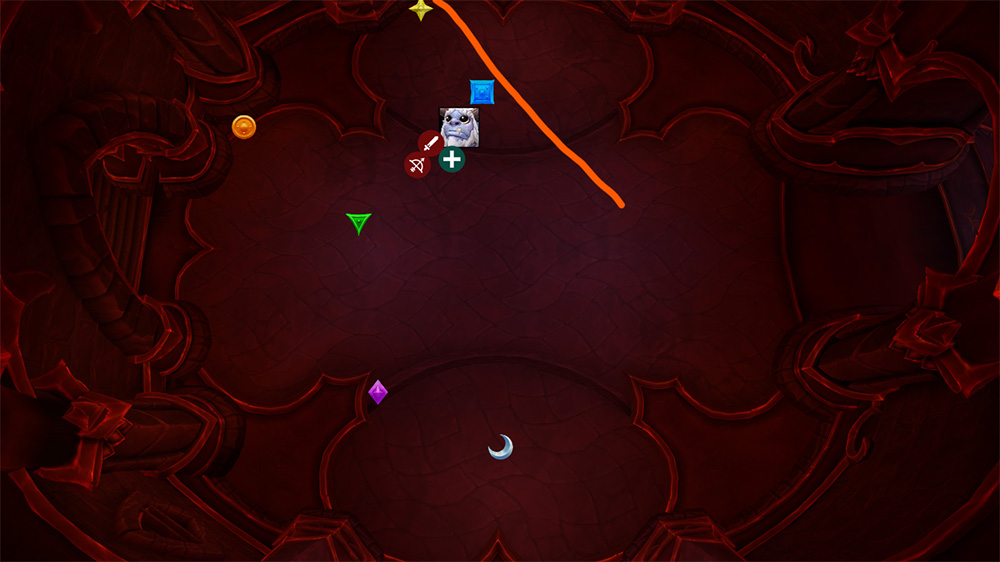
Rushing Darkness rules
This ability marks 3 players with a purple arrow, the Liquid WA will then assign a player that is saying ‘BREAK’. This player will then stand next to a wall and get knocked into it, you should aim to break only one small piece of the wall, so don’t stand sideways, otherwise you will be sliding on the knock and break several walls at once.
The other 2 players should simply aim the arrows towards a room wall, acting like a fake boss frontal.
Example:
In Phase 2 and 3, this ability is always aimed at the ROOM-WALL and never used to break the walls.
Bonus Hero / Lust Rule
It’s a very good habit to start the progression with Hero ON PULL. This is mainly because the end segment of Phase 1 is very spicy and will cause a lot of wipes early on. By using Hero on pull, you will skip the hard part of Phase 1 and get into Phase 2 much easier. Phase 2 is the hardest phase of the fight and you want to get there as quickly as possible for the practice. Once you reach Phase 3 with everyone alive, you can then stop using Hero on pull and just swap around some personals towards the end of Phase 1 in order to survive the 4th Fissure.
Phase 1
Now that we have the correct setup, mindset and fixed the ‘what on earth is this fight’ look on our face, we can begin with the step by step guide. I’ve already covered the Volcanic Heart (1) set, so we will continue here with the others.
Healer Note: If 1 or 2 is not a healer, make sure to cast extra HoTs on those targets as they will stay behind the wall for a few seconds with Volcanic Heart debuff ticking on them and you won't be able to heal them until the Tank breaks the wall.
Fissure 3 and 4 deal a lot of damage, so make sure personals are assigned and make sure players are standing in AMZ / Barrier / Darkness / Spirit-Link for the hit.
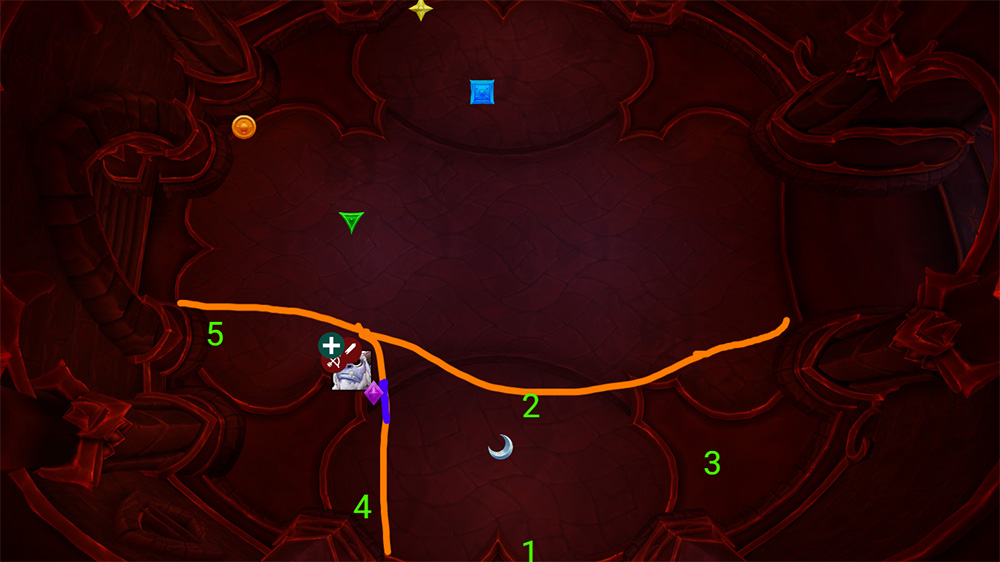
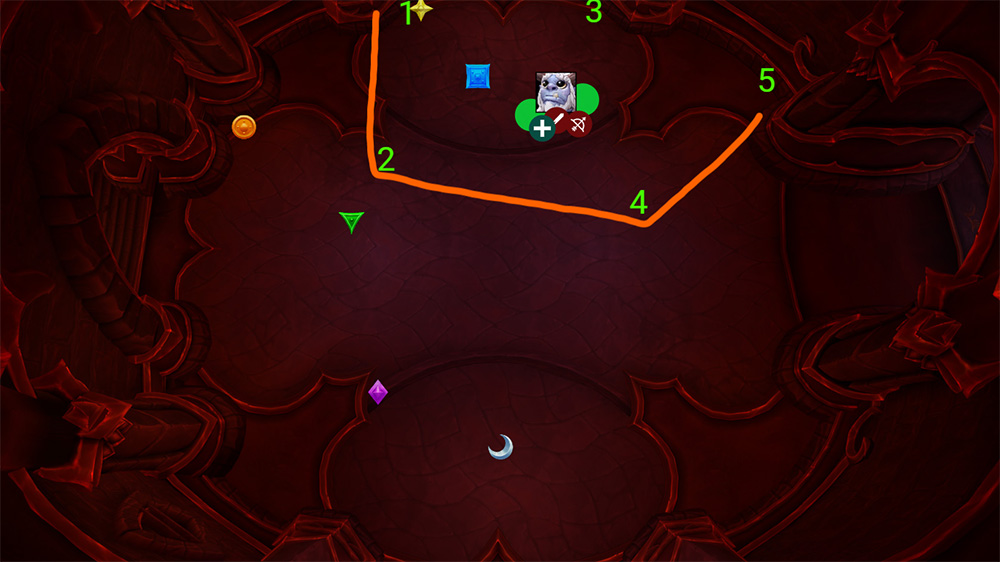
Volcanic Heart (2)
- Players assigned 1 and 2 go to their standard spots through the wall
- Player 3 goes to the door
- Players 4 and 5 go to the standard spots on their side
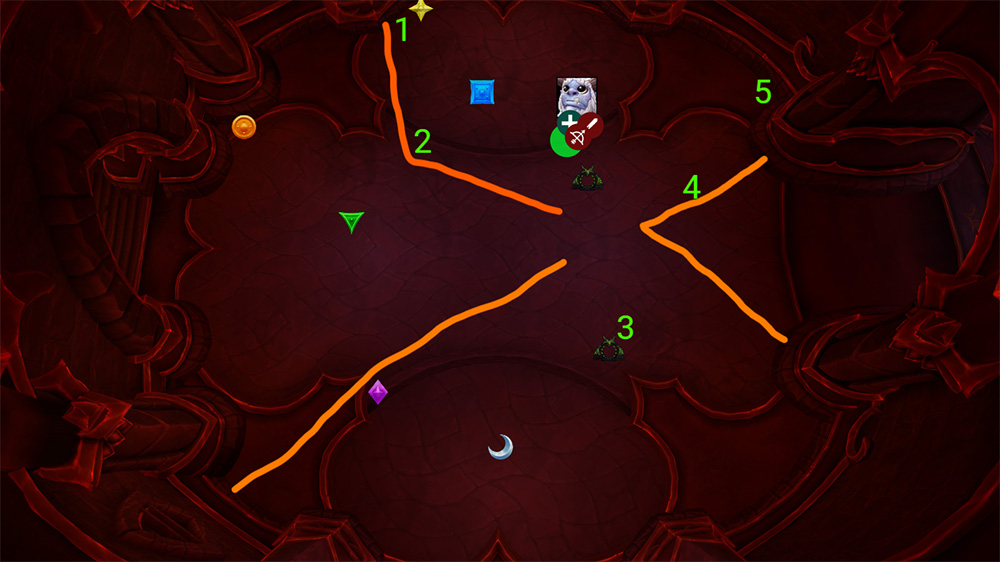
Volcanic Heart (3)
This set is more unique, because you will have players 1, 2 and 3 go through the wall.
- Players 1 and 2 will assume the mid positions
- Player 3 will run all the way to the back
- Player 4 goes along the wall, in front of the raid
- Player 5 goes along the wall, behind the raid
Note: Depending on your raid composition, if number 3 is often assigned to a slow class (like Priest), then it's worth swapping number 2 and 3 on this set. Meaning player 2 will go far, and player 3 will take the number 2 spot.
Volcanic Heart (4)
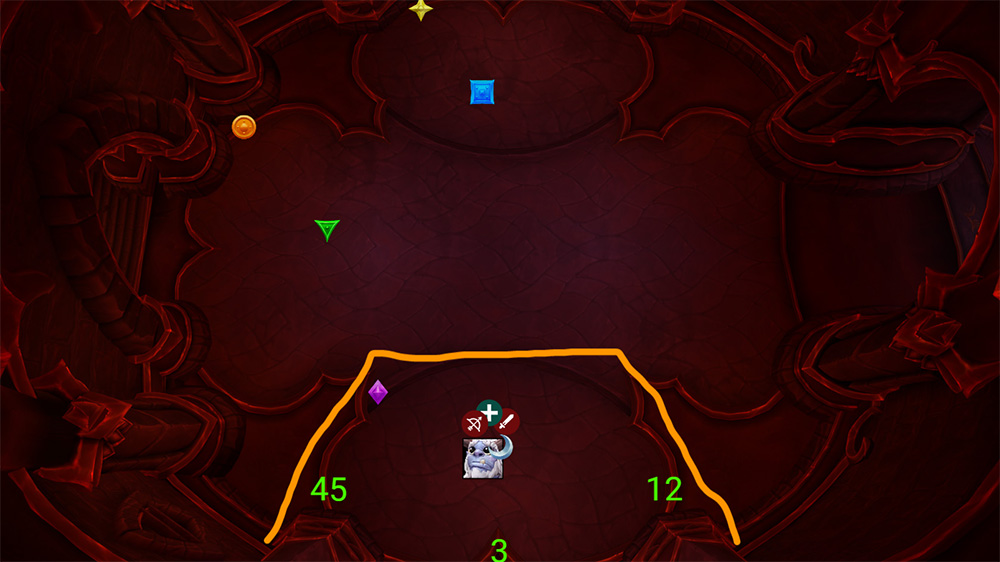
This is your first double stack set. Here, you will need to use strong personals, externals and immunities. The Double stack set’s will always be very similar, but there is some RNG to it.
In general, if you have players die here, you will have them die again at the end of Phase 2, when you are doing 2x double stack. So make sure that you have a set approach to this.
Players who are double stacking should always use every personal/immunity at their disposal. All immunities used here will be back for the Phase 2 double-stacking at the end.
- Players 1 and 2 should stack on the left side (using personals/Immunes)
- Player 3 is solo in the middle, and doesn’t need a personal/immunity
- Players 4 and 5 should stack on the right side (using personals/Immunes)
Fissure (4)
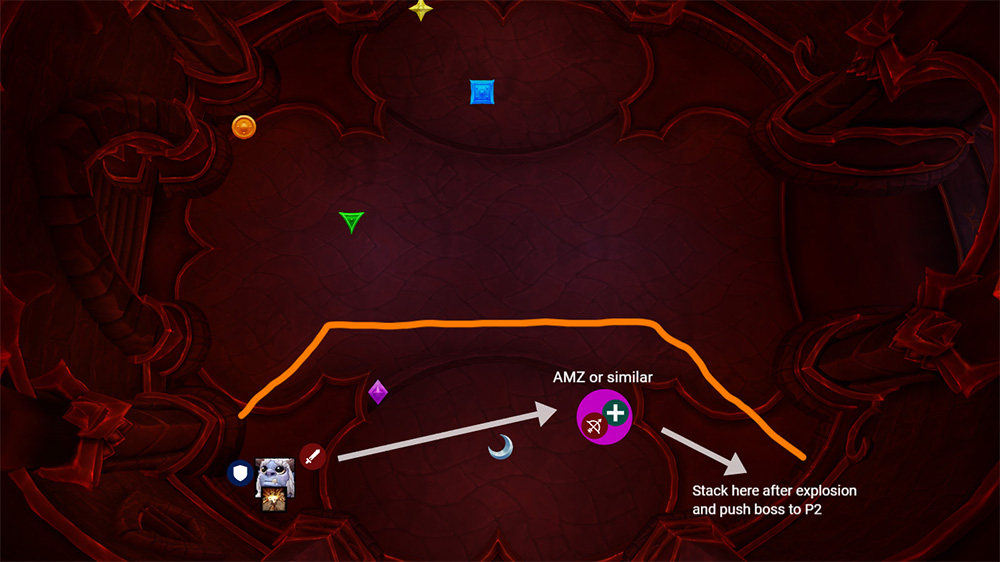
If you are not using Hero on Pull, you will get the 4th Fissure cast. This Fissure does a lot of damage, so make sure you have any form of damage reduction saved up for it. Barrier-Type of spells are crazy good here.
The entire raid should stack on the edge of the Fissure for the initial hit, then everyone moves to the corner of the room because fire will be creeping up towards you. The boss should be very low at this point, so you're going to push him into Phase 2 pretty quickly.
Phase 2
You will be dealing with 3 sets of Corruption in this phase.
Players targeted by it should simply stay in the raid and a call should be made to stop AoE/cleave abilities. If you know you are getting corrupted, make sure to save up on resources so you can instantly use it on the Void add; in general, the add gets broken in around 3 seconds.
What’s more important though, is that the corrupted players themselves do not use AoE/cleave spells, especially DoTs that spread to multiple targets. A Balance druid using Sunfire for example, this will affect a bunch of players with the DoT, and you will need priest Mass Dispel to remove all of them.
As for the Void add, once the shield is broken, my recommendation is that you fully swap to it early into your progress. The Void add not dying before you have to move will result in a wipe, and your goal at the start should be progressing through each section of Phase 2 properly. Once you can hit Phase 3, you can then easily swap damage to the boss and see how much you can get away with on the Void add.
Volcanic Heart (1 + 2)
The first 2 sets of Volcanics in Phase 2 are exactly the same. Now while this might look easy, somehow this ends up being the 2 set’s you will have the most deaths on. The reason for it is the extra small safe spot that players need to find and be fast to move into. It will mostly be around the same spot that I marked with the green circle, but it takes a while for it to show up (until all volcanic hearts are in position) and by then, some players might just be too slow to get there.
My biggest tip for those 2 sets is that you hug the bottom circles as soon as possible (4 and 2), as they have shorter travel time to their spot and will be in place faster. If you are standing on the edge of those circles, you will be in the safe spot almost instantly when it forms (unless one of the volcanic hearts is not positioned correctly).
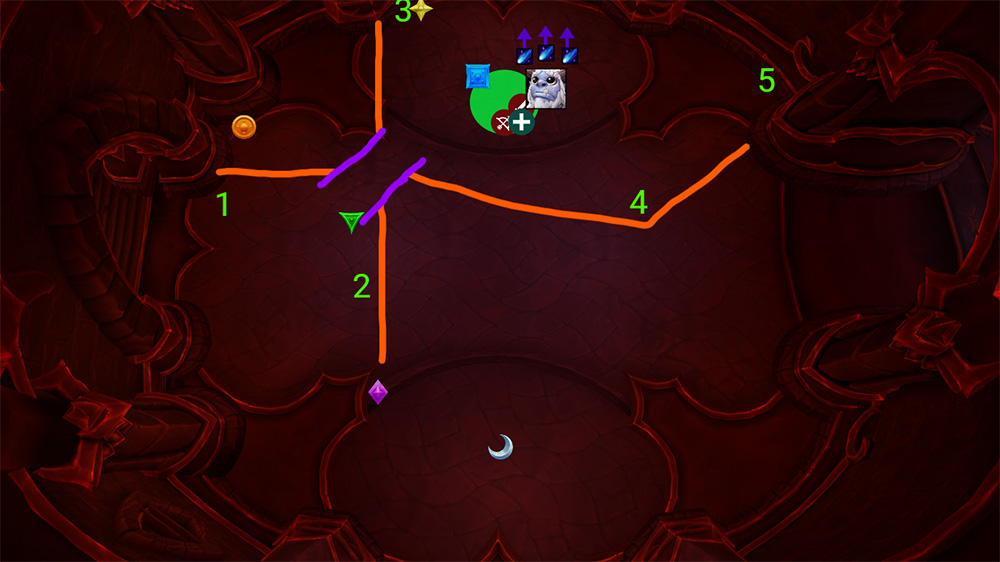
Volcanic Heart (3) Gateway
Instantly after Volcanic 2, several things will happen, pretty much at the same time:
- Tank will create a large gap at the cross point of the walls, resulting in extra ticking damage to the entire raid.
- 3 Players will get targeted by corruption
- Players will get targeted by Volcanic
- Annihilation (2) will happen shortly after
Tanks will move the boss instantly after Shadow Strike to the other room, holding the boss very close to the Warlock gate.
The 3 Players Affected by corruption should just instantly run to the next room, to hit the add as soon as possible.
Melees just run with the boss so you can dps and you know that melees mostly get chosen to go to Number 5, so you will be there just in time.
Ranged players are the tricky part here, but here are some extra tips to minimise errors:
- Players that are usually Number 1 or 2 will never get Number 3, they can instantly take the gate, even before Volcanic Heart cast
- Players that have never had Number 3 before, usually the ranged ones at the end of the WA list, can also take the gate instantly
- Everyone else has to wait for Volcanic cast
Once Volcanic is out, the player with Number 3 stays behind and gets close to the room, just so they are not clipping the raid or Number 4.
Number 4 goes to the right side wall, but stands almost in the middle of the wall, as close as possible to Number 5 without clipping.
Healer Note: This is a very spicy point of Phase 2, mainly because you have the wall DoTs ticking, everyone moving and you will have the second Annihilation hit at the same time as Volcanics explode. This means extra raid damage, plus deluxe extra damage on players affected by Volcanics.
Volcanic Heart (4)
This is one of the easiest Volcanics, here you have 2 large (large compared to set 1 and 2 standards) safe spots, and is only followed by the 3rd Annihilation cast. This one does hurt more, but mostly everyone is healthy around this point.
Volcanic Heart (5)
This set is also one of the easier ones, because the safe spot is basically a road towards the gap. However, you do get Rushing Darkness happening at the exact same time, but this is not problematic, as they have plenty of space to place them in front of the boss like they always do.
- Players 1 and 2 are going out here, and staying there after volcanic
- Player 3 is now going to Yellow Marker
- Player 4 goes to the standard spot
- Player 5 goes to the standard spot, BUT, if a slow player is selected (priest for example) you will need to grip/rescue them, or give them an external, such as Tiger’s Lust. This is because the entire raid will be moving to the last section, and if the priest stays behind by being too slow, they will get walled off.
Volcanic Heart (6+7)
Double stacking is back!
On these, you will have to deal with 2 sets of double-stack and the 4th Annihilation, which does very substantial damage. At this point, you want to invest whatever is possible to save the players who are double stacking, but you need to make peace with the fact that some of them will simply die. Having to use Combat Ress here is pretty much part of the fight.
Your aim is to push the boss into Phase 3 before the 3rd set of Volcanic in this room. The boss will start Phase 3 once the Void add is defeated, so you can stop DPS on the add for a bit and juice out extra damage on the boss.
Phase 3
1st Portals boss position
Start Phase 3 by placing the boss between the Green marker and the Wall, once they spawn.
There is not much to Phase 3 in terms of mechanical gameplay, it is:
- Burn the boss
- Place Rushing Darknesses in front of the boss, so that no Walls are broken
- Kill adds
- Players move into their assigned portal at the last second before the hit (deals a lot of damage and prevents you from doing damage if you’re just chilling inside of them)
You should use Hero/Lust after the first set of Portals
Make sure to set up the BDG WA for Portals, or make your own strategy around it.
Below is an approximate 1st Portal layout (these are not fully accurate, like 1-2 spots are wrong, but the BDG WA is up-to-date, so use this only to have an example image of how it looks).

2nd Portals boss position and Portals

3rd Portals boss position and Portals