Raid Setup
Introduction
Fight Style: Single Target Fight
Recommended Setup: 2 Tanks / 4 Healers / 14+ DPS
Hero/Lust: At a lower raid item level, use at 30%, otherwise on pull
Easy Mode
- Tank the boss in the middle of the room
- Place Dread Rifts to the sides
- Kite the laser into the Dread Rifts without hitting any puddle on the ground with it
- Dodge Breath (Hellbeam)
- Don’t get knocked into a puddle or off the edge
- Save personal defensives / Raid Healing cooldowns for sub 30%
Mechanics
The laser needs to be kited into a Dread Rift puddle to remove them, just like on Heroic. However, on Mythic, each time your laser touches a leftover puddle on the ground (trails from the laser or disarmed Dread Rift puddles) you will inflict 100k damage per second to the entire raid.
Your goal is to kite the laser so it never touches anything other than the active Dread Rift puddle.
Strategy
This fight is significantly harder than the Heroic version. The boss has a lot of health, making it a fairly long encounter for the first boss of the raid. The fight will last roughly 6 minutes.
It's important not to underestimate the sub 30% phase, as the raid wide damage ramps up heavily there. This is why we recommend using hero/lust around the 4 minute mark, when the boss should be close to 30% health and you will have most of your DPS cooldowns available.
Positioning
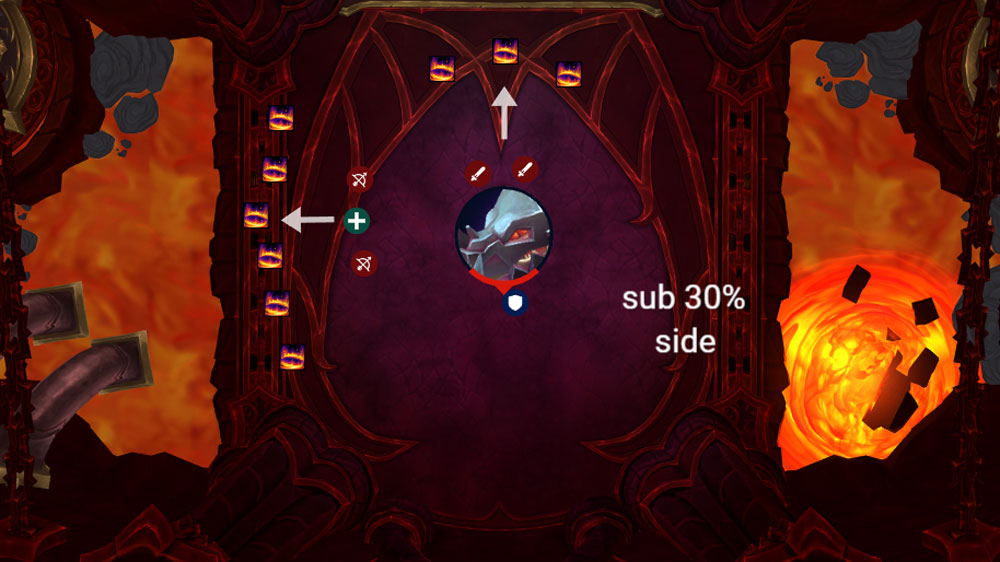
Pull the boss to the middle of the room and keep him there for the entire fight.
All melee players should stand behind the boss, loosely spread by a few yards.
All ranged players should stand on the side of the boss, at max range towards the edge of the room.
The boss will always do the same combo:
- Dread Rift
- Knock-back
- Laser
- Breath
When dread rift players are selected, ranged should place them close to the edge, preferably in a line next to each other, and melees should do the same, but behind the boss.
An important rule here for both groups, is that you never try to fill in the gaps or place the new dread rift behind a puddle. Doing this makes kiting the laser much harder.
Just after you drop the Dread Rifts, the boss will do a knock-back. It's not a very big knock, so just make sure you are not standing very close to the edge of the room, or in front of a puddle (you will take unnecessary damage by getting knocked into a puddle).
After the knock, several players will get marked by a laser.
Melees should prioritise clearing the Dread Rifts on their side and Range players should prioritise theirs.
Due to RNG, you can sometimes get, for example, 1 melee puddle, but 2 melee lasers. In that case, one of the melees has to kite their laser to the range side puddle to clear.
The most important rule about lasers is to take your time and play it safe. Better to kite a laser longer, and doing some crazy parkour route, than kiting it over a puddle and kill several players because of the raid wide damage.
A few seconds after the lasers start moving, the boss will target a random player with a Breath ability. Just dodge this.
This basically repeats until the boss dies.
As the fight progresses, the space will become limited and damage will ramp up heavily.
If done properly, the opposite side of the boss should be clean. At any point between 30-50% you can have your raid swap sides, which will basically reset the fight in terms of laser kiting difficulty.
Healers need to make sure to have their strongest raid cooldowns are ready for sub 30% boss health. Raid wide damage at that point is pretty high, and having someone hit a puddle with the laser at that point will most certainly lead to a wipe, unless strong CDs are used.