Raid Setup
Introduction
Recommended Setup: 2 Tanks / 4 Healers / 14 DPS
Useful Utilities: Speed Boosts (Druid, Shaman) and Gateway (Warlock)
Easy Mode
Phase 1:
- Split the raid into 2 groups, with an even number of players in each
- Reset your stacks after tanks swap the bosses in Phase 1
- Reset your stacks after Shadow and Flame cast in Phase 2
Krozgoth Group:
- Dodge Shadow / Fire projectiles
- Move away from Coalescing Void to reduce damage taken
- Drop Umbral Detonation puddles to the side
Moltannia Group:
- Soak Fiery Meteor
- Soak Molten Eruption
- Dodge Swirling Flame
Molgoth (Phase 2):
- Use Hero/Lust here when your cooldowns are ready
- Spread for Shadow and Flame cast
- Everyone Soaks the meteor
- Use Speed boosts/Gateway to run away from the large swirl after the meteor soak
- Soak Convergent Eruption circles
- Dodge swirls and boss frontal
Mechanics
If players affected by different debuffs (Fire/Shadow) collide with each other, they will trigger an explosion dealing approximately 100k damage in a 5 yard radius, which clears all the stacks from them.
This is the core mechanic of this mythic encounter and forces you to constantly reset your stacks before it becomes unhealable.
Phase 1
Split the raid into 2 groups and make sure each group has an even number of players.
- Melees should be on the Fire boss
- Ranged should be on the Shadow boss
Multi-dotters like Warlocks, Shadow Priest and Balance druids can stand in the middle of the room. But you need to make sure they are in pairs, so they can reset the stacks themselves.
If you have a tank with an immunity, have them start on the shadow boss, otherwise assign a healer with a strong external to that side, in order to skip soaking meteor on the ranged side of the room.

Now that you have your setup, you are essentially playing the Heroic version of the fight with an additional mechanic that requires your players to collide with each other in order to reset the stacks (Terros style). To do so, you need to collide with a player that has the opposite debuff (Fire/Shadow), but instead of running to the other side of the room, you will simply perform a boss swap and get both of the debuffs, making it possible for each side to reset the debuff by themselves.
Have your Tanks perform a boss swap each time Coalescing Void / Fiery Meteor have been cast. Both abilities happen at the same time, so it's pretty simple to hit the timing.
When the swap is complete, collide with a random player on your side, but try not to be stacked with others as it deals AoE damage each time you clear.
We suggest using personal defensives each time you go for a stack reset.
Note: The middle group has to reset their stacks much more frequently and not during a boss swap (deals increased damage).
Repeat this process until one of the bosses hits 50%, but try to push them both to 50% roughly at the same time. This will summon the last boss with a lower health percentage.
Phase 2
Place 2 world makers, and pull the boss to one of them, facing him towards the wall.
Warlocks should place a gateway between the 2 world makers.
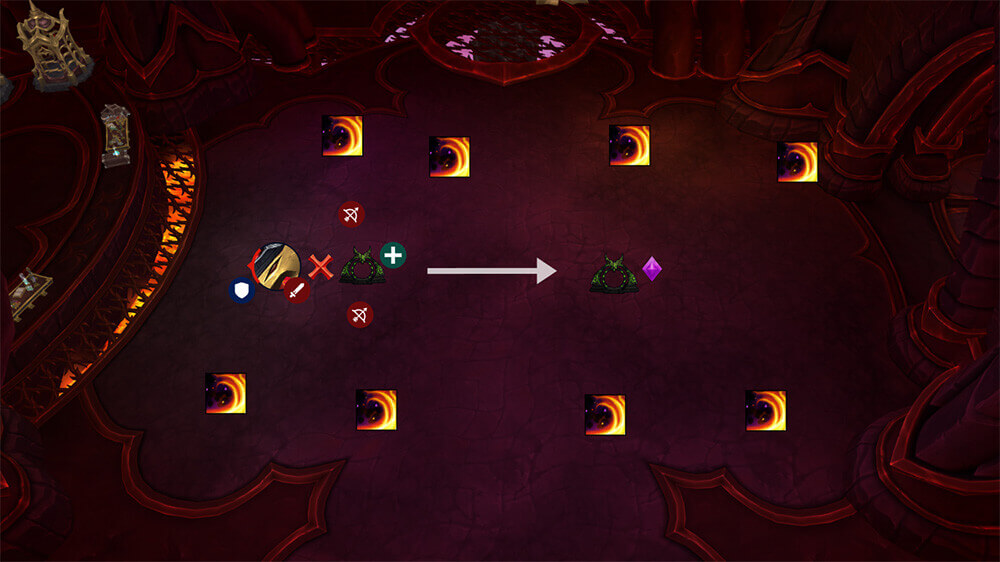
Everyone should loosely spread behind the boss.
The boss will use most of his abilities in quick succession, making it pretty hectic at times.
Several players will get the Blistering Twilight circle, they need to move far away, as it leaves a puddle and spawns a bunch of tornadoes that need to be dodged. At the same time, the boss will use his Mythic ability, Shadow and Flame. This ability does massive damage upon application, so make sure you are not standing next to anyone. After it's been cast, you will also get Convergent Eruption, those are the circles that need to be soaked.
You should aim to reset your stacks shortly after Shadow and Flame has been cast. This is mainly because you will soon get a Meteor soak that needs to be soaked by pretty much your entire raid; if you don’t reset stacks before the soak, you will be forced to stack up in the meteor soak and essentially trigger a reset, which will then deal massive damage and wipe the raid.
So after the Shadow and Flame debuff application, run to the nearest player with the opposite debuff and reset.
Once the Meteor soak ability (Gloom Conflagration) is used, have everyone soak it, then take the Warlock Gateway to move away from the large swirl zone, and move the boss to the other side of the room.
Repeat this process until the boss is dead, but be careful with increasing raid damage taken, and keep in mind you can only use the warlock gateway for every other swap. So, use Gateway > Speed Boost > Gateway.