Raid Setup
Introduction
Fight Style: Single-Target / Cleave
Recommended Setup: 2 Tanks / 4 Healers / 14 DPS
Useful Utilities: Speed-Boosts (Shaman/Druid), Knockbacks (Monk, Hunter, Evoker, Druid, Shaman), Spellward (Paladin), Gateway (Warlock), Ankh-Totem (Shaman), Mass Dispel (Priest)
Mechanics
Each time a player goes into the Cosmic realm, they create a void circle on the ground; players walking into it will just fall through the map and die. The circles stay up for 3 minutes.
Each time a player goes into the Cosmic realm, a DoT is applied to the entire raid, dealing damage for a few seconds. This stacks.
On Mythic difficulty, everyone has 2 types of debuffs (Fire and Void). In order to remove both, players need to get hit once by Mass Disintegrate and once by the Fire breath.
Strategy
Update: This fight received a heavy nerf recently to damage taken in all 3 phases! The Strategy still stays the same, but everything will feel much more forgiving, especially in Phase 3.
As usual for an end boss, this is a very mechanically demanding fight that requires your raid to do big numbers in both healing and damage in order to defeat the boss.
Note: There are currently 2 popular strategies that only differ in Phase 3 of the fight.
Liquid and Echo Strat
This guide will be based on the Liquid strat, as we feel it's much better in the current state of the boss. It has a lower damage requirement by approx 5% and will allow you to kill the boss pretty fast once you learn Phase 3. The Echo strategy on the other hand, is ‘simpler’ in execution, but forces your raid to maximise your damage dealing potential throughout the fight.
If there is a nerf to boss health in the near future, then we recommend using Echo strategy instead.
We suggest using the Liquid WeakAura package, because it has all the necessary things you will need for this fight (don't forget the Liquid Anchors WA).
Phase 1
Healer note: This phase is a major healing check. Losing people in Phase 1 is something that will happen throughout progress and sometimes can't be prevented, even if everyone played correctly.
Breath + Lasers Soak Assignments:
- 1st Breath: Healers can use this breath so they can focus on healing the second breath, one tank getting hit by this one is also good.
- Disintegrate 1:Assign 1 tank and 3-4 Melees to soak this one.
- 2nd Breath: Everyone who didn't soak 1st breath. Use Dwarf racial and Mass Dispels to remove the DoT after.
- Disintegrate 2: Nobody.
- 3rd Breath: Last chance for players to remove fire debuff if they missed the first two breaths.
- Disintegrate 3: Nobody.
- Disintegrate 4: Everyone with debuff.
Baiting Assignments:
The Melee team will have to bait a total of 3 Breaths in Phase 1.
- 1st Breath: Bait away from the ranged stack, so basically towards the middle of the room
- 2nd Breath: Bait towards the ranged stack on blue, because everyone is resetting Fire stacks here
- 3rd Breath: Bait away from the ranged stack, so basically towards the middle of the room
Everyone can be a Mass Disintegrate target, so everyone has to follow this one:
- Disintegrate 1: Away from the ranged stack and do not get hit by the breath because it happens at the same time, unless you want to/assigned
- Disintegrate 2: Away from the ranged stack
- Disintegrate 3: Away from the ranged stack
- Disintegrate 4: 1 Laser towards the ranged stack. Very important to not stack the arrows here and position yourself quickly because almost everyone is soaking this one. Have one person call out ‘I'm staying’ so the other one moves away. In some situations where you have 1 ranged player and 1 melee player selected as Laser targets, it's much simpler because the ranged will always just stay.
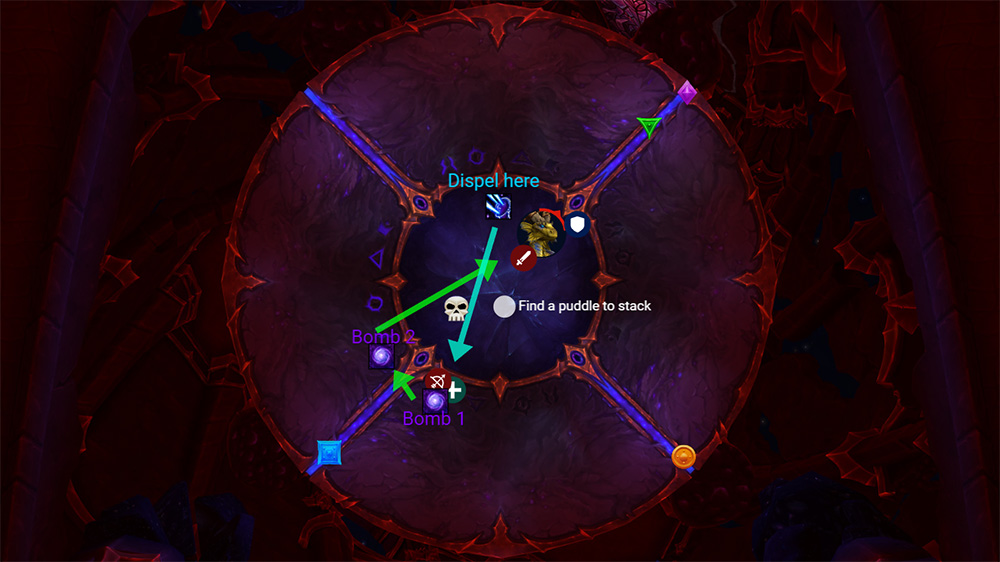
Positioning
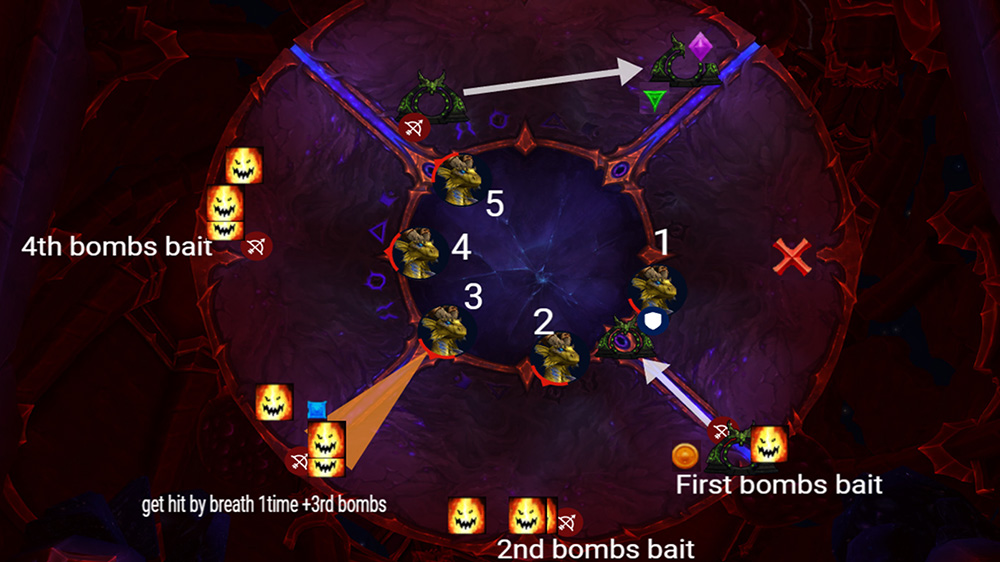
Place the markers like in the picture, and have your entire range team stack up on the edge of the map on Orange. As soon as you pull the boss, the ranged team will bait the bombs on top of them. Wait until both bombs are baited (the WA will show you the bomb cast bar) and instantly take the warlock gate when the 2nd bomb is baited.
Everyone will end up in melee and you will be taking heavy damage from Glittering Surge. Afterwards, the knockback happens.
Ranged will need to get into the bomb bait position, while melees are baiting the first Searing Breath away from Ranged.
Just after the 2nd bomb spawns, ranged will move close to Blue marker and be ready to take the Breath hit on the entire team. Melees need to bait this one towards the blue marker.
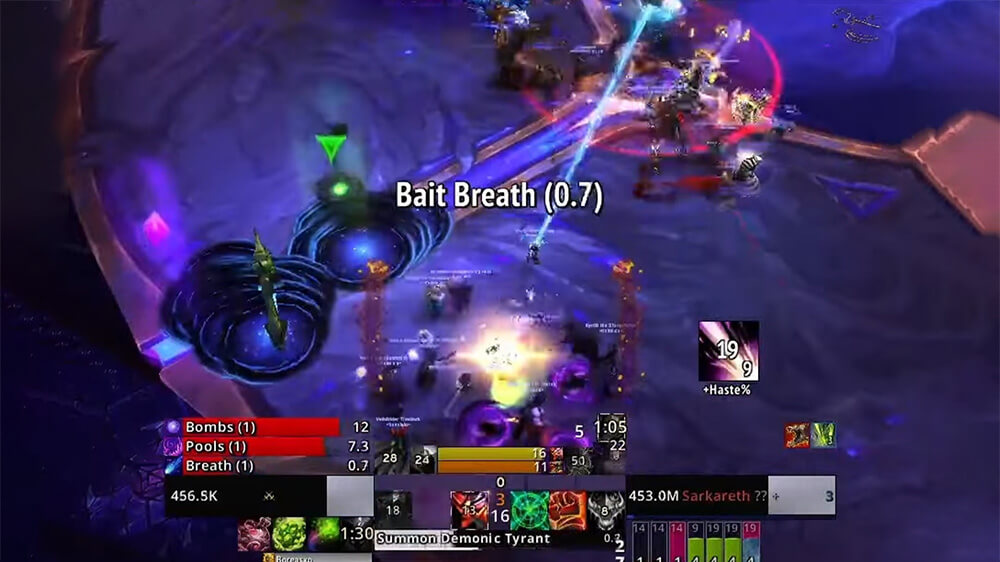
Once baited, and you see the breath animation, everyone should position themselves on the edge of the breath so you can escape instantly after it hits. This will reduce the stacks you gain from the breath. If you are standing in the middle of the breath, and you start moving as it hits, you will exit the breath with 2-3 stacks which is just unnecessary raid damage.
Afterwards, you get another set of lasers and the Ranged team has about 7 seconds to get into position for the 3rd bomb bait. Bomb 4 and the 3rd Lasers have nothing special going on, but after the 4th Bomb, the raid needs to prepare for the 4th Lasers cast which is arguably the hardest point of Phase 1.
Have all ranged stack up, and wait for Lasers. When players are selected, have one Laser target the ranged stack, and the other one just move to the side. Mages will be using Ice Block here, so it's super important to not make last second adjustments, because they can’t move in Ice Block, so will be missed by the lasers.
Make sure you are dodging all swirls around here, because getting hit by one will very likely result in death. Once the swirls are gone, stack up in melee and wait for the Glittering surge cast to finish. When it does, take the gateway towards Purple.
Once there, make sure everyone is stacked tightly together towards the edge of the room because everyone will spawn 1 void puddle, so you want to keep them as stacked as possible.
Important note about Dimensional Punctures (void puddles)
This ability is often not treated properly, in the sense that most players do not care about stacking them properly; you will see a lot of random puddles happen around Purple/Green marker drop off spots and most will think it's not a big deal. Considering this is on average a 100 pull boss, trust me when I say you will save yourself a significant amount of combat reses and frustration if your players simply do their best to stack them up properly.
The reason being that the circle that you use to get out of the Cosmic Realm, could simply spawn in the worst possible position and become unreachable/unusable. From experience, this happens more often than you can imagine.
Intermission 1
At the start of the intermission, you will have a few seconds to pick up the first buffs, but you will have to go back to the green marker before the Drop Void Bomb timer hits 0. You want to place the puddles as close as possible to the other puddles.
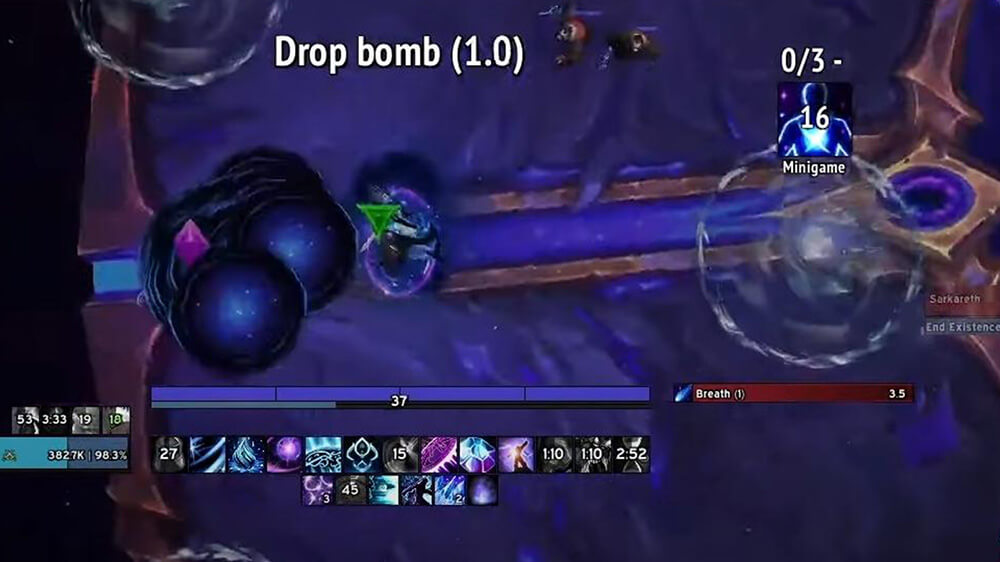
Afterwards, you want to keep collecting until you get 10 stacks. You need to leave the Cosmic Realm before your time runs out, but generally just look at the End Existence boss cast and leave when there is like 2 seconds remaining. The goal is to interrupt the boss cast at around 1 second left.
TIP: The last circle you take to get out of Cosmic realm, make sure it has a buff thingy very close by, this way you can pick up that buff just before you leave the realm which will extend your buff. Meaning you will come out and have the full duration of the haste buff.
Phase 2
This phase is rather simple in execution, but has some elements that can cause some frustrating wipes.
Add CC
- 1st set: Shaman + DH stun
- 2nd set: Shaman + DH stun with Ring if needed
- 3rd set: Shaman + DH stun with Ring + Vortex if needed
Interrupts
Note: This is just an example note assignment that works, you can do your own if you prefer
intstart
npc:202969
spell:411302
{skull} Shaman, Dh, Rogue, Warrior
{skull} Mage1, Mage2, Monk, Dk
npc:202971
spell:404754
{square} Shaman, Dh
{square} Warrior, Mage 1
{cross} Monk, Evoker
{cross} DK, Mage 2
{skull} Rogue
{skull} Range, Melee (unassigned players)
Intend
Bomb Soakers
- 1st Bombs: Healer + Healer
- 2nd Bombs: Warlocks or 3 min cooldown DPS spec
Additional Cosmic users
We suggest sending your mages downstairs after the healers come out. They do not have any bombs to pick up, they simply go down using the puddle to get the haste buff.
Unholy Death Knights should also go down around the 2:30 mark because they will come out with the buff just as their strongest cooldowns are ready.
Movement in Phase 2

It looks way more complicated than it is, so relax.
The raid will exit the Cosmic Realm after intermission, around the Green/Purple markers.
All Melees will always bait to the side of the boss or towards the middle of the room, just never towards the Ranged group, as this makes it a bit awkward.
Ranged players need to all run to the right of Purple as soon as they come out to bait the first breath, having the 1st Breath baited correctly is already the ‘hardest’ part of Phase 2.
Example:
Once baited, move next to it and wait there for the 1st bombs. They happen roughly 10 seconds afterwards.
Once the timer hits 0, everyone should start moving to the right and not stop until both bombs are down. The reason for this is that when bombs drop down, they do a small AoE around them. If people stand too close, they will receive a stack of Oblivion, which is unnecessary raid damage. This movement is important to learn, since you will have to do it again in Phase 3, which is far more punishing if done incorrectly.
After the assigned players have picked up their bombs. Your raid unit should stay stacked and wait for Infinite duress 1.
Infinite duress 1
This one you want to do as fast as possible. This is because it comes just before the tank hit, in some scenarios (if dispelled late) it might knock everyone and the tank towards the same side, which would then leave no time for the tank to move out with the tank ability, resulting in them hitting the entire melee stack.
So whoever gets targeted by Duress, go behind the Ranged stack and dispel. The Raid Leader should count down from 3, so players that can prevent knockbacks can get ready, as it's a damage gain to have more uptime on the boss.
Breath 2
Breath 2 happens a few seconds after the duress dispel. For this, your entire range team should cuddle up close to the previous Breath puddle and bait there.
Example:

Once baited, you will have the 2nd Infinite Duress cast happen roughly 10 seconds later.
Infinite Duress 2
You want your warlock to place a gateway towards the safe side. Whoever gets the Duress, needs to quickly move behind the range unit, and knock them in the direction of the gateway path. Once knocked, the players flying will take the front gateway to instantly teleport back and bait the 2nd Bombs + 3rd Breath combo.
Example:
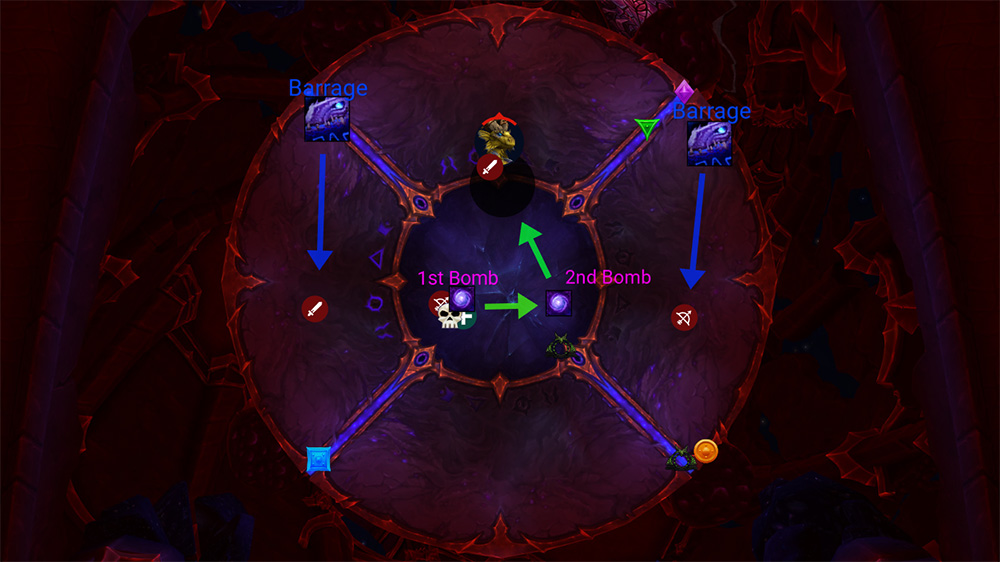
So, once the Bomb timer hits 0, do the same movement as the 1st set. The only difference here is that you will get a Breath bait at the same time. This is not a problem, and does not need to be perfectly placed, as long as nobody runs ahead too much and baits the breath somewhere in Goldshire. Shortly after, you will get the last Infinite Duress.
Infinite Duress 3
For this one, you want to delay it for a while, because you are in the process of killing the last set of adds and damaging the boss before he flies away. If you dispel too early, you might lose valuable uptime on the adds and the boss. I suggest that you dispel at around 5 seconds remaining on the Stage 3 timer.
Cosmic Realm
And now comes the weirdest and most annoying part of Phase 2. Getting the entire raid to enter the Cosmic realm (except one tank who stays up).
Have your entire raid stack up at one of the crossing points of Desolate Blossoms, because moving into a crossing point will give you the stacks faster, making it easier to go down.
Wait for the timer to hit 0 and everyone needs to move forward without using any additional movement speed abilities.
Example:
Now the camera shaking and the side-to-side movement is not because the player is a devoted PVP player. It’s stutter stepping, in order to slow down the movement slightly.
The reason why you need/should do it is because you want to stack up the Void circles as close as possible.
If for example, 1 player rushes ahead while everyone else is stutter-stepping, there is a good chance the player creates a Void Puddle that everyone runs into and falls down. There is a small grace period in which you can't fall down initially, but the further ahead the player runs the less of a grace period you will have available. The golden rule is to stay stacked and don't panic.
Once inside, collect the buffs until the Cosmic Ascension cast is done and come out as fast as possible after Phase 3 begins.
Remember: One Tank has to stay out with BoP.
Phase 3
Bomb Soakers:
- 1st Bombs: Mage + Mage (or 2 min class)
- 2nd Bombs: Warlocks + Warlock (or 3 min class)
- 3rd Bombs: Mage + Mage (or 2 min class)
Black Holes:
- 1st Black Hole: Soaked by everyone in melee behind the boss
- 2nd Black Hole: Soaked by everyone at Orange marker after the gateway
- 3rd Black Hole: Immune, Spellward, Sacrifice Solo at Orange marker to clear the rocks
- 4th Black Hole: Immune, Spellward, Sacrifice Solo away from the raid in a random spot
- 5th Black Hole: Soaked by everyone in melee behind the boss
Note: The black hole will always prioritise the player with the lowest amount of Oblivion stacks, this is something that is not as relevant for first 3 Black Holes, but you can predict the 4th one; it will mostly go on one of the players that went down with the 2nd set of bombs, because they come out with 0 stacks. This is only relevant to know in order to set up combat reses or potential leftover spellwards.
The opener of Phase 3 starts instantly with essentially every ability that you will get this phase.
Ranged players will have to bait the 1st set of Bombs (2 bombs), then join melees behind the boss to help soak the Black hole.
At the same time, you will have 2 players targeted by Hurtling Barrage. This can often overlap with the Bomb soakers, so if the player who is supposed to pick up the 1st bomb also gets the 1st Barrage, they will need a backup (player who is supposed to pick up the 2nd bomb takes theirs instead).
This entire sequence ends with hiding behind the boss in the safe spot/line for Scouring Eternity, also just known and called as Hide.
The Opener Sequence
Whoever is targeted by the Black hole needs to play this entire sequence as if they are not affected by it, because it does not change anything for them.
- If it's a melee, they just need to stay behind the boss and wait for players to help soak.
- If it's a ranged player, they will simply bait the 2 bombs first, then run into melee with everyone.
The 2 players picking up the first set of bombs should look to go into the cosmic realm around the Green/Purple area, if possible, to put all the Void puddles in that location.
Hide 1
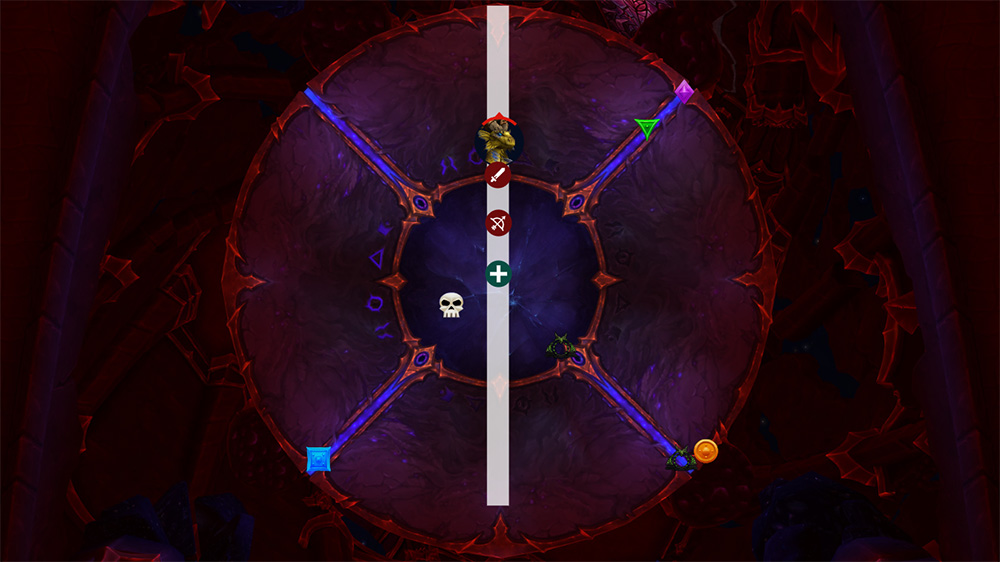
There is nothing special about the Hide mechanics, just make sure you do not get hit by puddles while standing inside in the safe spaces.
The Dispel + Gateway + Black Hole Sequence
Just after the hide, the entire raid should stack up at the gate, with the 2x Infinite Duress targets just behind them.
Make sure to dodge all the puddles, use some zone damage reductions and personals just before the dispel.
The priest who is mass dispeling should simply start the cast when the massive circle from Cosmic Ascension spawns.
It is helpful that players use a Mass Dispel WA like: https://wago.io/8cxt53LLi.
Basically, all players should be safe to take the gate once they see the Mass Dispel cast, but the 2 players who have the Infinite Duress need to wait until exactly at the end of the cast to take the gateway.
Once you’re at the orange marker, just wait out the Black hole and move to the side.
Bomb + Black Hole + Hide Sequence
This is a pretty simple sequence and there is not much happening apart from having to heal a lot, especially on the bomb carriers.
The range team will simply move out of the Black Hole after the Gateway soaks, and side step outside of it.
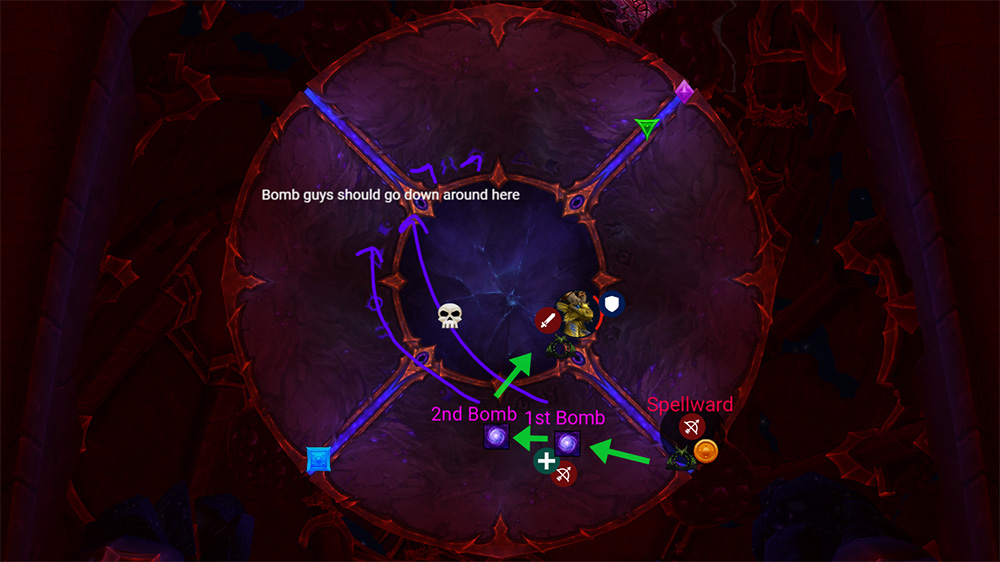
Wait for the bomb timer to hit 0, then start moving to the left, spawning the 2 bombs a few yards apart from each other.
Once down, every range should move close to the boss.
At the same time, 1 person will get another Black Hole, this one has to go to Orange marker to clear the Rocks, and should either use an Immunity, get Spellward or Sacrifice themselves.
There will be 2 barrages afterwards, so just move to the side with those, followed by another hide.
Dispel + Bombs + All go Down sequence!
This is the hardest point of the fight. However, it is not mechanically demanding, in fact the hardest part about it is keeping cool and not panicking.
Healers need to pay extra attention here, the entire raid has 5+ stacks of Oblivion so the damage taken is pretty wild. On top of that, you will have to keep the bomb carriers alive until the point you go down.
So after you finish Hide, you will have a player get Black Hole, at around the same time another player will get Infinite Duress. The player with the Black hole just goes somewhere to the side, preferably somewhere that is filled with Void ground already (the stuff that the rocks spawn).
You have 2 choices here if you have a CR:
- Res the player instantly so they spawn in the range team just before the dispel
- Res the player after the dispel + after both bombs have spawned
Doing anything else might create issues, spawning the bomb in melee for example will mostly result in a wipe.
Now the Infinite Duress player should go to the side and aim to knock players towards a clean side, which is usually around the Blue Marker. This has to go very fast, otherwise you risk spawning the bombs in the middle of the raid. Basically, the player that gets Duress, goes instantly to the side and 3-2-1 Dispel.
If done correctly, the first Bomb will spawn instantly as you land. You should just move to the Left, spawn the 2nd one and everyone goes back to the middle of the room.
You should have around 10 seconds remaining on the Cosmic Ascension timer at this point!
Pick a player who is calm and good mechanically and set a marker on them.
This player has only one objective; watch the Cosmic Ascension timer, and with 5 seconds remaining, pick a FRESHLY spawned puddle close to the raid and move there. The Entire raid should follow.
To understand what happens exactly and why 5 seconds:
- If you take a puddle earlier, let's say 8 seconds remaining on Cosmic Ascension, you will run out of time in the Cosmic Realm before it's safe to come out, resulting in a wipe.
- If you wait too long, you will have less time to collect the buffs while in the Cosmic Realm because you need to get out as soon as it’s safe.
1 Tank has to stay out, the best one for this task is a Death Knight! A DK will make this part much easier because they can just AMS the Infinite Duress cast and won’t get it.
If you can’t keep a tank that can immune the Infinite Duress cast, you have to make your Holy Paladin come out of the Cosmic Realm as soon as Cosmic Ascension is done (the black circle) and use bubble. That way, the Tank will get Infinite duress on them and the Paladin will instantly dispel it, after which everyone can come out.
Final Push
Once you are out of the Cosmic Realm it's a simple burn from this point.
Everyone has 0 stacks of Oblivion, meaning there is no raid damage happening.
You will instantly get the last Black Hole, you can soak this one in Melee because it's not worth sacrificing players and the damage taken is minimal.
One Hide, a Barrage afterwards and then the boss needs to die, otherwise you hit enrage.