Raid Setup
Introduction
Prepare yourselves for an epic encounter, as you are about to engage in a battle against one of the Scalecommanders of the Dracthyr - an adversary with a questionable sense of character customization. This three-phase fight will unleash a barrage of cosmic chaos, including meteors, black holes, and massive explosions. Brace yourselves as you are transported to a cosmic realm, where the rules of physics are defied, reminiscent of a fusion between the blockbuster movies Armageddon and Interstellar. In addition to these challenges, players must also vanquish several Null Glimmer enemies and masterfully navigate the battlefield to avoid being knocked off the platform - again.
Fight Style: Single-Target / Cleave
Recommended Setup: 2 Tanks / 4 - 5 Healers / 13+ DPS
Useful Utilities: Speed-Boosts (Shaman/Druid), Knockbacks (Monk, Hunter, Evoker, Druid, Shaman) and AoE-Stuns
Easy Mode
Phase 1
- Be stacked and move away from Scorching bombs together
- Use Mass Disintegrate to remove Oppressing Howl stacks before Glittering surge is used at the end of P1
- Dodge Searing Breath frontal
- Dodge small fire swirls
Phase 2
- Pick up Void bombs and stand in Desolate Blossom to get into the Spirit Realm
- Stay stacked at the boss to bait Desolate Blossom spawn on top of Null Glimmer adds
- Infinite Duress players stand behind the raid and knock them in a good direction
- Tank move away from the raid before the tank-debuff expires
Phase 3
- Pick up Void bombs and get hit by 2 Mote of Oblivion swirls to get into the Spirit Realm
- Tank should also get into the Spirit realm before their tank-debuff expires
- Dodge Cosmic Ascension together and dispel the player after it ends
- Try to hit as many Asteroids as possible with Embrace of Nothingness and help split the damage, or use an immunity to solo it
- Hide behind the Asteroids during the Scouring Eternity cast
- Move far away from the raid if targeted by Hurtling Barrage
Mechanics
Throughout the fight, getting hit by Void abilities will put a DoT on a player that deals low amounts of damage for 25 seconds, but stacks up.
Upon reaching 10 stacks, the player will enter a spirit phase (Emptiness Between Stars) where they need to collect ‘fragments of their mind’. If not collected in 20 seconds, the player dies.
This ability will be used to help deal with Void bomb in Phase 2 and Phase 3.
All players get affected by Oppressing Howl at the start of the fight. Your goal is to remove the debuff before the Glittering Surge cast, otherwise, the player will very likely die. Upon removal, it deals 28,626 Shadow Damage to all players.
You can remove Oppressing Howl with: Mass Disintegrate, Searing Breath, and Glittering Surge (but we don’t want to do that).
Inflicts 85,815 Arcane damage to all players every 1 second for 8 seconds. Kills players who are still affected by Oppressing Howl.
Several players spawn a fire bomb nearby, inflicting moderate damage to all players standing within 10 yards. After 12 seconds, the bombs will explode and each deal 61,307 Fire damage to all players instantly, and place a DoT on players.
Creates an image of himself that targets 2 players, after 6 sec the images shoot a laser towards a player inflicting 163,575 Arcane damage to all players hit by it and remove Oppresing Howl stack. Players hit also receive a slow and a small DoT for 5 sec.
It is a very similar ability to Sire Denathrius' Feeding time.
Assign several players per cast to soak the line to remove their Oppressing Howl stack.
Targets a random player with a frontal cone ability that is used 3x in a row and inflicts 98,145 Fire damage per hit and applies a small DoT that stacks. Removes Oppressing Howl.
Dodge this and use only as a last resort to remove Oppressing Howl.
Tank ability that does a heavy physical hit and applies a Fire DoT that ticks for 53,172 Fire damage every 1 second for 27 seconds. After expiring it will inflict 15% of the total Fire damage taken by the Tank to the entire raid.
Tank swap each hit and make sure to have active mitigation running during those 27 seconds to reduce raid wide damage.
Places several Void Bombs near players that inflict 98,145 Shadow damage to players within 12 yards every 1 second. All bombs explode (Void Surge) after 20 seconds, inflicting 114,503 Shadow damage to all players every 1 second for 4 seconds.
This effect is negated if the player picks up the bomb and is in the Spirit realm.
The idea is to have players soak the Bombs, then get pushed into the Spirit realm by gaining 10 stacks of Oblivion and explodes there.
Standing in Desolate Blossom circles will put you into the Spirit realm within 2 seconds.
Warning: Make sure to stay in the Spirit realm until the bombs explode.
Boss will do a fly-by ability just like Raszageth, but less spectacular and with a shorter distance, dealing moderate damage to players hit by it and creating a puddle that deals a small amount of damage to players standing within it.
It will also spawn Null Glimmer adds at the spot where the boss took off from.
This add will constantly heal itself with Rescind, restoring 4% of its maximum health every 1 second. Additionally, it will cast Blasting Scream that deals 163,575 Arcane damage to all players and interrupts spellcasting. This needs to be interrupted.
The self heal can be prevented by getting the adds to touch Desolate Blossom at least once.
2 circles will spawn near players that deal Void damage and apply an absorb to all players standing inside, removing Rescind from the Null Glimmer adds.
You should move the adds into one of these orbs, to prevent them from healing.
Note: Adds will spawn before the circles, if they are already standing inside of the swirl, stun them so they do not walk out before Desolate Blossom becomes active.
Players should avoid getting hit by it unless they need to get into the spirit realm with the bomb.
Applies a Shadow DoT to a target, it ticks for 57,253 Shadow Damage every 3 seconds for 30 seconds. This is dispellable.
If dispelled or expired, it will inflict 98,145 Shadow damage to all players and knock them away.
The player should simply stand behind the raid and knock them in a logical direction (not towards the edge or towards any harmful ground effects).
Each time the boss uses an ability, it will empower all his allies with 15% damage done and movement speed. At 5 stacks, they become immune to CC and interrupts.
Similar to the Phase 1 Tank ability, but now deals more damage and applies 25% healing reduction for 18 seconds. The DoT is now Shadow damage, and upon expiration will inflict 40% of the total Shadow Damage taken to all players within 20 yards.
The Tank should simply run away from the raid once this is about to expire.
Places several Void Bombs near players that inflict 98,145 Shadow damage to players within 12 yards every 1 second. All bombs explode (Void Surge) after 20 seconds, inflicting 114,503 Shadow damage to all players every 1 second for 4 seconds.
This effect is negated if the player picks up the bomb and is in the Spirit realm.
The idea is to have players soak the Bombs, then get pushed into the Spirit realm by gaining 10 stacks of Oblivion and explode there.
Standing in Mote swirls will put you into the Spirit realm after getting hit by 2 swirls.
Warning: Make sure to stay in the Spirit realm until the bombs explode.
Replaces the Fly-by ability from Phase 2. The boss will now fly up and crash into the ground, dealing 511,173 Shadow damage to all players within 30 yards and spawn Null Glimmer adds. Each time the boss flies up, it will increase all of his damage by 10%.
Additionally, it will spawn several Astral Formation asteroids that deal moderate shadow damage to all players nearby every 2 seconds. You will need the Asteroids to survive Scouring Eternity.
Similar to the Phase 1 Mass Disintegrate ability, it deals 163,575 Shadow damage to players stuck. In this phase, you will want to avoid getting hit by it, unless you are targeted.
It has a large hitbox, so the 2 players targeted by this should run out of the raid in a logical direction (not aiming at the raid).
Kills all players unless they are standing behind an Asteroid. When it explodes, it will trigger all Asteroids. This will deal a small amount of damage to players but ramps up if there are more Asteroids on the ground.
Targets one player, and after 8 seconds, the black hole will inflict 1.4 million shadow damage split evenly between players, and soak up all nearby Asteroids.
This is a simple stack up to split the damage type of ability, however, the player needs to hit as many Asteroids as possible with it while making sure at least one stays available to hide behind for another mechanic.
Same dispellable knockback as in Phase 2, however, you can use it to your advantage in Phase 3.
Check the strategy section for more information.
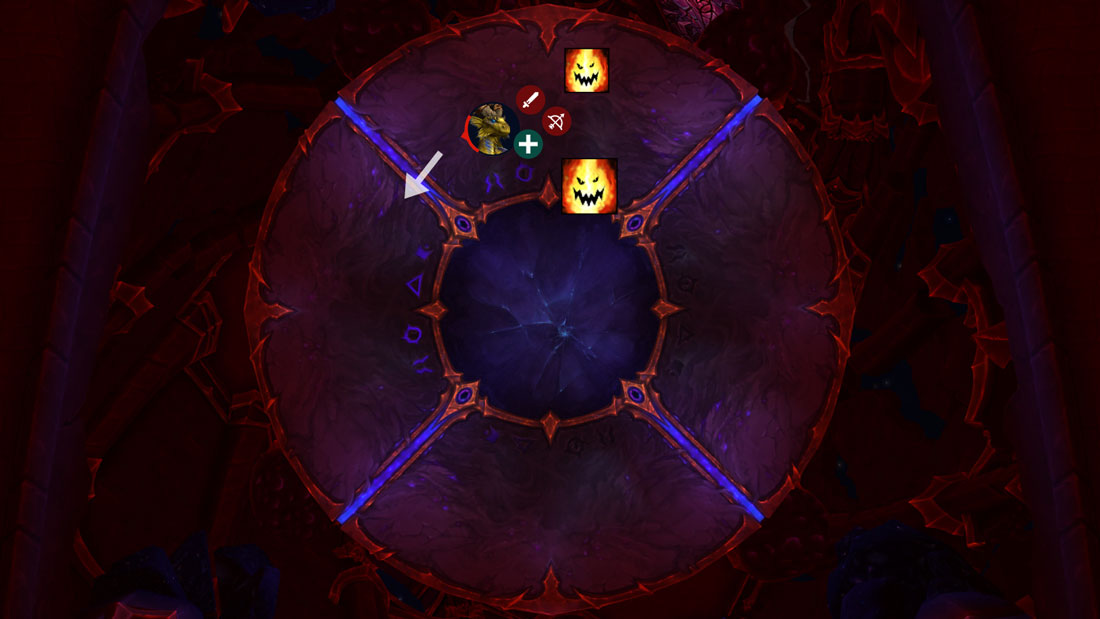
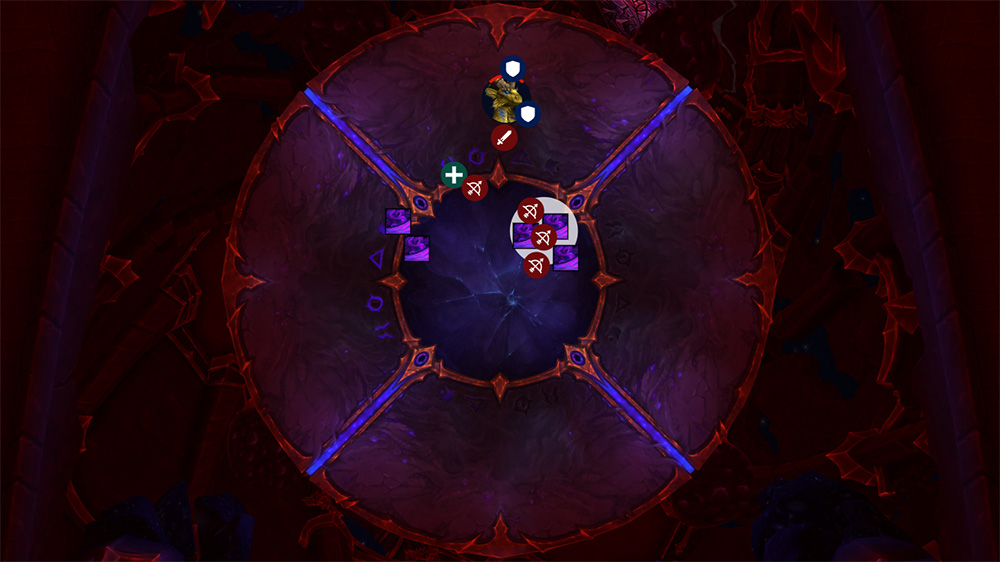
Phase 1
This phase comes down to removing Oppressing Howl stacks from everyone before the Glittering Surge cast.
You can remove the stacks with Mass Disintegrate and Searing Breath, but we suggest not using Searing Breath for this.
Players targeted by the Mass Disintegrate (Blue arrow) should split apart so players do not get hit by 2 beams at the same time. You take approximately 20k raid-wide damage per player hit; meaning you want around 6-8 players total per Mass Disintegrate cast to not create a large burst of damage on the raid. It doesn’t matter if all 5 use the same line or split up, as the player does not get reduced damage if players are intercepting the beam. There are 4 Mass Disintegrate casts, which is more than enough to remove stacks from all without doing risky plays.
The boss will target a random player and use the frontal 3 times in a row at the same spot, simply dodge this.
Apart from this, you should move aggressively from Scorching Bombs as they spawn. They deal AoE damage and leave a puddle once they explode (after 12 seconds). Players should be stacked most of the time to help healers. Dodge the small swirls.
Healers can use externals on the Tank with the tank debuff to reduce the damage on the raid.
Example positioning
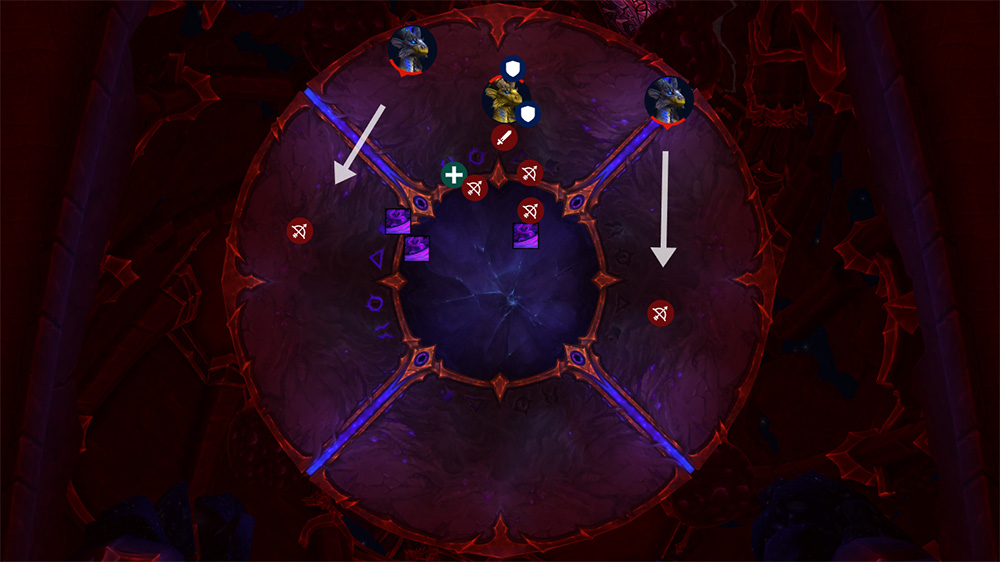
Phase 2
This phase comes down to two things:
- Clearing Void Bombs
- Killing all the Null Glimmer adds
The boss will spawn 2 Void bombs that will explode after 20 seconds, dealing lethal raid wide damage. Players need to pick up the bombs (1 player per bomb) and stand in Desolate Blossom until teleported into the spirit realm (around 2sec). The player will have a shiny glow and a bomb debuff once in the spirit realm. Make sure not to exit the realm too early. The bomb needs to explode inside, before you go out. Pick up the small fragments for haste buff while waiting. You need to soak all 3 big circles to get out. If not out in 20 sec, you die.
The boss targets a random side and will do a small frontal flight. Deals moderate damage to players hit but it's very easy to dodge. Leaves a puddle behind which does a small amount of ticking damage to players standing in it and spawns Null Glimmer adds.
The adds need to be interrupted at all costs and killed quickly, as they become interrupt/CC immune after getting empowered by 5x Ebon Might (5 boss abilities).
Stack them up on top of Desolate Blossom circles, with grips and knocks so that they hit the adds. Once the Null Glimmer adds touch to the circle, they will stop using their Rescind ability, which heals them for 4% of their total max HP every 1 second. They spawn just before Desolate Blossom swirls so if they are already standing in them, stun them so they don't move out. If they touched the circle at least once, there is no need to keep them inside of Desolate Blossom anymore.
One player will get affected by Infinite Duress. This is dispellable and will knock everyone away from the player once removed or expired. The player should simply move behind the raid and get dispelled to knock the players away in a logical direction (away from edges/harmful abilities). The knock-back is fairly small so it's not really problematic.
The Tank affected by the tank-debuff should run away from the raid a few seconds before their debuff expires, it will otherwise deal damage to everyone in a 20 yard radius.
Example positioning
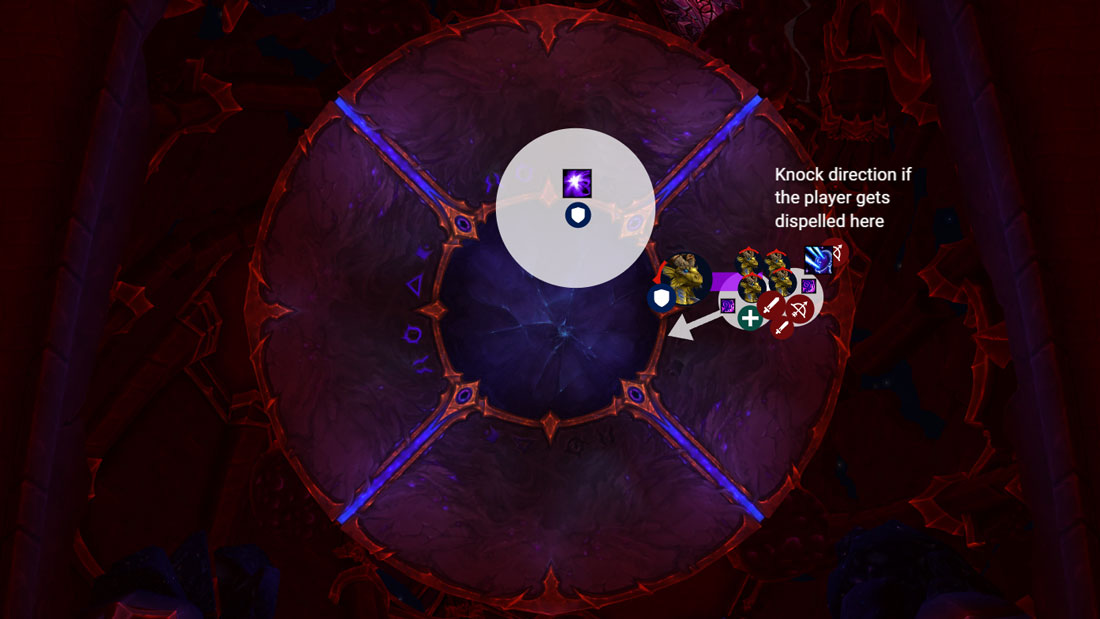
Phase 3
Void Bombs work the same as in Phase 2, however, now you will want to use Motes of Oblivion to get teleported into the spirit realm.
Motes of Oblivion are random swirls that deal 40k damage per hit and apply 5 stacks of Oblivion. Getting hit by 2 of these will instantly send you to the Spirit Realm.
The Tank also needs to use the Mote’s to get into the spirit realm before their Tank debuff expires, as this now damages the entire raid.
Instead of Abyssal Breath from Phase 2, the boss will now use Cosmic Ascension. He will fly up and crash into the ground, dealing lethal damage to everyone in 30 yards, and spawning Null Glimmer adds. As you are running away from this, make sure to stack up outside of the circle. At the same time, 1 player will have Infinite Duress. Have that player run behind the entire stack and dispel them the moment purple swirls spawn on top of the players. Doing this will safely knock everyone out of the swirls.
Use Hero/Lust here and make sure all DPS cooldowns are ready!
You will do the first two Infinite Duress dispels exactly like this. The third and fourth casts don't overlap, so should be dispelled just like in Phase 2.
Ebon Might is now Void Might and only empowers boss damage done by 10% each time he flys up.
Example on how this should look like:

Note: The massive boss circle will disappear before you do the dispel (when it explodes, it spawns the swirls under players which turn into Asteroids).
You will need those Asteroids to survive Scouring Eternity. When the boss is using Scouring Eternity, every player needs to get behind an Asteroid to survive this. They will then take damage based on how many Asteroids are on the map. You will need to use Embrace of Nothingness to remove meteors to reduce damage taken.
Embrace of Nothingness deals 1.4 million damage split between all players, and pulls in nearby Asteroids. Make sure to place the circle close to an Asteroid, preferably close to multiple, to pull several at once. Afterwards it will explode in a 12 yards radius, forcing you to move out. You need approximately 4-5 players to safely split the damage. Make sure there is always one Asteroid left at least. This is only an issue at the start of Phase 3, later on you have more Asteroids than you can clear.
Hurtling Barrage is the "line ability" from Phase 1, but now you want to avoid getting hit by it unless it targets you. It has a massive hitbox and the players being targeted should move far away and in a logical direction to make sure nobody else gets hit.
Lastly, players who pick up Oblivion stacks randomly should reset them by getting into the spirit realm even if they are not doing the bombs. Getting out will reset all oblivion stacks. Having these stacks makes it harder to heal, so be careful of extra stacks and reset when needed.
To go into the spirit realm quickly, simply get hit by Motes on the ground.