Raid Setup
Introduction
The Amalgamation Chamber (Molgoth) is a Single-Target encounter, featuring two phases. In the first half of the encounter, players are fighting two bosses which later fuse together, Power-Rangers style, to create one mega-boss. Players must navigate around a variety of challenging mechanics, testing their ability to dodge and soak incoming attacks. As the fight progresses, the stakes become increasingly higher, pushing the limits of both DPS and healers.
Fight Style: Single Target Fight
Recommended Setup: 2 Tanks / 4-5 Healers / 13+ DPS
Useful utilities: Druid Roar / Shaman Totem / Warlock Gateways
Easy Mode
Split the raid in 2 equal groups (Krozgoth and Moltannia).
Krozgoth Group
- Dodge Shadow / Fire projectiles
- Move away from Coalescing Void to reduce damage taken
- Drop Umbral Detonation puddles to the side
Moltannia Group
- Soak Fiery Meteor
- Soak Molten Eruption
- Dodge Swirling Flame
Molgoth (Phase 2)
- Use Hero/Lust here when your cooldowns are ready
- Same abilities as Phase 1 but combined
- Dodge & Soak
Mechanics
All players in Range of the Boss will get a DoT that reduces health by 2% and does 12,482 Damage every 5 seconds, per stack.
Getting hit by any other Krozgoth ability will also apply a stack of Corrupting Shadow.
A random player will spawn a bomb that inflicts 249,631 Damage once it explodes, damage is reduced by distance.
Several players get marked with a circle that will hit nearby players after 6 seconds for 49,926 Damage and leave a puddle on the ground.
Several orbs will spawn behind players that get pulled towards the boss, you take 156,019 damage if you get hit by it.
Hits the Tank for 109,213 Shadow damage and applies Corrupting Shadow. Can be immuned to reset the stacks.
All players in Range of the Boss will get a DoT that inflicts 3,120 damage every 1 sec.
Getting hit by any other Moltannia ability will also apply a stack of Blazing Heat.
A Large swirl on the ground that needs to be soaked by multiple players to split the damage.
Solo immunities also work, and will help reduce the amount of Blazing Heat stacks on the raid.
Several small swirls will spawn around the boss that need to be soaked. Soaking one will deal 49,926 damage, however, each time you fail to soak one, the entire raid will take 124,815 damage instead.
Sends out several Fire tornadoes in a frontal cone shape towards a random player, simply dodge this.
Deals 109,213 Fire Damage to the tank and applies a stack of Blazing Heat. Can be immuned to reset the stacks.
All players in Range of the Boss will get a DoT that inflicts fire damage and reduces health.
This acts like a soft enrage, as this ability cannot be avoided and eventually the damage from the stacks will get too high.
A large swirl on the ground that needs to be soaked by multiple players to split the damage. Solo immunities work, and will help reduce the amount of Shadowflame stacks on the raid.
It will leave behind a Coalescing Void From Phase 1 (Krozgoth).
Several players get marked with a circle that will hit nearby players after 5 seconds for 93,612 damage and leave a puddle on the ground. It will also shoot out several fire tornadoes in random directions that need to be avoided.
Several small swirls will spawn around the boss that need to be soaked. Soaking one will deal 62,408 damage, however, each time you fail to soak one, the entire raid will take 156,019 damage instead.
After the initial impact, several orbs will spawn around the swirl area that slowly move towards the center of the impact location. Getting hit by those will inflict 249,631 damage.
Hits the tank for 312,038 Physical damage and causes them to take 200% damage from Shadowflame.
Tank swap when you have this to avoid getting hit by Shadowflame Burst.
Strategy
![]() Awakened Note for Season 4 of Dragonflight.
Awakened Note for Season 4 of Dragonflight.
Due to tuning, it is unlikely you will need to swap bosses in Phase 1, so simply split into 2 even groups and trigger Phase 2 when one of the bosses hits 50%.
If you struggle to hit the damage requirement for this strategy to work, or prefer the boss swapping strategy, we have kept the original recommended strategy below.
There are currently 2 popular Phase 1 strategies for Heroic The Amalgamation Chamber. Phase 2 will always play out the same.
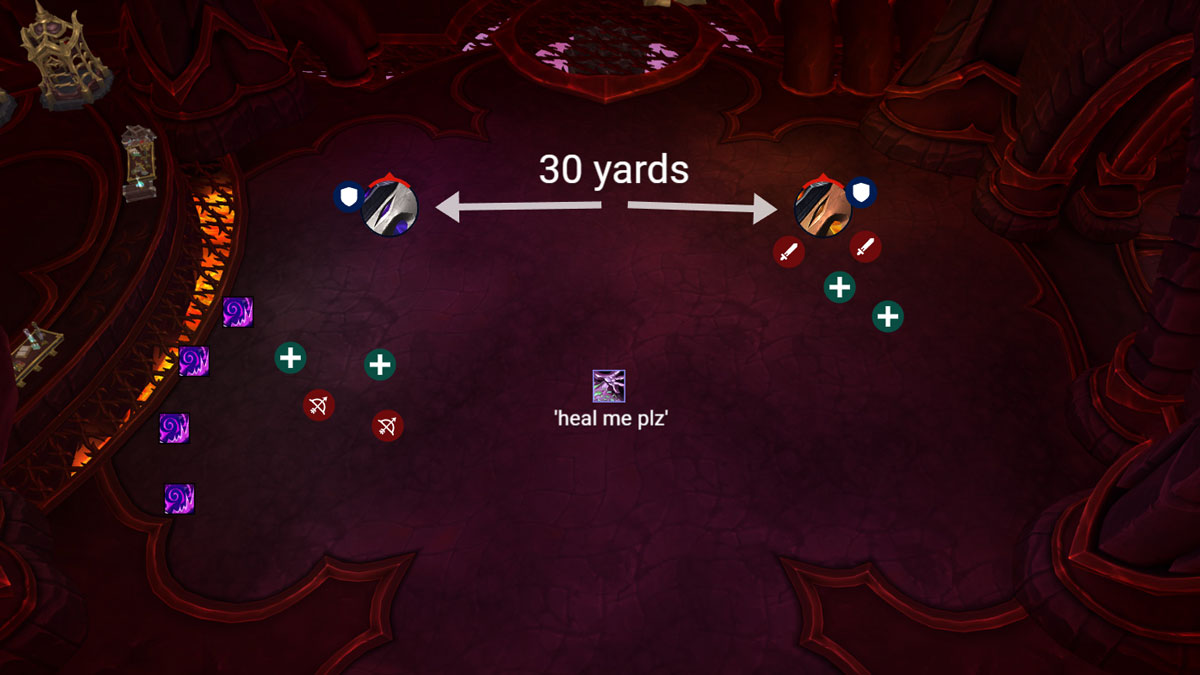
Regardless of which one you chose, the opening setup remains the same. Feel free to balance teams around, but generally Ranged starting on Krozgoth and Melees on Moltannia will work. You should aim to get both bosses to 50% roughly at the same time to reduce the HP pool of Megazord (Molgoth) at the end.
No Boss Swap Strategy
This means that the bosses will never swap sides and that each group will only deal with their side's boss abilities for the entirety of Phase 1. Downside of this strategy is that the damage taken towards the end of the phase will ramp up pretty high, so your healers need to be ready for that. After the bosses turn into Molgoth, stacks will reset.
Boss Swap Strategy
Here the tanks will perform a boss swap mid way into Phase 1. This way the Shadow/Fire stacks won’t get as high, but you will have to deal with different abilities once the new boss is in range.
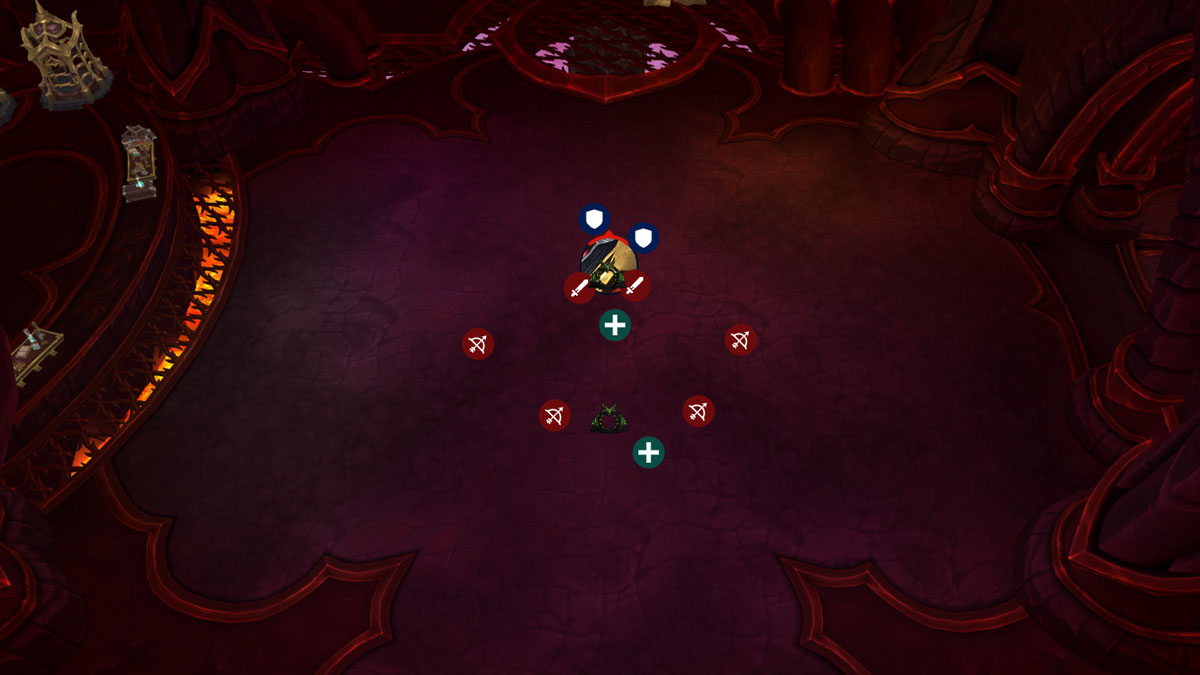
Opening positions in Phase 1
Phase 1
Krozgoth Side
Make sure to place the Umbral Detonation swirls to the side or to the back so you have lots of space in the middle of the left side of the room. To avoid extra damage, ranged players can stack up and bait the Coalescing Void bomb onto them, then use the Warlock gateway to quickly move away.
Dodge the Shadows Convergence orbs that spawn in the back of the room and move towards the boss.
Make sure to keep an eye out towards the opposite side of the room as the fire tornadoes might move in your direction if a melee baits it towards the ranged group.
When stacks get too high, make sure to use personals/externals for Umbral Detonation and strong raid cooldowns for Coalescing Void.
Moltannia Side
If you have players with immunities, make sure to setup a soak rotation for Fiery Meteor to avoid getting unnecessary stacks from multiple people soaking. If there are no immunities left, have all your players on that side soak each meteor to reduce the damage.
Molten Eruption circles need to be soaked, failing to do so will most likely kill several players on the other side as they have reduced HP pool because of Corrupting Shadows stacks.
Bait and dodge Swirling Flame towards the safe side of the room (so it does not hit players on the other side of the room).
Phase 2
Once one of the bosses hit 50%, Phase 2 will start.
Note: If you went with the "no boss swap" strategy, make sure to stack up in the middle of the room when the bosses are transforming to help with healing until the stacks reset, as you will still have high stacks ticking.
Opening Positions Phase 2
Use Hero/Lust in this phase as you want to kill the boss as soon as possible, before stacks get too high. Depending on the push timing, you may want to hold Hero/Lust until your main DPS cooldowns are available, or when execute kicks in.
Tanks need to make sure to face the boss away from the raid at all times because of the Shadowflame Burst frontal. Also, make sure you don't get hit by major abilities that deal Shadowflame damage if you have a vulnerability debuff on you.
Melee players should soak the Gloom Conflagration (Meteor) and then use the warlock gate to get out of range of the Coalescing Void bomb that is left behind, to reduce the damage taken. Immunities are also a good option, just like in Phase 1.
Players targeted by Blistering Twilight should move away from the raid to put fire puddles in safe spots and create more distance for others to dodge fire tornadoes that spawn on impact.
Everyone needs to make sure to soak Convergent Eruption circles and dodge the Orbs that spawn afterwards. Failing to soak one will most certainly lead to a wipe.