Raid Setup
Introduction
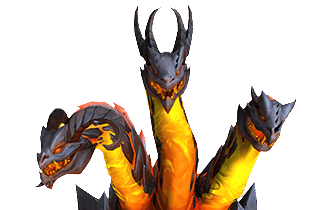
Echo of Neltharion is a single-target fight that becomes a cleave-heavy encounter in the later phases. The fight is unique in that it requires the raid to destroy parts of a stone wall to create gaps for players to move around. In phase 2, several players will become mind-controlled and turn hostile (free real estate for Warlocks) and their goal is to defeat a Void creature that only they can attack. In the final stage, the raid needs to make use of a protective portal to survive a massive explosion from Neltharion while killing the little Voidlings that spawn.
Fight Style: Single-Target / Cleave
Recommended Setup: 2 Tanks / 4 - 5 Healers / 13+ DPS
Useful Utilities: Barrier (Priest), AMZ (DK), Spirit-Link Totem (Shaman), Darkness (DH), Spatial Rift (Void-Elf racial), Unravel (Evoker), Wrecking Throw (Warrior), Various teleport abilities
Easy Mode
Phase 1
- Raid instantly stack up in the middle of the room when you pull the boss
- 3 players targeted by Rushing Darkness create gaps in the wall
- Instantly after this, Volcanic Heart targets go through the gaps to avoid damaging others with it
- Tank’s create a gap in the wall on on of the sides with Calamitous Strike
- Just before the boss reaches 100 energy, move him through the gap and drop Echoing Fissure there
- Dodge Swirls
Intermission
- Get into the designated room section before Raze the Earth cast finishes
- 2 players targeted by Surrender to Corruption move away from others to avoid getting cleaved
Phase 2
- Destroy the shield on the Void add if you are Corrupted (Corruption)
- Move the boss on top of the add when the shield is broken for extra cleave
- Players with Rushing Darkness just move to the side, no need to destroy walls
- Stack up for Umbral Annihilation to help Healers
- Tank’s break the wall where they cross to create a large gap
- Everyone move to another add and repeat the process
- Dodge Swirls
Phase 3
- Boss will turn closest walls to Portals with Sunder Reality
- Portals will spawn adds and protect you from Ebon Destruction
- Players with Rushing darkness avoid hitting the portals
- Step into the Portal before the Ebon Destruction cast is finished, but avoid standing in them before the cast, as they deal damage and reduce damage done by 99%
Mechanics
The boss will split the room with walls of earth, dealing damage where they emerge. The walls will break line of sight and you can only pass them with teleport abilities or if the wall gets broken with Rushing Darkness or the Tank ability (Calamitous Strike).
Several players will get a red arrow and a circle, dealing 613,408 Volcanic damage to players within 15 yards and apply a DoT that ticks for 81,571 Volcanic damage every 1.5 seconds for 15 seconds. Players affected by it should run through gaps in the wall that were created by the Rushing Darkness ability that happens just before. This way you will have enough space to spread out without hitting the rest of the raid.
The boss will spawn a large circle beneath him that kills anyone standing in it and additionally deal 122,682 Volcanic damage to all players. Each Echoing Fissure lava puddle will re-cast this, meaning you will take increased damage each time. It becomes lethal at around the 3rd or 4th Echoing Fissure cast, so make sure to push the boss into Phase 2 before the damage gets too high.
Afterwards, Collapsed Earth swirls will spawn, inflicting 163,575 Nature damage to players hit by it. Afterwards, it leaves behind a large lava puddle that deals damage.
Rushing Darkness
3 players will get marked with a blue arrow, after a few seconds the boss will shoot a beam at those players inflicting 122,682 Shadow damage and knock them away slightly. Other players standing in the path will also take the damage and get silenced for 3 seconds.
Hitting a wall with the beam will cause it to shatter, creating a gap and applying a small DoT to the entire raid.
Additionally, small swirls will spawn that deal 102,235 Nature damage if you get hit.
This is a simple tank swap mechanic that knocks the tank away and breaks a wall behind them. You should tank swap every time this is cast, and make sure to break the wall so you can move the boss to drop Echoing Fissure afterwards.
The boss will destroy all walls, creating large swirls and covering the room with a lot of Collapsed Earth (small swirls), simply dodge all of this.
Voice from Beyond
3 adds will spawn at different sides of the room, channelling into the boss. The channel prevents the boss dropping lower than 40% health, meaning that you cannot progress the fight until all 3 adds are dead. Each add has a 1.9 million absorb shield and can only be attacked by Corrupted players until the shield is broken, at which point the add becomes attackable by everyone.
Once the shield is broken, the add will inflict 81,788 Shadow damage to all players, every 6 seconds, and needs to be killed as soon as possible.
Several players will get a red arrow and a circle, dealing 613,408 Volcanic damage to players within 15 yards and apply a DoT that ticks for 81,571 Volcanic damage every 1.5 seconds for 15 seconds.
The boss will split the room with walls of earth, dealing damage where they emerge. The walls will break line of sight and you can only pass them with teleport abilities or if the wall gets broken with Rushing Darkness or the Tank ability (Sunder Shadow).
Several players will get corrupted, making them hostile to other players. Corrupted players need to break the absorb shield on the Voice from Beyond add. Once broken, the add will become attackable by everyone and players will lose Corruption. If not killed, the Corruption will get removed after 30 seconds, and new players will get it.
The boss will periodically cast this, inflicting 102,235 Shadow damage to all players, increasing in damage by 100% after each cast. This serves as a soft enrage to Phase 2 and forces you to kill the Voice from Beyond adds as soon as possible.
Random swirls that spawn around the room, inflicting 204,469 Volcanic damage to players hit. Simply dodge.
Rushing Darkness
3 players will get marked with a blue arrow, after a few seconds the boss will shoot a beam at those players inflicting 122,682 Shadow damage and knock them away slightly. Other players standing in the path will also take the damage and get silenced for 3 seconds.
Hits the tank and turns them into a shadow that can move through walls. A few seconds later, the boss will use Shadow Strike on the body and fire a line from the body towards the shadow.
Your goal here is to create a line between your body and where you want the wall to break. Additionally, the amount of health missing on the body will be inflicted as Shadow damage to the player.
The boss will turn nearby Twisted Earth walls into portals that spawn adds. These adds fixate on random players and gain 50% increased damage done every 8 seconds.
The portals will also deal 40,894 Shadow damage every 1.5 seconds to nearby players and protect them from Ebon Destruction, but will prevent them from doing damage (99% damage done reduction).
Deals lethal damage to all players not affected by Sundered reality portals. It will also destroy nearby portals that are being used by the players.
This is an enrage mechanic, forcing you to kill the boss before you run out of portals.
Rushing Darkness
While this is the same Rushing Darkness ability from Phase 1 and Phase 2, you should avoid hitting the portals as you need them to survive Ebon Destruction.
This mechanic is the same as in Phase 1. However, just like with Rushing Darkness, you do not want to destroy any portals, as you need them to survive Ebon Destruction.
Phase 1
![]() Awakened Note for Season 4 of Dragonflight.
Awakened Note for Season 4 of Dragonflight.
Due to the tuning of the fight on Heroic difficulty, you will likely push the boss into Phase 2 a lot faster, meaning you may only have to face 1 set of the mechanics in Phase 1.
Phase 1 Positioning
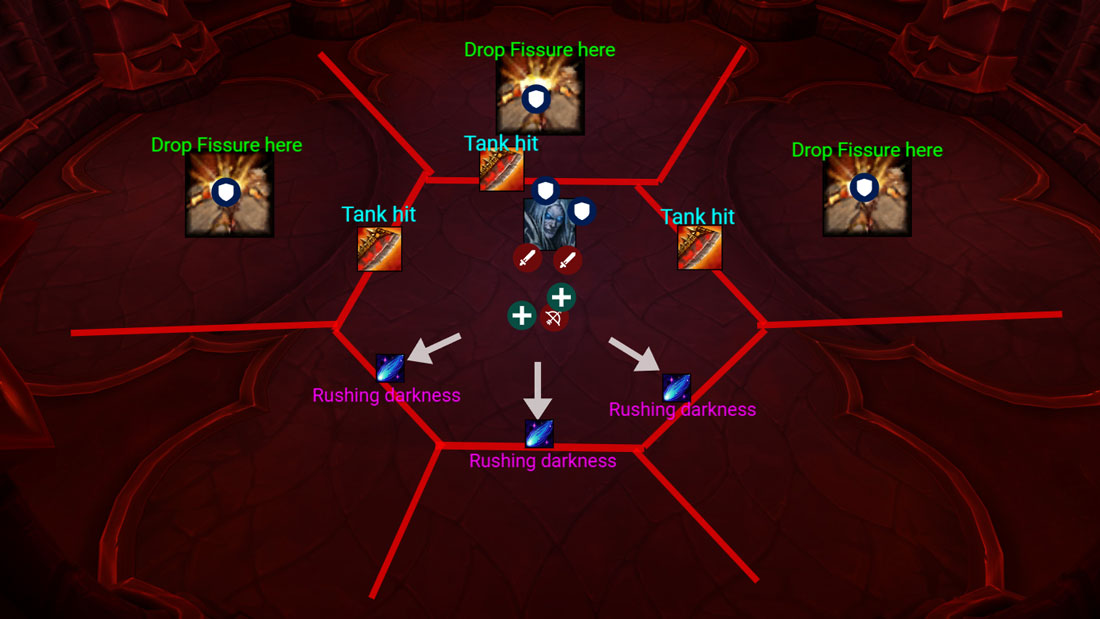
The entire raid should stack up in the middle of the room and pull the boss to one of the sides in the middle.
The boss will instantly create walls around the room; make sure that every player runs to the middle before they start smashing buttons, otherwise, they will get cut off from the raid and won’t be able to hit the boss or be healed.
There is a simple spell sequence that repeats throughout Phase 1, until you push the boss into Phase 2.
- Walls get created
- 3 players get marked with Rushing Darkness to break them
- 3 players get marked with Volcanic Heart
- Any destroyed walls will get fixed
- Tank ability (Tank only)
- Echoing Fissure (Tank only)
DPS Players
DPS players only need to worry about breaking the walls, preferably on 3 different sides (avoiding the tank side) and moving away with a volcanic heart afterwards. As soon as Volcanic Heart hits the player, they need to move back to the raid quickly as the walls will get recreated 2 seconds later, cutting them off if they don’t make it back. From here this repeats until Phase 2.
Note: Melees can follow the boss when the tank is moving him to the side to place Echoing Fissure, but make sure to avoid the circle afterwards and be back as soon as possible to not get cut off by the wall.
Tanks
Tanks basically AFK for most of Phase 1, just waiting for the Tank hit that happens close to 100 energy.
Make sure to create a gap in the wall on the side that you want to use for the Echoing Fissure. As you get hit and the wall breaks, move the boss into that section and wait for Echoing Fissure to drop. When a circle appears, run back to the middle and wait for the boss to come back. Rinse and repeat.
Healers
Healers should always put some HoTs and externals on players affected by Volcanic Heart as they are going to be out of line of sight when they are dropping the circles, and the DoT they gain afterwards ticks pretty hard.
When Tanks are dropping Echoing Fissure to the side, be prepared for high, raid wide damage that ramps up with each cast. Using Barrier, AMZ and similar abilities in the middle of the room are amazing for this.
Intermission (70%)
When the boss is at 70% health, all the walls will break and there will be a lot of swirls that you need to dodge, which you should, as they do moderate damage and stun you.
Your goal here is to move to the designated starting position in Phase 2 before the walls come up again. The raid will take moderate damage because of the Surrender to Corruption cast that deals ticking damage and a larger burst at the end. Once finished, Phase 2 starts and 2 players will get Corrupted.
Phase 2
The image below is just an estimate of the wall pattern, but it doesn’t really matter, as the middle corners and side one’s will always be there, just maybe in a slightly different shape or spot. Sorry, I was bad at geometry in school.
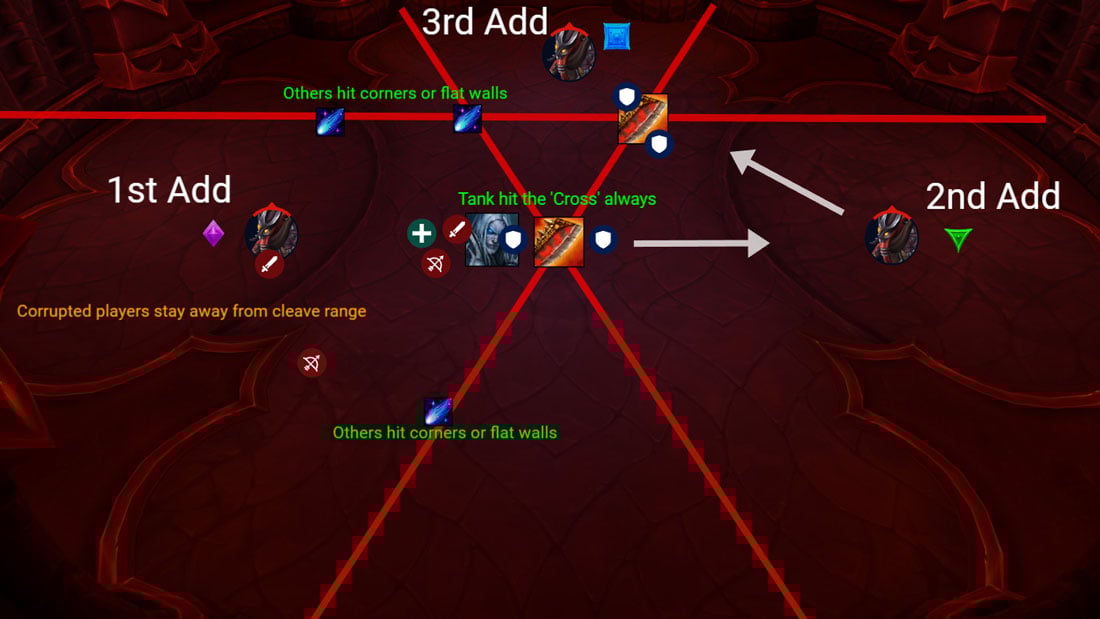
As the walls come up, you will get a warning for which players will get Corrupted (corruption), 3-4 seconds before it happens. Those players need to make sure to stand away from everyone, so they do not get instantly cleaved/dotted. Healers make sure to pre-HoT and external them.
Once the corruption is out, those 2 players should ONLY attack the Void add until the shield is broken.
Everyone else should be in the middle corner of the room, standing close together for easier healing and to avoid clipping the Corrupted players.
The first Volcanic heart targets should use the gap in the middle, created by the tank ability, to move away from others. After that, the Void add shield should be broken and the boss can be moved on top of the Void add. This is when the Void add becomes the priority target, because it will deal raid wide damage until killed.
Your main goal here is to kill the add before the second tank hit, since you will want to move the entire raid to the next add, through the middle when it happens, and shortly after 2 new players will get corrupted. The phase just repeats from here!
Note: It’s very likely that the Heroic version of the fight is tuned so that you can miss the window and repeat the same process twice on the same add.
Once you have killed all 3 adds, Phase 3 starts.
Phase 3
Because of the limited testing, we can only assume what Phase 3 approximately looks like. Once the fight is live, we will update this section.
Make sure your cooldowns are ready and use Hero/Lust.
Tank the boss where you are standing currently.
The boss will destroy nearby walls with Sunder Reality and create a bunch of portals that spawn adds and protect you from Ebon Destruction.
Make sure to avoid hitting the portals with Rushing Darkness / Calamitous Strike as that will destroy the portals.
Stand at least 10 yards away from the portal and cleave down the adds while nuking the boss. Make sure the adds are taking enough damage, as they will deal more damage the longer they are alive.
When the Boss starts casting Ebon Destruction, have your entire raid walk into one of the portals. This will prevent you from getting killed by Ebon Destruction, but will reduce your damage done by 99% while standing in the portal and will deal ticking damage every 1.5 seconds. So you should only be inside portals during the Ebon Destruction cast.
Ebon Destruction will then consume all portals that are being used, and you will move to another set of walls. Repeat this process until the Boss is dead.