Raid Setup
Introduction
Assault of the Zaqali is a challenging encounter that requires a coordinated team effort. The fight involves splitting your team into two equal-sized and balanced groups that fight on their designated platform against waves of Zaqali forces. These forces are trying to reach a magical door, and if they touch it, it's an instant wipe for your group. The main boss will alternate between the platforms, and upon landing, will spawn several rocks that must be thrown off the edge to kill upcoming reinforcements - yes, you read that right. After several waves of enemies, and when the boss's health reaches a critical amount, you will face the main boss in a final, epic 20 vs 1 showdown situation.
Fight Style: Hectic Cleave / AoE Fight
Recommended Setup: 2 Tanks / 4 Healers / 13+ DPS
Useful Utilities: Demonic Gateway (Warlock), Unravel (Evoker), Wrecking Throw (Warrior), Mortal Strike (Warrior), Ring of Peace (Monk), Ring of Frost (Mage), Grips (DK)
Easy Mode
See the ![]() Awakened note in the Strategy section below for a quicker Phase 1 strategy.
Awakened note in the Strategy section below for a quicker Phase 1 strategy.
- Split the raid in 2 equal groups
- Nuke the boss initially, move to your assigned platform when he flies away
- Prioritise destroying the absorb shield on Magma Mystic quickly
- Interrupt Lava Bolt
- Pick up the rocks when they spawn and throw them off the platform at the marked location (yellow arrow)
- Move away to the side when targeted by Blazing Spear
- Use AoE stuns frequently to reduce damage on the Tank and control the adds
- Grip/Knock Wallclimbers if they run past the group (they kind of fixate on reaching the door)
- Use Mortal Strike on the boss when he is channeling Desperate Immolation at the start of Phase 2
- At least 8 players soak the Catastrophic Slam frontal
Mechanics
If Zaqali adds reach the door and hit it, it will inflict 312,038 shadowflame damage to all players and apply a DoT that ticks for 37,445 shadowflame damage.
Essentially, this is an enrage mechanic and should never be triggered.
Circles that deal 31,204 physical damage to all players within 12 yards of impact.
Dodge them!
At full energy, the boss will swap platforms and jump into the middle of the new platform. Standing in the middle, where the boss lands, will inflict 93,612 volcanic damage within 12 yards and knock away players caught in the impact.
Additionally several lines of fire will shoot outwards, inflicting 24,963 volcanic damage every second for 8 seconds to players hit by it.
Hits the Tank for 312,038 physical damage in a frontal cone and increases damage taken by 15% for 45 seconds.
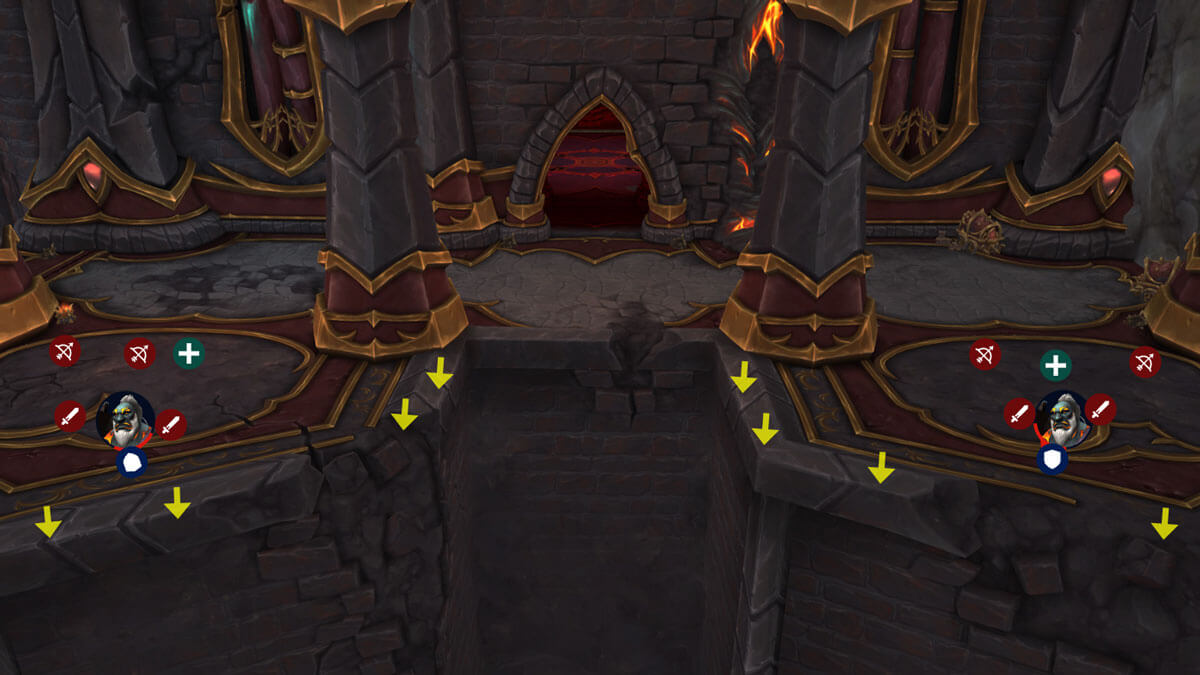
Each hit will also spawn Cave Rubble (stones). These stones need to be picked up and carried to the yellow arrows that appear on one of the sides of the platform, you then throw them down the wall using the extra action button. Throwing them will stop any wall climber adds that were making their way up.
Make sure you have 1 player per yellow arrow, as throwing more than one rock at the same spot is not effective.
Initially, this add spawns with an absorb shield and deals 46,806 fire damage and gains a stack of Molten Empowerment that increases Fire damage done by 25% every 4 seconds until the shield is destroyed.
Nuke down the shield as soon as possible to avoid taking unnecessary damage.
Dispellable DoT that deals 78,010 lava damage on impact and additional 15,602 lava damage every 3 seconds for 15 seconds.
Interruptible Lava Bolt cast that deals 37,445 volcanic damage. Interrupt to avoid taking unnecessary damage. This ability is only used after the Molten Barrier is broken.
Throws spears at random players that deal 149,778 physical damage to all players within 8 yards. The circle will remain after the initial hit and deal an additional 124,815 fire damage to players within 8 yards.
Move away when targeted by this and avoid standing in it afterwards.
A Roar that inflicts 24,963 fire damage every 0.5 seconds for 1.5 seconds to players within 25 yards.
The guard will shoot out a magma beam towards a random player and inflict 199,823 Volcanic damage to all players in the path of the beam.
Zaqali Wallclimber
If not aggroed by the Tank, the adds will simply run towards the door and upon reaching it, attempt to break down the door, which will then trigger Barrier Backfire.
A large circle will spawn at the door, dealing 545,988 physical damage, divided evenly between players standing in it.
Damage done by this ability is increased by 75% each time you soak this ability (Weakened Vitality).
The boss will use this at the start of Phase 2, and heal for 7.4 million health.
When the channel is finished, the boss will get the Ignara’s Fury buff.
After the boss is done channeling Desperate Immolation (the heal), the raid will take 156,019 fire damage every 10 seconds until the end of the fight.
Phase One
![]() Awakened Note for Season 4 of Dragonflight.
Awakened Note for Season 4 of Dragonflight.
Due to nature of this being a severely under-tuned fight on Heroic difficulty, the entire raid (except for 1 tank) can just go to the far side (right on the images below) after boss first flies away and nuke him down to trigger Phase 2. This will mean you skip the majority of the Phase 1 mechanics.
If you struggle to hit the damage requirement for this strategy to work, or prefer the full split approach, we have kept the original recommended strategy below.
Before you pull the boss, make sure to split the raid into 2 equal groups, 1 group for each platform.
Both groups should consist of:
- 1 Tank
- 2+ Healers
- 6+ DPS
Pull the boss at the location where it is standing. You should use Hero/Lust on pull and blast the boss, ignoring the rocks that spawn at the boss initially. The boss will fly away after roughly 27 seconds, at which point, each group should go to their assigned platform.
Initially both groups will get a Mystic add and several smaller ones. Group everything on top of the Mystic and kill them all.
The group that has the boss first (the platform on the right of the image above) will also get the rocks. Random players should pick them up as soon as possible, and throw them off the edge. Yellow arrows will indicate where you should throw them. Make sure each player picks their own yellow arrow, as throwing 2 rocks at the same spot will have no effect.
Note: Each rock that you fail to throw at the designated location, will spawn an extra add on that platform.
The boss will jump to the opposite platform once he reaches 100 energy. Players should move away from the middle of the room as this is where the boss will jump to, and you should also get ready to avoid the lines going out from there.
Tanks should always look to pick up each add as soon as possible. Otherwise, they will attack random players, except for the Wallclimbers, who focus on running towards the door unless attacked.
Healers need to avoid standing close to the edges of the platforms, as this is where the adds come up (spawn) from, and Healers tend to pick up aggro fast.
Players should use push-backs, slows and stuns to help the Tanks get control of the adds. Whilst also kicking the Lava Bolt cast to reduce unnecessary damage.
Phase 1 boils down to nuking down packs of adds and avoiding abilities. If you deal with the rocks correctly, you should not get overrun by the adds until the boss reaches 15% health.
DPS target priority:
- Magma Mystic (until shield broken)
- Obsidian Guard
- Flamebound Huntsman
- Boss
- Wall Climbers
Tank aggro priority:
- Boss
- Zaqali Wallclimber
- Flamebound Huntsman
- Obsidian Guard
Phase Two
Once the boss reaches 25% health, he will move to the middle of the room (close to the door) and channel Desperate Immolation. This will heal him for 7.4 million health and buff him with Ignara’s Fury; this buff causes the boss to deal 156,019 fire damage to all players every 10 seconds until the end of the fight.
Bring all the remaining adds to the boss and cleave everything down.
The boss will now use Flaming Cudgel on the Tank, which is still a frontal, so make sure the boss is faced away from the raid. The hit will spawn fire swirls instead of rocks, which just need to be avoided.
When the boss reaches 100 energy, he will send out a shockwave towards the Door (Catastrophic Slam), inflicting 936,114 Physical damage split evenly among players in its path. Each player hit will remove a portion of energy from the boss. If there is any energy remaining after the shockwave, it will trigger Barrier Backfire. We currently recommend a minimum of 10 players hit per shockwave.
Getting hit by the shockwave will also apply Weakened Vitality which increases damage taken by Catastrophic Slam by 75%.
Kill the boss before the damage becomes too high to heal.