Raid Setup
Introduction
Single-Target with constant passive cleave
Recommended Setup: 2 Tanks / 5 Healers / 13 DPS
Useful utilities: Druid Roar + Shaman Speed Totem / Immunities / Mass Grip
Easy Mode
Tanks should always swap after every Sundering Strike and face Kurog and the Add away from the raid at all times.
Altar order: Fire > Intermission > Earth > Intermission > Frost
Altars
Fire Altar (target 60% boss hp or less):
- Bait Magma Burst lava pools at the designated markers
- Assign players to soak lava pools with strong personal cooldowns
- Dodge Molten Rupture fire swirls
- Don't stand in fire
- Dodge Searing Carnage fire swirls
- Kill big Add before or just after enrage (100 energy)
Earth Altar (target 30% boss hp or less):
- Dodge Erupting Bedrock from Boss and Add
- Healing absorb on random players needs to be spot Healed
- Dodge swirls, Tank should stack up the adds, then Stun and Kill them
- Kill big Add before or just after enrage (100 energy)
Frost Altar (if boss higher than 30% it will be hard to kill before enrage):
- Heal the DoT
- Dodge Frost Orbs
- Split the damage of Absolute Zero, one circle in melee and one in the ranged camp or immune
Intermission 1 (Blazing Fiend/Thundering Ravager):
- Stay stacked most of the time and move as a group
- Start outside of the middle and move there after the first Searing Carnage cast
- Soak white circles (1 player each)
- Lethal current target move out
- Dodge swirls and don’t stand in fire
- Kill Thundering Ravager before the second set of Soaks, then swap to Blazing
- Find and kill it when it reaches 100 energy, but not before!
Intermission 2 (Tectonic Crusher/Frozen Destroyer):
- Interrupt Frozen Destroyer’s Frost Binds
- When Frozen Destroyer casts Freezing Tempest, everyone should quickly stack up in melee
- The first set of Absolute Zero should be soaked by 1 tank, 1 dps (pref rogue) and players targeted by the ability per circle (you get 2)
- The second set of Absolute Zero should be soaked by everyone except the players that soaked the 1st set
- Ground Shatter targets move out of the raid
- Cleave down Adds
- Kill Frozen Destroyer before the third set of Absolute Zero. Afterwards, kill the Tectonic Crusher when it reaches 100 energy, but not before
Mechanics
Big Adds
The only real change from heroic are the Big Adds that spawn during each Altar Phase!
Those adds will have all boss abilities, so you will have to deal with each Altar Mechanic x2.
They enrage at 100 energy, so make sure to kill them before, or shortly after.
Soaking Absolute Zero twice in a row will now freeze you in place.
Strategy
This fight is a very tight dps and healing check. Make sure to assign your healer cooldowns so that the strongest abilities will be ready for the last 20-30 sec of each Altar phase.
DPS players need to ensure to do as much damage to the boss as possible while maintaining a proper cleave on the add. The add will most likely kill the tank if it lives for more than 5-10 sec in Enrage and it will cast extra abilities. Killing it too fast has no disadvantage, apart from losing boss damage, but if you can do this with cleave only, feel free to go for it.
Opener Fire Altar
Pop Hero / Lust on pull and make sure everyone is attacking the boss (healers included).
All ranged players should start the fight baiting on Purple, then move to Blue after Magma Burst lava pools spawn.
Have a DPS (pref Rogue) soak the first pool with Cloak.
After you bait, move to melee and wait for the Searing Carnage cast.
Everyone who did not get Carnage cast on them should dodge to the left and those that are targeted move to the Right.
All Ranged players should now stack on Red.
Once lava pools spawn there, you will have to soak both Blue + Red at the same time.
Mages are good for the Blue soak with Mirror Image + Greater Invisibility, and whoever can do Red with immunities or a big personal.
After the soak, the raid can readjust to Red to wait for the next set of Magma Burst Pools and Searing Carnage.
Once you get those, you should assign a player with an immunity (Holy Paladin is great) to soak the last lava pools on Red, since that one overlaps with a bunch of abilities.
Around this point, you will want to make sure that the big Add is dead.
Get the boss close to the edge and make sure you move him over to the next altar (storm) at the moment it hits 97 energy.
If you move the boss before 97 energy, he will finish his cast on the new altar and you will get an extra big Add, resulting in a wipe.
If you move the boss at 98 energy, the boss will enter intermission before he can apply one Altar stack, making it fully random as to which adds you get during the intermission. In this case, sometimes you might get lucky and get Fire and Lighting adds, in which case this is still a good pull and you can continue. However, if you get any other combination it's suggested you simply wipe and go again.
Fire Altar tips:
- When dodging Searing Carnage, it will always overlap with the boss frontal and it has a very large cone, try not to dodge towards the front or you will get one shot.
- Ranged players should try to be stacked as best as possible when baiting Magma Burst lava pools! Doing so will make soaking easier and will give you a small DPS gain, since a bad bait will take longer to get soaked as the player can’t cover them all at the same time.
- If players targeted with Searing Carnage incorrectly dodge to the same side as the rest of the raid, it will cause everyone to move a lot, and lose dps in the process.
- Healers be prepared for the last 20-30 sec of the Fire Altar. The DoT damage will do a ton of damage. Also make sure to use an external on the Tank who has the big Add when it enrages.
Intermission
The raid should stack up around the starting area of Storm Altar, the Thundering add will spawn. Tank the Blazing Fiend on top of it and mainly focus the Thundering Ravager add.
With each Lethal Current cast the add will first JUMP to a target, then cast another Lethal Current on a different player which then deals damage to the raid if the player does not move out. This is important to understand as you will always want the Thundering add close to the Fire add. So on every first Lethal Current cast, the raid should look to be as close as possible to the Fire Add so that the Thundering Ravager jumps there.
When the Fire add casts the first Searing Carnage, the entire raid should look to stutter step towards the middle circle. You want to end up just over the edge and stack up there. At this point in the fight it's very important that everyone is actually moving together, because the Thundering add will cast Lethal current during the move. If players are too spread out, it will jump to someone all the way to the side and will mess up the stacking.
Once there, have ranged players soak the Thunder Strike. 2-3 sec after this, the Fire add will cast another Carnage and here you want the entire raid to stutter-step basically to the same side/spot they came from at the start of the intermission. The same Lethal Current jump will happen again mid movement, but this one is not so bad if it’s baited incorrectly.
Finish the Thundering add before he casts another set of Thunder Strike soaks, and swap to the Fire add afterwards. You will want to kill the Fire add after he reaches 100 energy to ensure damage cooldowns and such line up properly for boss phases.
Once both adds are dead, the boss becomes active again, the tank should pull him to the edge of the middle and let the boss do 1x Melee hit on the tank before moving him into Earth Altar.
Earth Altar
The entire raid should stack behind the boss as this phase is insanely healing intensive.
Tank the add to the side of the boss.
Dealing with Healing Absorbs:
- Nothing
- Nothing
- Small personals if absorb is on you
- Big personals if absorb is on you
- Everyone pops a personal
Players that get the 3rd, 4th or 5th set of absorbs but have nothing for it, should make sure to call it out so healers can either external or fully spot heal them.
The boss will start the phase with a Erupting Bedrock cast, simply dodge that. A few seconds later, the add will cast Bedrock as well. Make sure to use Shaman Wind Rush Totem and Druid Stampeding Roar for each Bedrock cast to play it safe.
The boss will then spawn Earth adds. When the large swirls appear, make sure to find a safe spot close/behind the boss and stack up there. Be extra careful as the impact area of the swirls is a bit bigger than the animation (1-2 yards). When the adds are up, grip them in, stun them and cleave them down.
As soon as this is done, make sure to split the boss and the add by at least 10 yards.
The reason for this is the double bedrock cast that happens pretty much at the same time by the boss and the add. So, if they are not split, the safe spot will be very small and hard to reach.
First dodge the boss Erupting Bedrock, then all players should swap to the add and dodge that Bedrock.
This is the perfect moment for DPS players to swap to killing the add. We think this is the safer strat, since if you kill the add earlier, you will skip Erupting Bedrock cast by the add at the end of the phase. This will put less stress on your tank as the add hits insanely hard when enraged.
You will now deal with those 4th and 5th sets of Absorbs and have the last set of adds spawn.
Make sure you all stack up behind the boss quickly, use personals and drop down Power Word Barrier + AMZ and nuke down the adds. Do not hesitate to use Health Pots / Health Stones as this is the most intense healing moment in the entire fight. When the boss is done casting Erupting Bedrock, he will move to the middle and Intermission 2 starts.
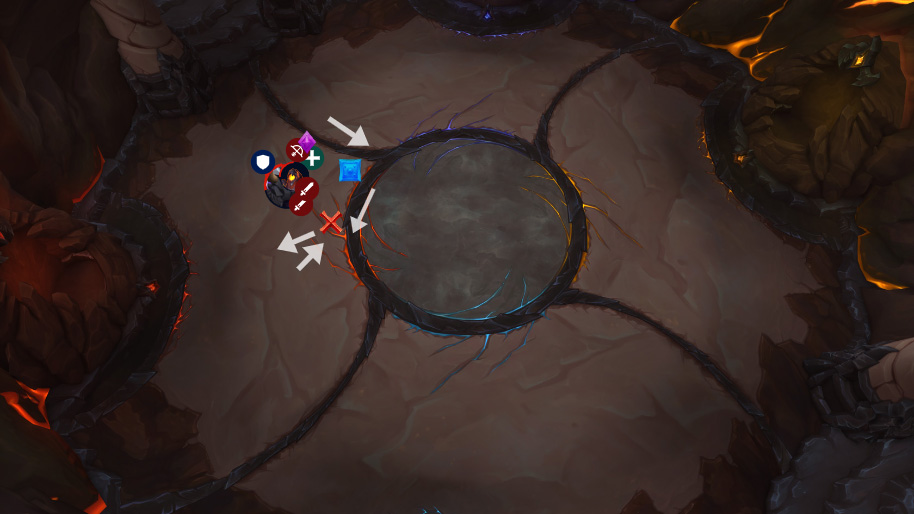
Intermission 2
Both adds will spawn far away from the raid. Make sure to pick up both and bring them pretty much to the same location the raid is in currently. Players should all focus on the Frost add first.
While you are stacking the adds up, the Earth add will do his first Ground Shatter. Players Targeted should simply drop them to the side of the room somewhere. This ability should target the closest eligible players to the Earth add, so you can decide who gets this mechanic.
Soon after you all stack up, an Absolute Zero cast will happen.
The 2 Players targeted should go to one side each. 1 Tank + 1 DPS with strong defenses will help soak each of those circles. Rogues are the best for this. You can also immune the circle if you can, which will reduce damage taken by the raid.
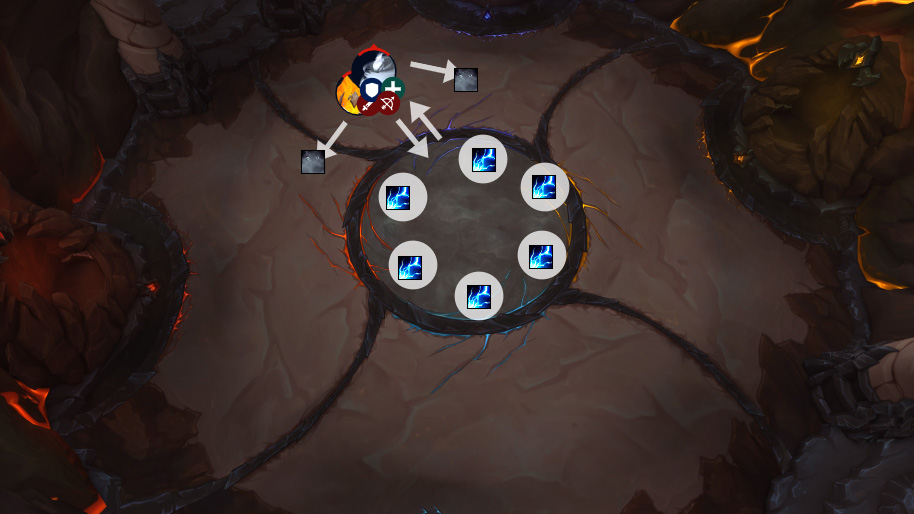
The Frost add will then cast Freezing Tempest and force everyone to stack up in melee (which you should be doing anyway), however, this Freezing Tempest overlaps with Ground Shatter from the Earth add. The 3 players targeted will need to drop the circles outside of the raid while you are forced to be in melee because of Freezing Tempest. To deal with this, make sure there is some speed boost down, and that those 3 players run out in the last 1.5 seconds or so and get back in as soon as possible. Healers should also be ready to cast extra heals on them, grips/rescue should also help, especially if someone is really slow to move out or back in.
After this is done, you will get another bad overlap. There will be swirls on the ground that force you to dodge, at the same time you will get a second set of Absolute Zero. Here you just need to make sure to dodge the swirl while having the 2 players with Absolute Zero split up and your entire Raid should soak except for the players who soaked the first set.
Still alive? Good, the worst is over now! Finish the Frost add and focus on Earth afterwards. You should aim to kill Earth as he reaches 100 energy to have your DPS cooldowns back for the final burn phase of the fight.
Frost Altar (Burn Phase)
This phase doesn’t have much going on, except for focusing on doing a lot of boss damage and making sure you dodge the orbs.
Split the raid into 2 groups; Melee and Ranged.
Fully blast the boss and do not waste anything on the add unless it's a boss damage gain for you.
The biggest priority in this phase is dodging the Frost Orbs! You simply need to make sure to not get hit by a single one, since it will most likely kill you and it will make it super hard to achieve the damage requirements. At the start, you will have 1 set going from the boss, then the second set going from the Add. The third set will be the Boss and add together, so if you have the boss and the add stacked, it will basically be a buffed orb (you get hit by 2 instead of 1). Some guilds choose to split them up, but that only makes it harder to dodge in my opinion. Find what works for your guild.
For Absolute Zero, make sure each group has one to Soak, Immunities are a free-for-all.
Kill the boss before the Enrage.