Raid Setup
Introduction
Single-Target with constant passive cleave
Recommended Setup: 2 Tanks / 4 Healers / 14 DPS
Essential Utilities:
- Druid - Roar
- Shaman - Speed Totem
- Evoker - Rescue + Time Spiral + Time Dilation
- Warlock - Gateway
Useful Utilities:
- Druid - Nature's Vigil (Heal)
- Shaman - Ancestral Guidance (Heal)
- Death Knight/DH - Mass Grip
- Priest - Lifegrip
- Warrior - Wrecking Throw
- Manic Grieftorch (Trinket)
- Momentum Redistributor Boots (Shadowlands Engineering level 1)
- All sorts of CC abilities
- All sorts of Immunities
- Arcane Torrent Racial
Important Timers
Phase 1
- Wind 1: 00:41
- Wind 2: 01:16
- Wind 3: 01:51
- Wind 4: 02:26
- Wind 5: 03:01
Personals:
- 1:16
- 2:08
Health Pot at:
- 03:10
Phase 2
Shields:
- 1st shield 5:49 - 6:04
- 2nd shield 7:08 - 7:27
- 3rd shield 8:30 - 8:49
Personals:
- Shield 1 5:54 (close to last few ticks) - 1min personals only
- Sparks 1 6:41 - Everyone Big Personal + Rally (just before spark hit)
- Shield 2 7:15 (half way cast) - Personals 1min
- Sparks 2 7:42 - AM + small stuff
- Sparks 3 8:21 - HP Pot + Personals + Rally
Phase 3
Pulls:
- Pull 1 - 11:21
- Pull 2 - 11:51
- Pull 3 - 12:24
- Pull 4 - 12:57
- Pull 5 - 14:20
Waves:
- Wave 1 - 11:54
- Wave 2 - 13:00
- Wave 3 - 13:24
Charges:
- Charges 1 - 11:25
- Charges 2 - 12:25
- Charges 3 - 13:33
Personals:
- 11:51 - Small Personals just before the grip (use big ones if you have a Holy Priest and symbol after)
- 12:57 - Small Personals just before the grip
- 13:24 - Everything
Push-back Ability Usage
DH
- Wind 1: Fel Rush
- Wind 2: Fel Blade > Fel Rush > Gate
- Wind 3: Fel Rush > Fel Blade > Fel Rush > Vengeful
- Wind 4: Fel Blade > Hunt > Fel Rush > Fel Rush
- Wind 5: Fel Blade > Fel Rush > Gate > Fel Rush
- Wind 6: Push Boss
Druid
- Wind 1: Roar > Cat Charge
- Wind 2: Gate > Cat Charge
- Wind 3: Cat Charge > Dash
- Wind 4: Cat Charge > Dash
- Wind 5: Cat Charge > Dash > Gate
- Wind 6: Push Boss
Evoker
- Wind 1: Rescue Priest
- Wind 2: Dream Flight
- Wind 3: 1x Evoker Deep Breath > 1x Rescue Priest
- Wind 4: 1x Deep Breath > 1x Rescue Priest
- Wind 5: Rescue Priest > Gate
- Wind 6: Push Boss
Hunter
- Wind 1: Cheetah + Disengage
- Wind 2: Gate
- Wind 3: Turtle (Pre Turtle the debuff)
- Wind 4: Void Elf or (Dathea Trinket)
- Wind 5: Gate
- Wind 6: Push Boss
Mage
- Wind 1: Pre-Alter > Blink > Blink > Alter
- Wind 2: Gate > Blink
- Wind 3: Pre-Alter > Blink > Blink > Alter
- Wind 4: Blink > Alter on CD > Blink > Alter
- Wind 5: Blink > Gate > Blink
- Wind 6: Push Boss
Monk
- Wind 1: Chi Torpedo > Tiger Palm > Flying Serpent
- Wind 2: Chi Torpedo > Gate
- Wind 3: Chi Torpedo > Tiger Palm > Flying Serpent
- Wind 4: Chi Torpedo > Teleport > yeet
- Wind 5: Chi Torpedo > Gate
- Wind 6: Push Boss
Paladin
- Wind 1: Horse > Priest Grip
- Wind 2: Horse > Gate
- Wind 3: Horse > Priest Grip
- Wind 4: Horse > Priest Grip
- Wind 5: Horse > Gate
- Wind 6: Push Boss
Priest
- Wind 1: Rescue > Grip the Paladin
- Wind 2: Gate
- Wind 3: Rescue > Grip the Paladin
- Wind 4: Rescue > Grip the Paladin > Feather
- Wind 5: Rescue > Gate
- Wind 6: Push Boss
#showtooltip
/cast [@Jokipala][@mouseover,help,nodead][] Leap of Faith
Rogue
- Wind 1: Step
- Wind 2: Gate > Step
- Wind 3: Step > Step
- Wind 4: Cloak (Pre Cloak the debuff)
- Wind 5: Gate > Step
- Wind 6: Push Boss
Shaman
- Wind 1: Feral Lunge
- Wind 2: Gate > Feral Lunge
- Wind 3: Feral Lunge
- Wind 4: Feral Lunge
- Wind 5: Gate > Feral Lunge
- Wind 6: Push Boss
Warlock
- Wind 1: Portal
- Wind 2: Gate > Portal
- Wind 3: Portal > Portal
- Wind 4: Portal > Portal
- Wind 5: Gate > Portal
- Wind 6: Push Boss
Warrior
- Wind 1: Charge > Leap
- Wind 2: Charge > Leap
- Wind 3: Charge > Leap
- Wind 4: Charge > Leap
- Wind 5: Charge > Leap
- Wind 6: Push Boss
Mechanics
Ramps up in strength with each cast and needs several spells to be used together in order to fight against it. The slow puddles do not exist on Mythic.
Frostforged Zealot
Extra add that spawns together with other adds when you break the Ruiner shield.
Will apply absorb to the entire group that needs to be healed before time runs out or it will kill the entire group.
Flamesworn Herald
Extra add that spawns together with other adds when you break the Ruiner shield. Herald will start casting Blazing Roar, that kills the entire group if not interrupted. You can only interrupt it once you nuke down the Flame Shield.
On mythic, players targeted by the Fulminating Charge will also get rooted and need to either self remove it or get externals like Hand of Freedom or Tiger’s Lust.
Players need to be spread out during the Stormsurge cast as they do splash damage around them when charges get applied.
Colossal Stormfiend
The only notable difference in this phase is that you have 3 big Adds instead of 2 (heroic).
Check the strategy section for a detailed guide on how to deal with them.
Phase 1
Changes to the Boss
With the recent nerfs (Feb 15th, 2023), the fight became noticeably easier. All of the mechanics are still present in the fight, just easier to deal with.
The main difference is in Phase 1, since you will now be skipping Winds 5 if your DPS is high enough!
Pulling the Boss
Start the fight by Pulling Raz to the side of the room, then instantly move the boss to the main position. This has to be done in order to place the boss better because of its large hitbox. If you try to move the boss straight from the middle to the main spot, the boss will simply stop moving before he reaches the desired location.
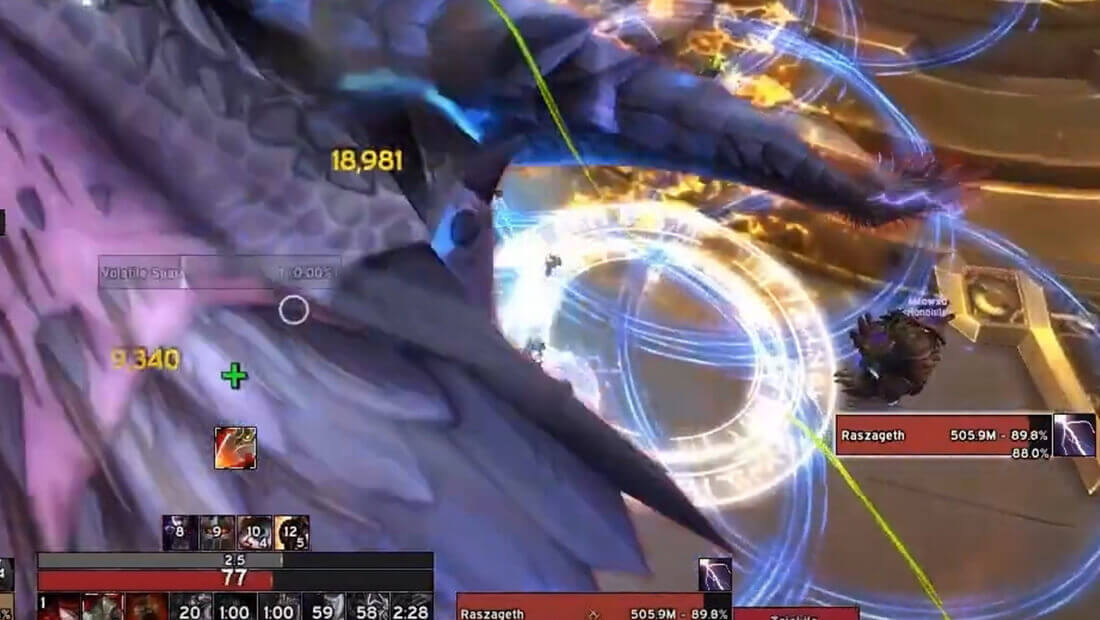
Static Charge (bombs)
Shortly after the pull, you will get the first Bombs + Breath. Breath is always targeted towards one random person, so it's fully random as to where it's going to go, simply dodge it.
Use WeakAuras for Bomb assignments (Left, right, back):
This will tell players which side they should go to if they get the bombs, and it will call for Healer externals on 3rd and 5th set. We recommend that you assign personals for the 1st set as well.
Once done with Breath + Bombs, you will get your first Volatile Current (Sparks 1).
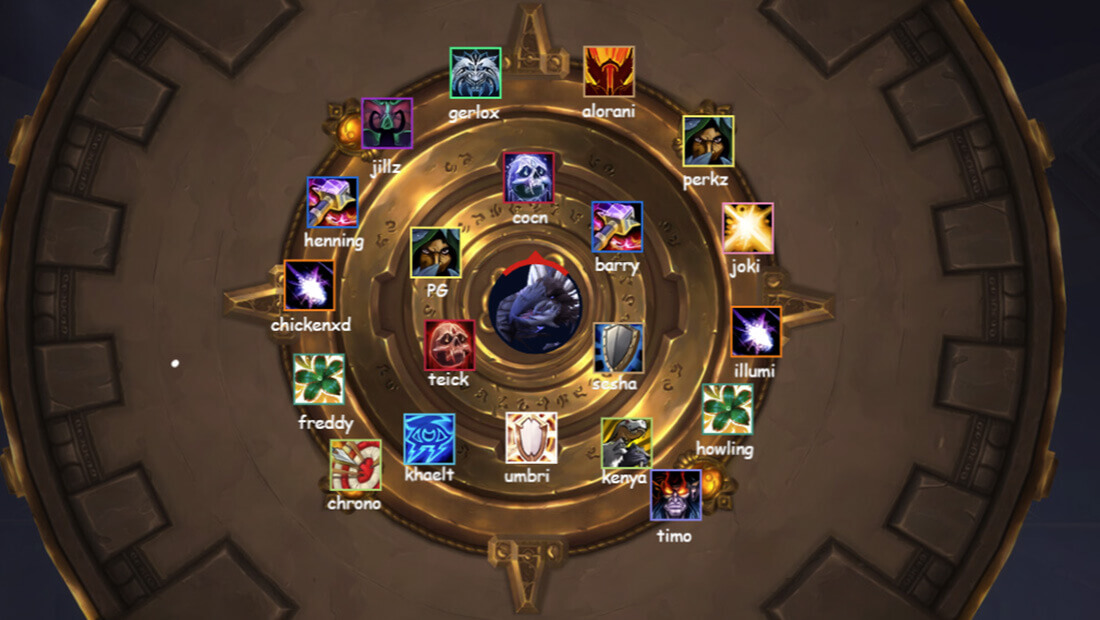
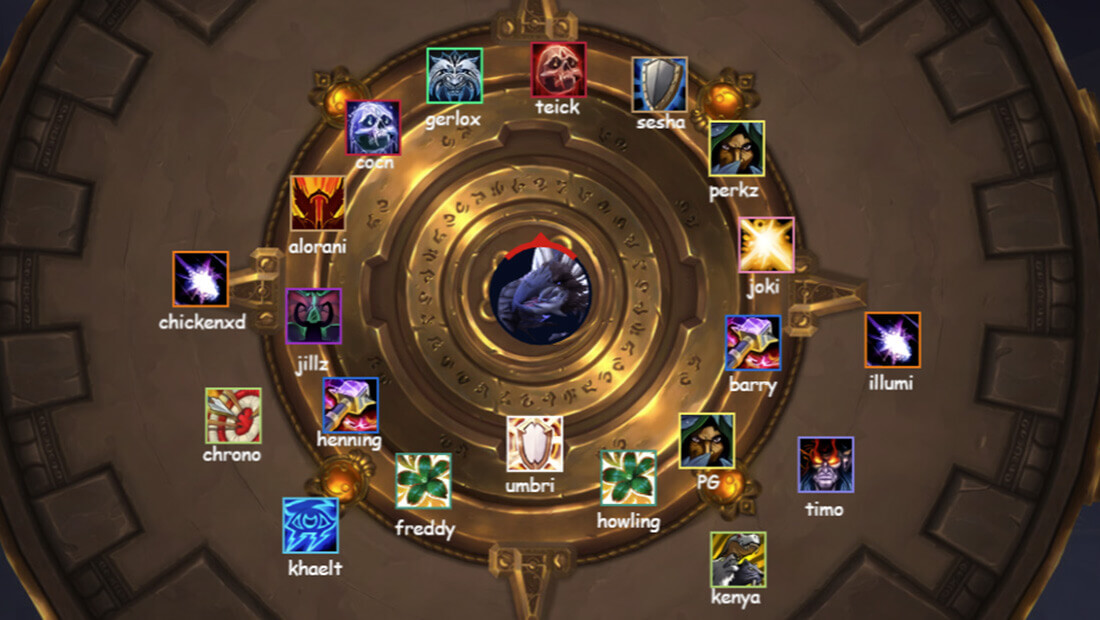
Recommended Formation
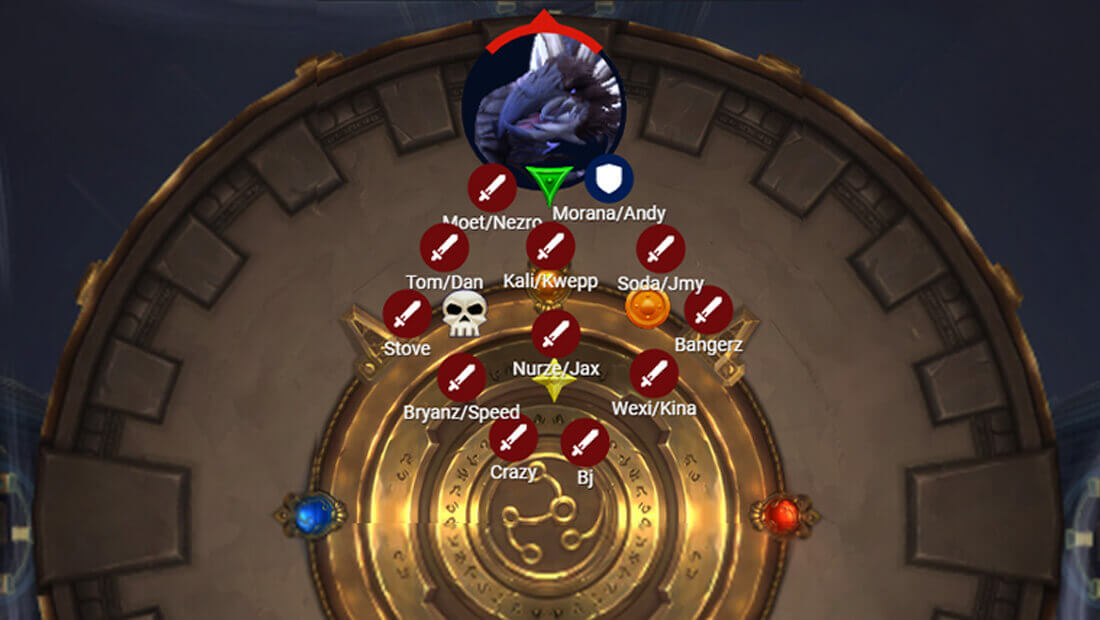
Note that the formation has been placed under the boss for an easier overview. In reality, you will want to start all the way in front of the boss and then stretch towards the bottom while maintaining the same formation (with the boss in the middle of the formation).
Example:

You will have to clear all Sparks quickly, as that will be very necessary in later stages of the fight.
To do so, you need to make sure all players have their best CC abilities prepared and planned in advance. You do not want every single player to use their biggest AoE CC instantly when the sparks spawn, since that will force you to manually (single target) the sparks that follow after the initial set and so on.
Placed abilities (Monk Ring, Mage Ring) should be placed in a set position before the sparks spawn, to start the cooldown and avoid having cast time or to use globals during sparks. This will be very important in Phase 2.
Sparks Spammable Macro
Replace ‘Axe Toss’ with whatever ability you want to use to interrupt spark.
/tar boss1
/targetenemy
/focus
/tar player
/tar focus
/tar boss1
/targetlasttarget
/cast [harm,nodead] Axe Toss
/tar boss1
This macro will auto-search for any available spark that is in range and instantly use the ability on it. This is best used once you finish your ability combo and the last thing remaining is a single target interrupt. Mages with Spellsteal, Shaman Purges etc can spam this macro forever until all sparks are gone.
Pushback 1
Pushback 1 happens a few seconds after the first Sparks.
After Pushback 1, you get a Breath and Bomb combo, followed by Pushback 2.
Here you should look to heal up as best as possible between Pushback 1 and 2, since you will get Sparks 2 very soon. We suggest using AMZ + Barrier/Darkness/SLT to reduce the damage taken by bombs.
Sparks 2
Just as you finish Pushback 2, you have to rush to your Spark position! We suggest using small/medium personal defensives here for smoother progression, early on, people will have trouble reaching their spot and will likely over stack on someone, creating larger damage spikes.
You also get the 3rd set of Bombs just as you finish Sparks, so having people with more health will help the raid to survive the explosion. If you survive this, you will have some extra time to heal up the raid to full before the next Pushback.
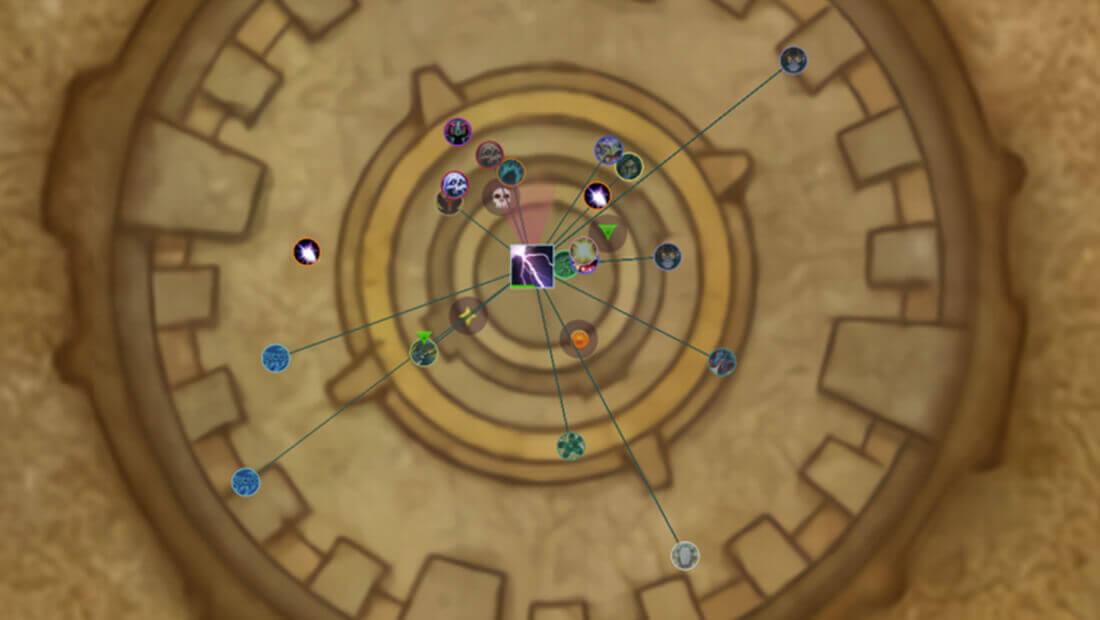
Pushback 3 + Sparks + Bombs (wombo combo)
You will have approximately 10 sec after Pushback 3 to position yourself properly before the big bang!
Here you will get Sparks spawning and Bombs going off nearly at the same time.
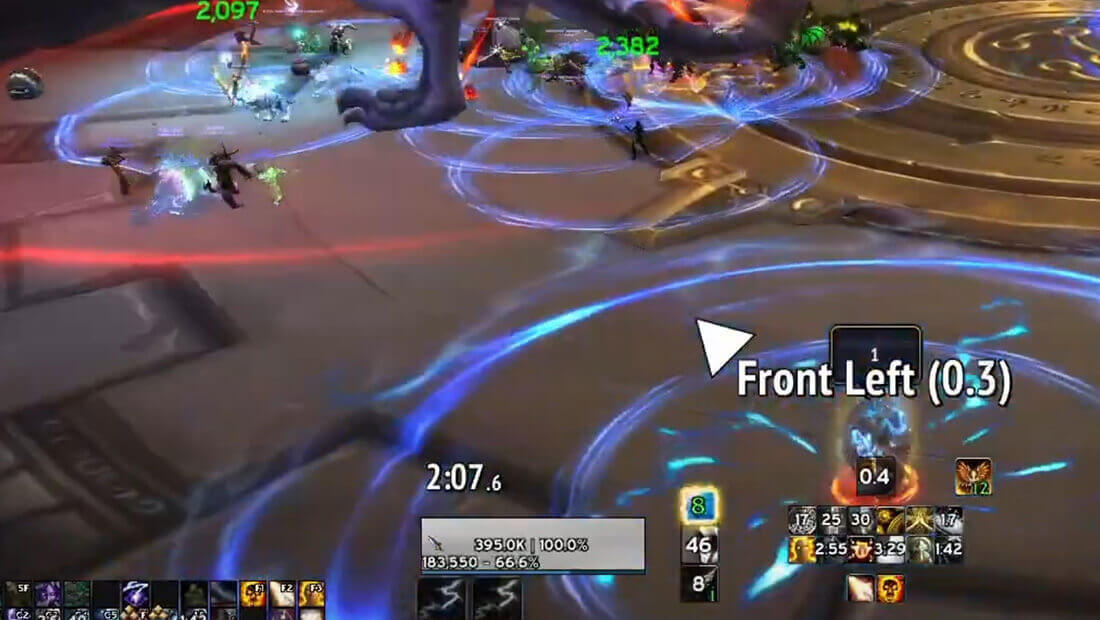
As you can see here, the Sparks circles have spawned already and the bombs are about to go off.
Here you will want everyone to use strong defensives + big healer CD’s.
Players need to go to their Spark position, even if that places them closer to the bomb players and take extra damage because of it (this is where defensives and healer cooldowns come into play).
The 3 players should look to go back quickly after the bomb explodes, but they should not try to force themselves back into their assigned position, as they will not be able to reach it in 90% of the scenarios, which will mostly lead to unnecessary deaths. Instead, simply get as close as possible to the group and just spawn the Spark there.
Pushback 4
Shortly after Pushback 4 happens, this is a rather chill moment, as it behaves like the Pushback 1+2 combo. So Breath into Bombs Into Pushback 5. Just make sure to be stacked behind the boss for extra heals.
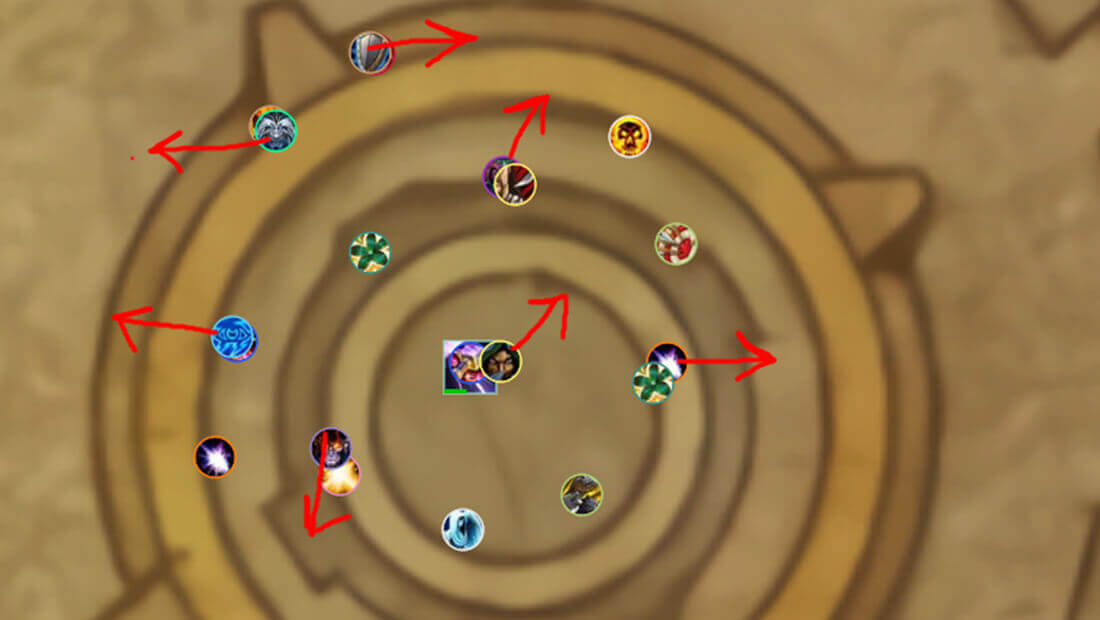
Pushback 5 + Sparks (middle of the room)
This is a crucial point in Phase 1, since this will lead you into the Intermission afterwards if you survive it.
This Pushback on its own is very hard to deal with. Winds are insanely strong and you will have to use your abilities/gates perfectly. Just as the Wind’s stop, you will start spawning sparks. With this one, you have to make a formation in the middle of the room, since you won't be able to reach your standard spot. You also get a set of bombs just after the sparks, so it's overall a very intensive damage taken sequence.
You need to make sure any leftover Healer CD’s, Personals and Health Pots are used for the Sparks/Bombs. You will get all of that back once you need it again (Health Pot for example will be ready for 3rd sparks in Phase 2).
Push the boss into Intermission 1 (65.0%) at 2 sec remaining on the Pushback 6 Cast and go to your sides, make sure to dodge swirls on the way to avoid taking unnecessary damage.
Intermission 1
Team Setup
Blue Side:
- 1x Tank
- 3x Healer (pref Evokers)
- 6x DPS
Red Side:
- 1x Tank (preferably a Warrior)
- 1x Healer (preferably a Holy Paladin)
- 8x DPS (DPS that has strong single target burst should be here)
The reason you want 3 healers on the Blue side is because of the Player Absorbs that you have to deal with. Not healing them in time will kill the entire group.
On the Red Side, players have to Nuke down the Shield before the cast is finished and interrupt it, otherwise the whole group dies.
Momentum Redistributor Boots
Picking up level 1 Shadowlands Engineering will make Intermission 1 much smoother.
3-4 Sec before you get knocked towards your platform, use the boots!
It will negate most of the fall damage and do damage to the Ruiner add! Having your entire team use the boots will almost instantly kill the Ruiner shield as you land. Doing so will give you extra time to set up damage/healing before you potentially have to dodge the first breath (more about breath down below).
Classes like Evoker, DH do not need to go for it as they can cancel the flight, avoid damage and start doing damage/healing before others can.
How-To Intermission Breath
Players often overthink the Breath mechanic in the Intermission, making it way more complicated than it actually is. The only Breath RNG is which side will get the first Breath. The moment you know that, you already have a set route that you will follow. You can move based on a timer, without any visual indication.
At the start of Intermission just dodge based on Smoke animation, or have someone looking out for where the boss is. As long as everyone knows that the moment Smoke animation happens, they need to start moving instantly, you should have no problem dodging it.
Every other Breath in this phase can be dodged without needing to look! When Breath Countdown hits 0, wait 1 sec and simply start moving. That way you will already have baited the Breath in the correct position, but will have some extra time to move away.
Each side will have 2 possible routes.
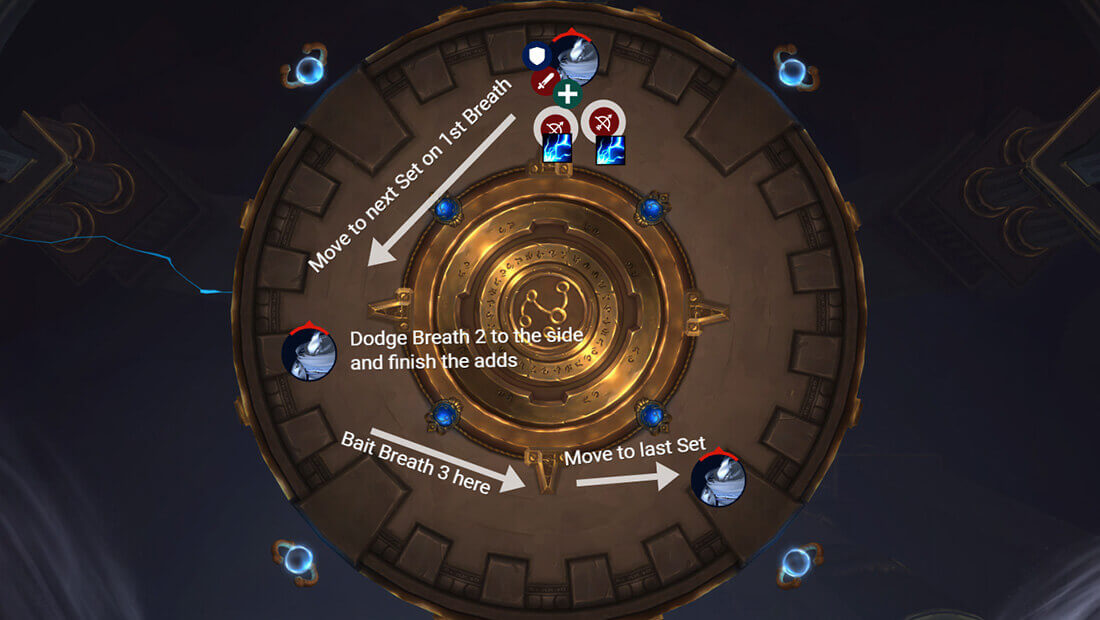
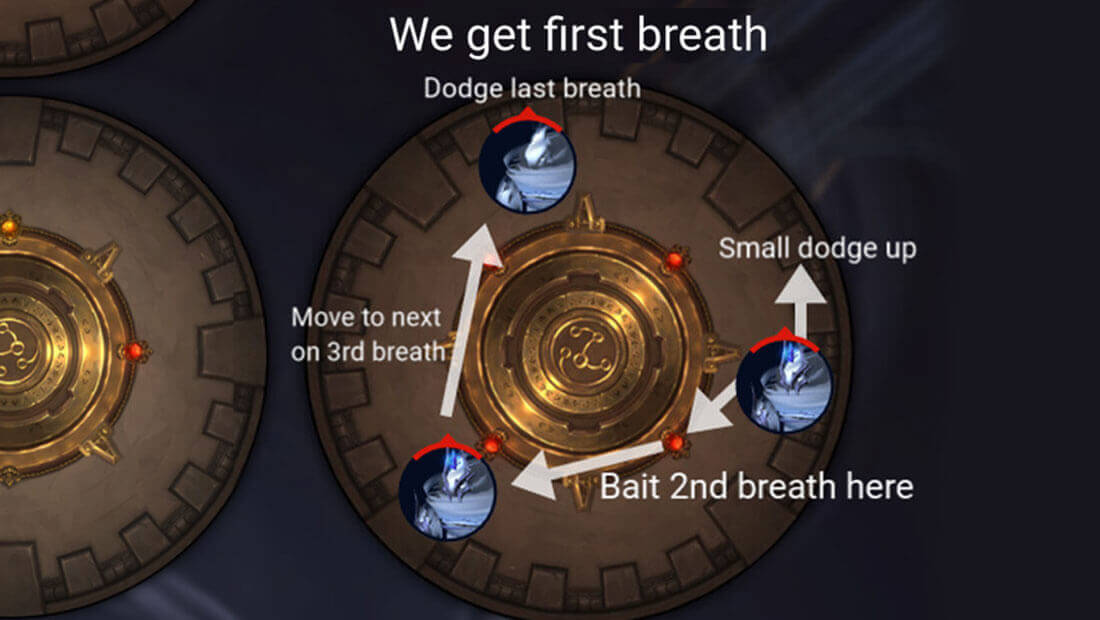
Blue Side
Blue Side Route if you get the first Breath
Blue Side Route if you DON’T get the first Breath
Blue side's main objective is Healing the Absorbs and properly interrupting.
Since Players cannot be healed when they have an absorb, failing to interrupt adds and stunning them will most likely result in deaths. Make sure you have proper CC assignments.
Add Priority: Ruiner > small adds > Zealot
1st Set
If you don’t get the first Breath, then the 1st set is super easy. You just stay stacked, AoE everything and heal up the absorbs.
If you get the first Breath, you will be forced to dodge it to the side, just as absorbs are applied. The Shattering Shroud application on its own deals 65k damage. You need to make sure players do not ignore adds while dodging breath! Do your assigned interrupts/stuns while dodging to the side and heal up the Absorbs.
2nd Set - Zerg strat (recommended)
The Zerg strat on the 2nd set is basically killing the Zealot add before the Shattering Shroud cast! This would fully skip Absorbs and will make this set extremely easy.
As soon as the Frostforged Zealot spawns, have everyone in your group (including tanks and healers) swap to it. Trinkets like Grieftorch are super good for this. If everyone is single target blasting the Zealot, it should not be a problem at all. Once killed, just AoE everything down.
3rd Set
This set behaves exactly like the 1st set and is directly affected by the 1st breath at the start of the phase.
If you didn’t have the First breath, You will get Absorbs at the same time as Breath cast on the 3rd set. So use kicks/stuns and heal.
If you had the First breath, just stack up and AoE everything down and heal through the absorb.
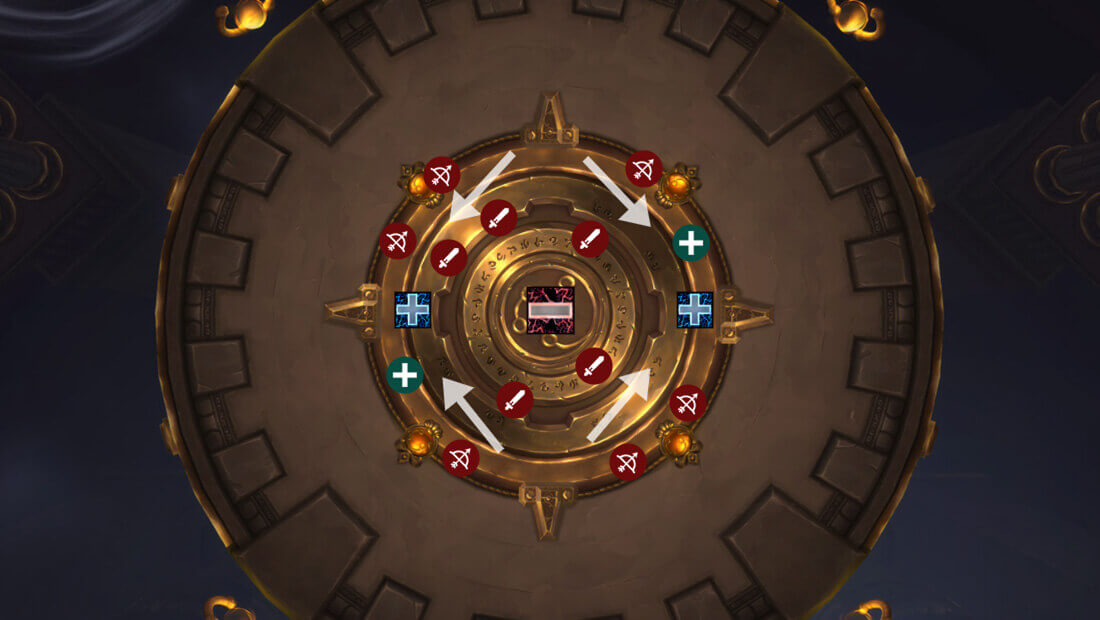
Red Side
Red side if you get the 1st Breath
Red side if you DON’T get the 1st Breath

Red side’s main objective is Destroying the Flame Shield on Flamesworn Herald! Failing to do so will kill the entire group. Unlike the Blue side, the Red side will have less issues with Interrupts/Stuns. You should still assign players to do kicks and stuns but this is mainly to move/stack adds easier.
One common issue on the Red Side is a lack of AoE damage due to everyone nuking down Flame Shield on each set. Just make sure that low health adds are always focused down since they get buffed when less than 50% health.
Add Priority: Herald > Ruiner > small adds
1st Set
If you don’t get the 1st Breath, just nuke down the Herald once he’s up and AoE everything else.
If you get the 1st Breath, the Flame Shield will come up just as you are dodging the breath. Make sure everyone is still nuking down the Herald while moving. Make sure to kick any adds in the back so they follow you, otherwise you might have 1-2 low health acolytes in the back, casting at 300% haste increase.
2nd Set
It behaves exactly like the 1st set, but you will get the opposite of what you had at the start. So if you had to Nuke down Flame Shield while dodging the Breath on 1st set, on 2nd you will have plenty of time to destroy it and AoE everything down before you have to dodge another Breath.
3rd Set
This set will be exactly like what you had on the 1st set.
Phase 2
Proper positioning is the key for progressing Phase 2.
You will want to assign positions for all players for the Shield and Wave.
How-To Shields in Phase 2
Have your players use their CD’s on the shields.
Most will have everything for Shield 1 and Shield 3. Shield 2 will get destroyed by Balance druids, Shamans and Mages. Your goal is to finish each shield in 14-16sec. Later into the progress, once you are hitting Phase 3 and know approximately how much damage you do to the boss in Phase 2, you can start optimizing CD’s by moving some of those to the boss instead of the shield. However, I strongly suggest you do not do that from the start since it will cause you a lot of shield wipes in Phase 2.
Make sure your players are using their strong abilities once they have the damage buff. A common mistake is having Warriors use Wrecking Throw before they get the buff.
Inversion
In Mythic, several players will have their mark swapped during the shield. This will happen at least 2x each Shield. A 3rd Inversion is also very common, especially early into progress. A 4th usually means you are way too slow and you will likely wipe to healers not being able to keep up.
Just have someone count the Inversion timer and have each player check to be safe. WeakAuras help a lot with this! When you get inverted, you have 2 sec to move away. You will keep the buff when you are running to the other group in those 2 seconds. Even if you are not stacked with anyone.
Pre-Shield Positions
Shield Positions
Note: On Heroic, most guilds send Positives under the boss. We recommend sending Negatives under, as it seems to prioritize Melee’s more, but both options will work.
Traffic Rules: If players are stuck in traffic, Negative has the priority!
How-To Waves in Phase 2
Waves do splash damage when you pass through them.
Each player needs to know in advance what abilities they need to use for each of the 3 waves in Phase 2! Minimizing damage taken by the Wave is very important. DK’s for example, even though they use Death’s Advance and do not get pushed by the wave, if they stand still they will take 2x the damage. This is because they spend more time in the waves. Using the ability and running through the wave will reduce the damage.
For some it’s super easy, and some will depend on others for supporting abilities.
Examples:
- Druids need certain distance to use Cat form Wild Charge
- Warlocks need Evoker’s Time Spiral to be able to teleport each time.
- Hunters need Warlock’s gate and turtle
- Priest should be rescued by Evokers each Wave
- Paladins need to Bubble Wave 2 or 3
Note that the Warlock Gate can be used by multiple players at the same time. Just make sure you are at max gate usage range and don’t stand next to the other player.
Wave Positions
How-To Fulminating Charges in Phase 2
You will get 2 sets in Phase 2. Your Paladin/Monk players need to be ready to use Freedom/Tigers Lust on one of the 3 players that get the initial Charges.
Prioritize Classes that cannot self remove the root effect.
Players affected by Charges should move away quickly to avoid getting clipped by the other Charges. Each player should always use their biggest defensive once they have the DoT. Healers should also assign externals to those players as well and make sure they have them in range for heals. Mages/Rogues should always remove the DoT with their immunity.
Classes that cannot self-remove the Root, should always pre-spread away from everyone. This will reduce the RNG by a lot, because having 3 circles spawn in the middle of the room will most likely lead to deaths.
The 1st Charge happens just after the 1st Wave. Have your druid use Roar when they are under the boss after their Wild Charge so players can spread out fast.
The 2nd Charge happens around 6 seconds after the 2nd Wave. Here you have a lot of time to spread out, so make sure you do so.
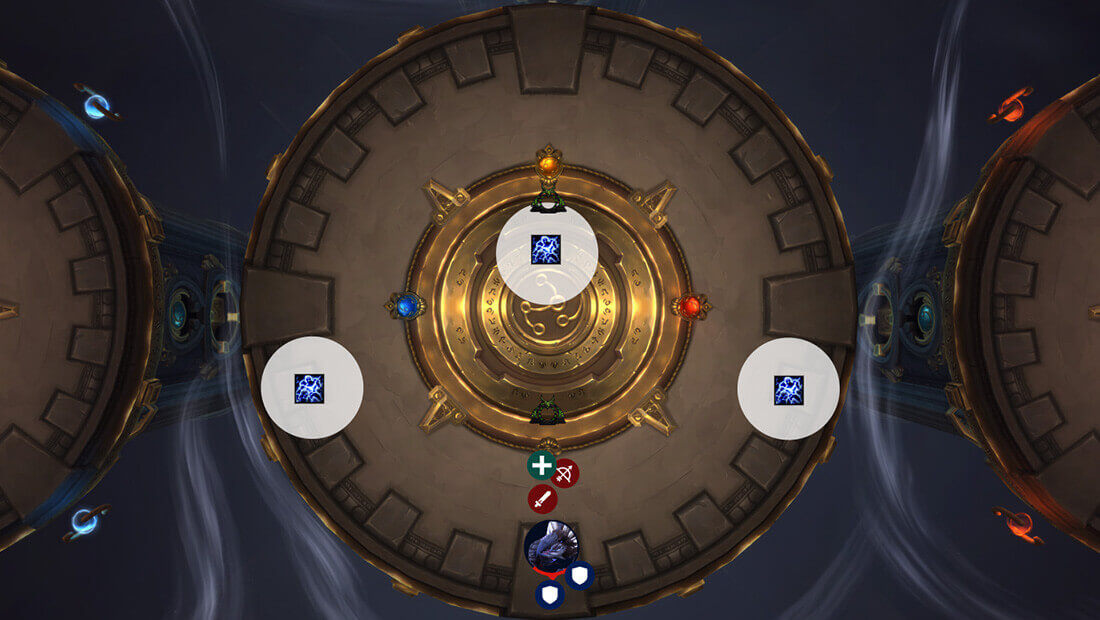
How-To Sparks in Phase 2
Early Phase 2 progress, make sure to set a few World Markers to help players orientate when getting into Spark Formation. All sparks are done in the middle of the room, just like you do at the end of Phase 1.
No matter what combo you get (Spark into wave, Spark into shield), players need to be aware that if a single spark goes off it's a wipe! This means that your absolute, number 1 priority, is killing all the sparks before you do anything else.
1st Sparks are simple. This is just positioning practice, there is no overlap and plenty of time between abilities.
On 2nd Sparks you will get the 2nd Wave 3 seconds after. Players tend to move/spread away too fast, leaving multiple sparks behind and causing a wipe. You should always have strong Healer cooldown’s assigned there, so even if you get cleaved by a wave a bit, it won’t kill you.
On 3rd Sparks you will get the 3rd Shield instantly. This means you have to kill all the sparks while not touching anyone with opposite marks and get into positions for the damage/heal buff. There is a very simple way to deal with this.
Everyone gets in their Spark position. Fully focus on sparks and ignore that there is a shield incoming. Raid Leader should count down the Stormsurge timer. Once it hits 0, assigned players should start moving. You will have exactly 3 sec from that moment to get into a safe spot.
Every dual stack should have 1 player assigned to move away. Every solo player should just stand still in their regular position.
Prioritize having players move that have less CC options for sparks. That way the players that do not have to move can fully focus on the remaining sparks.
Intermission 2
This phase is fully scripted and has no RNG, unless someone baits incorrectly.
Melee will have to dodge 1 Breath and Ranged players 2 Breaths. All 3 Breaths are baited, so you will know exactly where they are.
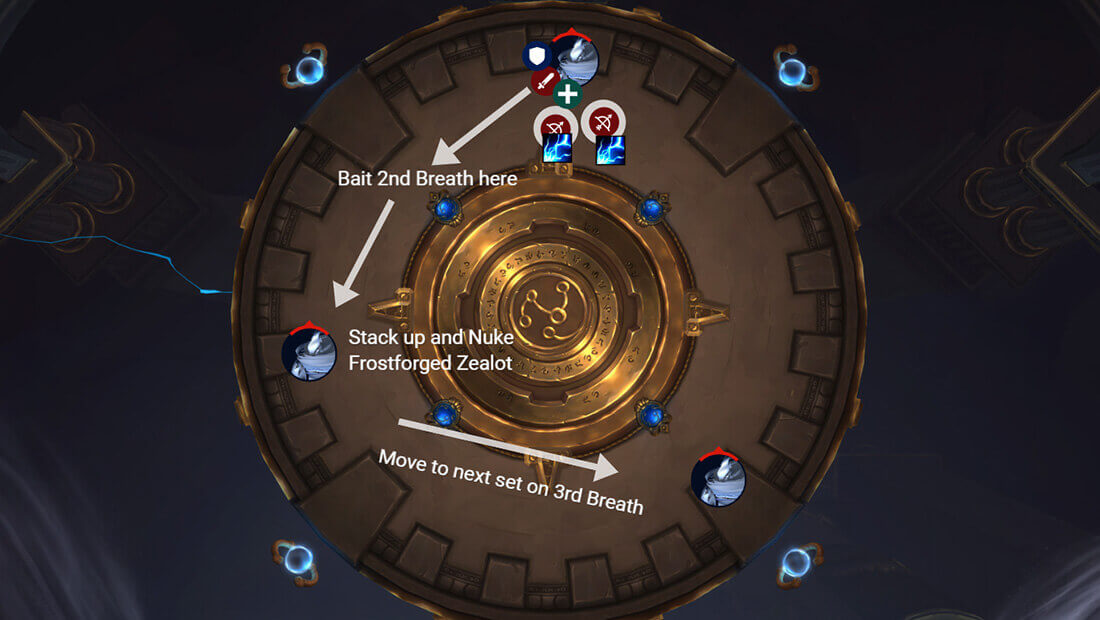
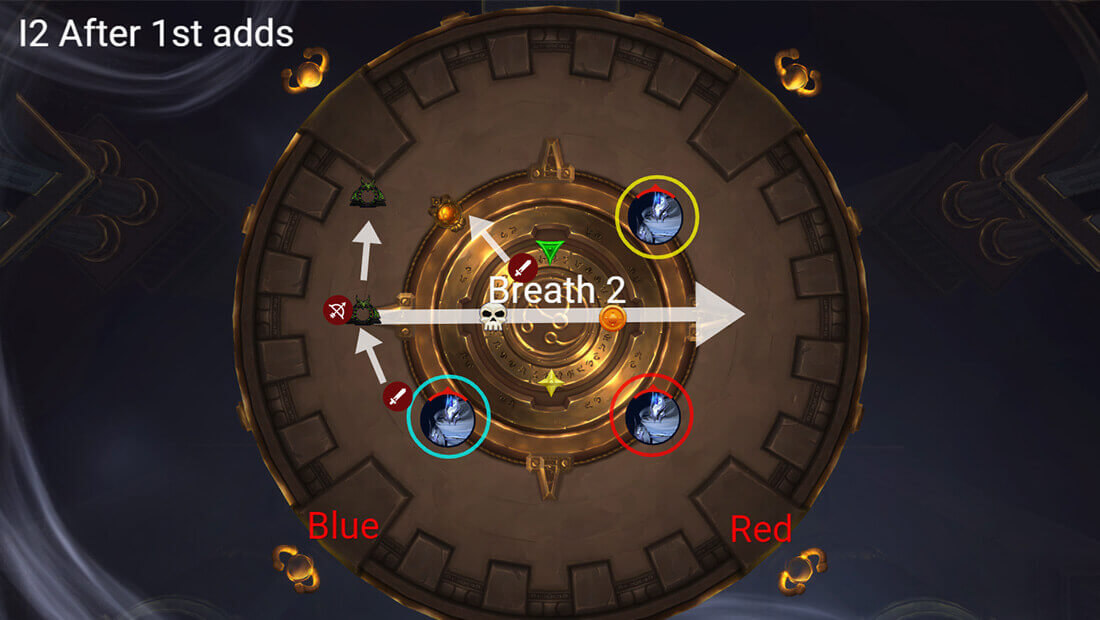
Breath 1
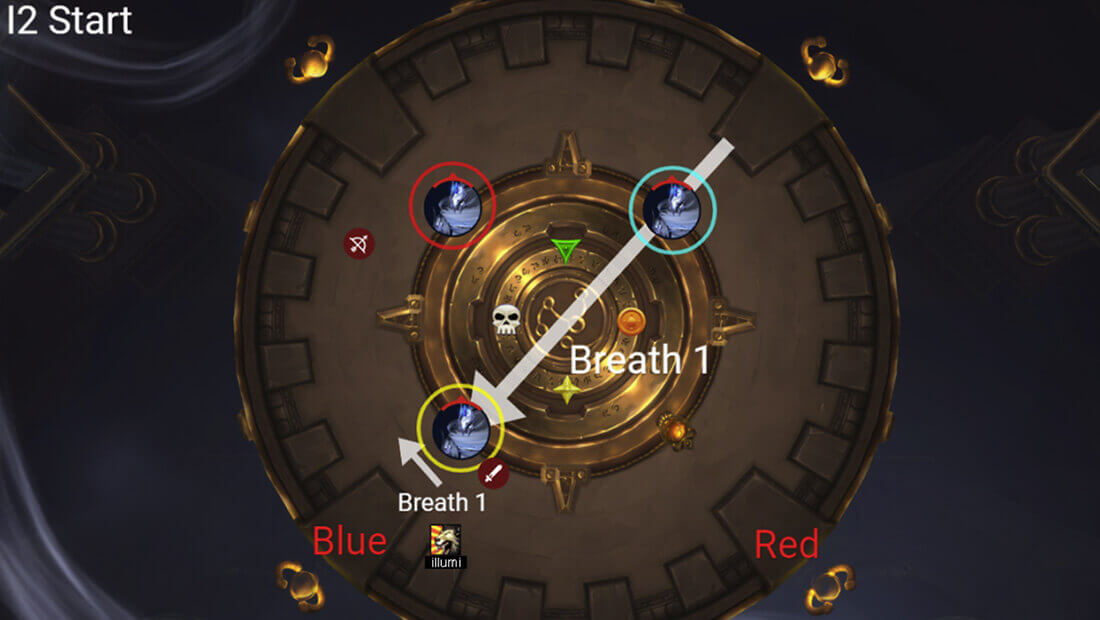
Intermission starts and all Melees + Balance druid + 2 Ranged Healers stack up behind the Yellow marked add.
You will get the 1st Orbs at the same time as you get the 1st Breath, which if baited properly will be exactly on top of that add. Just try to be stacked when dodging.
When the Breath is there, a Balance Druid should use Roar and melees can dodge towards the back or front, either is fine. However, Ranged players should aim to dodge forwards, towards the ranged group as they will want to rejoin them after the 1st Breath.
Ranged players should be close to Red add, loosely spread so they do not bait the breath. They should also be attacking the Red add.
Shortly after the breath, First Teleport (Storm Break) comes. On this one, you are NOT ALLOWED to slow anything. The Adds need to reach the middle of the room at the same time for the perfect Mass Grip. DoTs/Bleeds etc. that do not slow are fine.
When the adds are in the middle, Mass grip and Stun whilst everyone just blows them up.
Non-DK Tank + Healer (preferably Holy Paladin) do not go to the middle of the room and simply stay at the big add for the entire intermission.
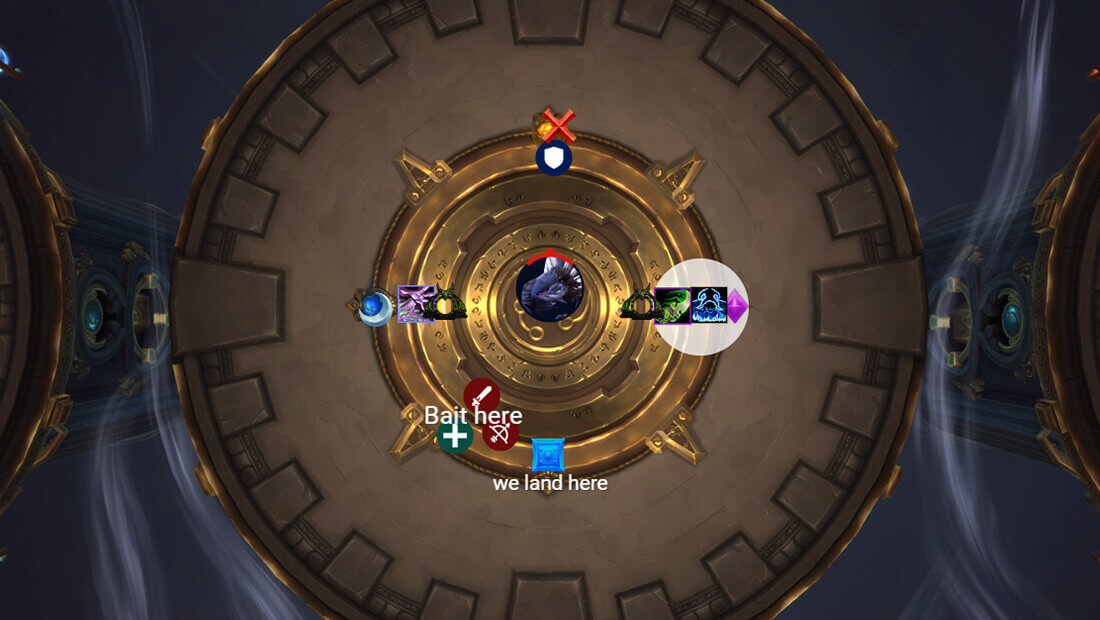
Breath 2
Instantly after you killed the middle small adds. Entire Ranged and 2-3 Melee DPS bait on the Gate that is placed on that tip. Once the Breath timer hits 0, wait 2 seconds and take the gate.
All leftover Melee should go back to the big add they came from. In most cases this should be 2 tanks, 3-4 DPS and 1 Healer.
Note: A lot of guilds would send 3 healers to Ranged and leave 1 healer on the melee unit, we find it safer to have 2 healers on each side as that could help prevent deaths from getting hit by the orbs.
The moment ranged take the gate is the same time the adds will cast Teleport 2!
It's very important when this is happening that nobody uses any kind of DoTs/slows and similar on the melee side!!!
Druids can Mass Root in the middle when all adds are in range.
Both groups are now attacking the big adds. You want the Colossal Stormfiend and Electrified Stormfiend to die roughly at the same time to reduce damage taken on the raid when one of them gets empowered too early. Depending on your raid comp and groups, one add might go down much faster than the other; adjust that by having some of the players from the faster camp move over to the slower one.
Breath 3
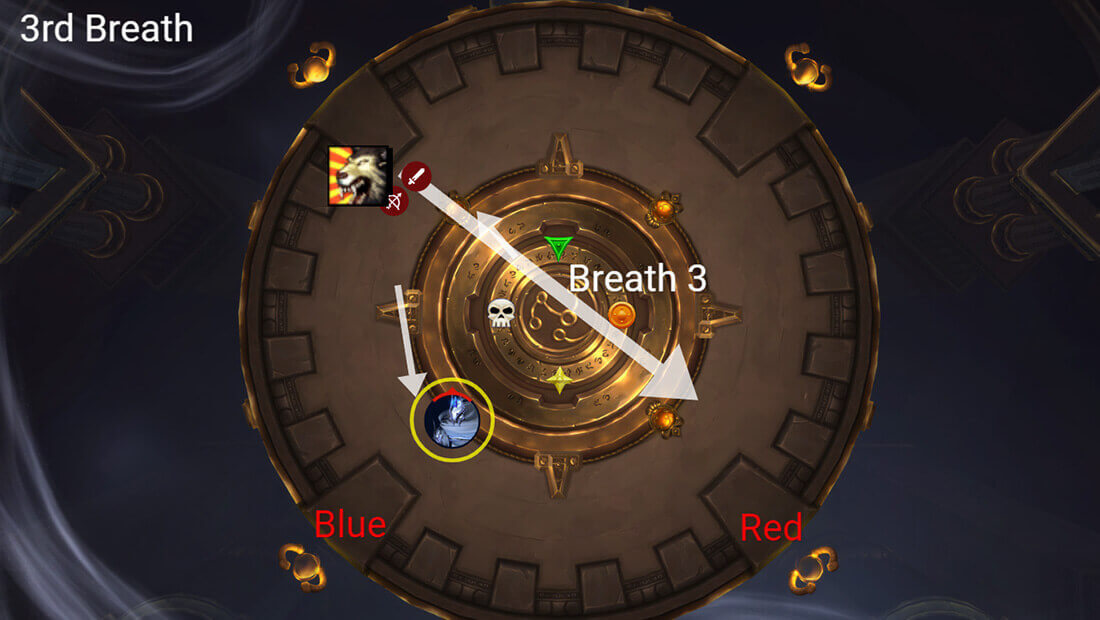
This Breath happens at the same time as Teleport 3 and acts like a small enrage in this Phase. If you fail to kill both big adds before Teleport 3, you will wipe.
Range team simply bait around where their add died and use speed boosts and run to the bottom Melee Add to meet up with others. When the timer hits 0, you can pretty much start moving, as this bait is not so tight and will not endanger the melee team.
The add will use Teleport 3. Those small adds are coming all the way from the back and mostly don't really matter. For safety, place a Mage/Monk Ring behind the big Melee add.
Kill off the Big add, then get knocked to the main platform and Phase 3 starts.
Note: Healers need to be prepared to heal the extra damage taken after Teleport 3. At this point everyone has high stacks, so make sure you have some cooldowns assigned here.
Phase 3
Opening Positions
You will land on Blue. Throughout the entirety of Phase 3, you will always want to slowly go back to Blue once you are done dealing with other abilities so you can get more healing.
You bait the first breath on the left side of it so you can dodge back to the right (to the spot where you landed.
Warlock can go to the left (Moon) side and place the gate once they are done with their DPS CD’s, and stay there until they get gripped to Purple.
How-To Tornadoes (they heal boss)
- Tanks will soak their front side.
- DH and other tanky/mobile classes will mostly soak the Tornadoes around Purple marker from the start of the fight.
- Other melee should soak the Tornadoes opposite of purple for most of the fight.
- Ranged team should soak the Tornadoes in the main stack area (Blue Marker).
Everyone soak as much as you can at all times! Never try to dodge a Tornado.
Note: Have your healers soak early in Phase 3 as they won’t be doing it later, since there is too much to heal. If each healer gets to around 4-5 stacks early into the fight, that should be enough to make it easier for others to soak afterwards without going crazy high on the stacks.
Extra tip: Make sure to clear the sides before the Pull happens, as you will be away from that side for some time.
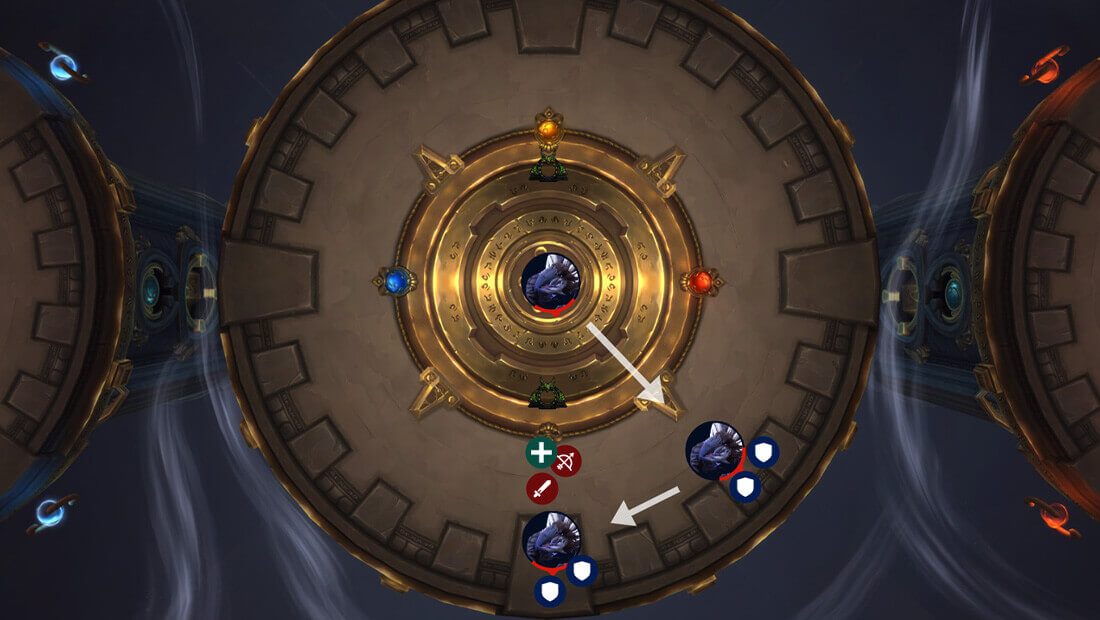
How-To Pull + Charges
Pull + Charge 1
Player with the Pull Charge goes to Purple (red gem). You get gripped there and take the Gateway after Charges are set.
Players with Charges stay, spread and pop a personal (give them Freedom + Tigers before you gate). And make sure all healers are fully spot healing them, as there is no significant raid damage going on at that point.
Pull 2
Player with the charge goes under the boss, use a speed boost as you get gripped and run away from the boss ASAP for the WAVE. Use the same Wave positions as in Phase 2.
Pull + Charge 3
Player goes to Purple again (red gem) and you get gripped there. Charges will happen at the same time, so speed totem/roar and run out to the opposite side of the room. Charges players stay and only move slightly to the sides since you will be using immunities for this set.
Have 3 players with immunities (rogues+mage are the best for this) be the closest player to one of the Charged players. That way when it pops it will jump to the nearest player, which in this case will be the immune player. If done correctly, you will only have 3 players (the one that initially got charges) have 3 stacks each. Which is the lowest amount you can have.
Pull 4
Player with the charge goes under the boss, speed boost as you get gripped and run out of boss ASAP for WAVE. This wave comes pretty fast after the Grip and you have less space compared to the 1st wave. Make sure to do this one as clean as possible since there is follow up damage afterwards (Tank beam).
Wave 3
This is the hardest moment in Phase 3. This wave comes 24 seconds after Wave 2. There is very little space to spread out, so getting cleaved is bound to happen here. Make sure you have very strong Healer CD’s assigned here with personals and health pots if needed.
As soon as you are done with the wave, have everyone run towards Purple Marker.
Charge 3
Everyone should be on the Purple Marker at this point. As soon as the Charges are applied, everyone else takes the gate. Give Freedom + Tigers Lust to rooted players and have them run away to not hit the raid with their circle. At this point, those players are pretty much chosen by the blizzard gods to sacrifice for the greater good of the raid. They can try to survive, but most likely won't, and should just focus on running away from others.
After this is done, there is nearly a minute of downtime where you are just trying to survive the ticking damage, soaking tornados and healing the Tank Beam hit.
If the boss is still alive by 14:20, you will get a Pull 5 which will happen on top of everyone, so not much you can do here except kill the boss.
Healer Externals
Use all externals on players that have Charges, however, make sure to reserve a Time-Dilation or similar for your non-DK tank on each Tank Beam. This will greatly reduce the damage done to the raid.