Raid Setup
Introduction
Welcome to our Mythic Smolderon guide. The Mythic difficulty of the boss will test your raiding team's damage, healing and orb kiting skills. Apart from the standard damage increase on Mythic Smolderon, there are 2 notable changes compared to Heroic difficulty; a new mechanic called Seeking Inferno and Living Flame orbs now buff the boss more if they reach him during the intermission.
Fight Style: Single Target fight
Recommended Setup: 2 Tanks / 4 Healers / 14 DPS
Useful Defensives: AMZ, Barrier, Darkness, Spirit Link, Spell Ward
Useful Movement: Speed-Totem, Roar, Timer Spiral, Gateway
Hero/Lust usage: 3rd Intermission (4 min)
Mechanics
4 random non tank players get targeted by an orb that follows them around. Colliding with the orb will cause an explosion dealing low damage to the raid, but increases damage taken from this ability by 2000% (a raid-wide one shot) for 3 seconds.
You simply need to take turns soaking this orb with at least a 3 second gap between the soaks.
Strategy
Before we begin, it's important to understand that this is a heavy HPS and DPS check fight, with simple yet unforgiving mechanics. All healer cooldowns have to be perfectly assigned, and you will need a very optimised DPS composition to meet the damage check.
There is one secret to the fight that often players struggle to understand; this fight essentially repeats after the first 1 minute and 40 seconds. So finishing the 1st intermission with everyone alive for the first time, essentially means that you know the fight, you just have to do this 2 more times.
The hard part comes from the fact that players simply need to survive all the way until the end. Mythic Smolderon does ramp up in damage, but that is covered with healer cooldowns and personals.
Soaking Living Flame orbs during the intermission is also an important factor in the fight, that will lead to way too many wipes. Players simply need to be very focused on soaking those orbs. The fight is doable with 2-3 orbs reaching the boss, but more than this will make it a lot harder than it should be.
Lastly, make sure to disable Particle Density in your settings, it will make Flame dodging much easier.
Dealing with Seeking Inferno (Hotfixed)
Seeking Inferno is one of the most annoying and problematic abilities in the fight. But with some rules, a good WeakAura and a little practice, it becomes much easier. Liquid (https://wago.io/LiquidAmirdrassil) and Northern Sky (https://wago.io/AmirdrassilCustom) WeakAura packs for Amirdrassil both have macro based Seeking Inferno lists for Smolderon, as well as other great WeakAuras for other bosses!
Note: Blizzard has hot-fixed the automation of a "Seeking Inferno" WA for this boss, so the only way to get a WeakAura that creates a list, is to have players press a macro once they get targeted by the Seeking Inferno orb. Check the description of the WeakAura you chose for instructions on what Macro to create and use.
3 players (previously 4) will get marked after each Overheated set. It is completely random who gets it, but it does not go on the tanks.
The general priority on clearing should be the following: Healer > Melee > Ranged > Hunter/Evoker.
However, I strongly recommend that the Raid leader is the only one who calls out who goes next, for multiple reasons.
Because the orbs do not spawn on all 3 players at the exact same time, there is a 0.5 second delay, the Raid Leader should call out the first player that he sees on the list, regardless of the spec/role of that player. This is simply to avoid any delay early on, because if you wait to see the full list, and then call out a name, the overall delay here can be up to 4 - 5 seconds.
Once the first player soaks, you can then follow the priority list.
It is the player's responsibility to look when they can safely hit the orb once their name has been called. Check the debuff!
When the name is called, the player should stop everything and simply go for the orb, unless you happen to be soaking the tank hit, as you have to do that first.
Two notable mentions regarding this ability:
- Orbs can spawn on top of the player, causing them to instantly soak if not careful (usually happens on the 2nd set before the intermission)
- Orbs passing through other players deal a small amount of damage, this is why melees are priority after healers, so they do not kite 2-3 orbs around the melee space.
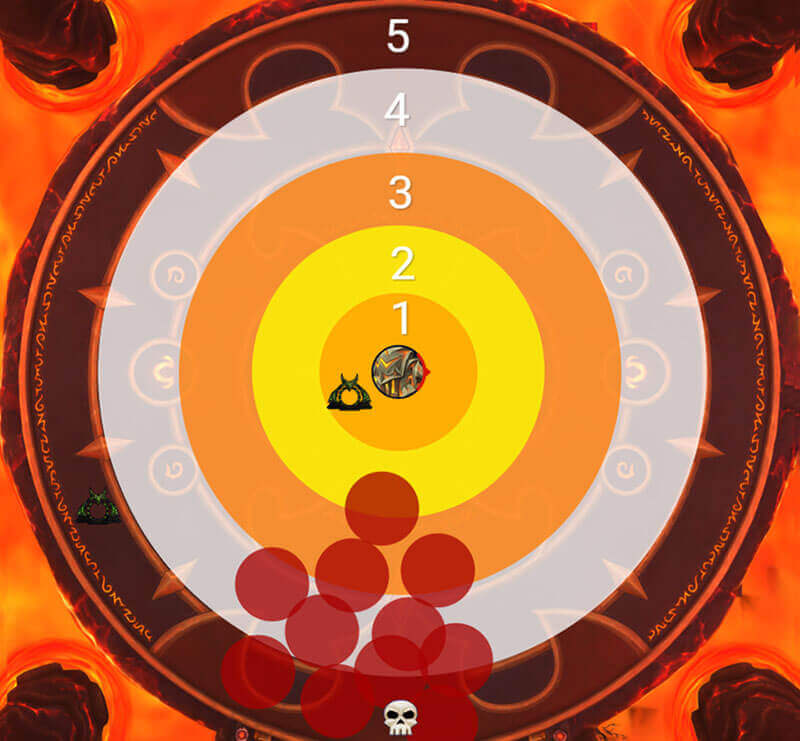
Opening Positions for 1st Set
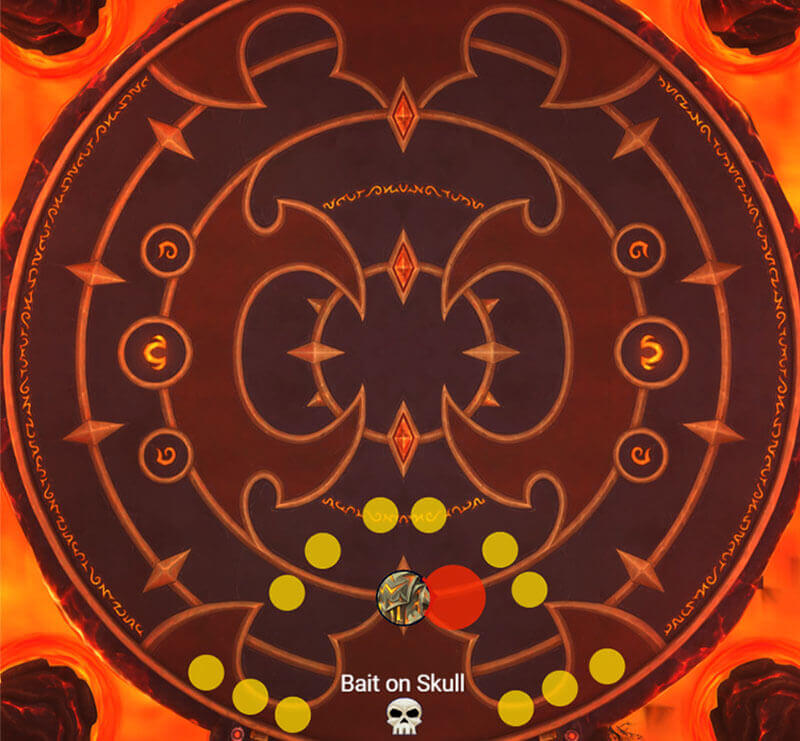
Pull the boss close to the entrance and do your first tank soak on the marked spot.
Have all Overheated players spread around the boss, ranged should prioritise wall/edge locations, but make sure there is a safe area around the skull.
Once overheated targets explode and start sending out Flame Waves, you have around 5 seconds to reach the preferred bait spot before potentially spawning puddles under you (this is random who gets it).
It is important to remember that the 1st set of Brand of Damnation and Overheated in each ‘phase’ always gives you 5 seconds to reach your bait spot. Meaning its very pointless for players to box themselves in with Overheated circles. You can stand anywhere you want during overheated as long as you can reach your bait spot within 5 seconds.
The 2nd set drops the puddles instantly as you explode with overheated. This means that those players need to be standing in a spot already; a place they would feel fine if a puddle spawns there.
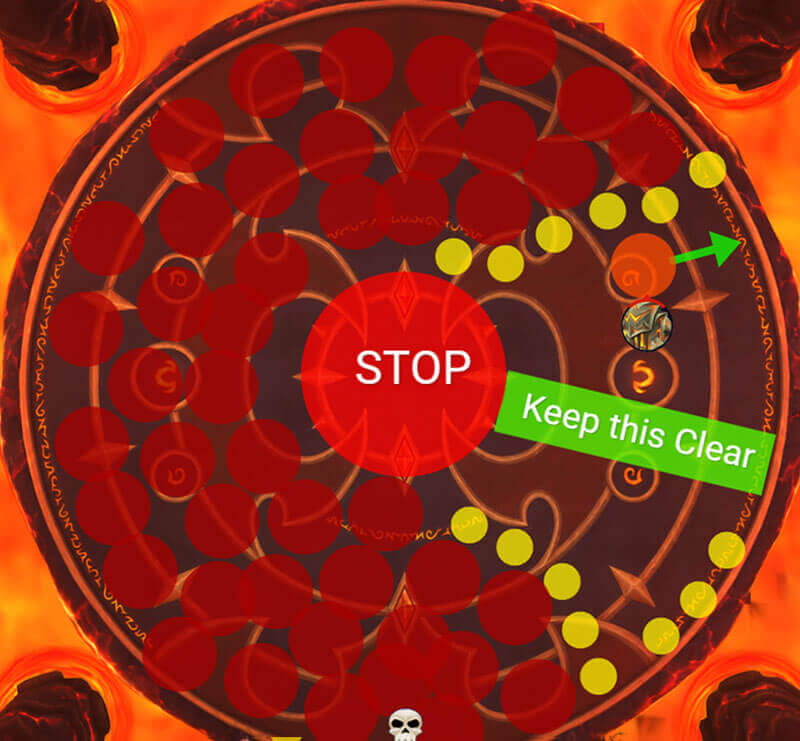
2nd Set Positions
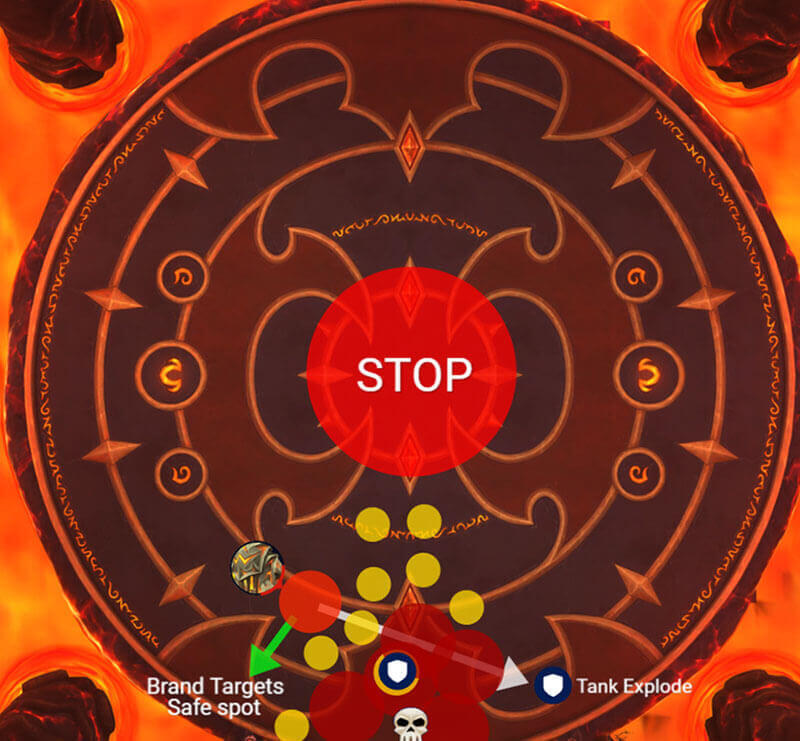
The second set is always the harder one in every phase.
You now need to place Overheated in spots which will potentially spawn a puddle, so if you run ahead or go to the middle, that's bad positioning. Instead you have to cuddle up somewhere close to the old puddles, away from the middle. The stop sign on the image above shows you how close you can go towards the middle.
The Tank that has overheated can drop it on top of a puddle, they don’t take much damage from standing in fire.
Additionally, any gaps in old puddles are a perfect drop position if a player can safely reach that spot without running through the fire.
Brand of Damnation targets (tank circle) have their own safe spot to the side, on the edge. Make sure there are no Overheated players standing within 15 yards of the safe spot to avoid unnecessary dodging.
It's important that the brand targets after the tank hit, do not instantly run to their safe spot, instead they need to stutter step towards there because you drop a puddle once the absorb is healed. This can become very problematic if players are pre-running.
Intermission
The intermissions are very similar to heroic, but the rings ‘pop’ faster and getting hit by a ring will require personals and externals if you want to stay alive.
I recommend using a WA that tells you the safe spots in advance like https://wago.io/qGG30dFY0.
Additionally, I recommend using a WA to show who missed soaking an orb (https://wago.io/RBcv1KK_k). It is very important to fix this quickly, and if there are several players who constantly struggle with soaking their orbs it’s much better to resolve that early into progress.
Whenever you need to use the warlock gateway, make sure to use a speed buff on the other side (after landing) because you are always forced to run back to 2 afterwards.
You will always bring several Seeking Inferno orbs in the intermission, you deal with them the same way as usual, with some added difficulty that you now need to soak your damage buff orbs, dodge rings and do Inferno orbs.
The 3rd intermission is at 4 minutes, and has a very generous pattern for damaging the boss, it's strongly recommended to use Hero/Lust here, just before the knock. Smolderon should be less than 28% after this intermission, otherwise you will have a hard time killing the boss before the enrage.
After each intermission, you position the boss close to the old puddles (15 - 20 yards gap) and you repeat the same exact thing you've been doing since the pull. The only difference is the last ‘Phase 1’.
The last ‘Phase 1’
This one is a bit different because you suddenly have way more space now (imagine that). Provided you've been playing clean up until this point, this phase is actually the easiest one. Why? Simply put, you now have 2 sides where you can drop stuff, instead of 1 (when only dropping behind).
So you made your way around the map and you will notice the initial puddles from the pull are on the other side now.
This allows your team to spread widely for each Overheated set because it's totally fine to drop the puddles on the opposite side of the room. Mobile range specs should always go to that side, but even some melees that do not lose too much DPS moving away from the boss can also use it.
There is absolutely no reason to not use the entire space, provided you keep the “green line” clear. You will need this to play the last intermission.
Save immunities for the end, to extend the pull in case you need a bit more damage. Use it when the room’s enrage is about to hit you (last intermission ring).
Special Tips:
- Spellward disc priest on important ramps or a range DPS during intermission
- Time Spiral before each intermission
- Personals/Immunes for tank soaks, Skills for Fire dodge
- Do not Shadowstep the boss in the intermission before DPS orbs spawn
- Make sure to set up a proper speed buff rotation for the intermission
- Use a WA to see who did not soak intermission orbs
- Check top DPS logs for your spec to see the best cooldown timings for Mythic Smolderon