


Raid Setup
Recommended Classes
- 2 or 3 for off-healing and P1 Intermission damage, Stampeding Roar etc.
Mechanics
Sylvanas will cast Windrunner, enabling a combo of three different abilities:
Desecrating Shot: Spawns swirls on the ground that need to be dodged, hitting for 33k. She will fire two different patterns of these per Windrunner cast.
Withering Fire: Hits random players for 11k Shadow damage and applies the Barbed Arrow debuff which needs to be cleared by taking a Domination Chain.
Shadow Dagger: Debuffs random players dealing 6.6k Shadow damage every second for 9 seconds. This mechanic can be dangerous in combination with high Barbed Arrow stacks, or being linked to a Domination Chain.
You will have to deal with 3 sets of Domination Chains over the course of Phase One. The boss will spawn 8 Arrows in 2 clumps of 4, based on where she is positioned before she casts it, she will hop backwards in a zig-zag pattern 3 times, spawning them loosely around the area that she has passed through on either side of her.
Once they have spawned, they will all lock on to their closest targets. If a player is closer two 2 Arrows than any other player, the Arrow closest to them will lock onto them, and the Arrow slightly further away from them will pick the next closest player.
Getting chained to an Arrow will allow a player to drop their Barbed Arrow stacks, so players with higher then 1 stack of this should prioritise getting chained to these.
Note you can BoP and Kyrian Potion the Barbed Arrow stacks if someone misses getting chained and is in danger.
Your dps should prioritise killing these Arrows at all times, boss dps will not be an issue in Phase One and you will very likely have to stop dps once comfortable in the phase.
On mythic difficulty if someone is pulled within 4 yards of a chain they will explode dealing 110K shadow damage to all players within 30 yards and most likely wipe the raid.
You should let you melee have priority on the closest pack of chains to the boss each time they spawn, and have ranged get linked to and nuke the furthest pack.
On mythic difficulty, each time a player is chained to an arrow, they gain a stack of Woe, which causes raid wide damage each time they are then chained to an arrow, this stacks up each time they are chained, starting at 1.3k shadow damage and ramping and increasing in damage by 100% per stack.
This mechanic is generally ignored for the most part.
Veil begins at 6 stacks on Mythic compared to 5 on heroic.
Veil is a very important mechanic in all phases of this fight.
In Phase One nobody should ever be hit by this, using a mixture of Sprint cooldowns and Gateways to dodge them.
If someone is hit, they should run over people to spread the debuff as quickly as possible to make it easier to heal off.
Veil will generally always pick a ranged player, so the mechanic can be baited in certain ways, and it also allows you to control the positioning of Sylvanas which can be tricky otherwise.
In P1 the Veil will generally be dropped onto a ranged player so you can bait it’s positioning by having all your ranged dps/healers stack at a certain area, this also helps you control the boss’ movement in P1 which is not always easy.
On mythic difficulty Wailing Arrow is replaced by Black Arrow in Phase One - working in much the same way except for the new addition of spawning Dark Sentinel adds.
The mechanic picks an extra target each time it is cast, and you will need to deal with it a total of three times in Phase One.
- Cast 1: Tank only
- Cast 2: Tank + 1 non-tank player
- Cast 3: 3 non-tank players
After the arrow hits, Dark Sentinel adds will spawn around the player and lock onto random players. These adds need to be controlled using things like Ring of Frost, Ring of Peace, and Ursol’s Vortex. Players should try and make sure that the purple line between themselves and the add that is focusing them is traveling through the boss, or through the Vortex/Ring of Frost.
Each time the boss casts Black Arrow she will gain a buff causing her to spawn additional Sentinels on future casts, which is compounded by the additional Arrow casts she does, resulting in this:
- Cast 1: 2 Sentinels (1x2)
- Cast 2: 6 Sentinels (2x3)
- Cast 3: 12 Sentinels (3x4)
Be aware these adds appear to have extremely long arms, and will clap you if you are anywhere near them, it’s recommended as a melee dps to stay away unless you are very sure you are not fixated.
Same as heroic except for damage values, the boss will gain a stack of Ranger’s Heartseeker roughly every 5 seconds, and once she has 3 stacks she can replace a normal Ranger Shot, her ranged attack, with a Ranger’s Heartseeker. Each arrow inflicts 35,804 Physical damage and 24,237 Shadow damage, applying Banshee's Mark which is a dot that ticks for 3,305 Shadow damage every 5 seconds for 18 seconds and can stack.
You want to mitigate this, and then taunt swap afterwards. Sometimes her spell queuing can get a little funky and a tank may have to take 6 stacks due to the Black Arrow timings, if this happens they should use a strong cooldown and/or call for an external from a healer.
Recites a chant of destruction, inflicting 2,754 Shadow damage to all players every second while no players are within 50 yards.
This is basically Blizzard’s way of making sure you don’t send the entire raid to one side and ignore some of the adds.
One of the small adds in Phase 2, Destabilize should be kicked whenever possible, otherwise these adds should be cleaved down and never focused as a priority.
Another small add, stun them when possible and cleave them down, never focus them unless nothing else is alive.
Mawsworn Summoner
Probably the most dangerous add in Phase 2, the Summoners will summon Terror Orbs which need to be interrupted, and Decrepit Orbs which will explode for increasing damage the longer they are left alive.
Summoners will also put Curse of Lethargy on players which needs to be decursed ASAP.
Summoners should always be the highest priority target to kill whenever they are present.
Souljudges will put Crushing Dread debuffs on players which cannot be dispelled on Mythic, so these are a high priority target, only below the Summoner in priority.
Players who are debuffed should be careful not to stand on their teammates and will need spot-healing until the Souljudge dies.
Once the Souljudge dies the debuffs remain on players until they expire but do not do any damage.
There is a Goliath in both the left and right 1st set of adds in Phase 2, these are the secondary prio targets as they are less dangerous than the Summoners and Souljudges. They do a lot of damage to the tank when their stacks of Fury get high enough, a dps Warrior Die By The Sword taunting can help the tanks out a lot here.
Sylvanas casts Ruin twice in Phase 2, after Adds 1 and Adds 2, this needs to be interrupted or she will make you all very dead.
You need to aim to be finished killing adds with between 7-10 seconds remaining on the Ruin timer in order to safely interrupt it in time.
Last but not least, Veil of Darkness continues in Phase 2, now throwing out 5 smaller circles each time it goes out. The reduced play-space in Phase 2 makes this ability quite tricky to handle, but it is imperative that nobody is hit by it as with Phase 1.
When fighting adds, the raid should split up creating gaps between the melee camp and ranged players, trying to create gaps between the Veil circles that are spawned.
While fighting Sylvanas in Phase 2, you should use a Demonic Gateway to have the entire raid stack together and then quickly leave the area once they land.
In Phase 3 Sylvanas will apply a stack of Banshee’s Bane to anyone who walks through one of her Bane Arrows puddles, and also a stack per hit of Banshee’s Heartseeker (3 Stacks) / Banshee’s Blades (4 Stacks) to the tank.
The debuff ticks for 2.2k Shadow per second per stack, and when dispelled it lands on the ground in a puddle, one per stack dispelled and they will naturally spread out if multiple stacks are dispelled at the same time.
If anyone in the raid has a stack of Banshee’s Bane on them when Sylvanas finishes her Banshee’s Fury cast, the raid will take 27.5k Shadow damage per stack that is currently on any player. This can’t ever be allowed to happen.
In Phase 3, Sylvanas can go up to 4 stacks of Banshee’s Weapons, at 3 she will cast Banshee’s Heartseeker on the tank instead of Ranger Shot, and at 4 stacks she will cast Banshee’s Blades, a 4 hit combo dealing 7.4k Physical and 19.2k Shadow per hit to the active tank.
As mentioned under Banshee’s Bane, when Sylvanas casts Banshee’s Fury you need to make sure there are no stacks of Banshee’s Bane when the cast finishes or you will likely wipe to the increased raid damage. Alongside this, Banshee’s Fury does 13.7k Shadow damage to the entire raid every second for 4 seconds whilst being cast and needs to be healed through and have defensive cooldowns committed to it.
Wailing Arrow works the same way as it does in Heroic, and you should send players to another platform where possible to reduce the raid damage taken further.
The first set of arrows into Phase 3 is particularly tricky, and we sent one player 2 platforms away, and the other 1 platform away to further reduce the raid damage. Both players should wait until the tank’s arrow has hit before jumping, and then the 3rd player (last to receive the debuff) should hop across another platform.
You need to come up with assigned positions for your raid that they always default to whenever Veil is being cast, as more than expected number of players getting hit by Veil can cause a wipe very easily.
This is the positioning we used for this:
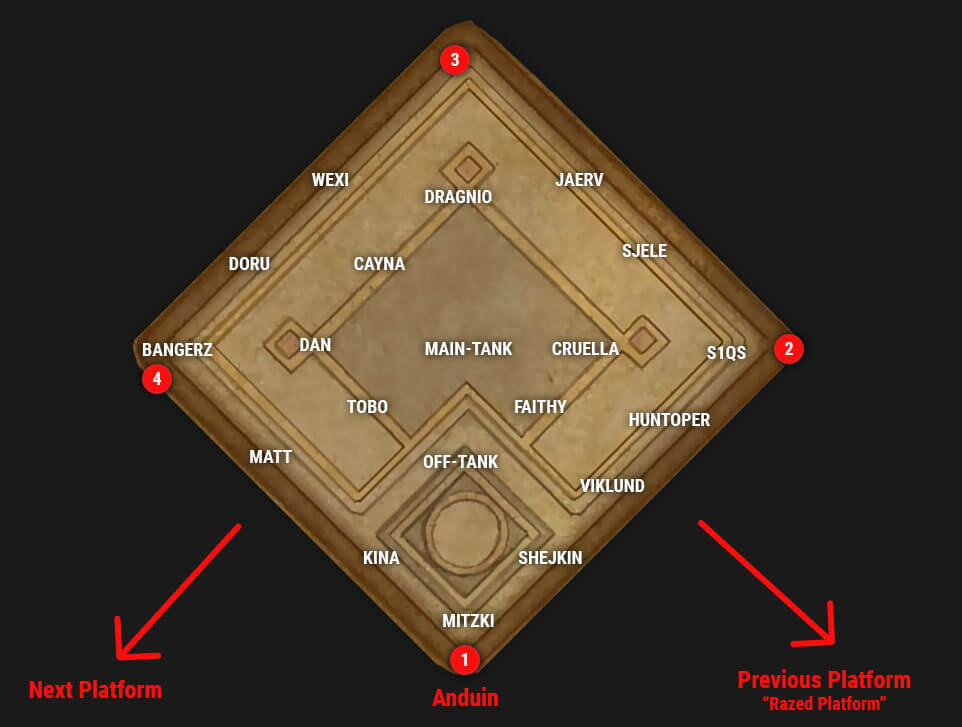
Once the Veils have been applied, everyone should stack under the boss to spread out the debuffs as quickly as possible to help the healers.
Scream works the same way as it does in Phase 2, be spread (use Veil positions), and make sure everyone is topped or they will take increased damage from this ability the lower their HP is.
This replaces Shadow Daggers from the heroic version of Phase 3, and is instead 3 debuffs that are applied to random players, with lines coming out of them.
To handle this everyone should spread for two seconds and then stop, to allow the debuffed players to avoid hitting each other, then everyone else can find a gap once they have stopped moving.

Another Mythic only mechanic, Merciless is where Sylvanas spawns white circles that need to be soaked or the entire raid will take 82k Shadow damage.
When soaking, the soaker is knocked out of the circle to the edge they are standing closest to, so always stand on the inside of the room edge rather than outside.
The first 2 are doubles that can be soaked by any durable ranged (we used boomkins).
The second 2 are quad-soaks, the first of these comes with a Veil right afterwards so you should use knock-immunities to soak this.
Sometimes they spawn overlapping each other, if so you can only soak both with an immunity or you will be knock out of the 2nd one before it explodes by the first, resulting in a raid wipe.
Sylvanas will cast Raze at the end of each platform, be ready to leave when her cast ends.
Phase One
Stage 1: First Domination Chains

Before pulling you should run behind where she is standing when you enter the room, so you are in position for the execution of the strategy. Pop Bloodlust on pull (enjoy the lag and make sure somebody says “I’m lagging!” every pull).
Dodge some swirlies from Windrunner and heal the daggers, then at about 00:30 seconds she will cast the first Domination Chains, leaping backwards twice towards the Star marker roughly and spawning the 2 bunches of chains in that area. Players with Barbed Arrow stacks, especially > 1, should look to get chained to these and your raid should kill them off ASAP.
Whilst you are handling the first Chains, she will cast Black Arrow 1 at the active tank, who should help up to the pillar above the Star marker and spawn 2 Dark Sentinel adds there. These can be dealt with mostly with cleave and dots if dragged through the boss’ hitbox, make sure they die before reaching their targets during the upcoming Veil cast.
Once you have dealt with these, she will cast Veil of Darkness 1 at 00:55, run away using a Roar, and then converge back onto the boss where she stands.
Stage 2: Second Domination Chains

After dodging Veil 1 the boss will cast Windrunner again, and then Domination Chains 2 at 01:25, leaping back towards the Skull marker, spawning the Chains close to Purple and Green markers. She will then cast Veil of Darkness 2 at 01:40, shortly after spawning the Chains. Ranged players should bait this in the very centre of the room, stood close to the Warlock Gateway which they should then click once the Veil is baited, moving them up towards the Moon marker. Once the Veil disappears, the raid should rush back into the centre of the room close to the boss and fight here there. During this time the boss will cast Black Arrow 2 at 01:35, these players should spawn the next set of Dark Sentinels at the Moon marker, staying behind as the rest of the raid runs back towards the boss.
Make sure everyone puts their fixation lines through whatever CC you choose to use to deal with these, there should be 6 adds in total (2x3).
Stage 3: Third Domination Chains and push into Intermission

After dealing with the 2nd set of Dark Sentinels, the boss will cast Windrunner again, and then Veil of Darkness 3 at 02:25. Your ranged players need to bait this Veil on the Skull marker, so be sure to tell them to move their before this happens, there’s a gap after Windrunner where they can safely move.
Once Veil is baited, you should Roar and rush back toward the middle of the room to safety, and as you are doing this the boss will cast Domination Chains 3 at 02:30, with her position remaining central in the room, the Chains should spawn around the Triangle and Circle markers.
As you are killing off the 3rd chains, the boss will cast Black Arrow 3, debuffing 3 players who should run in the direction of the Moon marker, not too far away from the raid, and spread out a little so they don’t kill each other. The 1st and 3rd Arrows can be placed fairly close together but the 2nd should be a little to the side to allow the 3rd player to move in.
Handle the adds, and make sure you get the boss to around 81.1% before she casts Veil of Darkness 4 at 03:20, and then push her fast when she reappears, as this will give you a few more seconds for important healer and dps cooldowns to be ready for the Intermission.
Bait Veil 4 away from Star marker, otherwise it’s positioning is not too important, then use Gateway or run to the Star ready for the Intermission.
Intermission:

In the Intermission there will be 4 packs of chains, 3 packs of 4, and one central pack of 7. You should organise a priority of which packs to kill first, to free up people fast so that they can help break other people out easier. On the screenshot I have numbered them 1-4, the kill priority should be 1 & 2 first, split your damage and blow them up ASAP, then 3, and finally 4. Players who are chained to 4 will need healing and to use defensives to survive this damage.
If you have Boomkins in your raid they excel at this Intermission, and you should have 2 Boomkins popping cooldowns here if you have the option, however it is definitely not required.
Whilst all of this is going on, dodge the lines and the swirls the boss sends out.
Phase Two
Raid Splitting
There are 4 “sections” to Phase 2: Adds 1, Boss 1, Adds 2, Boss 2.
You will need to split the raid for Adds 1 & 2.
For Adds 1 you want an even split of 1 Tank, 7 DPS, and 2 Healers on each side.
You should try and keep DPS levels similar on both sides as you want them to finish at the same time so that one side isn’t left behind during the burst windows on Sylvanas in this phase.
For Adds 2, you can solo heal the Colossus and send less people there, I would recommend sending 1 Tank, 6 DPS, 1 Healer to the Colossus (left) and everyone else to the right to deal with the Summoner & Souljudge pack which is very spicy.
Once again you want the Colossus to die as the right side are killing off the Souljudge ideally, and for both Adds 1 and Adds 2 you are aiming to have killed all of your adds no later than around 7-8 seconds left on the Ruin timer.
Make sure you have curse dispellers on the right for both sets of adds, at least 2 of them.
Adds 1
Left - Focus the Souljudge down as a priority, spreading out with the Crushing Dread debuffs and taking a good spread for Veil of Darkness when it happens.
Right - Focus the Summoner down as a priority, decursing as they are thrown out, and killing/interrupting the Orbs as they are spawned. You should really be aiming to only handle one set of Orbs, and they should be killed ASAP with a healer CD/Rally or something.
Once both sides are dead, the NPCs will cast bridges over to the next chain where you will fight Sylvanas for a period of time.
Boss Nuke 1

Stack on the boss, focus the gateway once it is down, and then dodge the first cast of Haunting Wave, once dodged, stand in range of the Demonic Gateway and be ready to click it once the 3rd dark circle has appeared. Then continue to fight the boss until she casts Haunting Wave again, after this she will go immune and you can spread out for Banshee Wail and walk down the chain towards where the NPCs will spawn the next bridges for Adds 2.
Adds 2
Left Side - Stack for Expulsion and hug behind the Colossus with the tank on the opposite side when Filth is being cast, when Veil of Darkness happens, everyone should run through the mob to safety, the tank needs to make sure they reposition quickly away from the group for the next Filth frontal.
Right Side - Focus the Summoner down, Veil of Darkness will come as the Orbs spawn, this is a dangerous moment and personal defensives should be used whilst running away from the veil as the Orbs are dying. Once the Summoner is dead, nuke the Souljudge and try and kill it at the same time as the Colossus on the other side, with 7-10 seconds remaining on the Ruin timer as with Adds 1.
Boss Nuke 2
Basically an exact repeat of Boss Nuke 1.
Phase Three
Orientation:

Platform 1
- Send a fast, durable dps (DH with Netherwalk is good for this) to Platform 2, and the non-active tank to Platform 3 and 4 to collect the puddles that are spawned by the boss’ first cast of Bane Arrows 1.
- Spread for Veil 1
- Stack under the boss right after the Veil and remain there for the rest of the Platform.
- Heal/dispel Banshee’s Fury 1 and then leave for Platform 2 at the end of her Raze 1 cast, dispelling any stacks before you do so.
Platform 2
- Handle Wailing Arrow 1, this is the tough one where you may want to send the 3rd player to the 4th Platform as the 2nd player leaves for the 3rd Platform.
- Spread for Death Knives 1, then Banshee Scream 1, followed immediately by Veil 2.
- Everyone should come under the boss except those assigned to soaking Merciless 1 (x2) which will happen now. Stay under the boss and heal/dispel for Banshee’s Fury 2.
- She will then cast Bane Arrows 2, spawning new puddles on all platforms, followed by Death Knives 2.
- Next is Merciless 2 (x2) and Wailing Arrow 2. Call backup if a Merciless soaker gets an arrow here, and the tank who receives the Arrow debuff should clean up Platform 3 before returning. Make sure the 3rd player to leave with Arrow doesn’t return until the upcoming Veil has happened.
- Spread for Veil 3, then come back in quickly to spread the debuffs and be ready to leave for Platform 3 when the boss casts Raze 2, dispelling any stacks just before you leave.
Platform 3
- Stay under the boss when you land as Banshee’s Fury 3 is the first thing to handle, you shouldn’t have any stacks on anyone at this point. Then spread for Death Knives 3.
- Stay spread for Banshee’s Scream 2, and then be ready to handle Merciless 3 (x4), with knockback immunities as it is immediately followed by Veil 4. This is a tough timing.
- After the Veil it is Wailing Arrow 3, once again have your Tank clear up Platform 4 on their way back from this.
- Next is heal/dispel Banshee’s Fury 4, followed immediately by Death Knives 4, and then Merciless 4 (x4). Stack for the fury, then spread for the Knives and make sure you get these soaks, don’t be scared of running through puddles to get to them if you have to.
- Then you need to spread out again for Veil 5 (this will now hit 3 players each time), and stack quickly after to spread the debuff before leaving the to Platform 4 after Raze 3.
Platform 4
- Stack up in the corner just to your right as you land and place a Warlock Gateway just outside of the group, ready to handle Wailing Arrow 4, here the players should move to the opposite corner of the platform using the Gateway or their own mobility.
- Next is Banshee’s Fury 5 and Death Knives 5, remain stacked under the boss and the debuffed players need to make sure they don’t put their lines through the raid. Players should use personal defensives at this moment as it is very rough on your healers.
- Spread for Banshee’s Scream 3 and don’t walk over the puddles she will spawn here, remain spread for Veil 6, and then stack up on the covenant with the boss and pop Bloodlust + Potions etc and nuke the boss.
- Place a new Gateway for Wailing Arrow 5 and handle it the exact same way as the previous set. You will get Death Knives 6 here at the same time, make sure they do not hit the raid stacked in the corner.
- Remain stacked and heal/dispel for Banshee’s Fury 6, then nuke the boss and win!
Healing Strategy
 By Dragnio
Sylvanas Windrunner is a very long fight with a lot of different damage events. Due to how much each of the 3 phases differ from each other, I would like to start with a general healer composition recommendation, and then give a brief rundown of each phase. It is recommended to run 4 healers for progress, since the amount of raid damage events which need to be covered with CDs might be too high for 3 healers, while the raid damage in general is not high enough to warrant bringing 5. Even though the fight duration is very long, mana is not a big concern due to the amount of downtime healers have with phase transitions / running / time when there is no raid damage incoming.
Healing Setup Recommendations
As far as the healing composition goes, this is what i’d consider bringing (just a personal recommendation, not by any means the only viable comp):
- 2x (Paladins are exceptional on this fight: great spot-healing, great passive tank healing, really good Ashen Hallow timings, extra damage, Aura Mastery for DR or Silence immune on p3, and Blessing of Freedom, Blessing of Protection, Blessing of Sacrifice and Divine Shield are all incredibly useful on different stages of the fight.)
- 1x (Having a Disc on this fight is not mandatory, but nevertheless is a great option due to insane burst healing when it’s needed the most and Barrier which is very good especially on phase 3, on top of dealing quite a bit of damage themselves and having Power Infusion to help your DPS to get through some damage checks.)
- 1x fill (In my opinion, Sylvanas does not have a heavy comp requirement, so anything can work here really well:
- has great utility with Spirit Link / APT / Windrush on top high healing and high damage that can rival Paladins and Priests (if your shaman is Kyrian).
- has amazing cooldown coverage, good utility with Roar / Ironbark, can do quite a bit of burst DPS with Heart of the Wild and does really good healing overall.
- is also a good option due to its good healing cooldowns and having Power Infusion as well.
- When it comes to , I might be a bit biased, but in my opinion Monk is actually one of the best if not the best option to fill the 4th healer role, especially if you already have 2 Paladins and a Disc, due to how well Monk covers the windows outside of Ashen Hallow / Disc ramp with his cooldowns, which are all incredibly potent, and how much healing Monk does in general.)
Phase 1 and Intermission
Main sources of damage in phase 1
Main sources of damage in this phase are: passive rot damage on players from Barbed Arrow, burst raid-wide AoE from Black Arrow or Woe, and single-target damage on different players affected by Domination Chains or Shadow Daggers. Damage intake from Barbed Arrow is by far the highest during phase 1 due to all players being affected by it for the whole duration of the phase, however it only poses threat only if some players have really high stacks of Barbed Arrow or during overlaps with other abilities, which you should cover with healing cooldowns. You should aim to use all available healing and DR cooldowns in phase 1 and during intermission since they will be back for when you need them in phase 2, while spreading healing throughput and DR throughout the whole phase and having a chunk of cooldowns available for Intermission.
Tips for healing and CD assignments
- Getting hit by Veil of Darkness in that phase is a mistake and ideally shouldn’t happen, however it is not by all means lethal, so if it happens, make sure to quickly heal the players affected by it and make sure players hit spread their stacks towards other people.
- Shadow Daggers paired with Barbed Arrow stacks can kill players quite quickly, so make sure to spot-heal Shadow Dagger’s targets especially if they have more than 1 stack of Barbed Arrow. Using some of your healing throughput there like Ashen Hallow or a Disc Ramp can be really helpful to ensure that the passive raid damage is well covered so healers can just focus on spot-healing. It is not advised to use DR cooldowns like Barrier or Spirit Link during Daggers, since it can be problematic to stand in them due to having to dodge Desecrating Shots happening at the same time.
- Black Arrow will affect more people on each subsequent cast (1 on the first cast, 2 on the second cast, and 3 on the third.), meaning more raid damage from Arrow hits on every set. First cast does not require any healing cooldowns and can just be out-healed normally. Second cast can be covered with a DR cooldown (like Aura Mastery). For the third cast, you might want to allocate a DR cooldown like Rallying Cry or Barrier as well as having a healing throughput cooldown used beforehand for the set of Domination Chains to make sure everyone is healthy after the Chains (like Ashen Hallow).
- Make sure to quickly top people affected with Black Arrow, since they will take some heavy damage and might have to run away from healer range before the hit.
- If somebody has a lot of stacks of Barbed Arrow and misses the cleanse with Domination Chain, it’s a good idea to BoP this player to remove the stacks.
- When it comes to Intermission, ground-placed DR cooldowns like Barrier, SLT, Darkness and AMZ are incredibly useful to mitigate the initial burst damage from Woe since it is one of the rare points in phase 1 when the whole raid can be properly stacked. Healing the damage from Domination Chains can be a bit problematic on progress if Chains don’t die quick enough and healers are dragged for a long time, however there are a couple of tips to help with that:
- Make sure healers stand on one side and are all dragged to the same close clump of Chains, which gets killed first.
- Using Cooldowns like Healing Tide Totem or Salvation is very useful there, so make sure they are assigned at this point.
- Using Blessing of Freedom almost negates the drag from the Chain, allowing you to cast a lot more while still being Chained. A good example of this is assigning a Blessing of Freedom for a Disc Priest so he can perform a Ramp for Intermission and cast DPS spells more freely.
- Make sure players use their personals if they have more than 4 stacks of Domination Chain.
- Ask your DPS to offheal if it doesn’t hurt their DPS too much and healing is a struggle. For example, Balance Druids (especially Night Fae) with Heart of the Wild are exceptional for this.
Phase 1 Cooldown Plan
A loose cooldown plan for this phase would look something like this (assuming a comp of 2x Paladin, 1x Disc, 1x Shaman, just a general idea where you want the healing throughput and DR):
- Pull to Shadow Dagger 1: HTT, Wings 2
- Chains 1: Ramp
- Black Arrow 1: nothing
- Shadow Dagger 2: Ashen 1 + Wings 1
- Chains 2: Rallying Cry 2 (if available)
- Black Arrow 2: Aura Mastery 2
- Shadow Dagger 3: Ramp
- Chains 3: Ashen 2 + Wings 2
- Black Arrow 3: Rallying Cry 1
- Shadow Dagger 4: Wings 1, Aura Mastery 1, HTT (if more needed here rather than on Intermission)
- Intermission: SLT, Barrier, Darkness, HotW from Balance Druid, HTT (if more needed here rather than on daggers beforehand).
Phase 2
Main sources of damage in phase 2
Main sources of damage in phase 2 depend on whether you are fighting Sylvanas or not. On Sylvanas’s platforms, the raid will take heavy raid-wide AoE from Shadow Daggers (same as phase 1, but now everyone will be affected by it instead of just 4-8 players) and Banshee’s Wail. On platforms with adds, the damage to look out for is from Detonation (Raid-wide AoE, Explosion of Orbs spawned by Mawforged Summoner), Crushing Dread (heavy single-target damage, cast by Mawforged Souljudge), Curse of Lethargy (heavy ST damage, cast by Summoner) and Expulsion (raid-wide AoE, cast by Mawforged Colossus). It’s important to note that the raid-wide AoE will only affect the players on the same platform and not the other half of the raid. You will generally want to allocate most healing cooldowns for Shadow Daggers due to high damage intake and the whole raid being in one place, while using some of the DR cooldowns for a platform with a Summoner and Souljudge, which is by far the most dangerous one due to the high amount of lethal damage with Crushing Dread + Detonation overlap.
Tips for healing and CD assignments
- Similar to Phase 1, getting hit by Veil of Darkness in that phase is a mistake and ideally should not happen, but if it does, make sure to quickly heal the players affected by it and make sure players hit spread their stacks towards other people.
- Banshee’s Wail will do more damage the less HP players have, so make sure nobody is dangerously low when it's being cast.
- You will need to split the raid into two groups to fight on two platforms at the same time, meaning healers will have to be split as well. First split happens at the start of phase 2 and you should send 2 healers to each side. Second split happens after the first Sylvanas platform, and you should be aware that the platform with the Souljudge and the Summoner (the right platform) will need more spot-healing and healing throughput in general compared to the platform with the Colossus, so you can either send 2 healers to each side but make sure that healers going right have their strong cooldowns available (a Holy Paladin with Ashen Hallow is a great candidate, for instance), or send 3 healers to the right side and only 1 healer to the left side (a good healer to solo heal left side is a or a with their DR cooldowns up, alternatively you can commit a Heart of the Wild from your Balance Druid to help with the healing).
- Even if you are sending 3 healers right on the second split, make sure you have some sort of DR for Detonation, since it can kill players on low hp or affected by Crushing Dread.
- Any Curse Dispel, Blessing of Freedom and Tiger’s Lust can be used as dispels for Curse of Lethargy, which ideally should be dispelled very quickly.
- Players affected by Crushing Dread should be the main healing focus in that phase. Two extremely important things to note:
- It’s easier to not dispel Crushing Dreads at all and just spot-heal the players affected by it due to the fact that dispelling the debuff will increase the number of debuffs on the raid.
- After the Souljudge dies, Crushing Dreads still linger on their targets but don’t deal any damage so they can be safely ignored.
Phase 4 Cooldown Plan
A loose cooldown plan for this phase would look something like this (assuming a comp of 2x Paladin, 1x Disc, 1x Shaman, just a general idea where you want the healing throughput and DR):
Split 1:
- Left (Souljudge): 2 healers, no CDs used
- Right (Summoner): 2 healers, Wings 2
Sylvanas platform 1:
- First Shadow Daggers: Ashen 1 + Wings 1
- Second Shadow Daggers: HTT / Ramp / x (depends on what healer you have) + Ashen 1 still present
Split 2:
- Left (Colossus): 1(2) healer, Barrier / SLT (depending on who is on this side), Heart of the Wild (if needed)
- Right (Summoner + Souljudge): 2(3) healers, Ashen 2 + Wings 2, Aura Mastery 2, Rallying Cry, Barrier / SLT (depending on who is on this side)
Sylvanas platform 2:
- First Shadow Daggers: Aura Mastery 1
- Second Shadow Daggers: Wings 1, Ramp
Phase 3
Main sources of damage in phase 3
There are 3 main sources of damage in this phase: Burst raid-wide AoE from Banshee’s Fury and Wailing Arrow, Burst AoE from Banshee’s Scream as well as raid damage from Veil of Darkness. Veil will now target 2 players instead of being a circle on the ground that everyone can run away from, so you can expect at least two players getting stacks after every cast. Handing this mechanic properly (spreading beforehand and spreading the stacks quickly after being hit) removes the need of committing raid cooldowns to outheal the healing absorb, which means that you can allocate all cooldowns you have for Banshee’s Fury and Wailing Arrow.
Tips for healing and CD assignments
- Tanks can take some heavy damage in this fight, especially when they have a lot of stacks of Banshee’s Bane. Though it should generally be covered by passive healing from Beacon of Light from Holy Paladins as well as passive HoTs / Atonements, it’s always a good idea to keep an eye on them and proactively use externals if needed.
- Make sure to quickly top players affected by Wailing Arrow, since they will take a lot of damage and will be forced to be out of healers’ range after a short while.
- Rallying Cry in particular is very good to counter Wailing Arrow's damage with due to its long duration and no positional requirement, meaning it can work on everyone in the raid, including Wailing Arrow targets. Same goes for Aura Mastery on the last platform.
- Top the players assigned to soak Merciless, since soaking one without an immunity is quite a big hit and they might die if they are on low HP.
- Banshee’s Scream will do more damage the less HP players have (similar to Banshee’s Wail in p2), so make sure nobody is dangerously low when it's being cast.
- If you have enough DRs and can spare one Aura Mastery, using Concentration Aura with Aura Mastery will make everyone in the raid immune to the silence / interrupt part of Banshee’s Scream, meaning they can just continue DPSing. This is especially valuable during Bloodlust / Heroism window. If you have more than one Paladin ,one of them should be using Concentration Aura for the whole duration of p3 to reduce the silence duration even outside Aura Mastery, and only swapping to Devotion Aura when you need his Devo Aura Mastery.
- Make sure to communicate dispels properly to avoid wiping to Banshee’s Fury, both on tanks and DPS who managed to pick up a stack. The dispel mechanic works exactly the same way as heroic - you generally want to dispel tanks towards the end of Banshee’s Fury cast to avoid anyone in the raid picking up the pools before the Fury cast is finished.
- If you are running a Mistweaver Monk, you can use Revival as both a raid cooldown and a mass dispel for tanks during Banshee’s Fury, just make sure to hit the button before the cast is over (ideally 1-2 seconds).
- There will be 6 Banshee’s Fury casts throughout phase 3 (assuming kill by the final raze, this number will be lower with more gear / DPS), and all of them come around a minute apart from each other, meaning you need to assign 3 groups of 3 minute cooldowns to cover all of them. Banshee’s Fury deals a lot of damage in a very short period of time, so it’s recommended to have some sort of DR for every cast if possible.
- Same rule applies to Wailing Arrow sets (more than a minute in between each set), however having DR for Arrows is a bit less important (except the last 2 sets due to not having other platforms to jump on and reduce the damage taken), so if your raid doesn’t have enough damage reduction cooldowns, prioritize using them for Banshee’s Fury and Wailing Arrow sets on the last platform.
Phase 3 Cooldown Plan
A loose cooldown plan for this phase would look something like this (assuming a comp of 2x , 1x , 1x , just a general idea where you want the healing throughput and DR):
Platform 1:
- Banshee’s Fury: Ramp, Darkness
Platform 2:
- Wailing Arrow: Wings 2, Rallying Cry 2 (if available), HTT
- Banshee’s Fury: Ashen 1 + Wings 1, SLT, Aura Mastery 2
- Wailing Arrow: Ramp, Rallying Cry 1
Platform 3:
- Banshee’s Fury: Barrier
- Wailing Arrow: Ashen 2 + Wings 2 beforehand for Veil, HotW if needed
- Banshee’s Fury: Wings 1, Ramp, Darkness
Platform 4:
- Wailing Arrow: HTT, Rallying Cry 2 (if available), Aura Mastery 1
- Banshee’s Fury: SLT, Aura Mastery 2
- Wailing Arrow: Wings 1+2, Ashen 1, Rallying Cry 1, Ramp
- Banshee’s Fury: Barrier
WeakAuras & Addons
Sanctum of Domination WeakAura Pack
https://wago.io/slraid2
