Raid Setup
Recommended Classes
At least 3 / for Sprints during Dragging Chains.
Mechanics
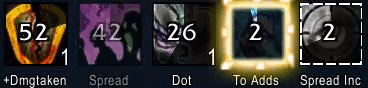
The Eye of the Jailer unleashes dark energies at its current target inflicting 110,289 Physical damage. In addition, the impact radiates a portion of the damage inflicted to all other players as Shadow damage. This should be mitigated by the tank as much as possible in order to reduce the raid-wide damage portion of the mechanic.
Dodge the white swirls on the ground, if you are hit your damage will be reduced by 30% until you walk into each of the three images channeling into you.
Big laser mechanic, no difference on mythic from heroic - run to the opposite side the boss is casting the beam towards and click the extra action button to grapple around behind the boss and avoid the laser.
This mechanic is cancelled instantly if the boss is pushed to either of it’s 66% or 33% add phases, meaning your raid can be a little out of position for the adds so be careful with push timings. There is a grace period where you can grapple back over to the correct add before receiving the wrong debuff however.
This is the new mythic mechanic on the fight, 3 players will be applied with a debuff that slows players within 8 yards of them, causing them to take 5.5k shadow damage every 1.5 seconds if close by.
Countered simply by having the debuffed players stand away from the rest of the raid.
Raid-wide debuff that does 16k damage every 5 seconds and applies a stack of healing reduction, going up by 10% every stack until you are fully healing immune.
Basically - kill the boss before you die to this mechanic.
Some tricks: Immunities allow you to reset stacks of this mechanic so can be used at around 5 stacks or so just before the debuff is re-applied to drop stacks completely.
Use all healthstones and healing potions before the value of them is diminished completely - the same logic applies to any healing throughput CDs.
Absorbs are unaffected by the healing immunity so are very strong in this phase.
Every 50 seconds inside this phase, an Abductor will spawn in the air near the boss and cast Dragging Chains on one of your raid members - this mechanic should be soaked to split the damage and reduce the strength at which the add pulls affected players towards the edge of the platform. Generally 5 players is a good amount to soak with, less can be a little bit risky if someone’s starting position is too close to the edge.
A sprint rotation should be used to assist players in dealing with this mechanic.
You want to try and avoid pushing the boss into an add phase at 66% and 33% when a new Abductor is about to spawn as you cannot really afford to hit the Abductor during the add phases and it will do a lot of damage to the tank if left alive too long.
The boss will do a raid wide hit of 22k shadow damage, this occurs every 40 seconds inside the add phase, generally you will be aiming to receive no more than 2 of these hits per add phase. The second hit occurs when the raid has quite high stacks of Scorn and Ire and is generally quite spicy, defensive personal CDs should be used for this as well as big damage reduction/throughput healing CDs.
With enough DPS during the add phases you can skip the second Death Gaze, the boss will sometimes cancel it when you kill the eyes however this seems a little bit finicky and it does not always cancel - keep a close eye on the boss’ cast timer to see if the mechanic is going to go off or not.
Heroic chain lightning beam mechanic, don’t stand near allies until the circle around you is gone.
The eye that you are standing closest to will dictate whether Scorn or Ire is applied, a debuff that will explode if you run into a player with the opposite debuff - for those fellow boomers out there it is basically Thaddius mechanic from Naxxramas.
The simple way to handle this is split the raid in half and have one half go to the left eye and the other the right eye - make sure nobody from either side ever walks near anyone from the opposite side.
The damage of these debuffs ramps up over time, meaning that getting through these add phases ASAP is very important before the debuff starts to become unhealable - there is an option to have the raid swap adds midway through the phase to reduce the damage of the debuff but this is an overcomplicated way of handling the phase and is more of a signal that your raid needs more DPS than anything.
We generally approach this by assigning all melee + 2 healers to one eye, and everyone else to the other eye, as ranged DPS can swap targets fairly easily and balance out the HP of the adds without being in any danger of exploding a debuff.
Players will be debuffed and drop pools on the ground after a 5 second delay - these pools can be stacked in one place quite aggressively to save space in the room, however be careful not to overdo this as a stack of 5+ pools in one spot can start to hurt a player who runs into it.
General rule of thumb, keep these pools in the back area of the room so that the center area to fight the boss is clear and the space you need to run from the laser is clear
Strategy
Phase 1: (Boss)
Position the raid centrally and handle the Dragging Chains mechanic as it comes through utilization of sprints, making sure any players debuffed with Hopeless Lethargy move away from the raid.
Dodge the laser as it comes, and prioritise killing the Abductor’s unless you are able to push the boss in a way that will skip the next Abductor spawn, in that case you should ignore the existing add and focus on pushing the boss.
Do not prioritise DPS CDs for this phase.
Generally 3min classes should hold and use in 1st Add Phase and midway through 2nd Add Phase.
2 min classes can use on pull, midway through 1st Add Phase and then hold for 2nd Add Phase.
Hold Lust for P3.
Phase 2 (Adds):

Split the raid, melee to one side and ranged the other with an even healer split - make sure nobody ever crosses sides once Scorn and Ire are applied.
Ranged can position centrally so that they can hit both adds once they have received their debuff - they need to run towards their add to begin with.
Place the pools away from the boss playspace and use DPS CDs to push through the phase as fast as you can.
Use defensive cooldowns on the second Titanic Death Gaze if you get it.
If you have any Abductor’s alive during the phase, do not focus DPS onto them, have your tank call for external CDs if he has to tank one for a long time during the phase.
Make sure that people don’t run into players with the opposite debuff when the phase ends, there are a couple of seconds before the debuffs drop.
Phase 3: (Lust & Nuke)
Pop Bloodlust here and full nuke the boss, do not hit any Abductor’s that spawn.
Handle the debuffs and the Chains as normal.
Have players use their healthstones and tonics before the healing reduction is too large, and have players use immunities to reset the debuff at around 5 stacks.
Personal damage reduction CDs should be used whilst dodging the laser as healing is reduced by movement at this time - time them so they reduce the damage of 2 ticks of the Extermination across a 6 second period by popping them just before a tick of damage comes in.
Tanks will very likely need externals towards the end of the phase as the adds start to really hurt them in combination with the healing reduction.
Strategy
Phase 1: (Boss)
Position the raid centrally and handle the Dragging Chains mechanic as it comes through utilization of sprints, making sure any players debuffed with Hopeless Lethargy move away from the raid.
Dodge the laser as it comes, and prioritise killing the Abductor’s unless you are able to push the boss in a way that will skip the next Abductor spawn, in that case you should ignore the existing add and focus on pushing the boss.
Do not prioritise DPS CDs for this phase.
Generally 3min classes should hold and use in 1st Add Phase and midway through 2nd Add Phase.
2 min classes can use on pull, midway through 1st Add Phase and then hold for 2nd Add Phase.
Hold Lust for P3.
Phase 2 (Adds):
Split the raid, melee to one side and ranged the other with an even healer split - make sure nobody ever crosses sides once Scorn and Ire are applied.
Ranged can position centrally so that they can hit both adds once they have received their debuff - they need to run towards their add to begin with.
Place the pools away from the boss playspace and use DPS CDs to push through the phase as fast as you can.
Use defensive cooldowns on the second Titanic Death Gaze if you get it.
If you have any Abductor’s alive during the phase, do not focus DPS onto them, have your tank call for external CDs if he has to tank one for a long time during the phase.
Make sure that people don’t run into players with the opposite debuff when the phase ends, there are a couple of seconds before the debuffs drop.
Phase 3: (Lust & Nuke)
Pop Bloodlust here and full nuke the boss, do not hit any Abductor’s that spawn.
Handle the debuffs and the Chains as normal.
Have players use their healthstones and tonics before the healing reduction is too large, and have players use immunities to reset the debuff at around 5 stacks.
Personal damage reduction CDs should be used whilst dodging the laser as healing is reduced by movement at this time - time them so they reduce the damage of 2 ticks of the Extermination across a 6 second period by popping them just before a tick of damage comes in.
Tanks will very likely need externals towards the end of the phase as the adds start to really hurt them in combination with the healing reduction.
Raid Leader Tips
Make sure sprints are used for the Dragging Chains
Call very clearly when the Titanic Death Gaze damage is incoming during the add phase, especially the second one.
Communicate to the raid if they should DPS the Abductor’s or the Boss during that phase, in order to avoid pushing into an add phase with a brand new Abductor alive.
Inform the ranged DPS which target they need to hit during the add phase to keep their HP aligned.
Tell people when to use Immunities and Healthstones etc in the last phase.
WeakAuras & Addons
Sanctum of Domination WeakAura Pack
https://wago.io/slraid2