

 Up to 84% Off VPN
Introduction
Hey everyone, and welcome to Method's guide to the Blackmaw Hold Dungeon in WoW: Forever. In this guide I'll be going over the mechanics of both the trash and bosses of the dungeon, the quests, and last but definitely not least, the loot.
Blackmaw Hold Location
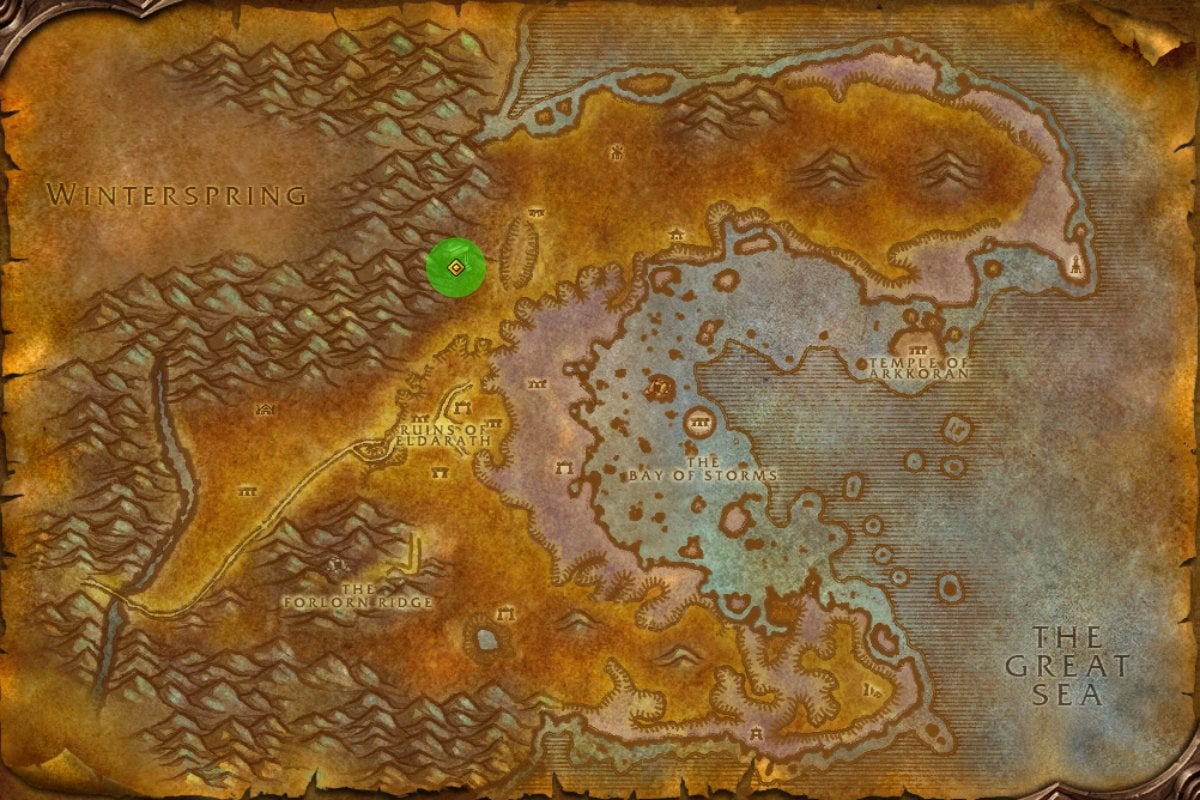
Blackmaw Hold is located in northern Azshara, just west of Timbermaw Hold.
How To Get To Blackmaw Hold in WoW Forever
Getting to Blackmaw Hold is fairly easy for both Alliance and Horde.
For Alliance, the easiest way to get to Blackmaw Hold is to take the flight path to Talrendis Point in southwestern Azshara. If you do not have this flight point, you should instead go to Astranaar in Ashenvale, and run east to Talrendis Point. From here, travel northeast to the entrance of Blackmaw Hold, marked on the map above.
For Horde, the easiest way to get to Blackmaw Hold is to take the flight path to Valormok in northwestern Azshara. If you do not have this flight point, you should instead go to Splintertree Post in Ashenvale, and run east to Valormok. From here, travel northeast to the entrance of Blackmaw Hold, marked on the map above.
Blackmaw Hold Dungeon Quests
Blackmaw Hold has 7 quests for both Alliance and Horde. Horde Paladins also have a quest here.
| Quest | Level | Location | XP |
| Get to the Roots of It | 45 | Mathrengyl Bearwalker - Darnassus (Starts with Beneath Nordrassil from Commander Truesong - Azshara) |
11,300 |
| Blackmaw Magic | 52 | Archmage Timear - Dalaran | 12,800 |
| Claws that Rend, Tusks that Gore | 45 | Ogtinc - Azshara | 12,400 |
| Blackmaw Pouches | 55 | Ekkal - Azshara | 13,200 |
| A Lost Memento | 47 | Feathered Charm Necklace - Blackmaw Hold (Requires Neutral with Timbermaw Hold) |
11,300 |
| The Twin Bears | 47 | Lorekeeper Nok - Azshara (Requires Neutral with Timbermaw Hold) |
11,300 |
| Blackmaw Reclamation | 47 |
Gatekeeper Rageroar - Azshara (Requires Neutral with Timbermaw Hold) |
13,200 |
Total Alliance XP from quests: 85,500 XP
| Quest | Level | Location | XP |
| Get to the Roots of It | 45 | Nara Wildmane - Thunder Bluff (Starts with Beneath Nordrassil from Jediga - Azshara) |
11,300 |
| Blackmaw Magic | 52 | Muln Earthfury - Mulgore | 16,100 |
| Claws that Rend, Tusks that Gore | 45 | Ogtinc - Azshara | 12,400 |
| Blackmaw Pouches | 55 | Ekkal - Azshara | 13,200 |
| A Lost Memento | 47 | Feathered Charm Necklace - Blackmaw Hold (Requires Neutral with Timbermaw Hold) |
11,300 |
| The Twin Bears | 47 | Lorekeeper Nok - Azshara (Requires Neutral with Timbermaw Hold) |
11,300 |
| Blackmaw Reclamation | 47 |
Gatekeeper Rageroar - Azshara (Requires Neutral with Timbermaw Hold) |
13,200 |
Total Horde XP from quests: 88,800 XP
| Quest | Level | Location | XP |
| The Reliquary of Tyr | 50 | Knight of Mourning - Tirisfal Glades (Starts with The Knight of Mourning from the same questgiver) |
13,550 |
Blackmaw Hold Dungeon Map
Blackmaw Hold has many different levels and areas, displayed in the images below:
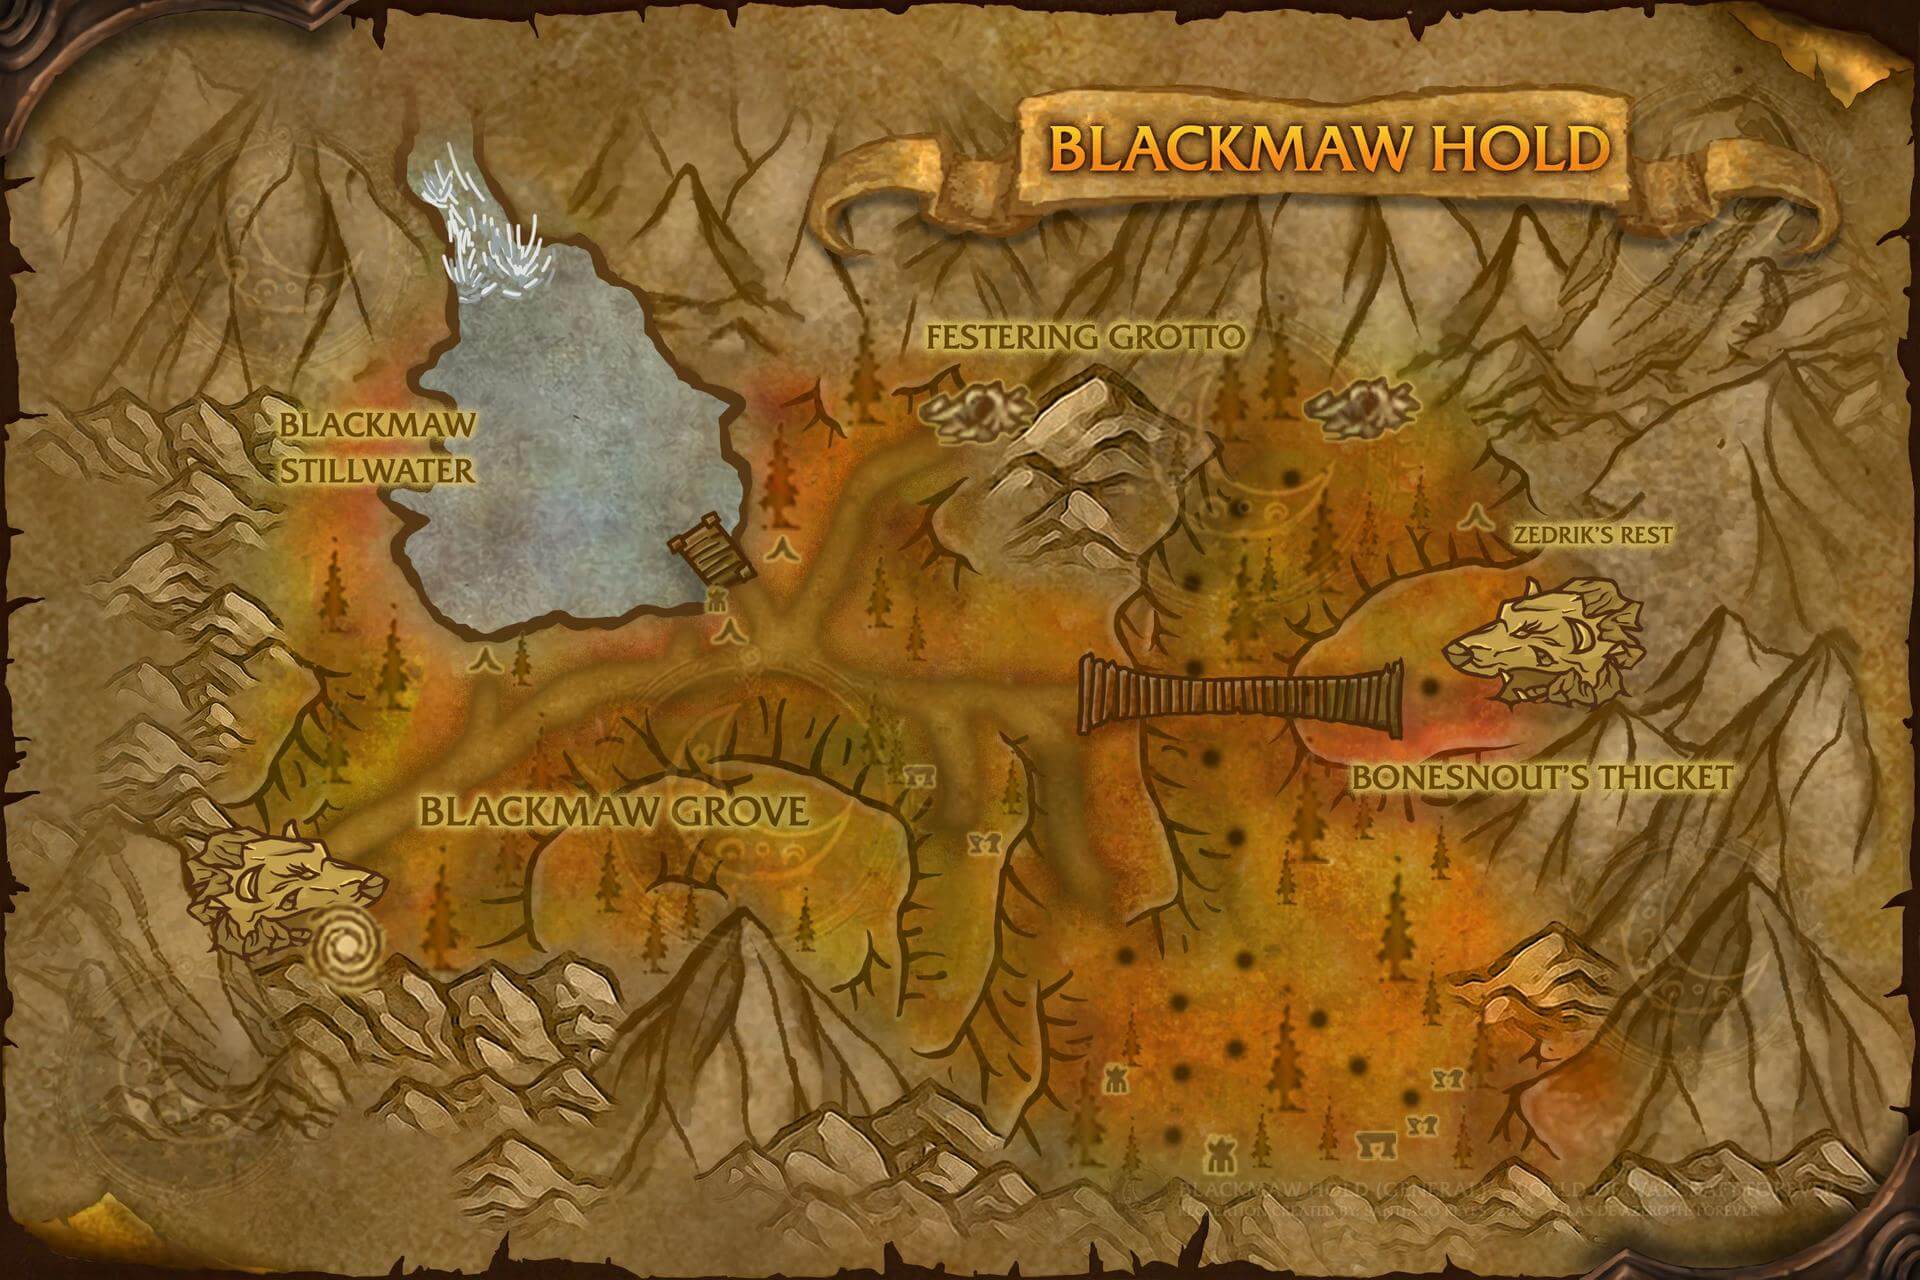
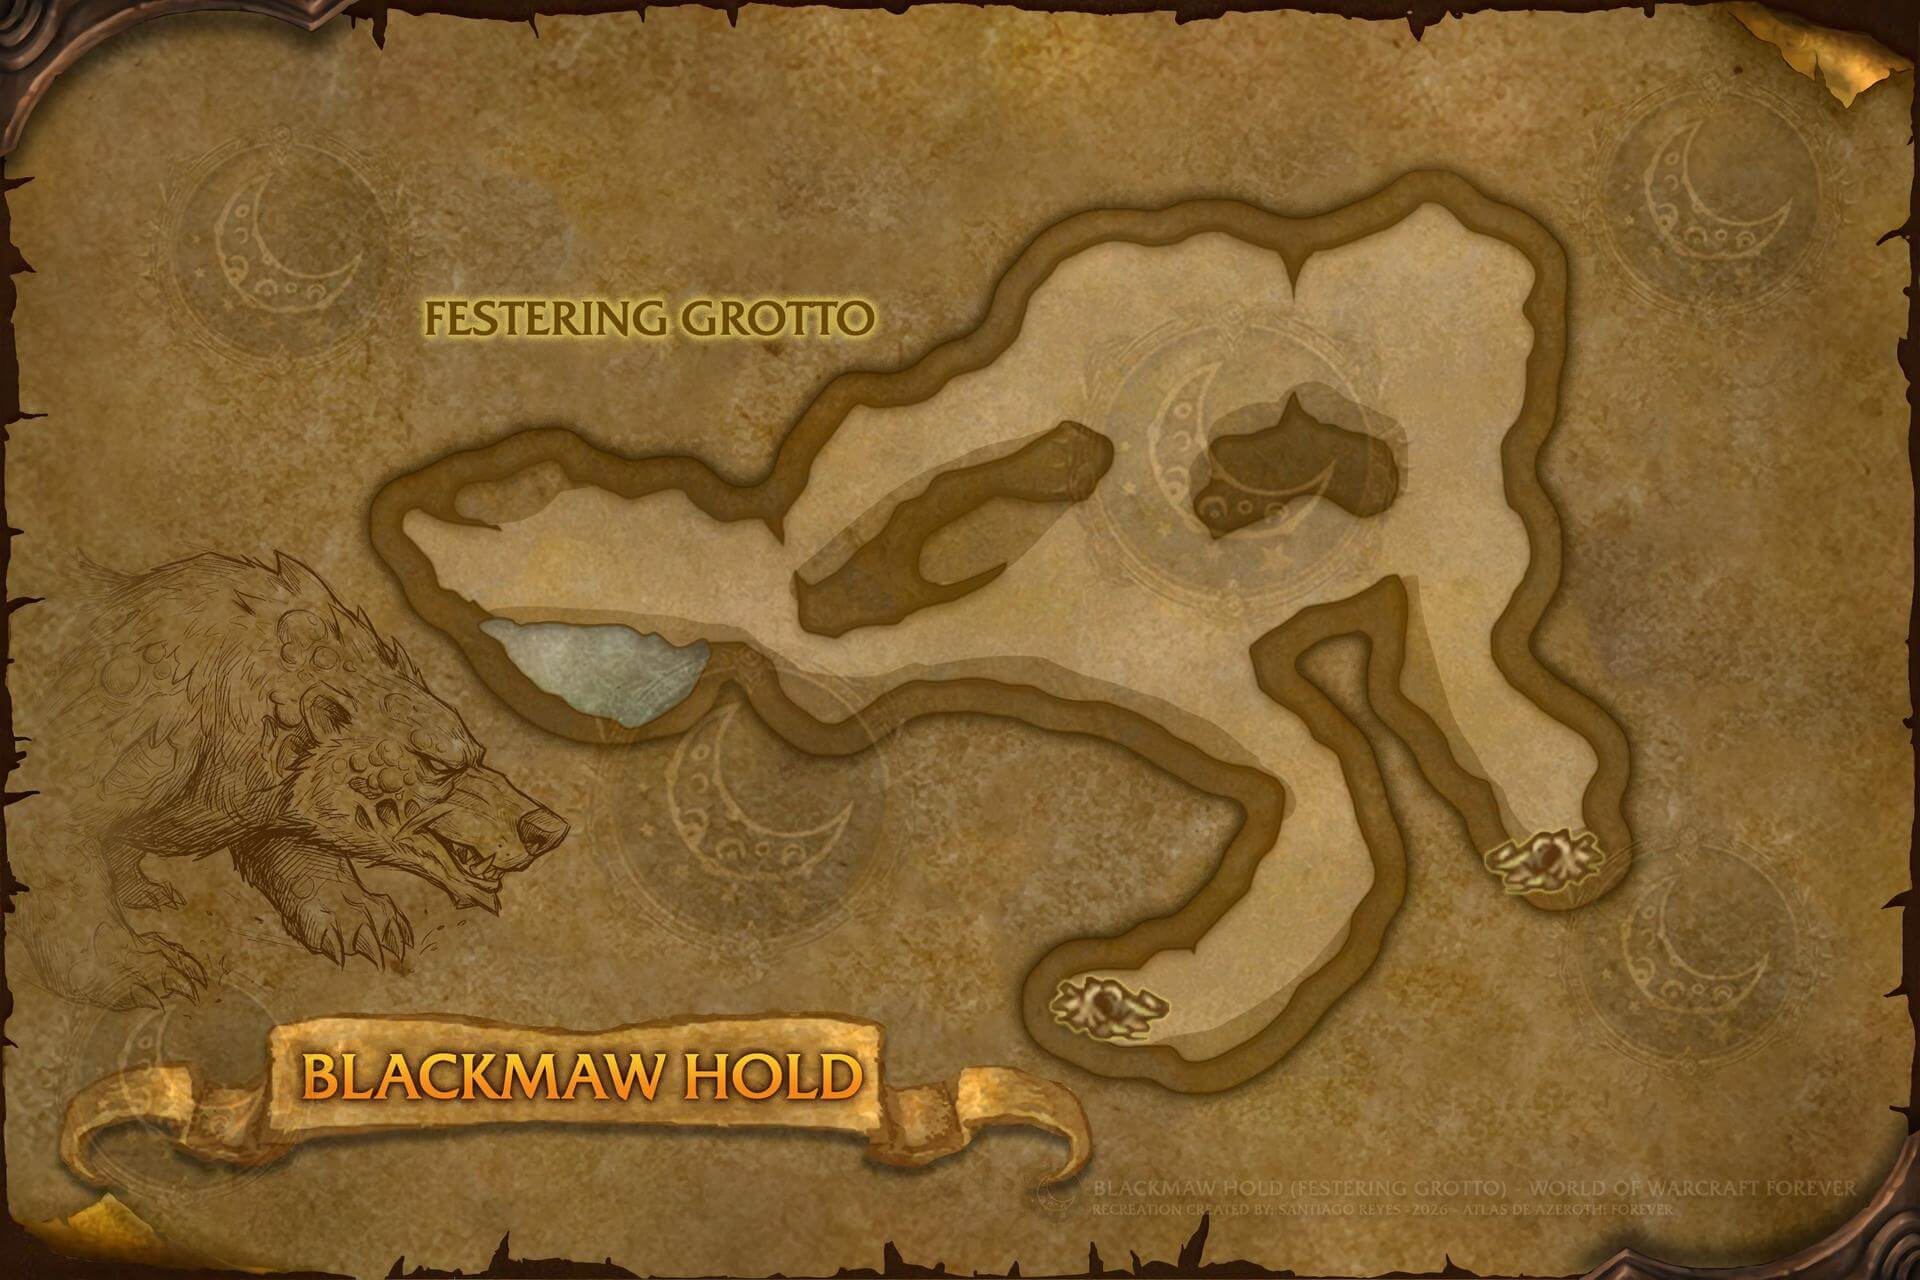
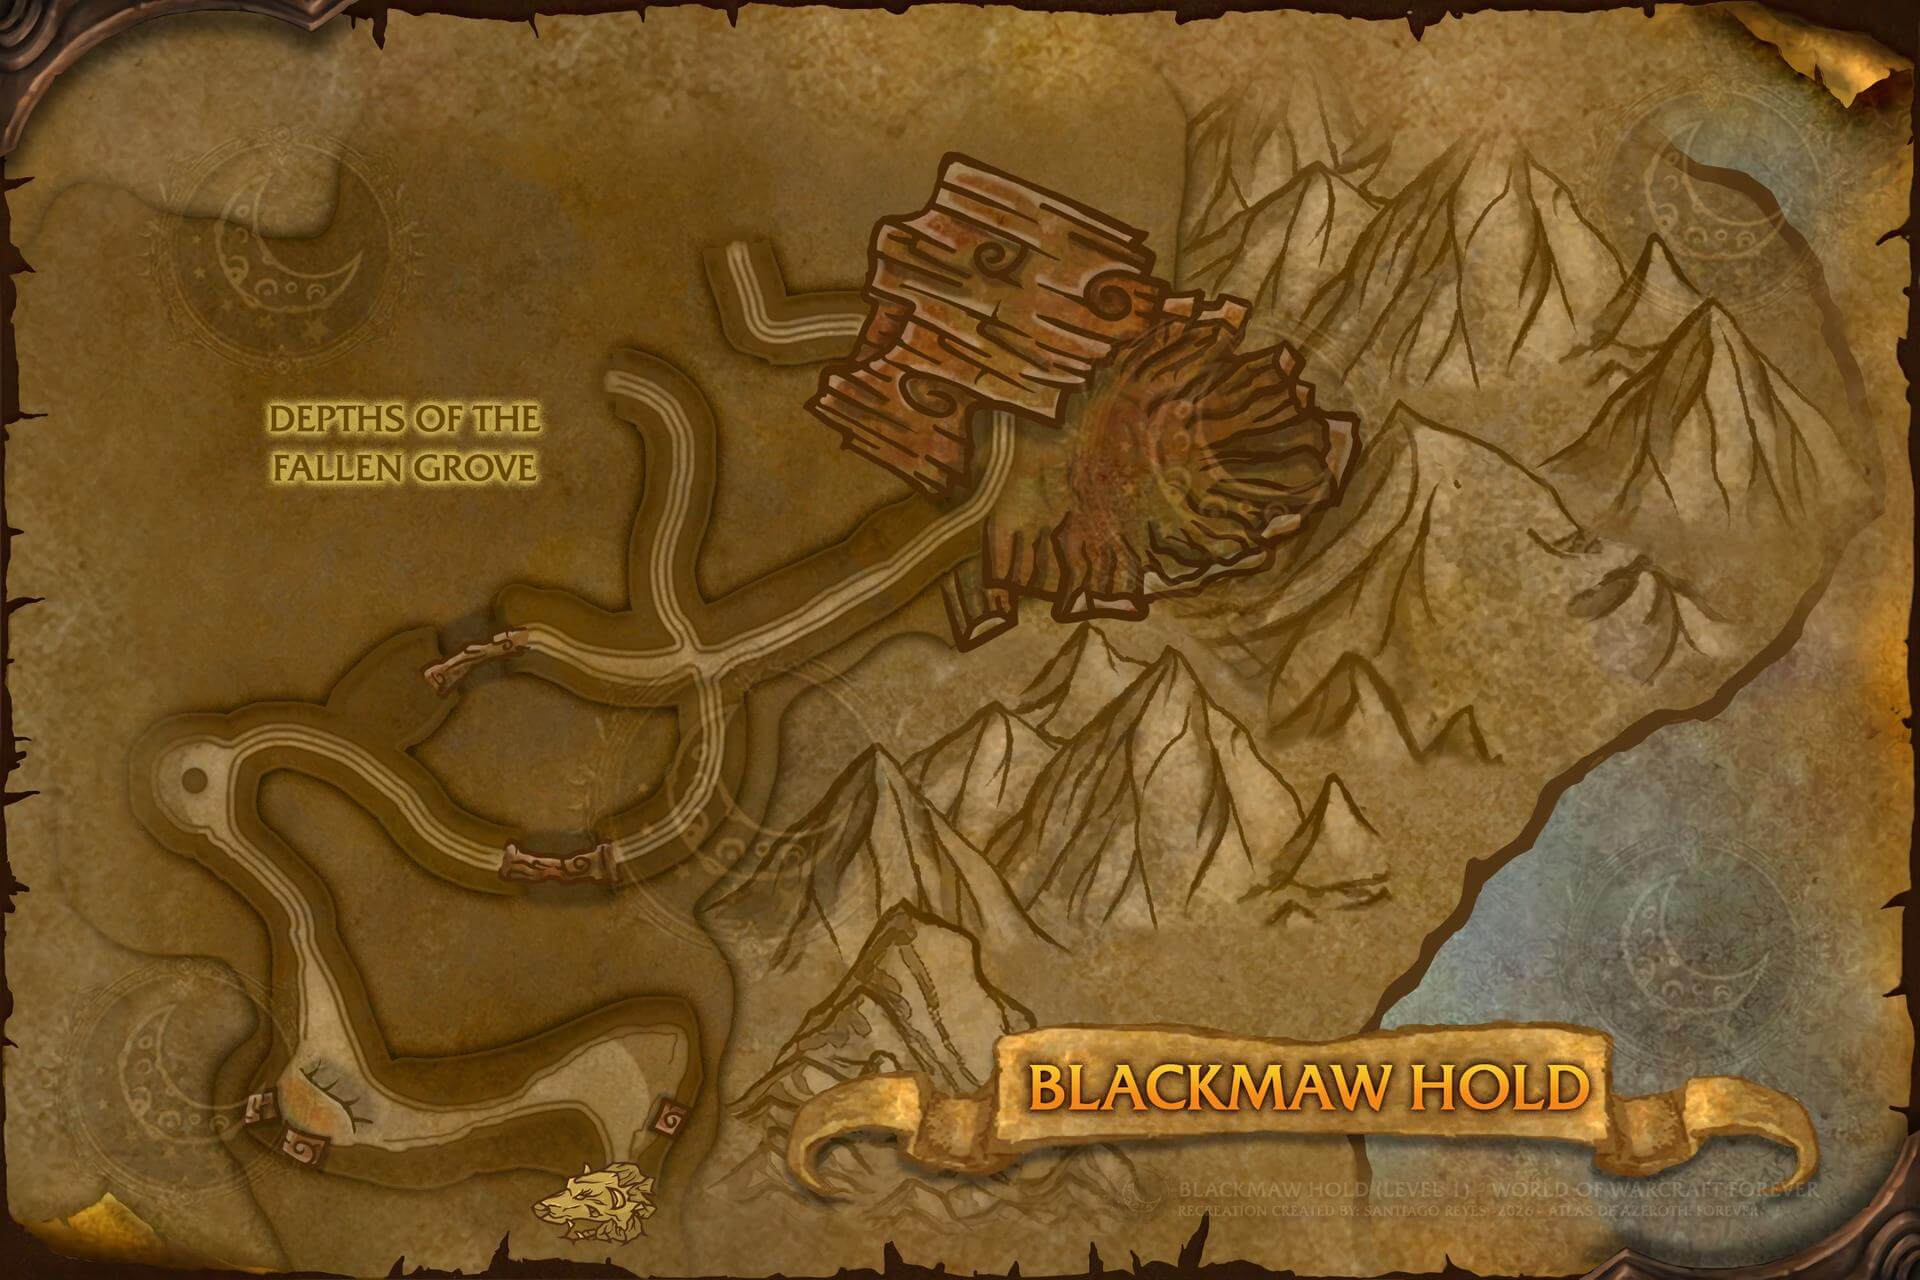
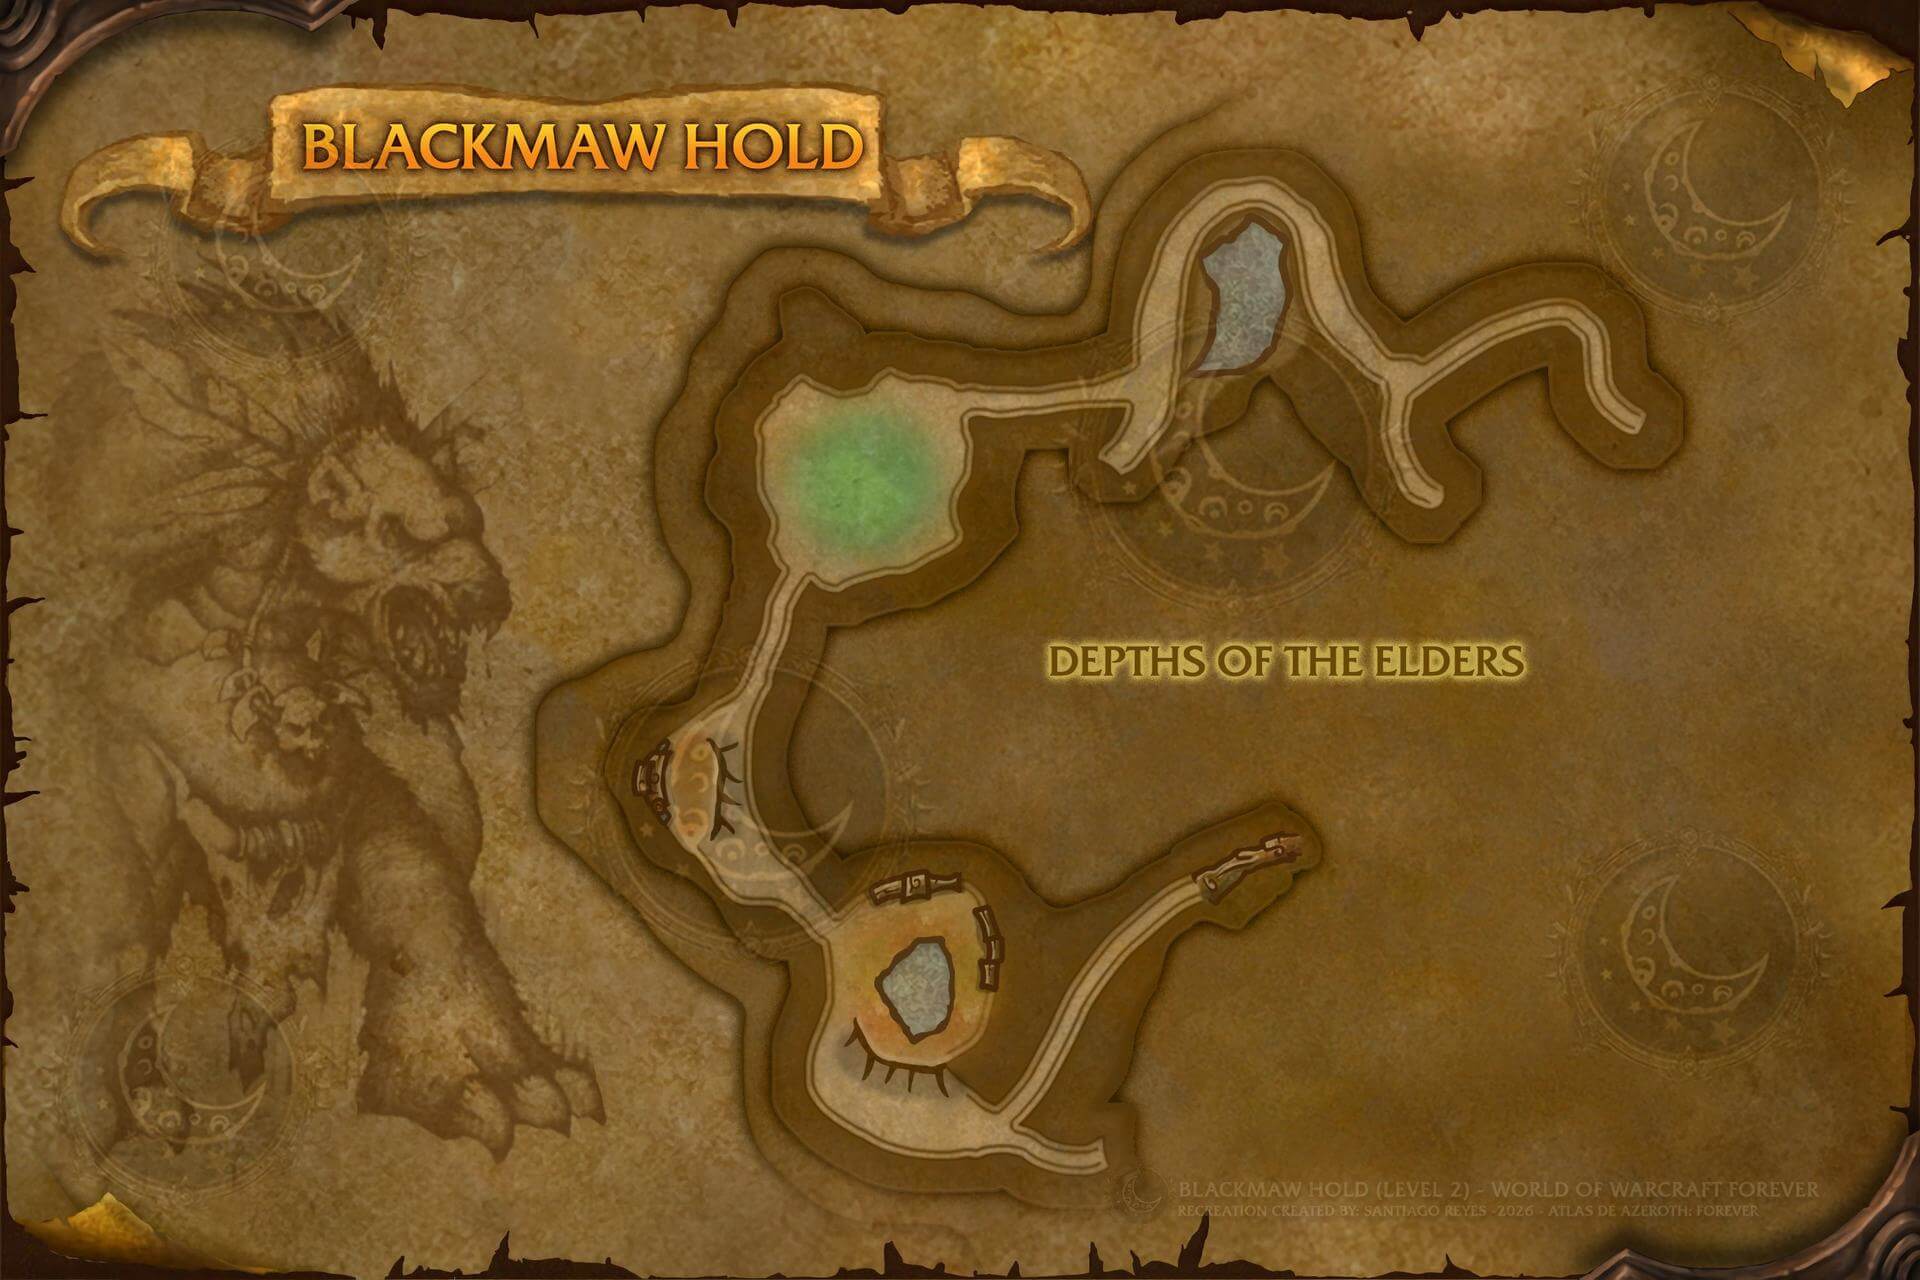
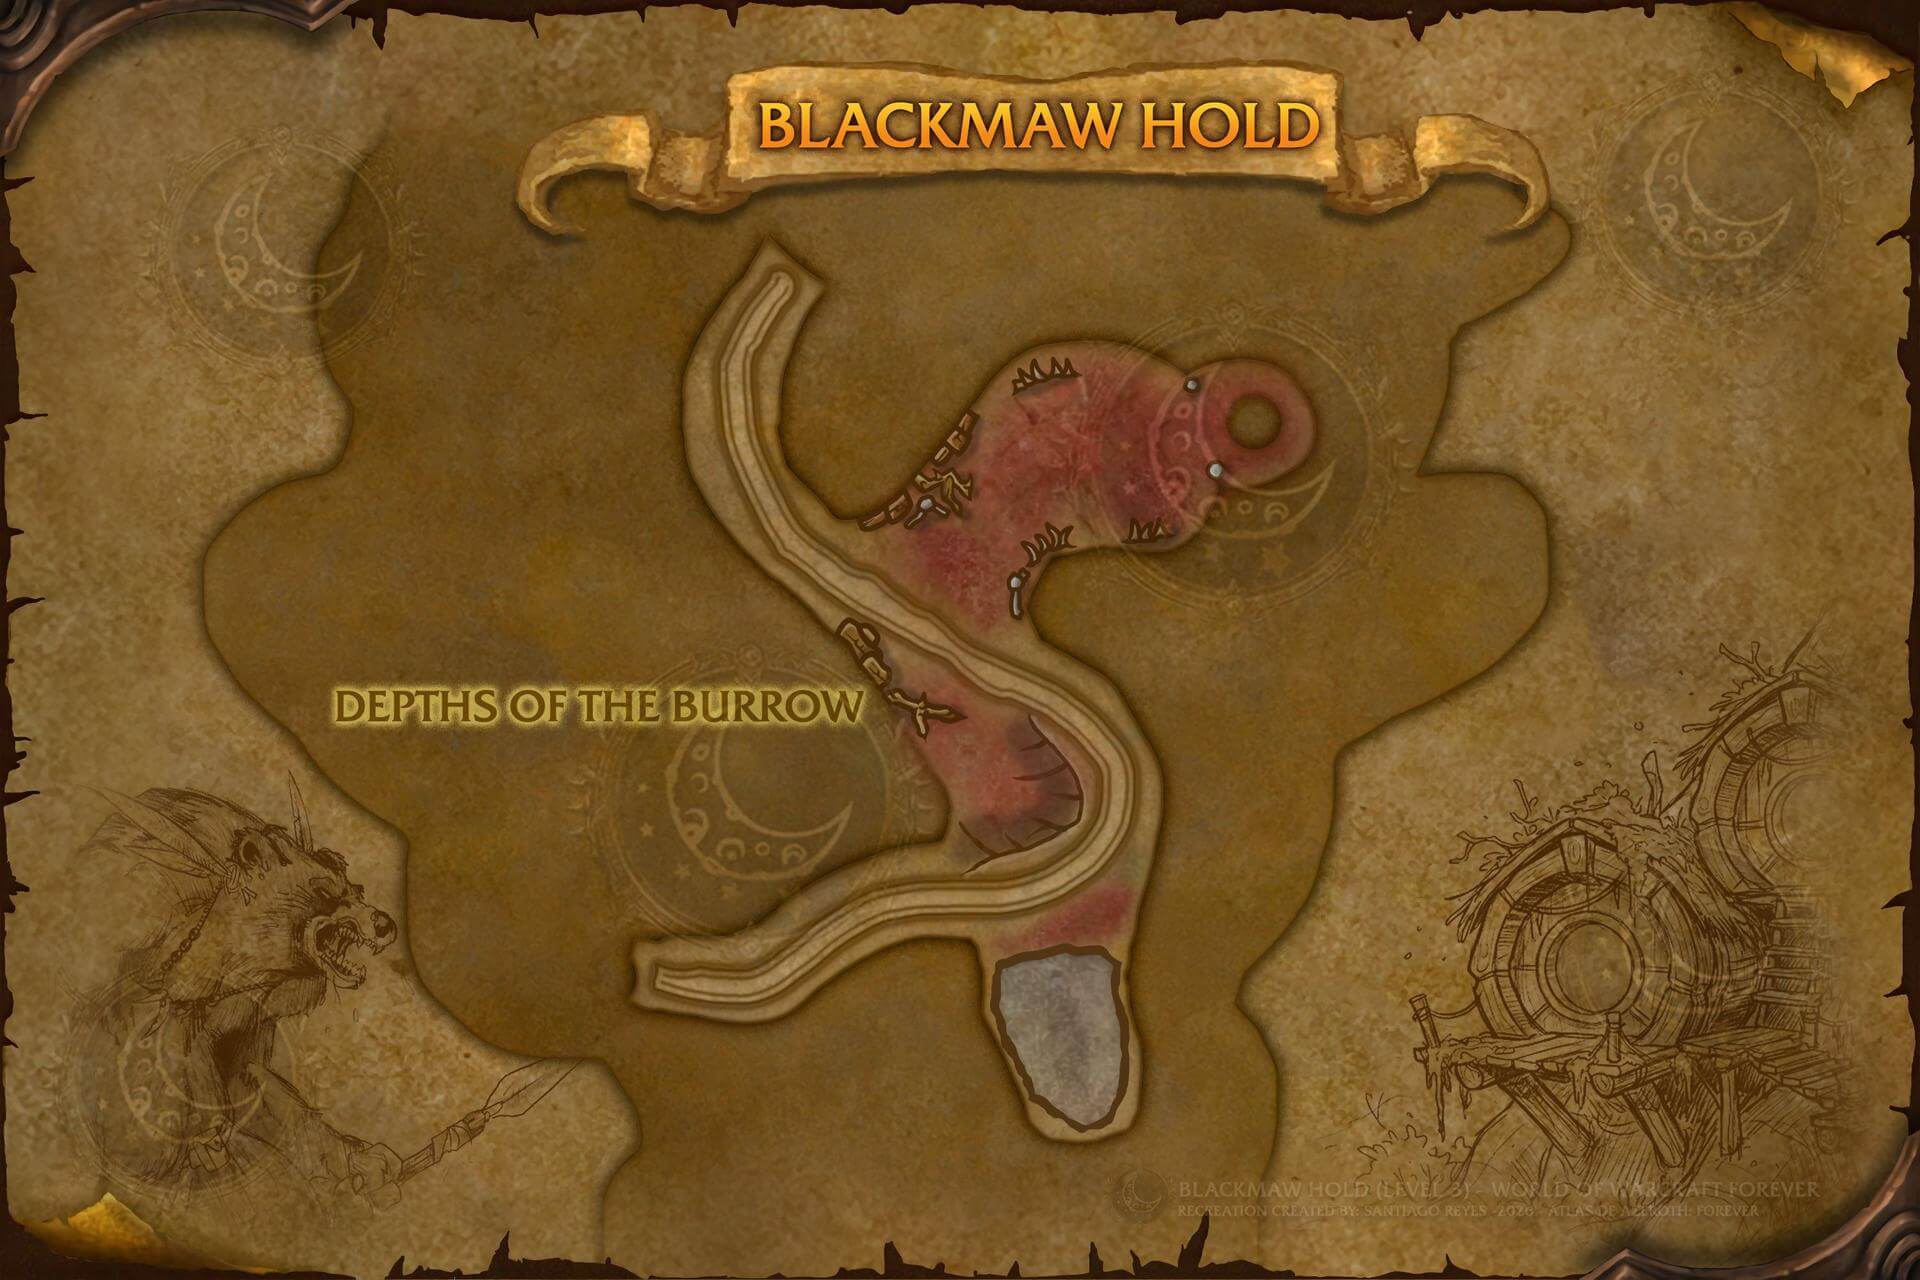
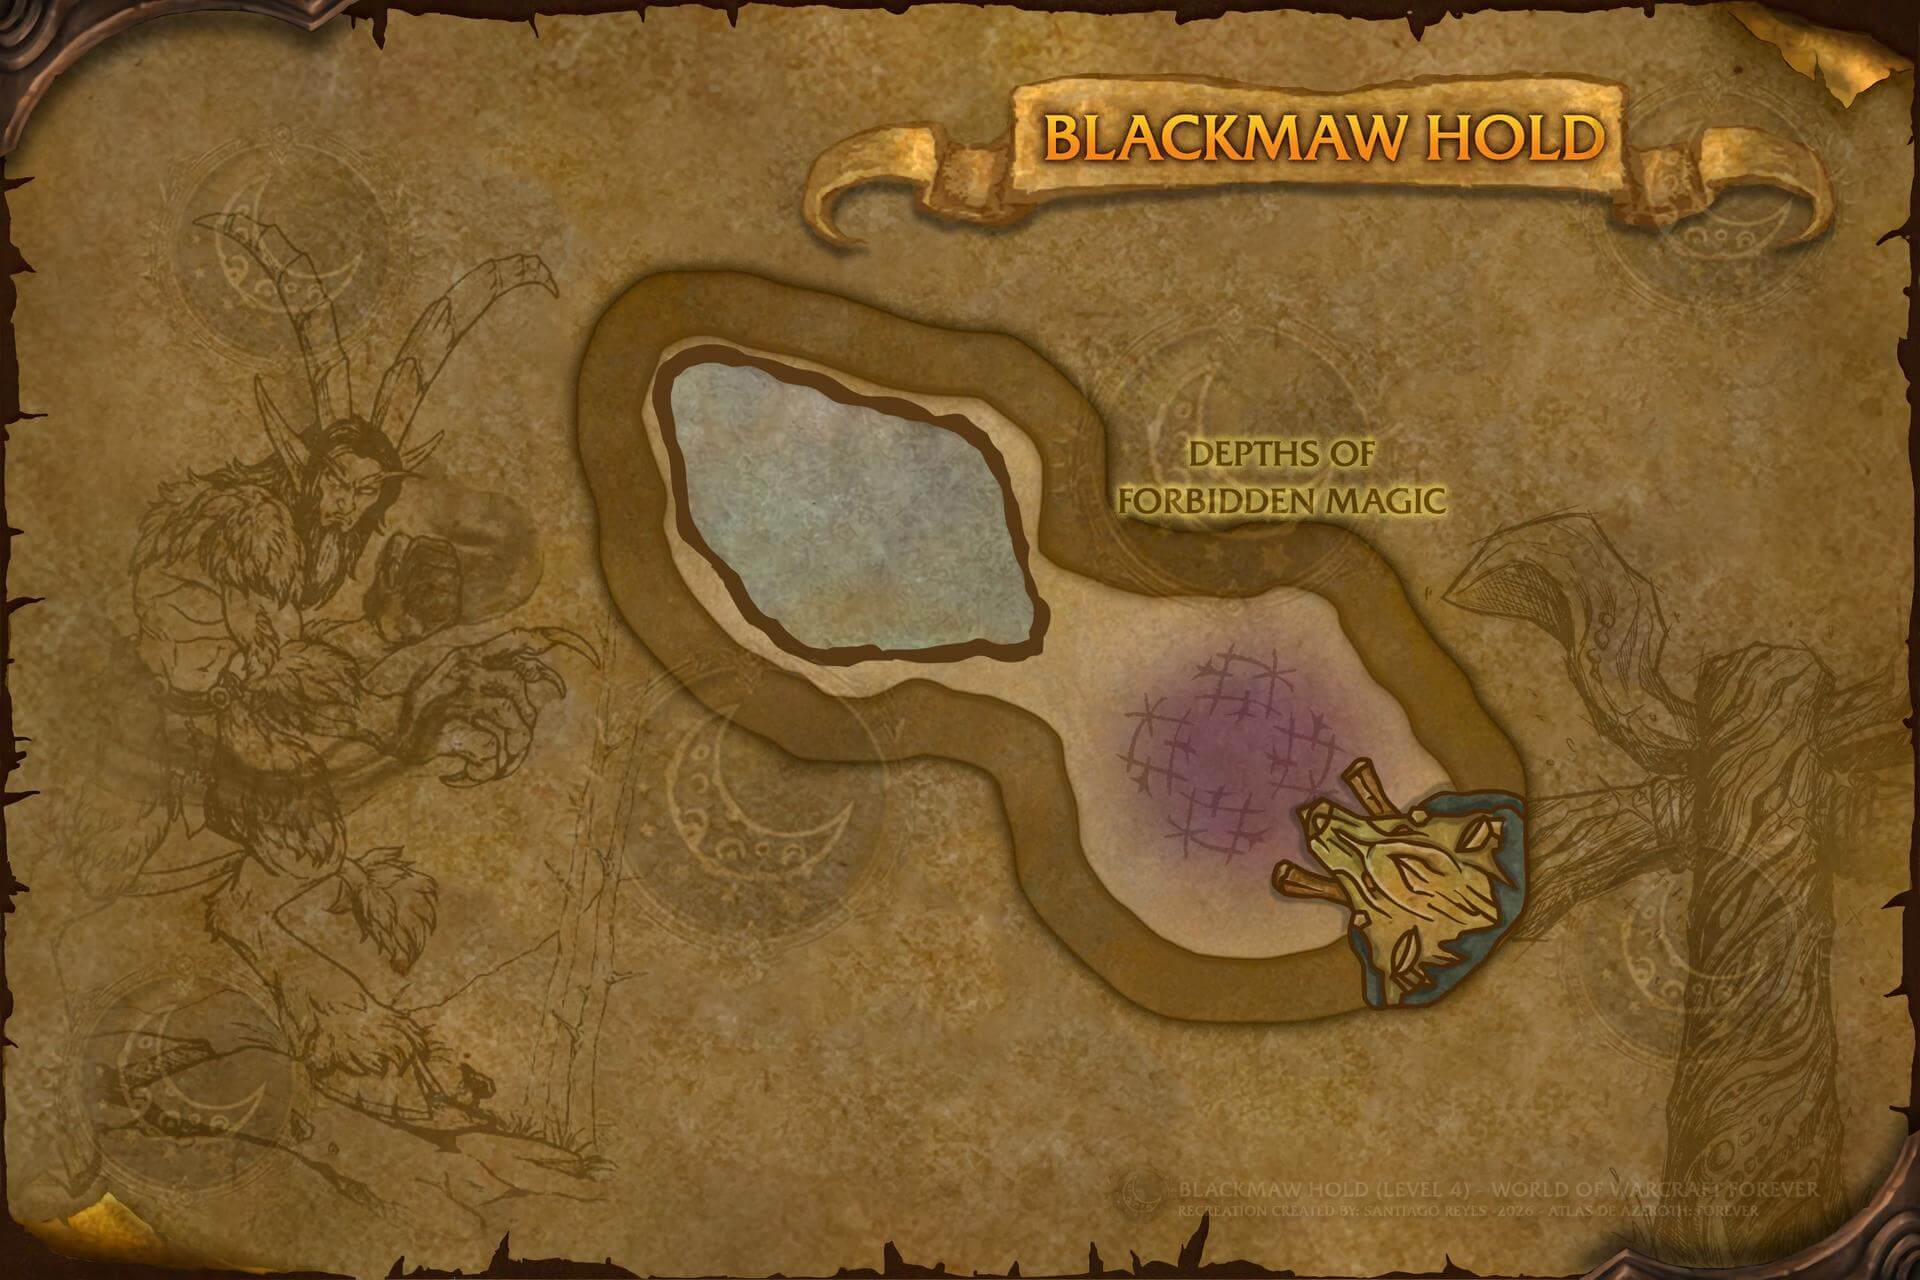
Maps created by Santiago Reyes.
Blackmaw Hold Important Trash
Blackmaw Headhunter
- Ranged DPS that applies Poisoned Shot, a deadly poison DoT. Dispel this where possible, and make sure the tank is in melee to reduce the amount of ranged hits taken (and thus opportunities for it to use this ability)!
Blackmaw Champion
- These use Terrifying Roar, an AoE fear that causes all affected targets to run in fear for 5 seconds. Burn this down ASAP to minimize casts of this, and use any abilities that prevent or cancel fear if possible (Tremor Totem, Ice Block, Fear Ward, etc). If you do not have these abilities, try to only pull these away from other packs, or you could get feared into a larger pull!
- They also use Slam, stunning the tank for 2 seconds.
Depraved Owlbeast
- Casts Moonfire, dealing incredibly high damage and applying a dangerous magic DoT for 12 seconds. Make sure everyone is full HP, and dispel this where possible.
Legashi Plaguebringer
- Uses Conjure Swarm, spawning Festering Swarmers that melee and apply Dark Plague, a disease DoT, for 90 seconds. DPS should be careful to not pull too much threat on newly spawned Festering Swarmers until the tank can pick them up, as the damage builds up fast.
- Also casts Shadow Bolt, an interruptible cast dealing high damage to the target.
Bloated Grizzly
- When killed, Bloated Grizzlies explode with Corpse Explosion, dealing incredibly high damage to anyone nearby and applying a disease DoT for 30 seconds. Everyone but the tank should get out of melee range immediately before these die.
Legashi Summoner
- These use Fear, causing the affected target to run in fear for 6 seconds. This is interruptible, but you should still focus this down immediately to minimize casts of this, and use any abilities that prevent or cancel fear if possible (Tremor Totem, Ice Block, Fear Ward, etc). If you do not have these abilities, try to only pull these away from other packs, or you could get feared into a larger pull!
- Additionally, they cast Shadow Word: Pain, applying a DoT to the target.
Swarming Imp
- These come in large packs, and when they die, players within 30 yards take moderate damage from Soulburst. Try to avoid killing many at the same time with AoE or anyone in range could take multiple ticks at once, adding up to large amounts of damage.
Blackmaw Hold Bosses
Impaan the Imprisoner
Impaan the Imprisoner is found in the outdoors area near the entrance of Blackmaw Hold. He's a fairly simple fight, with two primary abilities:
Most importantly, he'll use an instant cast ability, Imps!! (and yell it when he casts it!). This spawns 3 imp adds which provide a 99% damage reduction to the boss while alive, so killing these adds should be the absolute priority.
Aside from this, Impaan will use a variety of Shadowbolts on the tank, with different names beginning with "Imp" (i.e. Impalpable Shadowbolt). There is no difference in the Shadowbolts cast, this naming convention is just used for flavour. These are interruptible, so kick as many as possible to reduce the incoming damage on your tank!
Bonesnout the Unbroken
Bonesnout the Unbroken is another boss found patrolling a section of the outdoors starting area of Blackmaw Hold. Bonesnout begins with 4 stacks of Profane Bulwark granting him a total of 100% damage reduction, and players must kill the four Legashi Ritualists scattered around the area he patrols, removing 1 stack for 25% damage reduction each. Be careful not to let him patrol into you before you remove his damage reduction!
When the boss is pulled, your healer and all ranged DPS should stand out of range of the boss, as both of his abilities are limited to melee, and while simple they still do a lot of damage.
Trample deals high damage to all players in melee range, and Stomp stuns all players for 2 seconds. Simply stay out of melee where possible and heal through these to kill the boss.
Withermaw
Withermaw can be found in the Festering Grotto. He has three abilties, and can be fairly dangerous if not handled well.
Intimidating Roar will fear all party members for 8 seconds. Use any abilities that prevent or cancel fear if possible (Tremor Totem, Ice Block, Fear Ward, etc), with priority on the healer to keep the tank alive. If you don't have a way of cancelling fear in your group, make sure everyone is topped, away from any patrolling enemies, and ideally has a defensive up beforehand!
Writhing Mass will spawn constant Flesh Maggots, basic enemies with low HP that melee. These don't do much on their own, but if many are allowed to spawn, can do high damage - AoE them down as they enter the fight.
Finally, Maul does a large chunk of physical damage to the tank. Heal through this, and ideally use a defensive.
Elder Shaman Bloodmane
Elder Shaman Bloodmane is one of the easier bosses of Blackmaw Hold. First we recommend you clear the room of the many non-elite Blackmaw Devotees, and then you can pull the boss.
Bloodmane spawns two Feral Spirit at the start of the fight, which are hard hitting melee enemies. Make sure not to AoE too soon so your tank has time to pick up aggro!
Aside from this, Bloodmane uses Purge to stun and remove a buff from a party member, and casts Chain Lightning, which is interruptible and jumps to nearby party members. Spread out to try to avoid as much Chain Lightning damage as possible, and heal through Purge.
Clawbert + Blackmaw Behemoth
Clawbert and Blackmaw Behemoth is a two phase fight. When you pull the bosses, you will begin by fighting both at the same time. Focus down Clawbert first.
In this phase, Clawbert only casts Lightning Bolt, and Blackmaw Behemoth will pick him up and use him as an Improvised Weapon, increasing damage. He also uses Bestial Roar, which is an interruptible cast that reduces the party's damage, and spins around in a Whirlwind dealing damage to anyone in melee range.
Once Clawbert dies, the Blackmaw Behemoth will eat him, and modify his abilities. Firstly, Bestial Roar will become Thunder Roar, stunning all players for 3 seconds. This is still interruptible, so kick it! Aside from this, he will also gain Clawbert's Lightning Bolt ability, and his Whirlwind will do more damage. Kick, heal, stay out of melee when Whirlwind is happening, and take him down!
Unbound Spirit
Unbound Spirit is a two phase fight, with a much harder first phase, especially putting pressure on tanks and healers. Begin the fight by speaking to Elder Bramblesnap.
In Phase 1, the party must take down the 3 Profane Totems that are shielding the boss. Elder Bramblesnap will walk to a totem and begin channeling on it - this is the totem you must kill, as the others will be immune to damage.
While this is happening, the boss is pulsing damage on the party with Fire Nova, and a variety of Ethereal adds are spawning around the room, targetting Bramblesnap by default. The healer needs to make sure the party is topped, and the tank should pick up these adds before they can do serious damage to anyone else. DPS should focus the totem, only killing adds if the tank is beginning to be at risk of death.
Once all three totems have died, the Unbound Spirit becomes damageable, and uses Fireball, a basic interruptible damage spell. Simply burn it down to finish the encounter.
Varrox Bleakhoof
Varrox Bleakhoof is the last boss of Blackmaw Hold, and is largely manageable, with one very dangerous mechanic.
Varrox will target a random player in the party with Nightmare Detonation. Immediately following this, the same player will be targeted with Crimson Wrest, pulling them towards the boss. After Crimson Wrest expires, the targeted player has around 1.5 seconds to move away before Nightmare Detonation expires, causing the target and any nearby players to explode for a huge amount of damage and leaving a dangerous pool on the ground doing high damage over time to anyone inside it. Due to the short amount of time the affected player has to move, we recommend tanking the boss near the edge of the room, and all other party members moving away during the Crimson Wrest channel.
Finally, Varrox uses Fear, causing a player to flee for 4 seconds, and Shadow Bolt Volley, casting a damaging shadowbolt on everyone. Both of these are interruptible, so kick as much as possible. The healer should make sure the party is topped up before any Shadow Bolt Volley casts go out.
Moontouched Wanderer (Rare)
Moontouched Wanderer is a rare spawn that can be encountered in Blackmaw Hold.
He is a simple encounter, using Moonfire and Enrage. Moonfire hurts a lot and applies a magic DoT to its target, so keep the party health up and dispel it where possible.
Enrage causes the boss to hit harder and faster, so keep an eye on your tank when this is out.
Tunnelweb Matriarch (Rare)
Tunnelweb Matriarch is another rare spawn that can be encountered in Blackmaw Hold.
She's stealthed, so using stealth detection via potions, racials, or class abilities is the ideal way to find this boss if it spawned in your run.
The Matriarch uses Web, rooting players for 10 seconds, and Poison, a 30 second poison DoT. Dispel where possible and tank-and-spank the boss down.
Mopes (Rare)
Mopes is the final rare spawn in Blackmaw Hold. He is a simple Imp with one ability.
Shadow Bolt is an interruptible cast that does damage to its target - kick this as much as possible to reduce incoming damage!
Gortek the Apprentice (Rare)
Gortek the Apprentice is the 3rd rare spawn found in the Blackmaw Hold. This boss has a basic toolkit of two abilities similar to a Shaman's.
Lightning Bolt is an interruptible cast that does damage to its target - kick this as much as possible to reduce incoming damage!
Earth Shock is instant, doing damage and interrupting the target for 2 seconds. Because this is cast on the tank, the interrupt should rarely be a problem.