

 Up to 84% Off VPN
Introduction
Hey everyone, and welcome to Method's guide for the Uldaman Dungeon in World of Warcraft: Forever. In this guide we’ll be going over all trash, bosses, loot, and quests for this dungeon.
Uldaman Location
The location of Uldaman is within the Badlands, and there are two entrances for this dungeon. The intent is that players would come back to this dungeon later as there is a level spike in the latter half, but most players tend to brute force there way through it in one run.
The front entrance is located near the entrance to Loch Modan at the Makers Terrace, and the back entrance within Dustwing Gulch in a cave guarded by Troggs.
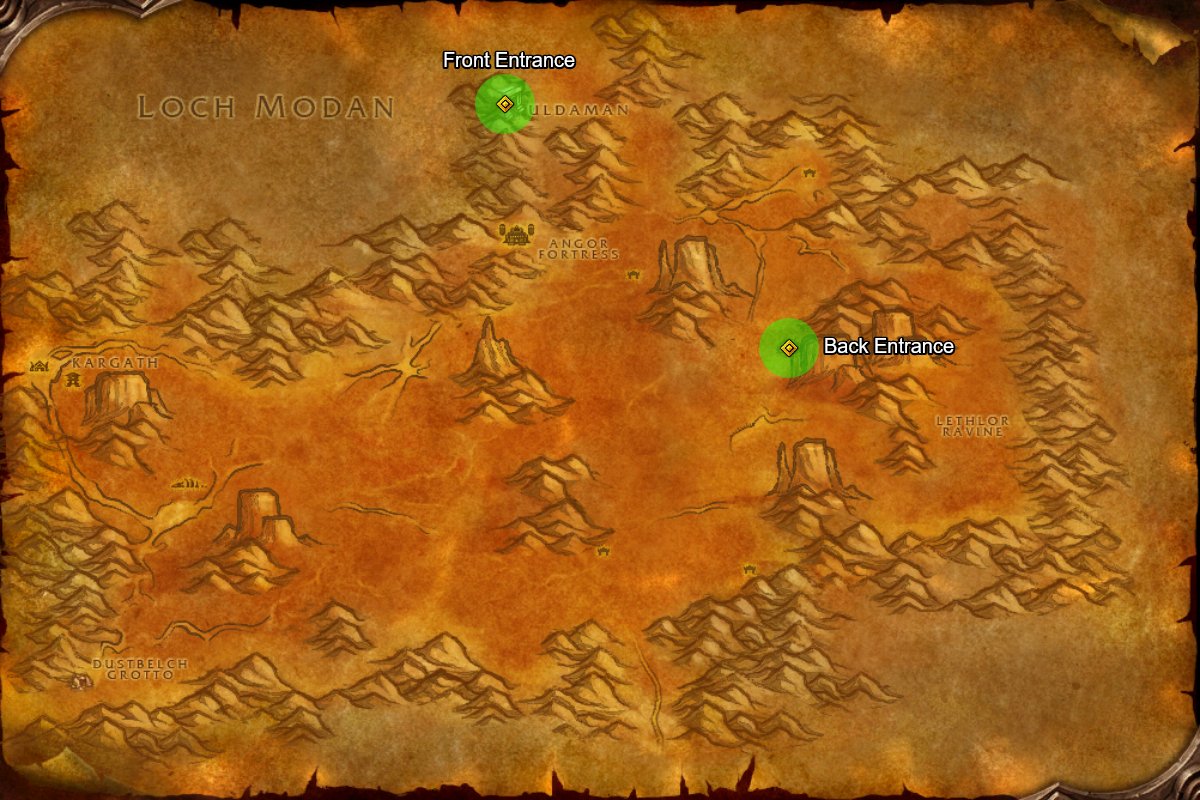
How To Get To Uldaman In WoW Forever
Here's how each faction can get to Uldaman in WoW Forever.
For Alliance, it's pretty easy. Just fly to Loch Modan and head south, or if you don't have the Loch Modan flight path, you can run from Ironforge, or head up north through the Riverglades.
For Horde, if you have the Kargath flight path in the Badlands then you can get there easily from there. If you do not have the flightpath, then the Riverglades will be your best bet:
- Get the boat from Steamwheedle Port in Tanaris to Powderfuse in The Riverglades
- Run west through the Riverglades, past Twilight's Shroud and then up north into Badlands.
Uldaman Dungeon Quests
There are several quests for both Horde and Alliance, along with some Neutral quests as well
| Quest | Level | Location | XP |
| The Lost Tablets of Will | 30 | Advisor Belgrum - Hall of Explorers, Ironforge (Starts from a Crumpled Map found near Angor Fortress) |
10,250 |
| Agmond's Fate | 33 | Proespector Ironband - Ironband's Excavation Site, Loch Modan (Starts with Ironband Wants You!) |
5,000 |
| Reclaimed Treasures | 33 | Krom Stoutarm - Hall of Explorers, Ironforge | 6,300 |
| The Lost Dwarves/The Hidden Chamber | 35 | Prospector Stormpike - Hall of Explorers, Ironforge | 6,850 |
| Uldaman Reagent Run | 38 | Ghak Healtouch - Thelsemar, Loch Modan (Starts with Badlands Reagent Run) |
6,050 |
| The Shattered Necklace (Leads to Restoring the Necklace) |
37 | Drops from Trash Mobs - Uldaman | 5,800 |
| Power Stones | 30 | Rigglefuzz - Valley of Fangs, The Badlands | 3,500 |
| Solution to Doom | 30 | Theldeurin the Lost - Agmond's End, The Badlands | 6,150 |
| The Platinum Discs | 40 | Located in secret room behind Archaedas's boss arena - Uldaman | 8,200 |
Total Alliance Quest Experience: 58,100 XP
| Quest | Level | Location | XP |
| Reclaimed Treasures | 33 | Patrick Garret - Central Undercity | 7,000 |
| Uldaman Reagent Run | 36 | Jarkal Mossmeld - Kargath, The Badlands | 6,750 |
| Necklace Recovery | 37 | Drops from Trash Mobs - Uldaman | 5,800 |
| Power Stones | 30 | Rigglefuzz - Valley of Fangs, The Badlands | 3,500 |
| Solution to Doom | 30 | Theldeurin the Lost - Agmond's End, The Badlands | 6,150 |
| The Platinum Discs | 40 | Located in secret room behind Archaedas's boss arena - Uldaman | 8,200 |
Total Horde Quest Experience: 37,400 XP
Uldaman Dungeon Loot
The Lost Dwarves Loot
The loot table below shows all drops from The Lost Dwarves in Uldaman.
| Type | Item | Boss |
|---|---|---|
| Bow Ranged | Baelog's Shortbow | The Lost Dwarves |
| Sword One-Hand | Nordic Longshank | The Lost Dwarves |
| Plate Head | Horned Viking Helmet | The Lost Dwarves |
| Leather Feet | Worn Running Boots | The Lost Dwarves |
| Shield Shield | Olaf's All Purpose Shield | The Lost Dwarves |
| Shield Shield | Battered Viking Shield | The Lost Dwarves |
| Arrow Projectile | Precision Arrow | The Lost Dwarves |
Revelosh Loot
The loot table below shows all drops from Revelosh in Uldaman.
| Type | Item | Boss |
|---|---|---|
| Plate Feet | Revelosh's Boots | Revelosh |
| Leather Shoulder | Revelosh's Spaulders | Revelosh |
| Mail Wrist | Revelosh's Armguards | Revelosh |
| Cloth Hands | Revelosh's Gloves | Revelosh |
| Quest Item | The Shaft of Tsol | Revelosh |
Ironaya Loot
The loot table below shows all drops from Ironaya in Uldaman.
| Type | Item | Boss |
|---|---|---|
| Mail Wrist | Ironaya's Bracers | Ironaya |
| Staff Two-Hand | Ironshod Bludgeon | Ironaya |
| Cloth Legs | Stoneweaver Leggings | Ironaya |
| Axe Two-Hand | Axe of Inevitable Ruin | Ironaya |
Obsidian Sentinel Loot
The loot table below shows all drops from Obsidian Sentinel in Uldaman.
| Type | Item | Boss |
|---|---|---|
| Axe Two-Hand | Rock Sentinel Slicer | Obsidian Sentinel |
| Wand Ranged | White Obsidian Wand | Obsidian Sentinel |
| Plate Chest | Dark Golem Breastplate | Obsidian Sentinel |
| Axe Two-Hand | Axe of Lingering Dread | Obsidian Sentinel |
| Quest Item | Obsidian Power Source | Obsidian Sentinel |
Ancient Stone Keeper Loot
The loot table below shows all drops from Ancient Stone Keeper in Uldaman.
| Type | Item | Boss |
|---|---|---|
| Mail Shoulder | Rockshard Pauldrons | Ancient Stone Keeper |
| Plate Hands | Cragfists | Ancient Stone Keeper |
| Staff Two-Hand | Sandstorm Staff | Ancient Stone Keeper |
| Leather Waist | Heraldic Belt | Ancient Stone Keeper |
Galgann Firehammer Loot
The loot table below shows all drops from Galgann Firehammer in Uldaman.
| Type | Item | Boss |
|---|---|---|
| Back | Emberscale Cape | Galgann Firehammer |
| Cloth Shoulder | Flameseer Mantle | Galgann Firehammer |
| Gun Ranged | Galgann's Fireblaster | Galgann Firehammer |
| Mace Main Hand | Galgann's Firehammer | Galgann Firehammer |
| Held In Off-hand | Royal Scepter | Galgann Firehammer |
Grimlok Loot
The loot table below shows all drops from Grimlok in Uldaman.
| Type | Item | Boss |
|---|---|---|
| Cloth Chest | Grimlok's Tribal Vestments | Grimlok |
| Polearm Two-Hand | Grimlok's Charge | Grimlok |
| Leather Legs | Oilskin Leggings | Grimlok |
| Mail Legs | Champion's Leggings | Grimlok |
Archaedas Loot
The loot table below shows all drops from Archaedas in Uldaman.
| Type | Item | Boss |
|---|---|---|
| Finger | Archaedic Stone | Archaedas |
| Staff Two-Hand | Stone Keeper Spire | Archaedas |
| Mace Two-Hand | The Rockpounder | Archaedas |
| Sword Two-Hand | Stoneslayer | Archaedas |
| Quest Item | Shattered Necklace Power Source | Archaedas |
Uldaman Dungeon Map
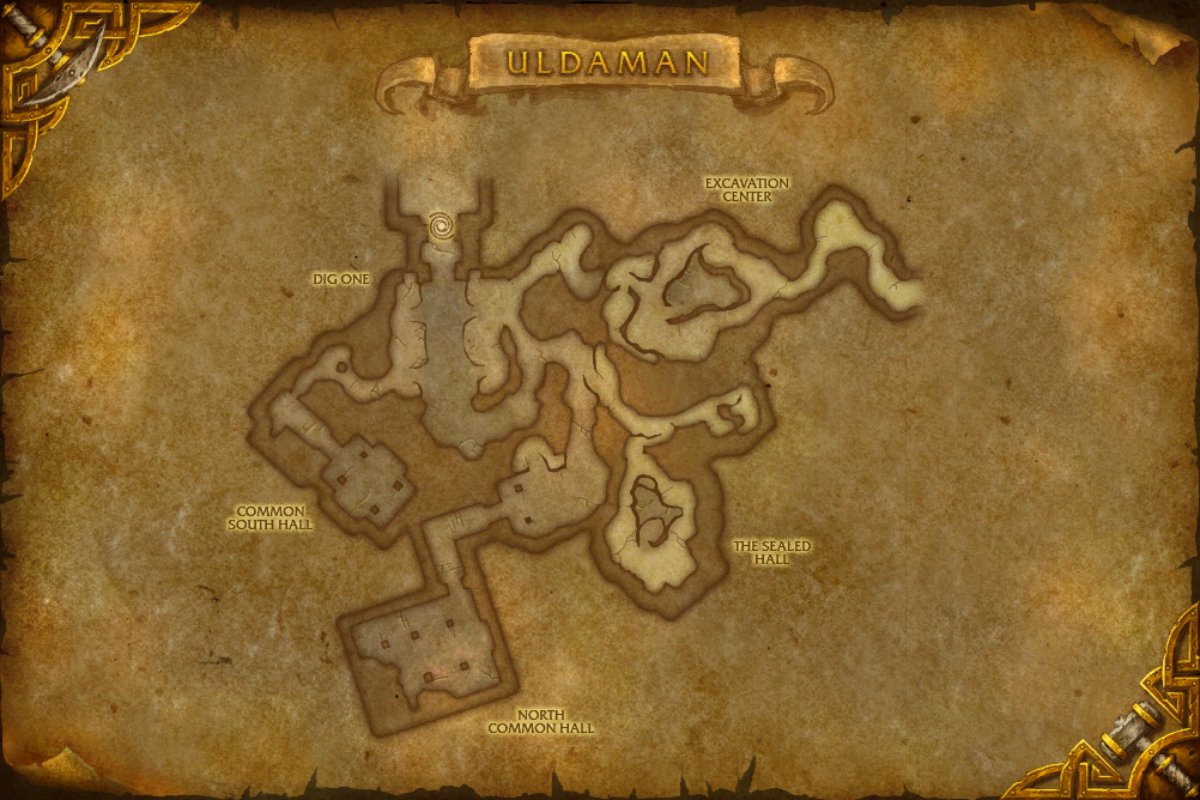
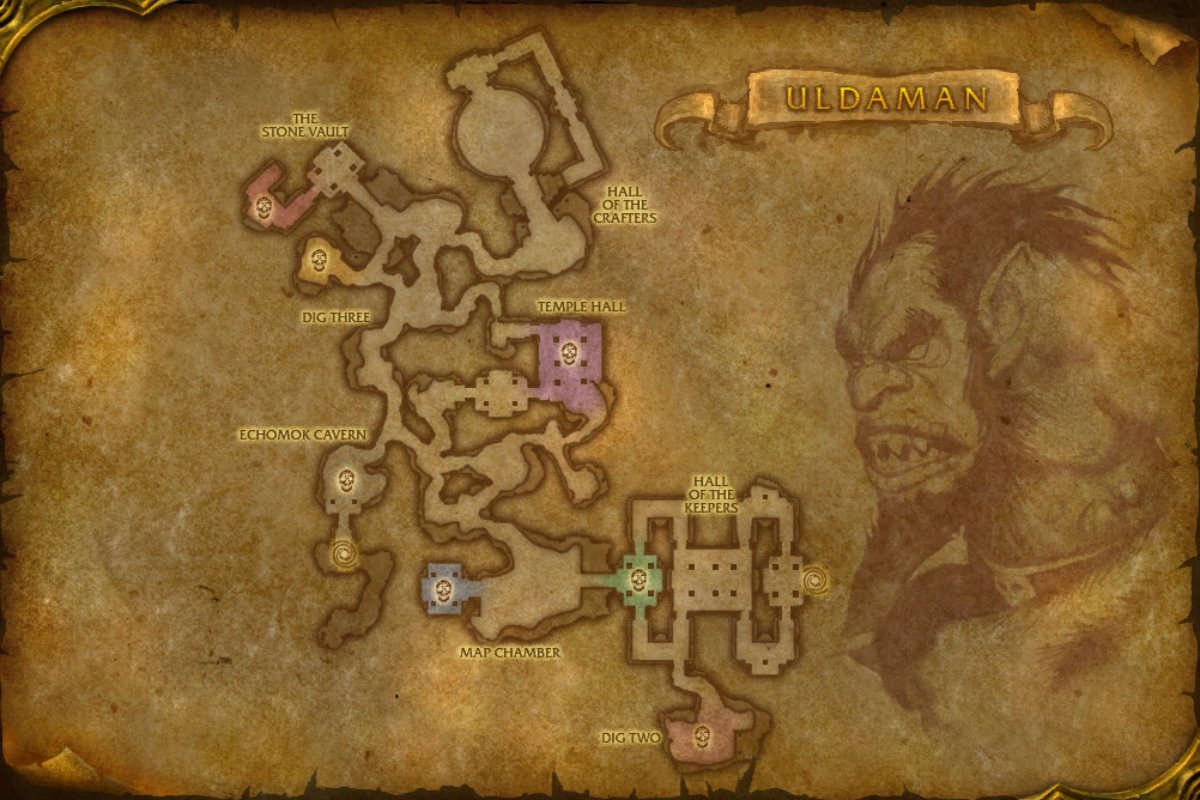
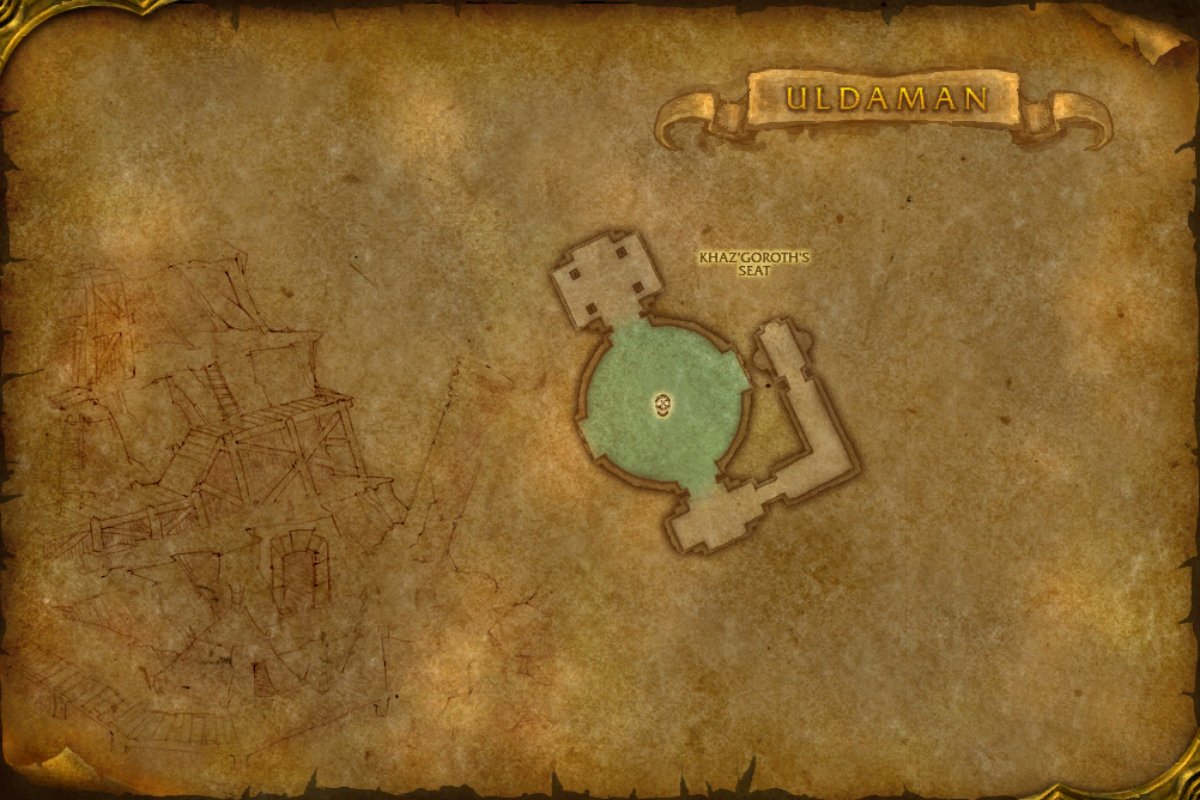
Uldaman is a very large dungeon. The first picture below is the outside portion of the dungeon, with the next two being the instanced portion.
Uldaman Important Trash
Trash here consists of Humanoids, Beasts, and Elementals, with a mixture of ranged dps and poison dealing abilities.
Stonevault Oracle
Stonevault Oracles are the most powerful and dangerous of the troggs within this dungeon, as they'll cast Shaman-like abilities and totems:
Always prioritize these mobs first, as they can heal other mobs with Healing Wave. Although the ability is called Lightning Shield, it is a Lightning Bolt ability. Always kill their totems as soon as the spawn.
Jadespine Basilisk

The Basilisks have two very powerful abilities: Reflection and Crystalline Slumber.
- Reflection: Reflects all magical damage for 5 seconds.
- Crystalline Slumber: stuns an enemy for 15 seconds.
Crystalline Slumber is incredibly dangerous, and needs to be magically dispelled ASAP.
Earthen Sculptor
Earthen Sculptors have a couple of abilities to watch out for.
- Flame Buffet: Deals increasing damage with every application.
- Fire Shield IV: Deals damage to nearby enemies every 3 seconds.
Because of the cumulative damage nature of Flame Buffet, try and take out these targets fast.
Shadowforge Relic Hunter
Shadowforge Relic Hunters are 'Priest' mobs of the Shadowforge mobs, with their most powerful ability being Silence.
- Heal: Interrupt this.
- Shadow Word: Pain
- Silence: Instant-cast silence for 6 seconds.
When these mobs are present, use stuns to incapacitate them and take them down ASAP. You do not want these silences going out with the other trash mobs, especially if your tank is a Paladin.
Shadowforge Geologist
These mobs are incredibly powerful, as they deal intense fire damage to players with their two abilities:
- Flame Lash: Deals damage and reduces target's fire resistance.
- Flame Spike: Powerful AoE damage cast.
Move out of Flame Spike damage, and heal players affected by Flame Lash. Dispel it if a player can in your party.
Uldaman Bosses
Bosses here range in level, starting from level 40 and going all the way to level 47! Be careful entering here at the lower level range, as it will make the final boss particularly challenging!
Revelosh
Revelosh is a Trogg boss found early on in Uldaman, accompanied by two Stonevault Rockchewers. You cannot pull these separately.
The Rockchewers only Enrage when at low HP, but the combined damage from all three mobs could be overwhelming for your tank, so using crowd-control like a Mage's Polymorph can be helpful. Revelosh himself only has two abilities:
Since the Rockchewers only Enrage at lower HP, if you cannot CC them, then focus Revelosh first and then the adds after, to avoid triggering the Enrage effect. Afterwards, take the adds down.
The Lost Dwarves
The Lost Dwarves are only hostile towards the Horde, making them a Horde only boss. There are three Dwarves with different abilities:
- Baelog: Shoot
- Eric "The Swift": Intercept
- Olaf: Shield Slam
You can use crowd control and stuns on all three, and we recommend using them on Eric "The Swift" for his annoying intercept. However, you can also all stack up on the tank to prevent him from being able to cast it, and choose to CC Baelog.
To get all three together, you can also stack on the tank and slowly drag over the two other mobs to Baelog, to prevent him from being able to shoot. As you're doing this, make sure to be mindful of Olaf's Shield Slam, as it will stun the tank for 2 seconds, allowing threat to potentially transfer to someone else.
Ironaya
This boss is only available if players combine the Gni'kiv Medallion and The Shaft of Tsol, together. The former is found in a chest in the Lost Dwarves room, and the latter drops of Revelosh. Once combined, it'll create the Staff of Prehistoria and players can place it on the keystone in the room following Revelosh's area.
Ironaya only has three abilities that are all fairly easy to manage:
The tank should go against a wall and face her away from the rest of the party to negate the Knock Away and Arcing Smash, and all ranged dps and healer should be away from the boss to avoid getting hit by the War Stomp. This War Stomp is a knockback, not a stun.
Tip: Knockbacks in WoW Forever also come with a threat drop, so tanks should be ready to taunt the boss following one!
Obsidian Sentinel
Obsidian Sentinel is the 4th boss of the dungeon, found close to the back entrance of Uldaman, and jumps to level 44, whereas the previous bosses were only level 40.
His only ability is his Summon Obsidian Shard, where he summons adds throughout the fight from his body. Take down the adds and then the boss.
Note: This boss is immune to Damage Over Time (DoT) effects
Ancient Stone Keeper
Ancient Stone Keeper can be a very dangerous encounter if players pull the boss with the trash around it. he patrols around his room, so carefully pull the trash around him until it's safe to pull the boss.
His one ability is Sand Storms, summoning storms that silence all players that get hit, and also slowing their movement speed. Similar to the previous boss, he is also immune to DoT effects.
Once the room is clear, this boss is not too challenging, but Sand Storms can be fatal with other trash involved.
Galgann Firehammer
Galgann Firehammer is a fire sorcerer Dark Iron Dwarf found within Uldaman, accompanied by two Shadowforge Geologist , and has a variety of fire-type abilities:
If you have a Paladin or Priest that can dispel magic debuffs, make sure they do so whenever Amplify Flames goes out, as this can be fatal when added with the other fire abilities from him and the two Geologists.
Use crowd controls and stuns on the adds to keep them from dealing damage. Unlike Revelosh, take down the adds ASAP if you do not have crowd control, as the damage can be overwhelming to your tank.
All ranged should be far from the boss to avoid the Fire Nova, and the healer needs to keep the tank close to full HP as the burst damage from Flame Shock and Flame Lash can be deadly.
Grimlok
Grimlok is the penultimate boss of Uldaman, and comes with a Stonevault Geomancer, Stonevault Brawler and a Jadespine Basilisk with the encounter.
Similar to other encounters, using crowd control to reduce the amount of members of this fight is recommended. Grimlok himself has several abilities:
One strategy is to fully focus on the boss and ignore the adds to take him down before mechanics go out. However, we recommend quickly taking out the Jadespine Basilisk, as that 15 second stun they cast with Crystalline Slumber is incredibly deadly.
After the Basilisk is taken down, you can focus on the boss. Bloodlust will make everyone attack faster and harder, so use any personal or external defensive cooldowns on the tank, and use stuns on the adds to reduce incoming damage. Take down the Basilisk, and then the boss to make this encounter easy.
Archaedas
Archaedas is the final boss of Uldaman, and jumps up another 3 levels to level 47! He has one primary ability: Ground Tremor, stunning all nearby players for 2 seconds. Along with that, he'll summon adds at 20% HP with Awaken Earthen Guardians and Awaken Vault Warder.
A popular strategy is to have a ranged DPS, preferably a Hunter with Aspect of the Cheetah, to pull the boss and drag him upstairs into the previous room. This typically gives players enough time to burn the boss from 20% HP to 0 before the adds reach the encounter.
If you cannot do this, use any crowd control or stuns on the adds. We highly recommend this strategy if coming in at level 44 or below, as your damage will be weaker from higher Resist and Misses on the boss.