
Raid Setup
Introduction
If you've been following my guides, you know I once recommended bringing a fire extinguisher to a boss fight. Well, here's the good news – this time, Heroic Larodar, Keeper of the Flame has it built-in! Forget about your plans for that peaceful botanic garden visit this year because this encounter has it all: trees, seeds, roots, and fire. You need to be extra sweet to your healers, because they've got some new buddies to look after in this wild, leafy party.
Fight Style: Single Target fight with plenty of cleave
Recommended Setup: 2 Tanks / 5 Healers / 13 DPS
Useful utilities: Rescue, Life-Grip, Guardian Spirit
Hero/Lust usage: Phase 2
![]() Awakened Note:
Awakened Note:
If your group has significant DPS, then you should consider using lust and cooldowns on pull and push the boss earlier to reduce the amount of phase 1 mechanics you need to do. Ideally you will only need to do the Phase 1 mechanic rotation once.
If you struggle with Phase 2 of the boss, you can instead move lust back to Phase 2 and just play through more Phase 1 rotations.
Mechanics
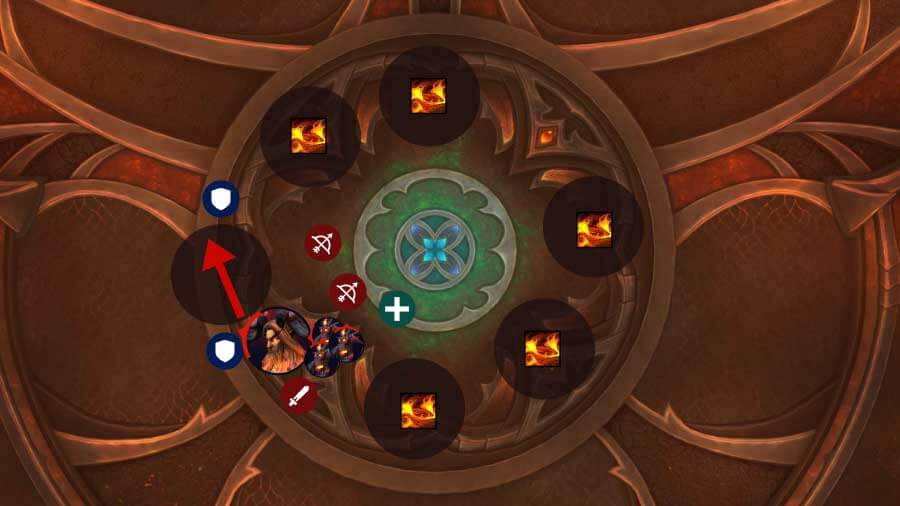
Seed of Life
Core mechanic of the fight. A seed in the middle of the room that needs to be charged via Treants. Once it has energy, It needs to be used to clear fire puddles around the room.
Detailed explanation on how it works is in the strategy section.
Treants
3 Fiery Treants will spawn close to the boss, they need to be tanked and killed. They spread additional fire puddles and have an interruptible cast called Fiery Flourish.
Once killed, they become Charred Treants that need to be healed up! When healed, they will move to the middle of the room and start charging the seed. Life-Grip and Rescue can also be used to move them into the middle of the room faster.
Small root on the ground that fixates on a random player. If hit by the Scorching Roots, the player will take damage and become rooted until dispelled!
Once killed, the roots turn into Charred Bramble just like the Treants, and have to be healed up before Larodar reaches 100 energy, otherwise you will wipe! When healed it will turn into a Life-Tree that reduces damage taken from Raging Inferno by 90% but only if you are standing in the green circle.
Note: The root is not attackable until it gets cleansed by Seed of Life.
Charges the current tank, inflicting heavy physical damage and additional magic damage. Damage is reduced based on distance. It will also hit the entire raid for heavy damage, but this can also be reduced by distance. During PTR testing, being around 15-20 yards away felt fine.
Star shaped, mini swirls around the boss that need to be dodged. The tip of each line will spawn a Blazing Coalescence orb that needs to be picked up before they reach Larodar. Picking it up will deal a low amount of damage to the player and gives 20% increased crit chance for 10 seconds.
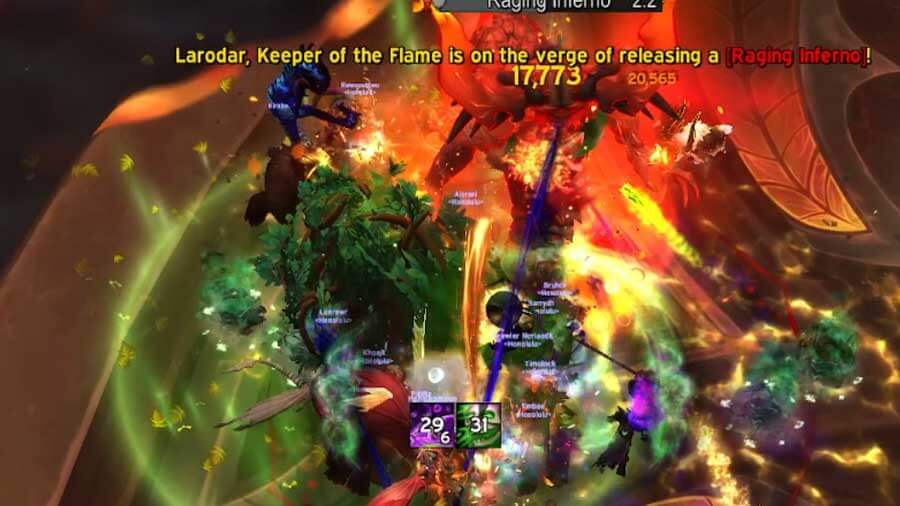
At 100 energy, Larodar will channel Raging Inferno for several seconds, this deals lethal damage to anyone not standing inside of the Bramble Barrier (Green tree).
Unavoidable raid wide damage that ramps up in damage after each Raging Inferno cast.
After 3x Raging Inferno casts, or when Larodar reaches 40%, Consuming Flame will trigger. It deals heavy raid-wide damage for several seconds and forces your raid to spread out, as you take additional damage if other players are within 3 yards. All fire puddles will also move towards the boss.
Small circles (3) that need to be soaked by 1 player per circle, otherwise they inflict a medium amount of raid-wide damage and give everyone a stack of Searing Ash.
Several players gain a medium strength absorb shield for 8 seconds. This shield needs to be healed before it expires. If it does expire, the player will explode, dealing a low amount of damage to players within 8 yards. Additionally, it stuns the player for 20 seconds, but this can be dispelled.
A Tank frontal that needs to be avoided. Getting hit by this will reduce healing received by 100% for 18 seconds and deals a medium amount of damage every second. However, the player can leech health from allies within 6 yards.
Ashen Treant
Treants will spawn all around the room, leaving fire puddles behind them as they move/die. When killed they will explode, dealing a medium amount of damage to anyone in a 3 yards range.
Strategy
This is a very demanding healer fight, so you should experiment with healing comps.
A Shadow Priest playing Holy on this fight as the 5th or 6th healer is very beneficial, because Guardian Spirit is the best spell that you can have in this fight!
Seed of Life Gameplay
The seed can be interacted with as soon as it has energy. To use it, simply move to the middle and click on it. The player will turn into a water hose (you will have a frontal cleansing animation going on), this will last until all energy has been drained from the seed.
Assign 3 players per each Phase 1 cycle to deal with the Seed. This means a total of 9 players since the boss will automatically enter Phase 2 after 3 Raging Inferno casts.
Player 1 should click the Seed as soon as Scorching Root appears! Run to the root instantly and cleanse it so it's targetable, afterwards clear the fire around the room.
Player 2 should click the Seed when Player 1 is done, and Player 3 should do it after Player 2 is done. It is important that players make use of all available Seed energy and clear the fire as much as possible! This will be incredibly helpful in Phase 2 when space becomes very limited.
Every Phase 1 cycle is the same, so you won’t have any RNG involved.
Phase 1
Opener:
Start the fight by having the boss somewhere in the corner, in between the fire puddles; there will be several fire patches on the ground before the pull.
The idea is that the boss will fill that gap with the Blazing Thorns cast, which drops extra fire puddles, but he will charge the other tank afterwards and naturally move the raid into another "clear" space of the room. This formation also ensures that there is plenty of distance for the charge to do negligible damage. Remember to pick up the orbs after each Blazing Thorns cast.
Fiery Treants will spawn shortly after the pull. Make sure to nuke them down as soon as possible.
In general, you should always prioritise everything else over the boss in this fight, because the slower you deal with the adds, the more issues you will have in dealing with fire puddles and surviving Raging Inferno.
Once the Fiery Treants are dead, healers should heal them up quickly! You can set up life-grip and rescue to position them in the middle of the room so they don’t have to walk to the middle once healed up (it's a walking tree, of course it's going to be slow). When fully healed and in the middle of the room, they will channel into the Seed of Life.
At around 30 Boss energy, Scorching roots will spawn and fixate on a player. Cleanse it with Seed of life and kill it as quickly as you can to give healers plenty of time to heal it up before the Raging Inferno cast at 100 energy.
The root has a fair amount of health that needs to be healed up, make sure to assign healer cooldowns like Guardian Spirit, Ascendance or anything similar that gives you strong spot healing.
Once Larodar reaches 100 energy, everybody must be standing in the green circle to survive the Raging Inferno. You will still take heavy damage, so make sure to use personals and raid cooldown.
Phase 1 will repeat from here until you reach 40% or the 3rd Raging Inferno cast. Keep in mind that each Phase 1 hurts more than the previous, due to Combusting Presence stacks.
Pro tip: Get Larodar to 41% and stop damage until he casts Raging Inferno, then start attacking midway through the cast. That way he will finish his Raging Inferno and be under 40%, so essentially a free % gain.
Intermission
Everything happens very fast here, in fact this might be the fastest Intermission in a long time. As soon as you see that intermission has been triggered, spread out quickly and use defensives and raid cooldowns.
Prepare to dodge any incoming fire puddles that move towards Larodar and make sure nobody is standing within 3 yards of you.
Once the channel is finished, Phase 2 will start.
Phase 2
Make sure you have all your damage cooldowns ready, because you will use hero/lust and blast the boss.
3 Falling ember soaks will spawn shortly into Phase 2, these need to be soaked by 1 player each. Keep in mind that this ability becomes problematic towards the end of Phase 2, when the entire area is covered in fire and you have to stand in fire puddles to soak the Embers.
Additionally, several players will get the Absorb Shield (flash fire), you need to heal them before they explode (after 8 seconds).
Ashen Treants will walk towards Larodar from the side, Ranged players should swap to them as they explode in a 3 yards radius, so stacking them up on top of the boss might not be the best idea if you value your melee players. It is possible to Crowd Control several of these adds as well.
Dodge tornadoes, and the frontal cone! The Tank getting hit by the frontal should just run into the melee stack to leach health from them.
Essentially, Phase 2 is just a burn phase and you will only get in trouble if you miss soaks or healers cannot keep up with the absorb shield. The adds themselves are not a massive issue and even if they get into melee, just keep an eye on their health and move out when they are about to die. And, even though the soft enrage via Searing Ash might add some form of urgency, this can be "fixed" by adding additional healers to the team.