Raid Setup
Introduction
Hold onto your helms adventurers, because Heroic Nymue is turning the battleground into a lawnmower's dream! To survive this green and mean showdown, you'll need to channel your inner nature lover. You've got to touch some grass! And if that's not enough, Nymue brought along her band of Wardens! So, grab your gardening gloves and your sharpest sword, because Nymue is here to test your grass-touching and line-crossing skills (cross them at your own risk) like never before!
Fight Style: Single Target fight
Recommended Setup: 2 Tanks / 4 Healers / 14 DPS
Useful utilities: Gardening Tools, No Evokers (thank me later), Speed-Boosts
Hero/Lust usage: On Pull
Mechanics
At the end of the intermission, Nymue will redraw the lines, inflicting Medium damage to the entire raid every 1 second for 10 seconds.
When you cross the lines on the floor, players take a low amount of damage instantly and gain a low damage, ticking DoT for 6 seconds.
This stacks.
The player will receive a circle that, upon expiration, remains on the ground. It will then knock back anyone who comes into contact with it, causing a low amount of damage during the knock-back.
The Player will gain Inflorescence for a short duration.
Spread grass on the ground, when running through the grass, players become immune to Verdant Matrix damage and gain a 45% movement speed increase (only when in the grass area).
The boss releases multiple blue lines that inflict a significant amount of damage and stun the player for 3 seconds upon contact.
Several flowers will constantly spawn around the map, inflicting a low amount of damage to all players every 2 seconds for 1 minute. This stacks based on how many flowers are currently active on the platform. Standing in a flower for a few seconds will remove it. Having multiple players soak the same flower will speed up the process. You do not take any additional damage from soaking the flower.
The Tank gains a low damage ticking DoT that explodes after 12 seconds, after explosion, tanks spawn grass on the ground for several seconds.
Tank gains Woven Resonance which Increases Nature damage taken by 100% for 30 seconds. You will also spawn a Barrier Blossom at the location.
Deals a high amount of Physical damage to the tank and medium nature damage. Tanks affected by Woven Resonance should not take a hit from this.
Unavoidable, low level of raid wide damage that lasts for 6 seconds, but increases in intensity after each intermission.
Frontal that deals lethal damage to players hit by it. Simply avoid. Will also spawn several Flowers.
Swirl formation that deals high damage if you get hit by it. Has different patterns every cast so don’t get surprised.
Strategy
Phase 1
Split the raid in 6 groups of (preferably) 3 players. This will come down to your comp, but overall you should be able to have at least 2 players in each group which is enough.

The groups will handle all the Surging Growth soaking.

The reason why you need to split up like this is to minimise the amount of line crossing you need to do, in order to soak the maximum amount of flowers.
As the flowers spawn, you want the group to soak a flower together because that way it goes faster. Keep in mind that you are not supposed to run around trying to get every single flower on the map. The flowers naturally expire after 1 min, but also having 3-4 flowers up will not deal a significant amount of damage to the raid. In fact you might just take way more damage crossing the lines, trying to soak them.
Having the groups spread like this will make sure that you are able to soak the majority of the flowers without having to cross more than 1-2 lines.
Additionally, groups should play around the Barrier Blossom buff.
Each time players get a Barrier Blossom circle and drop it, they will gain Inflorescence buff for several seconds. They can run into their teammates to spread the grass which enables you to cross the lines without taking damage.
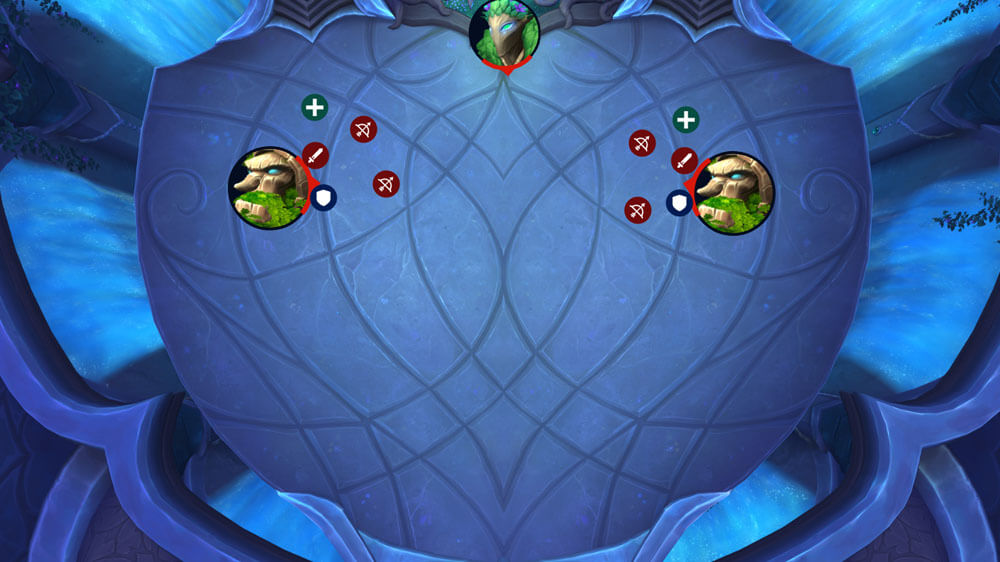
The suggested drop positions should look like this:

Now keep in mind these are not set in stone positions, but just a general suggestion of how you could drop them. Doing it this way will ensure that players are close enough after dropping the circle to buff others with grass, and will also create a safe path for you to cross towards the Wardens in the intermission.
Tanks, make sure to pay attention to your health when coming back. You take 100% increased nature damage and have a ticking DoT on you. You will be crossing a lot of lines on the way back, that all deal nature damage.
Additionally, you will absolutely have to dodge the Impending Loom lines as those are super deadly. Evokers have the ability to jump over the line, but this action will result in a 50% failure rate.

Eventually, the boss reaches 100% energy and the intermission starts.
Intermission
As soon as Nymue reaches 100 energy, she will become immune to damage and
2 Wardens will spawn.
Split the raid into 2 equal groups and go there fast. Tank the Warden as close as possible to the middle without making them cross a single line. Keep in mind that the lines are still active, so avoid any unnecessary movement and do not cross the lines if you are low health.
The Wardens have 3 abilities that you need to worry about: Lumbering Slam, Radial Flourish and Verdant Rend.
Lumbering Slam is a frontal that needs to be avoided as it deals lethal damage to players hit! Additionally, it will spawn Flowers. Make sure you soak those quickly, because if you kill the Warden and run back to the boss, those flowers will stay behind and last a full minute. Having 2 flowers left behind on each side will make you start Phase 1 again with 4 stacks, which will put unnecessary pressure on the healers.
Radial Flourish is just a formation of swirls that needs to be avoided as it deals high damage to anyone getting hit by it.
Verdant Rend is a wipe mechanic that triggers if a Warden crosses the line. This should simply never be triggered.
Once the Warden is dead, your Tank will get a grass buff for a short duration, make sure to run to Nymue and stack up for extra healing. At this point, Nymue will be casting Continuum, which deals a significant amount of raid wide damage if everyone is spread around. When there is around 3 seconds left on the Continuum cast, use speed boost and spread into your initial Phase 1 positions.
The fight repeats from here.