In Fellowship, you are only required to kill enemies in each Dungeon until you reach a Kill Score of 100%. This means that rather than clearing the entire Dungeon, you will want to find efficient routes that ensure you are able to hit the timer.
Method has worked with expert players (including the top ranked players and teams in the world) to develop it's Fellowship Route Planner which not only allows you to build your own routes for every dungeon, but also comes with a list of pre-drafted suggested routes for each difficulty level. Just Load a route up and you will be good to go.
Dungeon Routes in Fellowship: Plug & Play
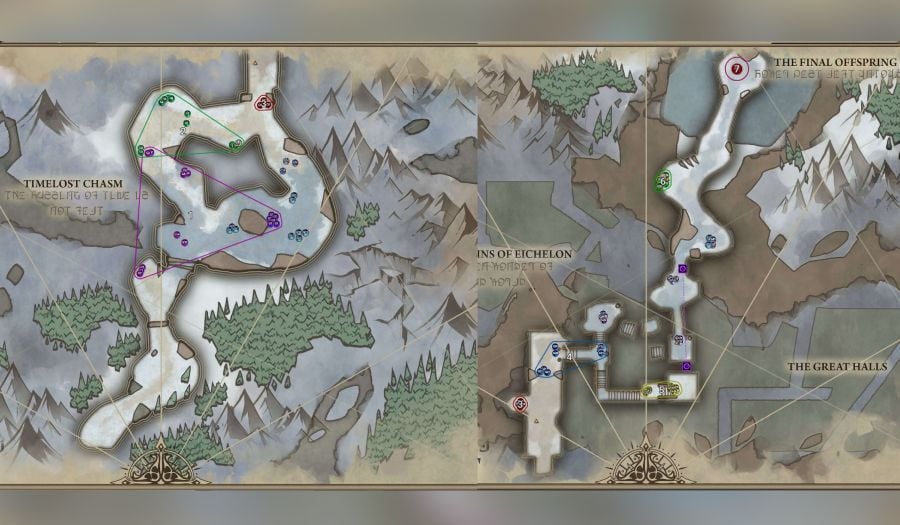
If you just want to load up a dungeon route that you know you can trust, head to Method's Dungeon Routes, select the dungeon you want to run and then just load in one of the routes below the map.
The higher difficulty options will typically come with less pulls, with more mobs/enemies in each pull. This is to speed up the route but is also of course much more difficult. The most advanced routes will also make use of Relics at key points throughout the run. This includes Chicken, Stealth & Portals.
To share the route with your group or your friends, you can either Export the string (which they can then Import) or you can simply share the URL by hitting 'Copy URL' below the map.
Note: Don't forget you can also make the map Full Screen if you want to see it in a much larger form on your second monitor for example!
Dungeon Routes in Fellowship: Creating Your Own Route
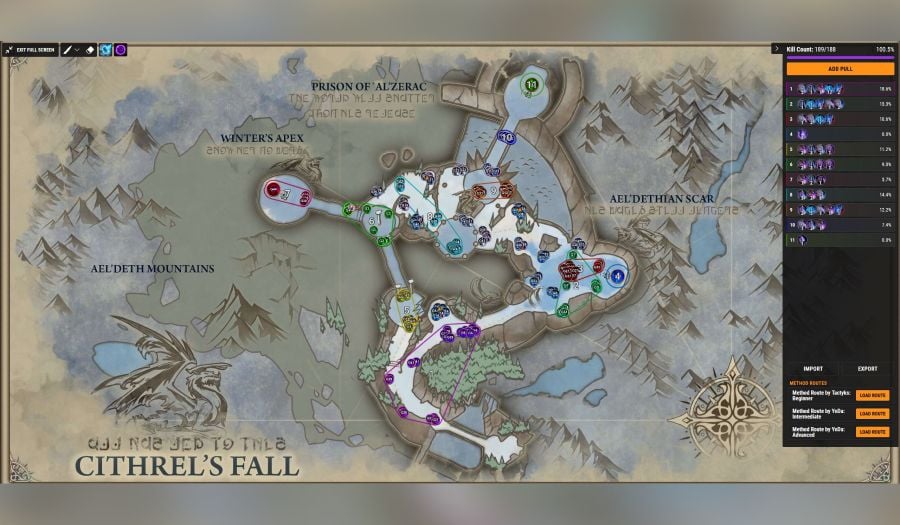
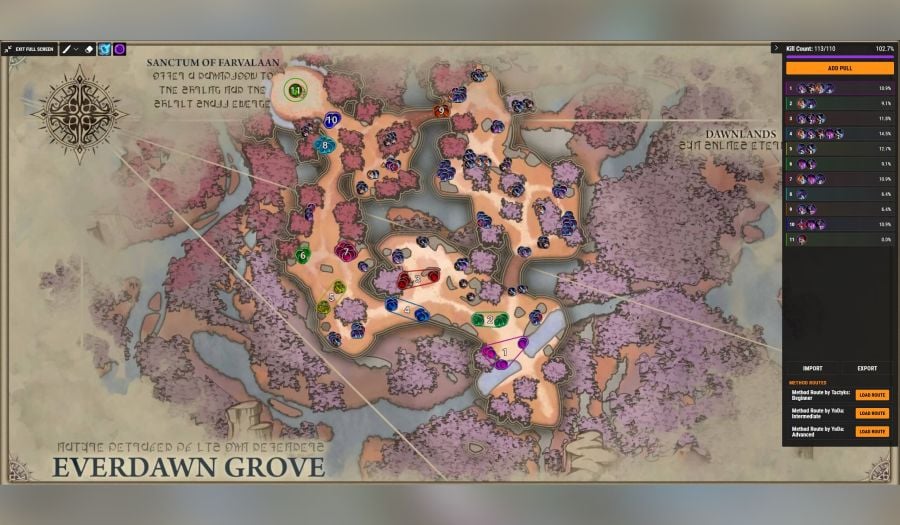
If you want to create your own route, then you can do that easily with Method's Route Planner. Just select the dungeon you want to plan a route for and start adding pulls by hitting 'Add Pull' and then selecting the enemies you want to include in that pull.
If you are just getting started (think Contender level), you might want to play around smaller pulls while you learn the ropes. Forget about including Relics until you reach much higher difficulties.
An example of an easy route with lots of small pulls, taking the dungeon slowly.
Creating More Advanced Routes (Champion+)
When it comes to planning your own advanced route, keep the following in mind:
- What needs to be interrupted or soaked? If there are too many things to kick, your pull will most likely be too dangerous. If the other mobs tend to deal high group damage while requiring soaks, you’ll struggle.
- Are there dangerous mobs for your tank? Mobs like Pillagers can be a bit dangerous if you pull them in very big pulls without killing them first, as they stack damage.
- Is there too much group damage? Be careful that you aren't pulling too many enemies that have instant cast abilities. For example, Sickle’s Throw Dagger can surprise a lot of healers if you have too much of them in a single pull.
- Are you playing around cooldowns? The first pull of a dungeon can usually be pretty big as everyone has everything up, then you might want to consider larger pulls around Ultimates coming up again later etc.
- Are you playing with Relics? In order to push beyond Paragon and into Eternal you will likely need to start incorporating Relics such as Chicken, Stealth and Portal to optimize your routes.
Creating Dungeon Routes: Route Planning Examples
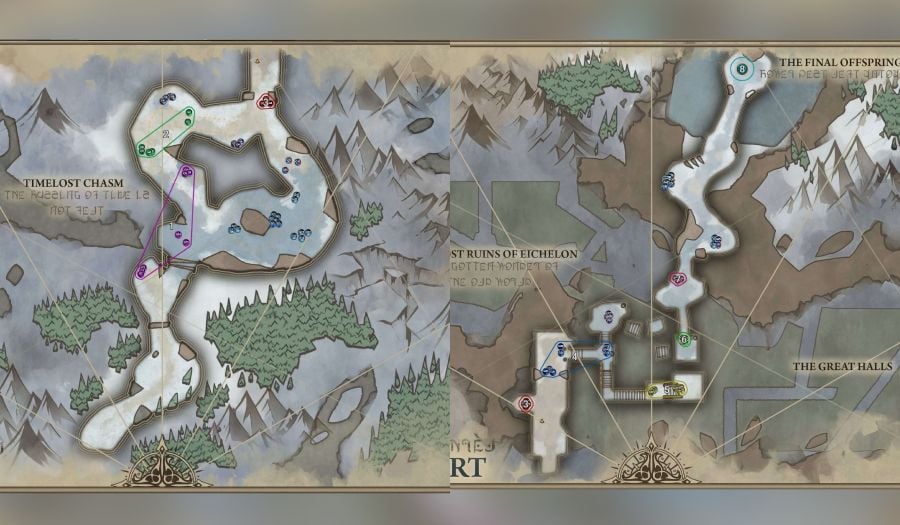
In Wyrmheart, Taktyks Beginners route is a great example of a route built for a beginner group. The first pull is pretty easy, with only one interrupt required. The following pulls are built around the same ideas 1 interrupt maximum, small packs of mobs to help everyone deal with every mechanic. The only bigger pull is pull 6. This is a very good route to discover Wyrmheart, without any trinkets and easy interrupts.

Next we can take a look at Yoda’s Intermediate Route. Notice that the base of the route is pretty similar, but with fewer pulls. Pull 1 and 2 can be chained together nicely, with the lookouts triggering the Blade of Cithrel. The old pull 4 and 5 are now one pull. This route is a bit harder, with bigger pulls, more strain on the healer and tank, but interrupts and CCs are still pretty easy to use.
Last, let's look at YoDa's Advanced Route. Note how every advantage available here is used:
- Big pulls & no downtime. Pull 1 and 2 can be done in quick succession while being both pretty big. The pull set up is longer and harder, but everything is nicely tied together. Pull 3, 4 and 5 are the same as the intermediate route.
- Getting around the harder mobs. The old pull 8, with 2 Deceitful Scholars and one Blade of Cithrel, can be harsh and is often the source of a lot of issues. Dodging it is key.
- Using Relics intelligently. Relics are a great source of creative gameplay. Here, they are used to simplify the second pull, using a Chicken on Coldheart Assassin. Then, a Shroud (stealth) is used to dodge the two worst pulls in the dungeon. A second Chicken is used on a Greater Ice elemental. The big Chicken and the other adds are then pulled onto the boss to minimize downtime.