Ironforge (Heroic) Siege Guide
Learn how to complete the Ironforge (Heroic) Siege in Warcraft Rumble. Follow our suggested build and strategy for Thief Catchers, Mekkatorque and Magni Bronzebeard.
Welcome to our Heroic Siege guide for Ironforge. This guide will contain the information and strategy you need to defeat this Siege on Heroic Difficulty.
Co-op Builds
Cairne with Swole Troll


rumblo:CBYQABoECFkQAhoECFEQAhoECF0QABoECEYQABoECB4QARoECAsQAQ==
Important talents
Meatier Elbow on Swole Troll allows it to fight against all minis, which is important to get more aoe damage on the huge swarms that spawn.
Soundbite on Dire Batlings gives them cleave, which is useful against the swarms of enemy minis.
Chain Reaction on Living Bomb spreads it further, again to handle the swarms.
Strategy
- Take all Towers and then push with Swole Troll, Priestess, and either Witch Doctor or Pyromancer or both to provide more damage.
- Be ready to defend the Towers when either of the minor Thiefcatchers die (Gryphon Riders and Prowlers) and when phase 2 and phase 3 begin (masses of Defias Bandits, Goblin Sappers, and a Maiev). Use your ranged dps for defense alongside Dire Batlings that see through stealth.
- Try to push only one phase at a time. Avoid using Living Bomb at the main boss until the last phase, so that you do not push multiple phases accidentally. Pushing multiple phases at once is the main way to get overwhelmed. Rather send more minis from further away and through another path than reinforce an already strong push. The last phase is the time when you can push as hard as you want.
Watch it in action
Tirion with Abomination


rumblo:CFMQABoECF0QABoECAMQABoECA4QABoECEYQABoECFkQAhoECB4QAQ==
Important talents
Noxious Presence on Abomination helps to unstealth enemies because minis lose stealth when they take damage.
Soundbite on Dire Batlings gives them cleave, which is useful against the swarms of enemy minis.
Strategy
- Take all Towers and then push with Abomination, Priestess, Tirion, and either Witch Doctor or Pyromancer or both to provide more damage.
- Be ready to defend the Towers when either of the minor Thiefcatchers die (Gryphon Riders and Prowlers) and when phase 2 and phase 3 begin (masses of Defias Bandits, Goblin Sappers, and a Maiev). Use your ranged dps for defense alongside Dire Batlings that see through stealth.
- Try to push only one phase at a time. Pushing multiple phases at once is the main way to get overwhelmed. Rather send more minis from further away and through another path than reinforce an already strong push. The last phase is the time when you can push as hard as you want.
Watch it in action
Thrall with Molten Giant


rumblo:CF8QABoECFkQAhoECBMQARoECB4QARoECDsQARoECF0QABoECEYQAA==
Thrall is generally best used in Normal Thiefcatchers for XP farming, but it can also clear the Heroic version. Detect on a ground mini is less useful in Heroic because of Prowlers though.
Important talents
Soundbite on Dire Batlings gives them cleave, which is useful against the swarms of enemy minis.
Strategy
- Take all Towers and then push with Molten Giant, Priestess, and either Witch Doctor or Pyromancer or both to provide more damage.
- Be ready to defend the Towers when either of the minor Thiefcatchers die (Gryphon Riders and Prowlers) and when phase 2 and phase 3 begin (masses of Defias Bandits, Goblin Sappers, and a Maiev). Use your ranged dps for defense alongside Dire Batlings and Thrall that see through stealth.
- Try to push only one phase at a time. Pushing multiple phases at once is the main way to get overwhelmed. Rather send more minis from further away and through another path than reinforce an already strong push. The last phase is the time when you can push as hard as you want.
Watch it in action
Boss Strategy
Heroic Thief Catchers are the fourth boss in the Siege of Ironforge. They guard the Vaults of Ironforge. The first-time reward for defeating Heroic Thief Catchers is a Golden Dark Iron Dwarf skin. A repeatable reward of 200 Valor is available on the following cycles, one reward per cycle. Valor can be used to upgrade an army slot to Diamond (+4 levels).
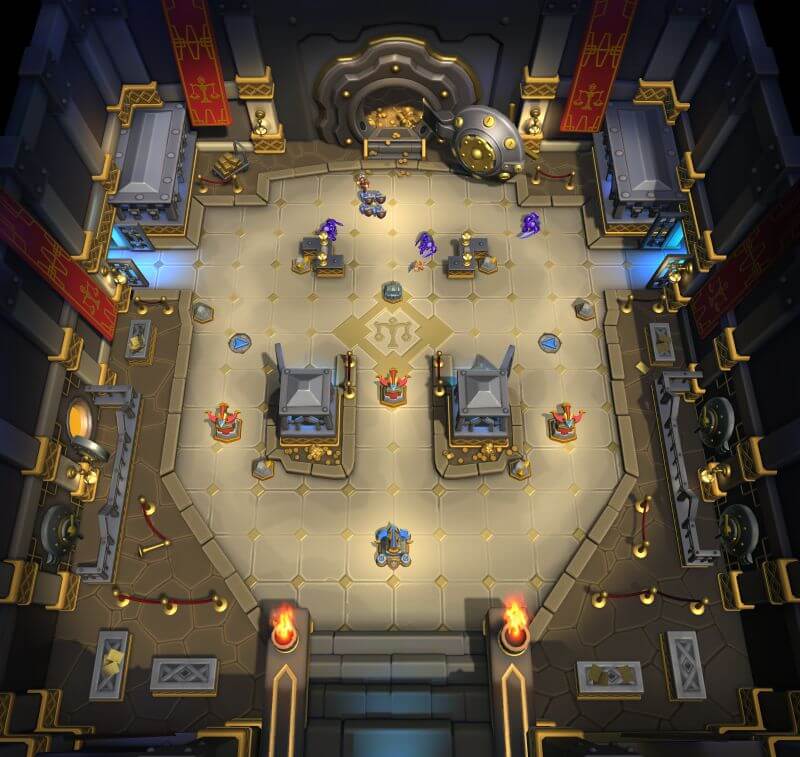
Thief Catchers map (illustration from the normal version):
Minis in Heroic Thiefcatchers' army
- Darkspear Troll - Serpent Sting
- Footmen - Last Stand
- Harpies - Infectious Swipes
- Mountaineer - Frenzied Spirit
- Polymorph - Exploding Sheep
- Pyromancer - Pyroblast
The Exploding Sheep Polymorph can be devastating against small minis, as the Sheep explode upon death.
Other minis and map mechanics
The three Thiefcatchers are very similar, they mostly differ by their Health and damage.
Thunderbrew is the smallest one with 10,625 Health, 200 ranged Physical damage, and 262.5 melee Physical damage. He starts in the middle and patrols around the right column. If Thunderbrew dies, all enemy minis gain to poison (1 stack per hit) for the rest of the game.
Farmountain is the second with 12,500 Health, 175 ranged Elemental damage, and 375 melee Physical damage. He starts on the left and patrols around the left column. If Farmountain dies, all enemy minis gain Stealth with no movement penalty for the rest of the game.
Shadowdelve is the final one with 15,000 Health, 300 melee Physical damage, and a 360-degree fan of knives for 255 Physical damage. She starts on the right and patrols the top area. She is the main boss of the encounter, and her Health determines the phase changes.
When a mini of yours approaches a chest or a gold mini within a radius of 9 of any of the Thiefcatchers, they become alerted and gain Bloodlust and Taunt for 10 seconds. The ability has a 10-second cooldown.
When Thunderbrew or Farmountain dies, six special Gryphon Riders and four special Prowlers will spawn: two Gryphon Riders and a Prowler from both sides and two of each from the top. The Gryphon Riders have Armored, Resistant, Stealth, +20% damage, +20% movement speed, and they stun when they attack from Stealth (Defias Bandits' Cheap Shot ability). The Prowlers have Armored, Resistant, Stealth, +20% health, and +20% movement speed. The remaining Thiefcatchers also gain Fury.
When the second phase of Shadowdelve begins, a whopping 22 special Defias Bandits spawn around the map: they come from all sides and from the vaults in the middle. These Defias Bandits have Armored, Resistant, +20% damage, and +20% movement speed. They also apply a stack of poison with each attack.
Additionally, a special Maiev and 12 special Goblin Sappers will spawn. Maiev spawns between the pillars in the middle and has Shadowstep, Armored, Resistant, and +20% attack speed, movement speed, damage, and health. Four Goblin Sappers spawn on both sides and at the top; they have Armored, Resistant, +20% movement speed, and Stealth.
Shadowdelve also gains +0.1 gold per second in additional income.
When the third phase of Shadowdelve begins, she will call the same set of guards as at the start of phase 2 (Defias Bandits, Maiev, and Goblin Sappers), and traps will spawn throughout the middle and top parts of the map. The traps cause a 1.5-second stun and deal 375 damage to ground minis that touch them, but have no effect on flying minis.
Shadowdelve also gains +0.1 gold per second in additional income.
Finally, Shadowdelve gains Vanish at the start of phase 3: if there are 4 or more enemies within a radius of 6 around Shadowdelve, she will smoke bomb and blink away.
General strategy
With such huge numbers of minis coming with the death of each miniboss and with every phase transition of the main boss, it is important to not push too fast. Ideally, you want to take all three Towers and then spawn the groups one by one: beat the previous group and then phase the next one. By working through the encounter step by step, you will find it much easier to maintain control and not get overwhelmed.
Co-op Builds
Arthas with Whelp Eggs


rumblo:CF4QARoECEQQAhoECF0QABoECEYQABoECFgQARoECBMQARoECFkQAg==
The Living Bomb Arthas build is stronger than this, especially in the open queue. If you do not have Living Bomb, this works too.
Important talents
Splashing Pumpkins on Plague Farmer gives it a large splash radius, perfect against the masses of Bombs and Robo Gnomes.
Enchanted Vials on Bat Rider also increase the splash radius.
Strategy
- Push through all three lanes with Arthas leading the way. Multiple directions are good because of Mekkatorque’s Living Bomb.
- Be ready to defend the Towers and your base when Chickens die, at phase changes, and every 35 seconds in the last phase when Bombs arrive.
- Avoid pushing multiple phases at once to avoid being overwhelmed.
- Big Bombs and Robo Gnomes can be forced to explode by playing a mini on top of them. If the mini is Whelp Eggs, the Eggs are destroyed by the explosion, but you get to keep the Whelps.
Watch it in action
Arthas with Living Bomb
rumblo:CF4QARoECEQQAhoECF0QABoECEYQABoECAsQARoECBMQARoECFkQAg==
Important talents
Chain Reaction on Living Bomb is the best talent by far, as it spreads the Bomb to all nearby enemies.
Splashing Pumpkins on Plague Farmer gives it a large splash radius, perfect against the masses of Bombs and Robo Gnomes.
Enchanted Vials on Bat Rider also increase the splash radius.
Strategy
- Push through all three lanes with Arthas leading the way. Multiple directions are good because of Mekkatorque’s Living Bomb.
- Be ready to defend the Towers and your base when Chickens die, at phase changes, and every 35 seconds in the last phase when Bombs arrive.
- The waves in the final phase can be completely destroyed by playing a Living Bomb (with Chain Reaction) on the middle pack.
- Avoid pushing multiple phases at once to avoid being overwhelmed.
- Big Bombs and Robo Gnomes can be forced to explode by playing a mini on top of them.
Watch it in action
Rend with Living Bomb

rumblo:CEoQABoECAsQARoECFgQARoECDIQABoECCAQABoECEQQAhoECBMQAQ==
Important talents
Chain Reaction on Living Bomb is mandatory for it to be worthwhile.
Splashing Pumpkins on Plague Farmer gives it a large splash radius, perfect against the masses of Bombs and Robo Gnomes.
Enchanted Vials on Bat Rider also increase the splash radius.
Strategy
- Push through all three lanes. Multiple directions are good because of Mekkatorque’s Living Bomb.
- Try to keep a Rend alive as much as possible, and try to get it to dismount close to as many enemies as possible to blow them up with the Living Bomb from Flaming Soul talent.
- Be ready to defend the Towers and your base when Chickens die, at phase changes, and every 35 seconds in the last phase when Bombs arrive.
- The waves in the final phase can be completely destroyed by playing a Living Bomb (with Chain Reaction) on the middle pack.
- Avoid pushing multiple phases at once to avoid being overwhelmed.
- Big Bombs and Robo Gnomes can be forced to explode by playing a mini on top of them. If the mini is Whelp Eggs, the Eggs are destroyed by the explosion, but you get to keep the Whelps.
Watch it in action
Ragnaros


rumblo:CEgQARoECBsQAhoECAYQARoECFkQAhoECF0QABoECEQQAhoECFYQAQ==
rumblo:CEgQARoECDsQARoECAYQARoECFkQAhoECF0QABoECEQQAhoECBsQAg==
Warsong Grunts are optimal for open queue: they are a little slower and allow you to have more presence around the map. Molten Giant (build 2) is faster with a good partner, but riskier in the open queue.
Important talents
Guard Duty on Warsong Grunts is needed to make them Armored.
Splashing Pumpkins on Plague Farmer gives it a large splash radius, perfect against the masses of Bombs and Robo Gnomes.
Strategy
- Push through all three lanes. Multiple directions are good because of Mekkatorque’s Living Bomb.
- Note that Ragnaros' main job is to give damage reflection on your Armored tanks. You are not trying to build a big Ragnaros.
- Be ready to defend the Towers and your base when Chickens die, at phase changes, and every 35 seconds in the last phase when Bombs arrive: use Deep Breath on the minis that arrive with the tram.
- Alternatively, the waves in the final phase can be completely destroyed by playing a Living Bomb (with Chain Reaction) on the middle pack, if you do not have Deep Breath.
- Avoid pushing multiple phases at once to avoid being overwhelmed.
- Big Bombs and Robo Gnomes can be forced to explode by playing a mini on top of them.
Watch it in action
Boss Strategy
Heroic High Tinker Mekkatorque is the fifth boss in the Siege of Ironforge. He guards the Ironforge Tram. The first-time reward for defeating Heroic High Tinker Mekkatorque is a Golden S.A.F.E. Pilot skin. A repeatable reward of 200 Valor is available on the following cycles, one reward per cycle. Valor can be used to upgrade an army slot to Diamond (+4 levels).
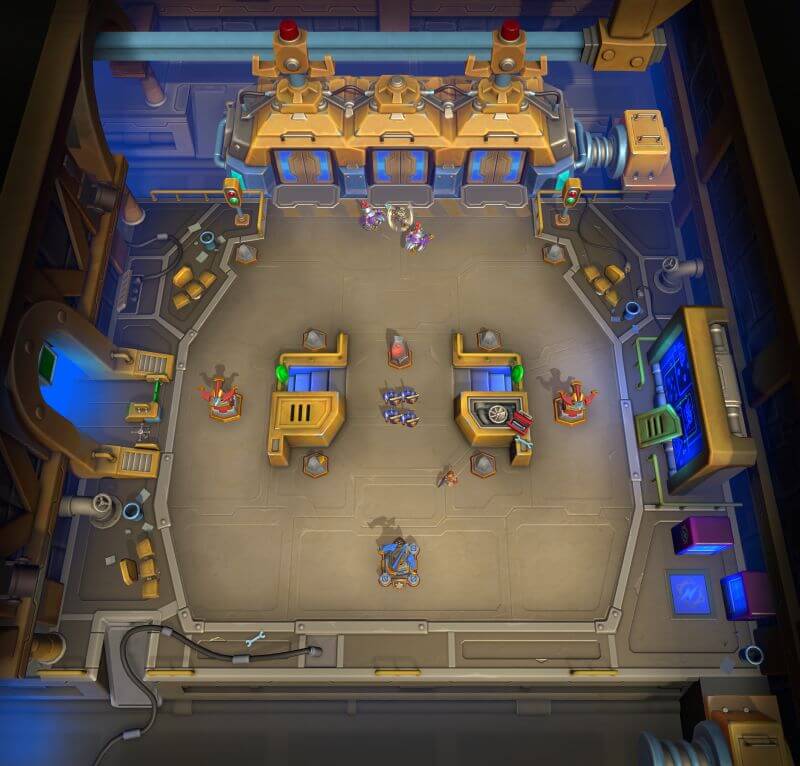
High Tinker Mekkatorque map (illustration from the normal version):
Minis in Heroic Mekkatorque's army
- Footmen - Last Stand
- Ghoul - Bone Shield
- Gryphon Rider - Mighty Throw
- Harpies - Talon Dive
- Huntress - Darnassian Steel
- Living Bomb - Blast Radius
Mekkatorque has Living Bomb, so large concentrations of minis are at risk of getting blown to pieces.
Other minis and map mechanics
Mekkatorque summons a wide variety of Bombs and other minis during the encounter.
Baby Bomb:
- 275 health, Armored
- Explodes when within a range of 4 from a building or a ground mini - explodes when meeting melee minis
- 300 Siege damage explosion, radius of 6
Big Bomb:
- 2187.5 health, Armored, Unstoppable
- Explodes when within a range of 2 from a building or a ground mini - pushes melee minis away, explodes when something is played directly on top of it or it walks over a mini it cannot push, like Whelp Eggs
- 3000 damage explosion, radius of 6
Flying Bomb:
- 1000 health
- Explodes when within a range of 2 from a building or a mini (also flying)
- 300 damage explosion, radius of 3
Robo Gnome:
- 500 health
- Shoots Laser Missiles
- 11 range
- 12.5 Elemental damage every 0.2 seconds for 8 seconds
- Explodes when within a range of 2 from a building or a ground mini, 300 damage on a radius of 2, ground only
Two Dark Iron Miners spawn at the start of the fight and then every 40 seconds (6:00, 5:20, 4:40, 4:00, and so on).
Four Robo Gnomes will spawn at 5:00 and then every 30 seconds for the entire fight (4:30, 4:00, 3:30, and so on).
In phase 1, Mekkatorque is protected by two Chickens that give it a 99% damage shield. After you kill a Chicken, a Tram arrives that brings eight Baby Bombs that start walking towards the Towers and your base.
Note that the Bombs explode only if they reach your minis or buildings, they do not explode if killed. Whelp Eggs, for example, are great for blowing up a Bomb, and you get to keep the popped Whelps.
When you have killed both Chickens, another Tram arrives with eight Baby Bombs and Mekkatorque loses its damage shield. Subsequently, Mekkatorque will gain a temporary 12-second damage shield at each phase change.
At the start of phase 2, another Tram arrives with eight Baby Bombs and three Big Bombs.
At the start of phase 3, yet another Tram arrives with eight Baby Bombs and three Big Bombs.
At the start of phase 4, Mekkatorque puts on a Mech suit and heals to full. When the Mech Suit arrives, it also kills all of your minis within 8 range of Mekkatorque: this is the only small board clear the boss has.
Furthermore, a Tram arrives at the start of phase 4 that brings eight Baby Bombs, three Big Bombs, and nine Robo Gnomes.
Ten seconds after the previous Tram, a Tram carrying a Meeting Stone Destroyer Bomb will spawn. The Meeting Stone Destroyer Bomb has a damage shield, and it will walk up to and blow up the Meeting Stone and any of your nearby minis.
During phase 4, another Tram with 24 Baby Bombs and 6 Flying Bombs arrives after 30 seconds. New Trams will then arrive every 35 seconds.
General strategy
Push through all three lanes to keep your army more resilient against Living Bomb.
Be ready to defend the Towers and your base when Chickens die, at phase changes, and every 35 seconds in the last phase when Bombs arrive.
Avoid pushing multiple phases at once to avoid being overwhelmed.
Big Bombs and Robo Gnomes can be forced to explode by playing a mini on top of them. If the mini is Whelp Eggs, the Eggs are destroyed by the explosion, but you get to keep the Whelps.
Co-op Builds
Thaurissan with Bolster Giants

rumblo:CCUQARoECBsQARoECEYQABoECDsQAhoECEQQAhoECFkQAhoECAkQAA==
Important talents
Hubris on Emperor Thaurissan enables you to make Molten Giant +2 levels higher for a major boost to damage and health.
Splashing Pumpkins on Plague Farmer give it a large splash radius and enable it to outrange Towers. There will be plenty of Tower fights, so this is extremely useful
Bolster on Molten Giant heals it and gives you gold whenever it destroys a Tower. Three are plenty of Tower fights, so this will keep it healthy and make you rich..
Strategy
- Kill the Fire Lord with Execute as often as possible.
- Take all Towers and retain control over them.
- Mine the red Gem mines at the top whenever you can. Gold spawns there every 10 seconds.
- Be ready to defend the Towers at phase transitions, especially the ones closer to your base.
- In the last phase, Magni will toss his hammer at your Barracks every 9 seconds if you control no Towers, so you need to get some to keep your base safe.
Watch it in action
Sneed with Worgen
rumblo:CE4QABoECAkQABoECFEQAhoECDoQARoECFoQARoECEYQARoECFkQAg==
Important talents
Bloodthirsty on Execute helps your Worgen (with Premeditation) to kill the Fire Lord.
Meatier Elbow on Swole Troll enables it to fight against minis.
Strategy
- Kill the Fire Lord with Execute and Worgen as often as possible. They can kill it if Fire Lord is shooting at something else. If not, Fire Lord will kill the Worgen.
- Take all Towers and retain control over them.
- Send Meat Wagon to support your partner's push so that you will get gold from all Towers that fall.
- Mine the red Gem mines at the top whenever you can. Gold spawns there every 10 seconds.
- Be ready to defend the Towers at phase transitions, especially the ones closer to your base.
- In the last phase, Magni will toss his hammer at your Barracks every 9 seconds if you control no Towers, so you need to get some to keep your base safe.
Watch it in action
Arthas

rumblo:CF4QABoECEQQAhoECF0QABoECFkQAhoECFoQARoECAkQABoECBwQAA==
Important talents
Bloodthirsty on Execute helps your Worgen (with Premeditation) to kill the Fire Lord.
Strategy
- Kill the Fire Lord with Execute and Worgen as often as possible. They can kill it if Fire Lord is shooting at something else. If not, Fire Lord will kill the Worgen.
- Take all Towers and retain control over them. Try to push a different side than your partner.
- Mine the red Gem Mines at the top whenever you can. Gold spawns there every 10 seconds.
- Be ready to defend the Towers at phase transitions, especially the ones closer to your base.
- In the last phase, Magni will toss his hammer at your Barracks every 9 seconds if you control no Towers, so you need to get some to keep your base safe.
Watch it in action
Boss Strategy
Heroic King Magni Bronzebeard is the sixth and final boss in the Siege of Ironforge. He guards the Ironforge Throne Room. The first-time reward for defeating Heroic King Magni Bronzebeard is a Golden Sneed skin. The repeatable reward that is available on the following cycles, one reward per cycle, is 500 Coins (750 Coins with Booster).
King Magni Bronzebeard map (illustration from the normal version):

Minis in Heroic Magni's army
- Fire Elemental - Blazing Speed (Firehammer talent, essentially talentless)
- Firehammer - Moultin' Metal
- Harpies - Trinket Collectors
- Living Bomb - Blast Radius
- Mountaineer Dwarf - Intimidation (essentially talentless)
- S.A.F.E. Pilot - Gnomish Cloaking Device
Magni has Living Bomb, so large concentrations of minis are at risk of getting blown to pieces.
Other minis and map mechanics
There is a special Fire Lord in the middle of the map. It guards the Chest there and has a powerful long-range attack that deals 650 Elemental area damage with an attack speed of 1.5 seconds and a range of 14 - that’s a longer range than a Meat Wagon has with the range talent! You want to take it out both to get access to more gold and to prevent it from shooting your minis as they make their way towards Magni. Unfortunately, it also has 2450 health, making it very difficult to kill. The Fire Lord will respawn after 45 seconds, so you will need to take it out multiple times during the course of the fight.
At the start of phase 2, four Magni Bears and 12 Magni Guard dwarves will spawn. Four Magni Guard dwarves and two Magni Bears attack from the top, two of each from the top side entrances, and two Magni Guard dwarves from the bottom side entrances. The Dwarves from the side entrances are strong enough to destroy even a +2 level Tower, unless you send some troops to fight them.
The Magni Bears are beefed-up Mountaineer Bears with more damage (165), a knockback effect on their attack, Taunt, and more Health (2750). The Magni Guards are enhanced Mountaineer Dwarves with more health (336) and a longer range (10.2, same as range-talented Sylvanas).
At the start of phase 3, the same set of Magni Bears and Magni Guards spawns again. Magni also gains the Hammer Toss ability, threatening your base. Finally, Magni gains Molten Armor and will start burning melee attackers for 75 Elemental damage every 1.5 seconds when hit.
Hammer Toss targets the closest building you own: a Tower or your Barracks. Magni tosses a hammer every 9 seconds in the last phase. It deals 1200 damage to a Tower or 1000 damage to your Barracks.
Magni summons two Mountaineers (Bear and Dwarf, Mend Pets talent) after 10 seconds and then every 30 seconds (at 5:50, 5:20, 4:50, 4:20, and so on) throughout the fight.
The top gold mines in the Magni map are Gem mines with a reddish hue that start with 3 gold nuggets on them and respawn a gold nugget every 10 seconds.
General strategy
The Fire Lord will wreck any push at Magni because of its long range that reaches the boss area. You need some way to take it out. It is notoriously difficult to tank even with Resistant minis, but it takes full damage from Execute, which means that two Executes drop it nicely. Kill it as soon as it respawns, every 45 seconds.
You want to take and retain control of the Towers. Both because the Gem mines are too valuable to leave to Magni and because Hammer Toss in the last phase will kill your base too quickly if you have no Towers. Any undefended Towers will fall at phase transitions to the minis attacking from the sides. Start your defense from the bottom Towers, and then move to the top Towers from there if you are not able to defend them all at the same time.
If you are able to maintain control over the Fire Lord spawn, Towers, and Gem mines, Magni will inevitably fall.