Up to 84% Off VPN









Raid Setup


Introduction
Welcome to our Illidari Council guide, the eighth boss encounter of the Black Temple raid in The Burning Crusade Phase 3. This guide covers the fight mechanics and the strategy we recommend to defeat this boss!
The Illidari Council consists of four different bosses, representatives of the Blood Elves of Kael'thas Sunstrider who aligned with The Betrayer in their venture in the Outland. The Council consists of a Paladin, Rogue, Mage, and Priest that will work together to be the wall players must break through to get to Illidan Stormrage.
This fight has a lot of movement through powerful AoE damage-dealing abilities, requires multiple tanks, and requires fast reflexes for interrupts, dodging avoidable damage, and healers to keep everyone up.
Fight Style: Council fight with a lot of movement from AoE damage abilities and raid damage.
Recommended Setup: 3-4x Tanks /5-6x Healers / 17-18x DPS
Required Utilities: Healthstones, Super Mana Potions, Dark Runes, Personal Mana-Regeneration Spells, and Interrupts
Hero/Lust Usage: On Pull
Method Boss Review
This is an encounter that will keep players on their toes and will have all players moving throughout. There is an intense amount of raid damage that can go out; pair that with hard-hitting bosses, and it makes for a healing-intensive fight.
Unique strategies like kiting one of the bosses throughout to minimize certain mechanics/abilities, as well as having to interrupt deadly heals that sometimes can only be either physical or magical, just make this an encounter that requires intense coordination, which I not only really appreciate, but which can also be harder to find in Classic WoW encounters.
(5/5)
Easy Mode
This is a one-phase fight with four bosses that all have a shared health pool. The four bosses are all different classes: a Retribution Paladin, Mage, Rogue, and Holy Priest. All bosses need to be tanked. Below is a quick overview of all their abilities:
Gathios the Shatterer (Paladin)
- Will cast a Judgement on their primary threat target
- Alternates between Devotion Aura and Chromatic Resistance Aura, either increasing Armor or Spell Resistance
- Will cast Consecration below them
- Will Cast Blessing of Protection or Blessing of Spellwarding on other Council Members
Veras Darkshadow (Paladin)
- Will Vanish every 30 seconds and then apply Deadly Poison to three targets
- After Deadly Poison expires, it will deal burst damage called Envenom
Lady Melande (Priest)
- Will cast Prayer of Healing, healing all members of the council (needs to be interrupted)
- Will cast damage spells that can also be interrupted
- Will place a reflective shield on herself
High Nethermancer Zerevor (Mage)
- Will cast a very powerful Dampen Magic on himself that needs to be spell-stolen
- Will cast Arcane Bolt on his primary threat target
- Will cast Flamestrike and Blizzard on top of random raid members
Mechanics

Gathios the Shatterer is the Paladin of this fight and will need to be tanked by a traditional tank, with the following abiltiies:
- Consecration: AoE around Gathios for 20 seconds that deals 2,250 Holy damage every 3 seconds to players inside. Casts every 30 seconds.
- Judgement of Blood: Deals 1,200 Holy damage every second for 9 seconds to the primary threat target.
- Judgment Of Command: Deals 6,175-6,825 Holy Damage to the tank. This has a 2-second cast (can be spell-reflected).
- Devotion Aura/Chromatic Resistance Aura: Swaps between a +20% Armor Aura and +250 Magic Resistance Aura for 30 seconds.
- Blessing Of Protection/Spell Warding: Will bless other council members with either a physical or spell shield, making them immune for 15 seconds.

Priest boss that needs to be tanked by a traditional tank. She will cast her DPS spells often.
- Circle Of Healing: 2.5-second cast that restores 95,000 health to ALL council members. Needs to be interrupted.
- Divine Wrath: 2-second cast that deals 5,000 initial damage plus 2,500 damage every 2 seconds for 8 seconds. Can be interrupted.
- Empowered Smite: 2-second cast that deals 5,500-6,000 damage. Can be interrupted.

The Rogue boss of the Council, Veras will need to be tanked, but can eventually be tanked by the same tank on Gathios as well, with more gear.
- Vanish: Every minute, Veras vanishes for 30 seconds and applies Deadly Poison to 3 random members after the 30 seconds are up.
- Deadly Poison: Deals 1,000 nature damage every second for 4 seconds.
- Envenom: Deals 2,450 instant nature damage after Deadly Poison falls off.

The mage of the council, this boss will need to be tanked by another mage of your group.
- Dampen Magic: Reduces magic damage taken by 75%. This needs to be spell-stolen by your mage tank.
- Arcane Bolt: Deals 12,950 arcane damage in 2 seconds.
- Flamestrike: AoE circle that targets random players, dealing 4,600 initial damage plus 2,800 every 2 seconds for 12 seconds.
- Blizzard: AoE zone that deals 4,375 damage every 2 seconds to all players inside, lasts 12 seconds.
Strategy
This fight requires pretty strong coordination, and the strategy we're going to recommend involves kiting High Nethermancer Zerevor to significantly reduce the amount of Blizzard and Flamestrike casts that can go on the raid. However, we will go over the normal strategy of not doing that as well. You will want one tank on Gathios, one tank on Veras, one tank on Melande, and a mage to tank Zerevor. Eventually, you can try running one tank on both Gathios and Veras.
Things to remember for this fight:
- You MUST interrupt Melande's Circle Of Healing.
- Move out of any Consecration, Blizzard, and Flamestrike ASAP.
- Mage needs to spellsteal Dampen Magic to prevent one-shots from Zerevor's spells.
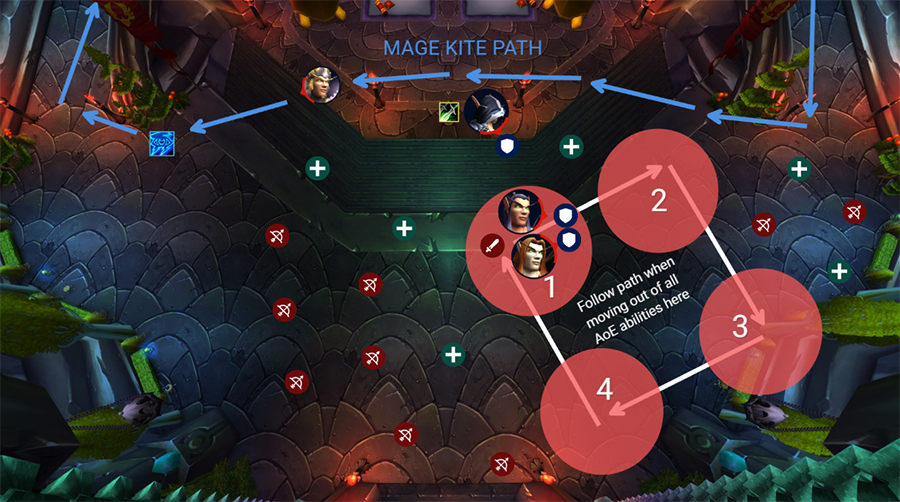
The Pull
The first objective is understanding how to execute the pull of this encounter correctly. You'll want your Mage tank to go in first to get threat on Zerevor, but without getting hit by the other bosses. To do this, have one of your Paladins cast Blessing Of Protection on that mage, as caster threat will not be negated by a BoP compared to physical threat.
Hunters should use Misdirection on the other tanks to their respective boss assignments to get threat ASAP. From here, the tanks will move to position 1 on the map, and then follow the order whenever an AoE spell is cast on top of them. You can also drag in Melande on top of the other 2 to cleave as well; you will just need 2-3 interrupts to stop her from casting for a bit.
Blessing of Protection/Blessing of Spellwarding
This can be cast on other members of the council by Gathios, but it's a crucial mechanic if it's cast on Melande, as it will limit who is able to interrupt her. If she gets Blessing Of Protection, then only magical interrupts like Counterspell and Earth Shock can be used. If Melande receives Blessing Of Spell Warding, then only physical interrupts like Kick, Pummel, and Shield Bash will work.
The raid must check what blessing Melande has to be ready to know who is able to interrupt when she begins to cast her Circle Of Healing. Along with that, having a Warlock cast Curse of Tongues on her will also give players more time to interrupt.
Tank or Kite High Nethermancer Zerevor
You can either tank or kite the mage boss. If you choose to traditionally tank the boss, you will need a healer assigned to the mage tank to keep them up. Because of this, and because this means more Blizzard and Flamestrike casts will hit the raid, we'd recommend running a sixth healer.
If you choose to kite the mage, the pull of the encounter will remain the same, but you will start leaving and following the path shown above for the entire fight. While kiting, a healer should top off the mage tank as they make their way back to the bottom floor.
The mage will also need to continue spell-stealing Zerevor every time he reapplies Dampen Magic. Before you leave, you will want to build around 25,000-30,000 threat. Since you are not attacking Zerevor throughout, your threat will drop over time from healing aggro, so if you don't grab enough threat at the start, the boss will swap to another target mid-encounter.
Healers
From here, you will just need to get in the "groove" of the fight. Once you feel the dance of moving out of the AoE, interrupting Melande's casts, it's a matter of healers keeping the tanks alive and topping off any raid damage. Although technically Blizzard and Flamestrike damage is "avoidable", you will still take the first tick of damage, as well as three players will always get hit with Deadly Poison.
Pair that with the hard-hitting Gathios, and this makes this a very healer-centered encounter. Make sure healers know who their assigned tank is to heal, while also knowing when it's appropriate to heal the raid. This encounter is also a longer one, so make sure you have Super Mana Potions, Dark Runes, and personal mana regeneration abilities like Shadowfiend, Mana Tide Totem, Evocation, Innervate, etc, as you will lose all your mana without this on this encounter. Once you find the groove, you'll take down this boss.