Up to 84% Off VPN







Raid Setup


Introduction
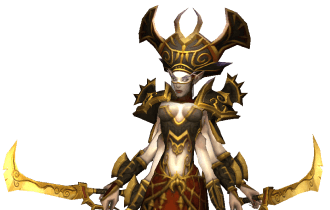
Welcome to our Mother Shaharaz guide, the seventh boss of the Black Temple raid in The Burning Crusade Phase 3. This guide covers the fight mechanics and the strategy we recommend to defeat this boss!
Mother Shahraz guards the entrance into the Illidari Council's sanctum. She owns the... "entertainment" sections of the Black Temple, where hosts, hostesses, and those who couldn't resist temptation rest and take leisure.
This fight focuses on her high amount of Shadow Damage, requiring players to equip Shadow Resistance gear to alleviate that, with the main mechanic being Fatal Attraction. Outside of that, there are some RNG mechanics such as silences and damage reductions/increases throughout.
SR Gearing: Check out our Shadow Resistance Guide to find out how you can quickly gear for this encounter.
Fight Style: Single-target encounter with a niche focus on Shadow Damage and Shadow resistance.
Recommended Setup: 2-3x Tank /5x Healer / 17-18x DPS
Required utilities: Healthstones, Shadow Resistance Gear, or Engineering Utilities
Hero/Lust usage: Phase 3
Method Boss Review
This fight is a fun concept through the idea of needing resistance gear to mitigate the intense shadow damage that goes out throughout the encounter. This fight will be a fun challenge for healers, requiring them to be on top of their assignments to not only make sure the tanks live, but also keep up all the raid from the raidwide damage going out.
Any fight in Classic WoW that requires actual focus and planning is always a positive from us. On top of that, players can also be cheeky and opt out of Shadow Resistance for Engineering tools such as Schematic: Rocket Boots Xtreme or Nigh Invulnerability Belt.
It's a fun fight with unique ideas that requires brainpower from your healers, making this another meaningful encounter in this raid.
(3/5)
Video Guide
Easy Mode
This is a 1-phase fight with a focus on Shadow Resistance and the main mechanic: Fatal Attraction. Three random players (who aren't the tank) are teleported to a random spot in the boss area, taking ramping shadow damage until all three of them are 25 yards away from each other. Outside of that, there's a tank soak through Saber Lash, requiring one main tank and two soakers to evenly split the damage.
Overview:
- Non-tanks should wear 174 Shadow Resistance unbuffed + a Priest's Prayer of Shadow Protection to guarantee every Shadow spell is at least partially resisted.
- Healers need to keep the tanks alive as the bosses damage is high, while also healing through raid-wide Shadow Beams and Fatal Attraction.
- 3 Tanks stack to absorb Saber Lash as it will kill the tanks if not all 3 are present to soak.
Mechanics

Three (3) random players are linked by demonic energy. Shadow damage is inflicted to nearby allies every 1 sec. The 3 targets will break the link after being 25 yards away from each other.


One of Mother's four types of shadow beam spells. Strikes an enemy, dealing 7,000 shadow damage that arcs to another nearby player. The spell affects up to 10 targets.
One of Mother's four shadow beam spells. Srikes an enemy with 2,000 Shadow Damage that arcs to another nearby enemies, and also knocks players up in the air. The spell affects up to 10 targets.
One of Mother's four shadow beam spells. Strikes an enemy with a shadow damage DoT, dealing 2,500 shadow damage every 2 seconds for 8 seconds, and arcs to another nearby player. The spell affects up to 10 targets.
One of Mother's four shadow beam spells. Strikes an enemy with shadow energy, draining 1,000 mana that arcs to another nearby enemy. The spell affects up to 10 targets.
Strategy
For this encounter, there are multiple ways you can position Mother Shahraz, but for this guide, we're going to use the Elf statues as a reference. You'll want to evenly split your ranged DPS and healers under each statue. The reason we go under these statues is to mitigate the knock-up effect from Sinister Beam. This positioning also gives us more open space for when players get hit with Fatal Attraction.
Three things to get right here:
- Make sure tanks are pixel-stacked together, as we want to make sure they are all soaking Saber Lash.
- Have healers and a backup healer ready to heal those affected by Fatal Attraction and any of the shadow beams.
- Have a total of 244 Shadow Resistance or Engineering + Immunities to combat Fatal Attraction.
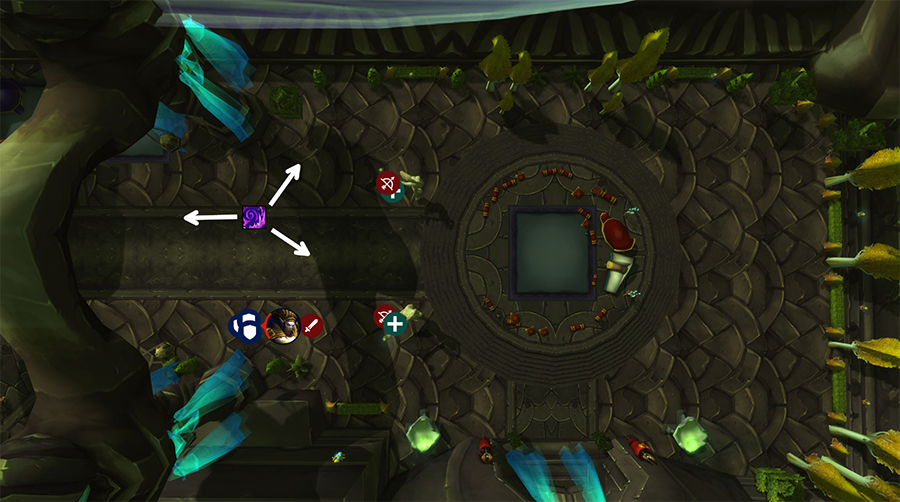
At the start, have a Hunter use Misdirection on your main tank to bring the boss down. As she's coming down, NOBODY should be in front of her to avoid getting hit by Saber Lash. Once the boss and players are all in position, use Bloodlust. Over time, players will randomly get silenced, so make sure that the boss is 18 yards away from the closer elf statue. Have 1-2 healers assigned to heal AoE damage when it goes out. If there's not, keep pumping heals into the main tank as this boss hits hard.
Fatal Attraction
When Fatal Attraction goes out, having 244 Shadow Resistance will grant you way more time to make the 25-yard distance check before dying. You should wait to use your Healthstone until AFTER you break out of Fatal Attraction, as you may get some damage from one of the beams after. Trust your healers to keep you up during Fatal Attraction. If opting out of Shadow Resistance, use engineering tools like the Schematic: Rocket Boots Xtreme and Nigh Invulnerability Belt. Note that you will take SIGNIFICANT Shadow damage (around 3000 damage a tick) when not wearing any Shadow Resistance gear, so you will have to act fast.
Prismatic Aura
Mother Shahraz's final mechanic is Prismatic Aura, where she'll take reduced damage from one school of magic while taking increased damage from another by 25%. The name of the debuff is the aura being decreased, but the increased damage is the name of the other Aura. For example: Prismatic Aura: Frost, decreases Frost damage but increases Fire damage, but Prismatic Aura: Fire, decreases Fire but increases Frost. The pairing Auras are:
- Fire/Frost
- Arcane/Nature
- Holy/Shadow
Outside of that, it's just DPS the boss down. There are no movement mechanics outside of Fatal Attraction, so get your rotation perfected while surviving the shadow damage!