Up to 84% Off VPN








Raid Setup


Introduction
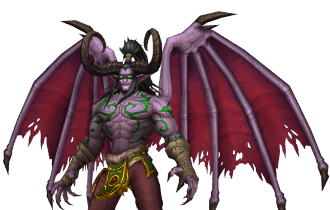
Welcome to our Illidan Stormrage guide, the ninth and final boss encounter of the Black Temple raid in The Burning Crusade Phase 3. This guide covers the fight mechanics and the strategy we recommend to defeat this boss!
The Betrayer, the leader of the venture into Outland after the Lich King's victory in Azeroth, and the new ruler of the sacred Black Temple, awaits adventurers at the pinnacle of the keep. Players will fight through five phases to take this epic Warcraft character down.
This fight has five phases, involving fighting Illidan, Flame Elementals, and Illidan's Demon form, while getting help from Akama and Maiev Shadowsong in the final phase. A variety of tanks will be needed, ranging from a traditional tank with high Avoidance gear, 2 Fire Resistance tanks, and 1 Shadow Resistance tank.
Fight Style: Multi-phase fight involving high tank damage, fire resistance tanks, shadow resistance tanks, and intense raid-wide damage.
Recommended Setup: 3-4x Tanks /5-6x Healers / 17-18x DPS
Required utilities: Healthstones, Super Mana Potions, Dark Runes, Personal Mana-Regeneration Spells, Fire Resistance, and Shadow Resistance
Hero/Lust usage: Phase 3 or 2
Method Boss Review
This fight has a lot of fun mechanics and is a true challenge for both tanks and healers. Illidan deals massive damage to the tank and requires specific movement for the Flames of Azzinoth tanks, and will also need to think on their feet for random Eye Blast paths. Healers will have no downtime keeping the Illidan tank alive in Phases 1, 3, and 5, and will have to balance keeping the Flames of Azzinoth tanks alive along with the raid during Phase 2. Along with that, Phase 4 will require similar challenges to Phase 2.
However, most teams will be able to completely skip Phase 4 due to the not-so-challenging timer for triggering Phase 5 during Phase 3, and in the grand scope of things, Phases 1, 3, and 5 are nearly the exact same. Most raids will only truly struggle during Phase 2, and once they figure that out, the progression of this fight diminishes fast.
This fight has the potential to be a truly spectacular fight with some slightly better tuning, however, still a fun and challenging fight, especially for tanks and healers.
(4/5)
Video Guide
Easy Mode
This fight has 5 phases; however, phases 1, 3, and 5 are relatively the same, with the exception of 1 new mechanic added in phases 3 and 5. These phases will require a tank in a specific set of gear to achieve Shear Immunity, needing a total of 101.8% Dodge, Parry, and Block Rating to avoid being hit by Shear. Phase 2 will require 2 Fire Resistance tanks to tank the Flames of Azzinoth, and Phase 4 will require a Shadow Resistance tank to tank the Shadow Blast. However, it is not too hard to skip Phase 4.
Phase 1: Illidan
- Tank needs to gear high enough to avoid Shear.
- Players hit with Parasitic Shadowfiend need to move out of the raid to spawn the adds away from the raid, and they should be killed ASAP after.
- Illidan needs to be moved after casting Flame Crash.
Phase 2: Illidan
- Two Fire Resistance tanks need to grab the Flames of Azzinoth.
- Tanks need to face the elementals away from the raid to avoid their Flame Blast.
- Tanks need to move after fire patches hit the ground.
- All players, tanks especially, need to avoid Eye Blast.
- Ranged and Healers need to split into 3-4 groups to mitigate Fireball damage.
- Healers need to keep the player hit by Dark Barrage alive.
Phase 3: Illidan 2
- All mechanics from Phase 1 return here.
- All players spread 5 yards from each other to mitigate players from spreading Agonizing Flames.
- Keep the Agonizing Flames targets alive.
Phase 4: Demon Form
- A Shadow Resistance tank needs to hold threat on Illidan to absorb his Shadow Blast.
- Everyone needs to spread 5 yards from each other to avoid Flame Burst damage.
- Kill Shadow Demons when they spawn.
Phase 5: Illidan 3
- All mechanics from Phase 1 and 3 return here.
- Illidan will Enrage and needs to be placed in Maiev's trap before or immediately after he does.
Mechanics

Roughly every 10 seconds, Illidan will cast Shear on the tank, decreasing their HP by 60%. This ability cannot miss, but it can be dodged, parried, and blocked.

Applies a 10-second debuff dealing 3,000 Shadow damage every 2 seconds. After the timer is up, two Parasitic Shadowfiends will spawn, fixating on targets. If they reach their target, they'll apply another Parasitic Shadowfiend debuff to that target.

Illidan crashes into the ground, creating a fire circle on the ground that deals 5,000 fire damage every 2 seconds to those in it.

Frontal leech attack that hits players for 4,500 shadow damage and heals Illidan for 100,000 HP per target hit.

Deals instant 4,000 Fire damage and 3,000 Fire damage every 5 seconds for 1 minute. Also applied to targets within 5 yards of the initial target.

For 20 seconds, Illidan's damage is increased by 50% and his attack speed increased by 30%.


Two Flame of Azzinoth adds will spawn during Phase 2 where Illidan throws his glaives down. These mobs have 2 abilities:
- Flame Blast: Frontal attack that deals 9m000 Fire damage. Casts around every 10 seconds.
- Uncaged Wrath: When too far from their glaive, Flame of Azzinoth will increase its damage by 500% and movement speed by 200%.


Illidan enters his true Demon Form, increasing in size and increasing physical damage by 500%. Also applies Aura Of Dread to those within 15 yards of him.

Illidan will cast Shadow Blast to the primary threat target, dealing 8,750 Shadow damage to them.
Four (4) Shadow Demons are summoned at Illidan's feet, stunning and fixating on target players until they reach them. If they reach the target, they will kill them.


Phases 1, 3, and 5: Illidan Stormrage
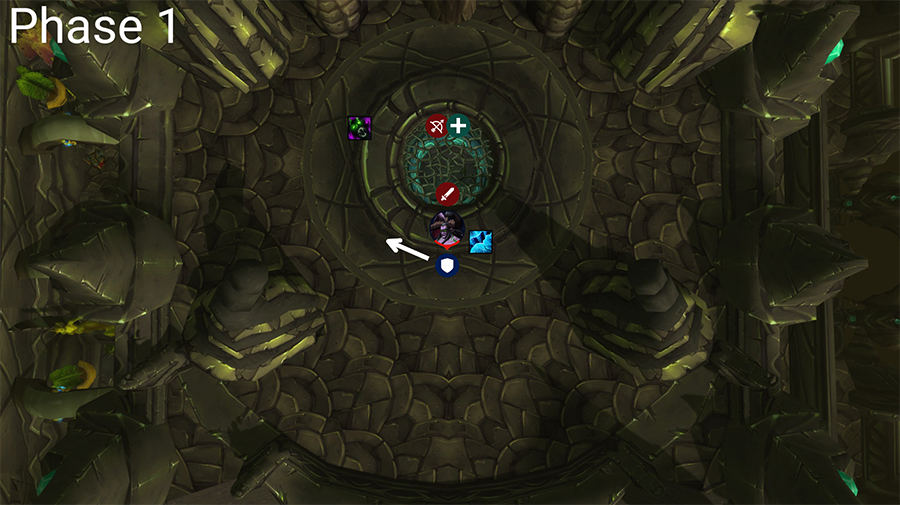
Phases 1, 3, and 5 are traditional tank-and-spank phases with only a few movement mechanics. The tank will take massive damage from Illidan, so healers will have no downtime during this phase.
Things to remember here:
- The tank needs to reposition the boss away from Flame Crash, enough so that Hunter pets are not still in it.
- No one except the tank should be in front of Illidan to avoid the leech from Draw Soul.
- Move out of the raid with Parasitic Shadowfiend and kill the ones that spawn ASAP.
- Make sure the target hit with Parasitic Shadowfiend is getting healed.
Shear
Shear is a unique mechanic in that the only way to negate it is simply to avoid it, literally. Shear cannot miss, but it can be dodged, parried, and blocked. Tanks will need to gear for 101.8% of these three stats. Be careful and make sure you are not accidentally accounting for Miss Rating in that percentage as well. If you achieve 101.8% Dodge/Parry/Block, you will never get hit by Shear. Protection Paladins do this with the assistance of Holy Shield, and Protection Warriors with Shield Block.
Agonizing Flame and the Start of Phase 3:
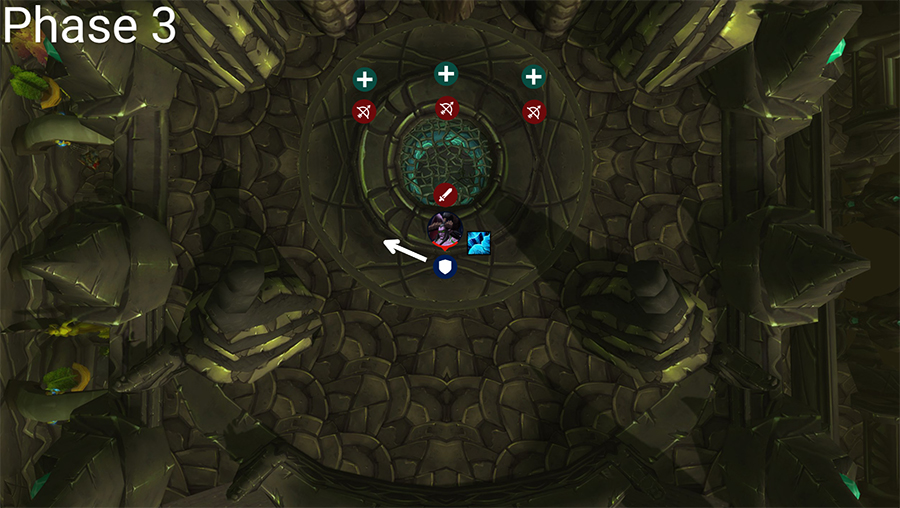
When Phase 3 starts, healers should be spamming healing casts on the tank, as they will immediately take massive tank damage once again when Illidan becomes active. You may have some bad fire leftover from Phase 2, if so, just alternate sides of the positioning, as the opposite side will have more room for your raid to spread out.
On the PTR, Agonizing Flames was bugged and only cast on the tank. It now correctly works and will cast on anyone BUT the tank. It will spread to anyone within 5 yards of the target hit. To mitigate this, simply spread out 5 yards from each other. The best way to do this is to have range still in their assigned Phase 2 groups (see our Phase 2 section for that) and then just loosely spread out around each other.
Phase 3 lasts one minute, or until 30% HP. If you do not reach 30% within a minute, you will go into Phase 4. If you do get to 30%, you will go to Phase 5.
Tip: You can use your 2 and 3-minute damage cooldowns at Phase 1, and if your team is comfortably getting through Phase 2, you should save your cooldowns and Bloodlust/Heroism for Phase 3 to help meet the time limit/DPS check to skip Phase 4 and go straight into Phase 5.
Maiev and Enrage (Phase 5):
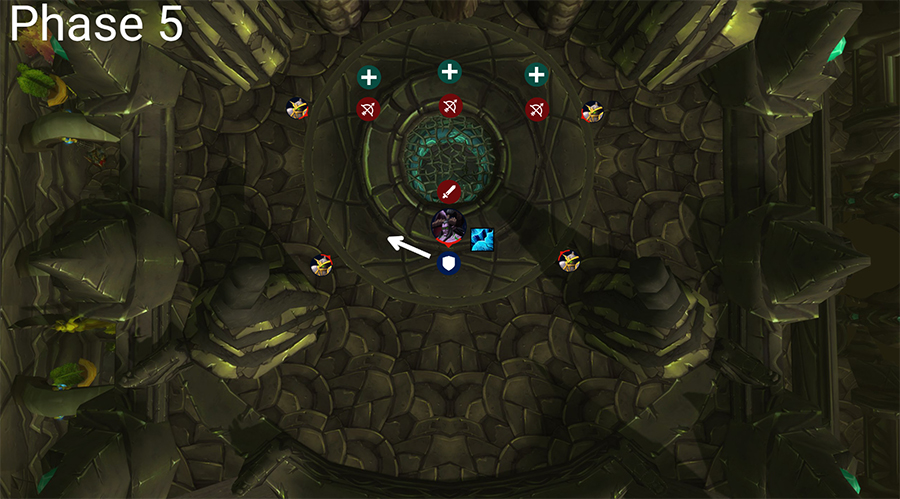
Before Phase 5 starts, Illidan, Maiev, and Akama will do some RP while the raid is stunned. Similar to Phase 2 to 3, you'll want to be spamming heals into the tank as Illidan becomes active again. Positioning will be the exact same as Phase 3, especially if you skip Phase 4.
Maiev will place her trap somewhere in the boss arena. Sometimes, she will decide to be anti-helpful and place it on the opposite side. If so, make sure in your path to get Illidan to the trap, no one is in front of the boss as you do not want him healing from Draw Soul. This is the final phase of the encounter; get Illidan down to 0% HP and you have now cleared the Black Temple! Congrats!
Phase 2: The Flames of Azzinoth
At 65%, Illidan becomes unattackable and will fly into the sky, throwing down his glaives, spawning two Flames of Azzinoth. These will need to be tanked by Fire Resistance tanks, ideally as close to 365 Fire Resistance as possible to mitigate the damage taken.
Things to Remember:
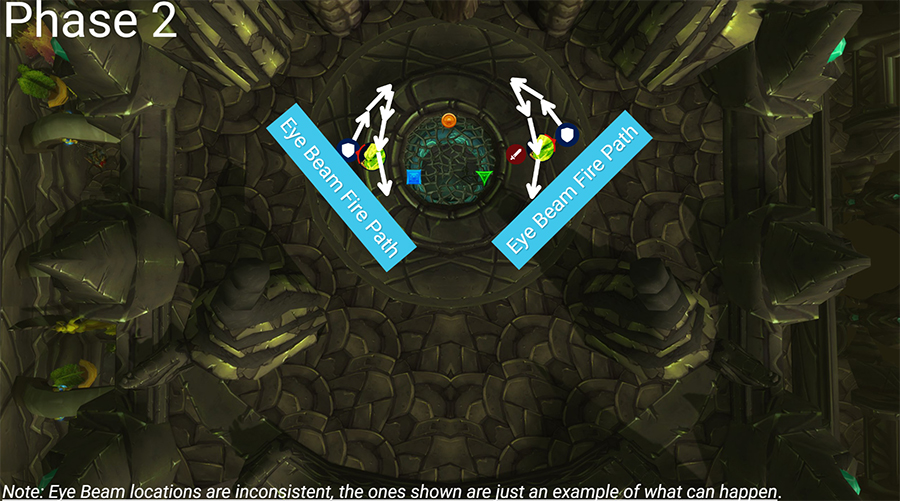
- Ranged and healers spread into 3 groups to mitigate Fireball damage.
- Evenly divide up heals on both tanks while having 1 healer raid heal when damage goes out.
- Tanks face the Elementals away from the raid.
- Move out of Eye Blasts' pathway.
Tanks
Tanks need to immediately pick up the Flames of Azzinoth and face them away from the raid. As you're moving the elementals, when the fire elementals spawn flame patches on the ground; try to move as little as possible to preserve maximum space. However, Illidan will more than likely make this harder, as he'll channel Eye Blasts (more commonly referred to as Eye Beams) that will probably cut your pathway in some way, shape, or form.
You cannot move the elementals too far from their glaive, or it'll trigger their Uncaged Wrath. The best tip we can provide you with is to use room in the inner circles of the pathway by "pushing" the boss back. To "push" the boss, move your character until you're almost inside the elementals model, and it'll force the elemental to move back.
DPS and Healers
Ranged and healers will need to move into 3-4 groups and spread from each other to avoid spreading Fireball damage. All DPS should focus down one elemental first before moving to the next, as once one is killed, healing will be a lot easier. This phase ends once both elementals are killed, angering Illidan and forcing him to return to combat.
Phase 4: Illidan Stormage's Demon Form
This phase is something players can often skip, but if they don't, it is not too challenging. Players will need to spread out while a Shadow Resistance tank holds threat on Illidan Stormrage. The tank has to be a ranged player, as they cannot be close to the boss. Phase 4 lasts one minute and will restart Phase 3 when it's over, or will trigger Phase 5 if Illidan reaches 30% HP.
Things to Remember:
- Everyone needs to spread out 5 yards away from each other.
- Healers need to keep the Shadow Resistance tank alive.
- All DPS need to focus down the Shadow Demons before they reach and kill their targets.
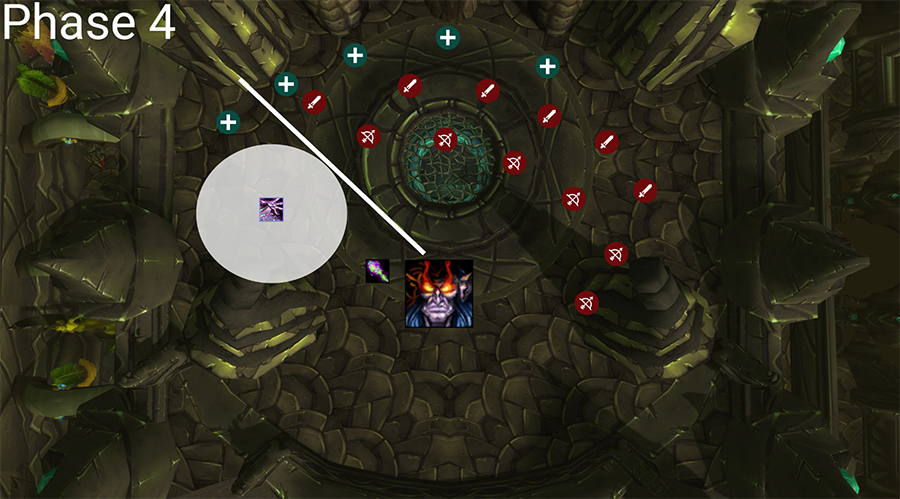
A Hunter needs to use Misdirection and direct it to your assigned Shadow Resistance tank while the rest of your raid spreads out to avoid taking Flame Burst damage. This phase is simple: keep the Shadow Resistance tank alive, heal the raid from AoE damage, and focus down the Shadow Demons as soon as they spawn. If you do not reach 30%, the boss will return to Phase 3. If you do, the boss will trigger Phase 5.