Raid Setup
Introduction
Welcome to our Heroic The Soul Hunters Boss Guide, for the Manaforge Omega Raid. Learn about the fight mechanics and the strategy we recommend to defeat this boss on Heroic difficulty! The Soul Hunters is technically an optional boss, something quite rare in raiding. However, their loot includes special boots that boost the power of your Reshii Wraps, so it's unlikely you will be skipping this boss for some time.
The Soul Hunters fight is where three Demon Hunters walk into a raid and decide the best way to express teamwork is by all spamming their full ability kits at the same time. Just pure chaos and glowing green/purple anime slashes flying everywhere.
It’s a classic "kill them at the same time or die slowly" kind of fight, complete with void puddles, soul fragments, healing absorbs, and charge lines that practically beg your raid to grief each other. Oh, and don’t forget the intermissions. One’s a soak-fest, one’s a rave light show, and one just wants to knock you into space.
Fight Style: 3 Target Council Fight
Recommended Setup: 2x Tank / 4x Healer / 14x DPS
Required Utilities: None
Hero/Lust usage: On Pull
Method Boss Review
As usual, council-style fights are hit or miss, but this one’s definitely a win. The big difference here is that all three bosses are active at once, constantly throwing out their full mechanic sets, so you never get the classic "now it’s this boss’s turn" downtime. It keeps things fast, flashy, and engaging.
None of the mechanics feel like annoying chores, which is rare for a triple boss encounter. The fact that the bosses are so easy to reposition also makes tanks and DPS way less grumpy. And honestly? The intermissions are actually fun instead of filler.
Method Boss Rating: (4/5)
Easy Mode
Phase 1:
- Focus Adarus first while cleaving the others
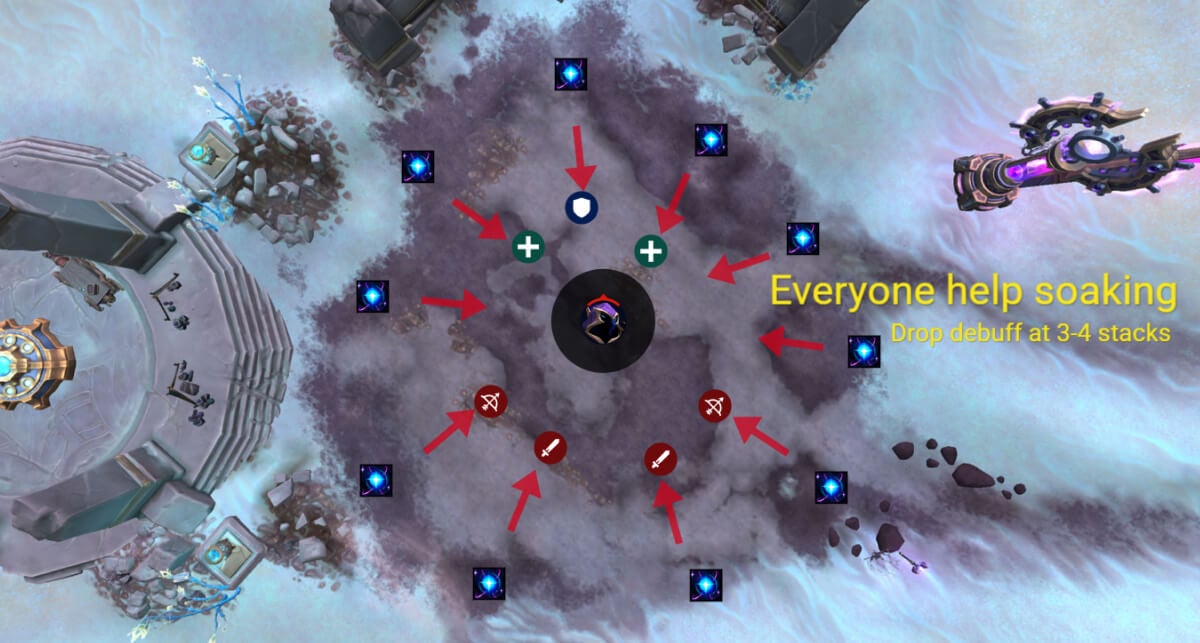
- Soak Devourer's Ire puddles with marked players to despawn them
- Rotate Devourer's Ire debuff every 3-4 stacks via dispels
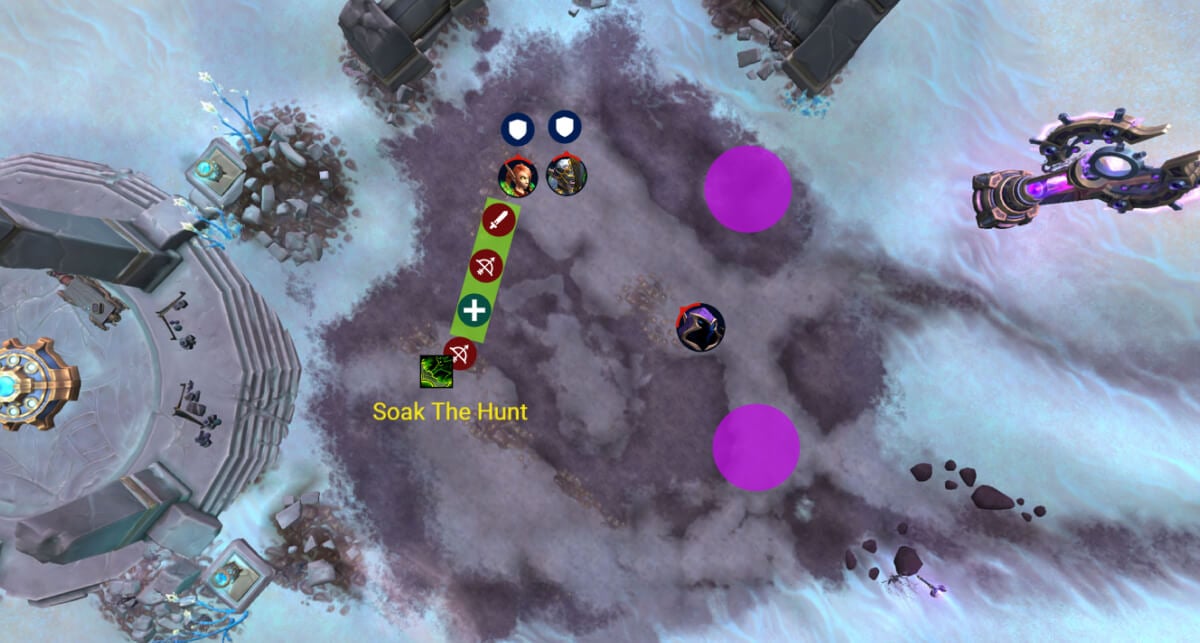
- Soak The Hunt line with 4-5 players, spread within the line to avoid cleaving each other
- Dodge Voidstep, Blade Dance, and other swirlies
- Tank swap on Eye Beam to avoid getting combo’d by Felblade
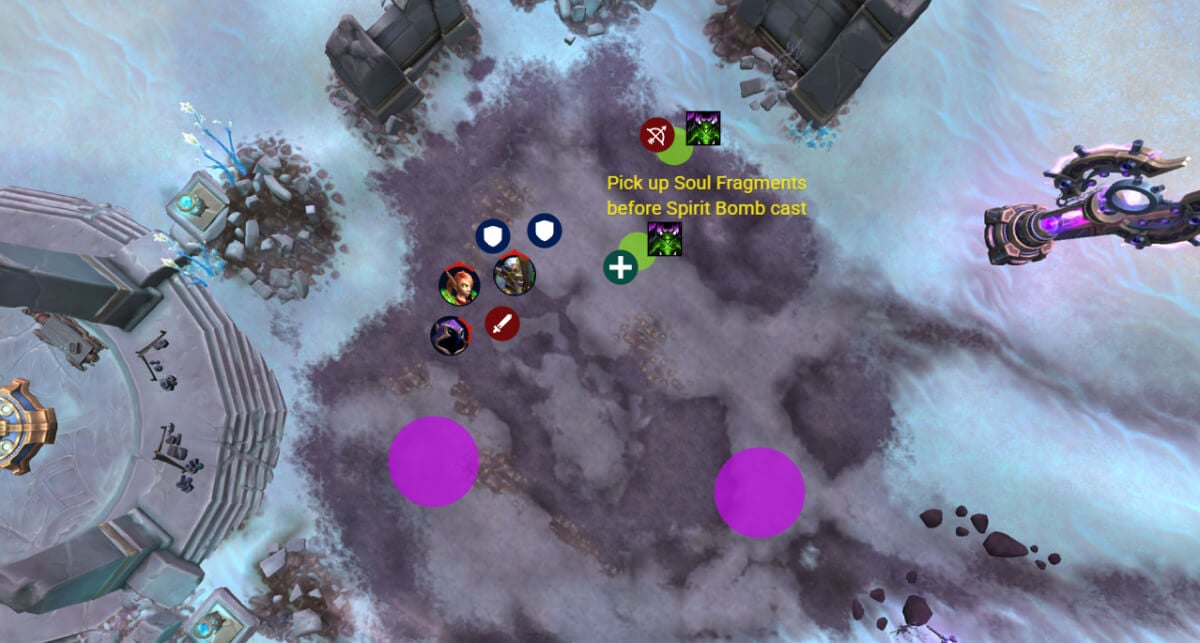
- Pick up soul fragments after Fracture to prevent heavy tank damage
- Ensure all soul fragments are picked up before Spirit Bomb, or the raid gets chunked
Intermission 1 (Adarus):
- Soak purple orbs before they reach the boss
- Grab 3-4 orbs, wait for debuff to fall off, repeat
- Don’t touch the center, it kills you
Intermission 2 (Velaryn):
- Dodge flame lines
- Only move if your line intersects someone else’s
Intermission 3 (Ilyssa):
- Stay close to the boss
- Watch for knockbacks and dodge the frontal cone (Fel Devastation)
Final Phase:
- Repeat mechanics as before
- Bring all bosses to ~20% and kill them together
- Failing to sync kills means a pulsing raid-wide wipe mechanic
Mechanics
Two void circles spawn at the start of the fight, and 2 players need to pick them up or the entire raid takes damage. Players that pick this up gain a dispellable Devourer's Ire debuff.
Targets players with Devourer's Ire. Deals heavy Cosmic damage and applies a healing absorb. Each hit also increases damage taken from future Consume casts by 20%. This stacks, so you need to rotate who holds the debuff.
Adarus teleports across the room, dealing damage to anyone in his path. As he travels, he creates multiple images that each cast Hungering Slash and spawn a growing void zone (Encroaching Oblivion) at the location.
Spawns under each Hungering Slash impact. Expands over time and deals high ticking damage to anyone inside. Players with Devourer's Ire can stand in the zone to shrink it.
Velaryn marks a player and charges toward them. Damage is massively reduced for each player standing in her path.
Also deals splash damage to anyone within 4 yards of each soaker along the line.
Requires soak coordination and spacing.
Velaryn channels a frontal beam at her target for 4 seconds, dealing stacking damage and applying Fel-Singed which increases damage taken from Eye Beam and Felblade. This effect stacks and forces tank swaps after each combo.
After the beam, she immediately charges with Felblade.
Velaryn dashes to several nearby locations, dealing high Chaos damage to anyone hit. Basic Blaze dodge mechanic.
Arena of fire is created at the start of the fight that lasts until the end, dealing heavy ticking damage to players standing in them. Getting hit also applies stacking Fire DoTs.
Don’t stand in it.
Ilyssa cleaves her tank, splitting their soul and spawning 2 soul fragments. The tank takes 33% reduced healing per orb, so 66% until both orbs are picked up.
Applied to players who pick up the soul fragments. Reduces their healing received and applies a ticking DoT. This stacks.
Ilyssa detonates all remaining soul fragments. If any fragments are still up, the entire raid takes massive damage over 8 seconds and absorbs healing through Soulcrush. If all fragments were collected, the damage is greatly reduced.
Ilyssa drops a sigil that pulls all players into its center and snares them shortly after. It appears at her current target’s location.
A pulsing AoE that deals consistent Chaos damage to all players while active. Adds extra pressure during bomb phases.
Intermission (Adarus 100 energy)
- Collapsing Star spawns in the middle and pulls all players in.
- Stellar Fragments move from outside, players must intercept them before they reach the center or the raid takes heavy damage.
- Anyone who catches a fragment gets a stacking DoT (Dark Residue).
- Standing too close to the center results in instant death from Event Horizon
Intermission (Velaryn 100 energy)
- Multiple Fel Rush echoes charge in preset paths.
- Similar to the Fyrakk Blaze lines ability.
- Anyone hit takes heavy Chaos damage.
Intermission (Ilyssa 100 energy)
- Infernal Strike lands in random locations and knocks players away.
- Fel Devastation fires a frontal cone that deals heavy damage every 0.5 seconds.
- Getting hit applies Withering Flames, which slows movement speed.
- Spread out and avoid getting knocked into a beam.
Strategy
This fight is all about killing all three bosses at the same time, because if you don’t, the ones still alive will pulse AoE until you wipe. So balance DPS and plan your burn phase carefully, no accidental cleaves at 20%.
The fight opens with Adarus as the recommended first target. He teleports around and is less frequently in cleave range, so it’s better to get your focused damage on him early while cleaving the other two as they come in.
Early Phase Mechanics
Right on pull, two void circles will spawn, these are Devourer's Ire and need to be soaked or the raid takes damage. Two random players will get the debuff and should now be responsible for soaking the purple puddles that appear throughout the fight. Stand in the puddle until it despawns completely, if you leave early, it grows back.
While holding the debuff, each Consume cast hits you harder and applies a healing absorb. This stacks via Unending Hunger, so healers need to dispel and pass the debuff to someone else. It always jumps to the closest player, unless they already have it. Aim to dispel around 3-4 stacks per person.

The Hunt
Velaryn will pick a random player and charge them with The Hunt. You’ll need 4-5 players standing in a line to soak the hit. Each soaker gets a circle that forces them to spread, so make sure you're not stacked on top of each other in the line.
The targeted player can move further away to make the line longer and give more room for soaking.
Movement & Tank Mechanics
Other abilities like Voidstep, Hungering Slash, or Blade Dance are just basic dodges. They’re telegraphed well and don’t need special handling, just don’t be standing still in the bad stuff.
Tanks, on the other hand, have their hands full:
- Eye Beam hits Velaryn’s target and immediately triggers a Felblade charge. The tank who gets Eye Beam will take increased damage from Felblade, so you need to swap immediately before it hits.
- Fracture hits Ilyssa’s current target and spawns soul fragments. Other players need to run in and pick them up fast. While they’re active, the Tank is taking massive bonus damage.
- A few seconds later, Ilyssa casts Spirit Bomb. If any soul fragments are left, the raid takes huge ticking damage and gets an absorb. If all were picked up, it’s just moderate AoE. So, collect the souls!
Healers will hate you if people get hit by avoidable stuff; healing absorbs, raid-wide hits, and constant ticking damage from the tanks make this a very healing-intensive fight. Don’t make it worse by face-tanking swirlies.
Before each intermission, make sure all purple puddles (Encroaching Oblivion) are cleared using the players with Devourer's Ire. This frees up space and reduces the chance of accidental damage during movement phases.
Intermission 1 - Adarus
Adarus moves to the center and becomes unattackable. Purple orbs spawn on the edge and float toward him. If they reach the center, the raid takes heavy damage.
Players need to intercept these orbs, but each pickup gives a stacking DoT. Debuff lasts for 4 seconds, so you want to grab 3-4 orbs, wait for it to drop, then grab more. Just don’t let them reach the boss.
The center of the room instantly kills you, so mind your step.
Intermission 2 - Velaryn
This one’s a Fyrakk-style flame line phase.
Several players get lines shooting out of them, and they need to move only if they’re intersecting with someone else. Everyone else just dodges.
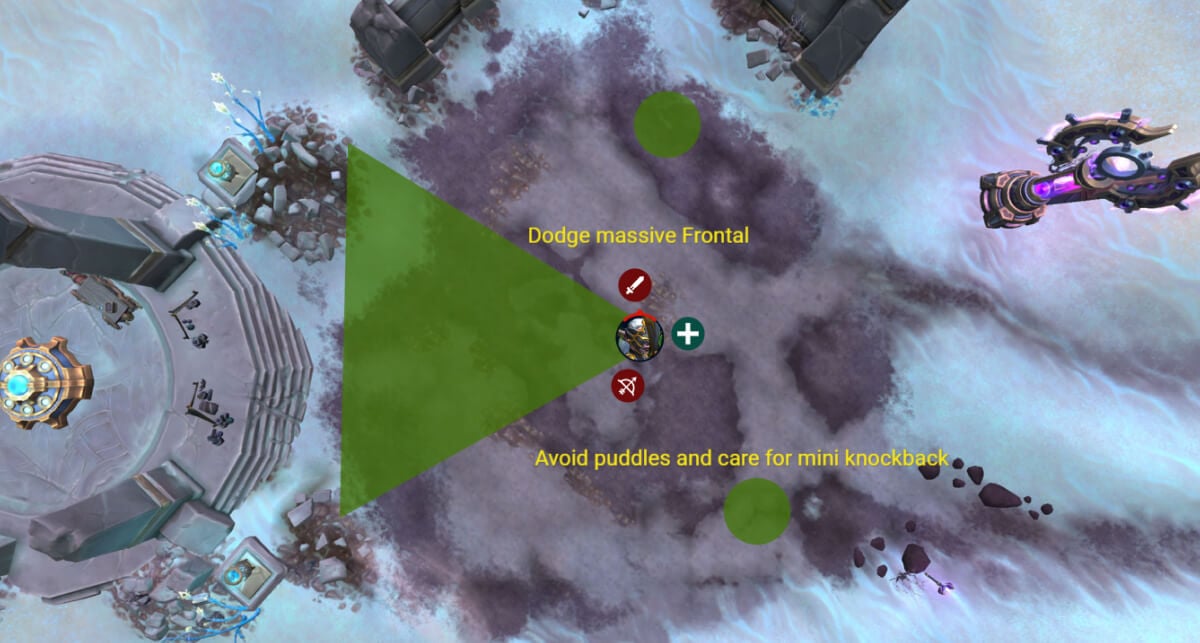
Intermission 3 - Ilyssa
This one’s spicier. The arena has mini knockbacks going out frequently, and Ilyssa casts a large frontal cone (Fel Devastation) in front of her. You want to stay as close as possible to the boss and use mobility abilities to dodge the frontal.
Watch where the boss is jumping, run there asap without standing in the circle. Once the boss is down, go behind her. Repeat this until the end of intermission.
If you get yeeted by a knock and land in the beam, you’re done.
Final Notes
After the three intermissions, the cycle begins again. Keep soaking puddles, rotating debuffs, dodging lines, and managing your tank swaps and soul fragments.
Eventually, you’ll want to sync all bosses to around 20% and do a controlled burn. Pop cooldowns and nuke all three down together to avoid an enrage wipe.
WeakAuras
Northern Sky: Manaforge Omega WeakAura Pack
This WeakAura also requires the Northern Sky Anchors WeakAura and the Northern Sky Raid Tools Addon.
https://wago.io/NSManaforge